2009 OPEL AGILA air condition
[x] Cancel search: air conditionPage 43 of 153

3-17Seats, restraints and interior
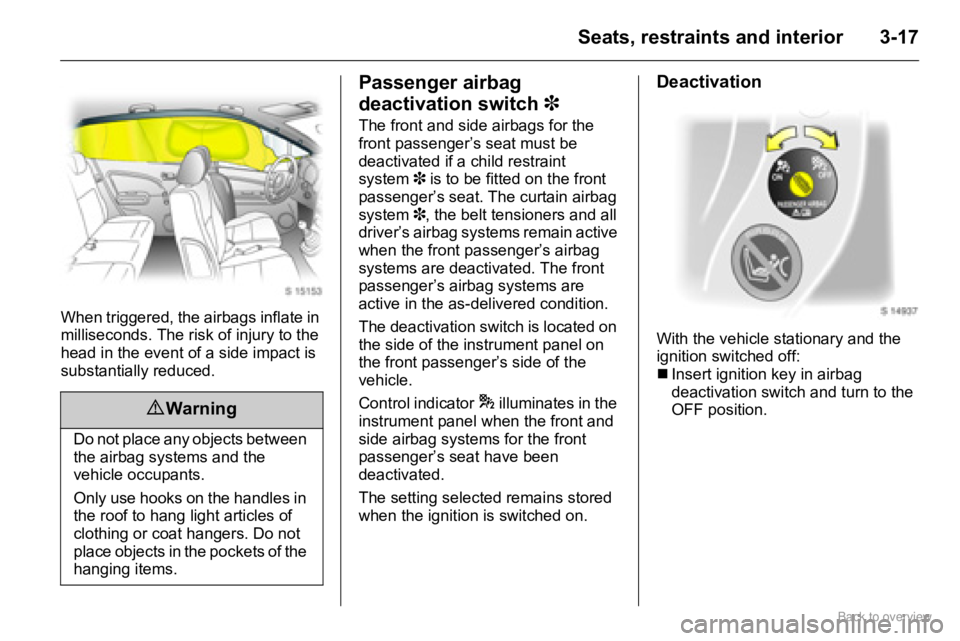
When triggered, the airbags inflate in
milliseconds. The risk of injury to the
head in the event of a side impact is
substantially reduced.
Passenger airbag
deactivation switch 3
The front and side airbags for the
front passenger’s seat must be
deactivated if a child restraint
system3 is to be fitted on the front
passenger’s seat. The curtain airbag
system3, the belt tensioners and all
driver’s airbag systems remain active
when the front passenger’s airbag
systems are deactivated. The front
passenger’s airbag systems are
active in the as-delivered condition.
The deactivation switch is located on
the side of the instrument panel on
the front passenger’s side of the
vehicle.
Control indicator* illuminates in the
instrument panel when the front and
side airbag systems for the front
passenger’s seat have been
deactivated.
The setting selected remains stored
when the ignition is switched on.
Deactivation
With the vehicle stationary and the
ignition switched off:
�„Insert ignition key in airbag
deactivation switch and turn to the
OFF position.
9 Warning
Do not place any objects between
the airbag systems and the
vehicle occupants.
Only use hooks on the handles in
the roof to hang light articles of
clothing or coat hangers. Do not
place objects in the pockets of the
hanging items.
Page 59 of 153

5-9Instruments and controls
X Driver’s seat belt
Will illuminate in red when ignition is
switched on if driver’s seat belt is not
engaged.
If vehicle speed exceeds 15 km/h
(9 mph) and driver’s seat belt is not
engaged, the control indicator will
flash for approx. 90 seconds along
with a warning chime and then
illuminate until driver’s seat belt is
fastened correctly.
Seat belts 3 3-5.
v Airbag systems, belt
tensioners
Will flash in red several times when
the ignition is switched on, then
extinguish.
If it does not flash when the ignition is
switched on, stays lit, illuminates or
flashes whilst driving, there is a fault
with the airbag systems or with the
belt tensioners. The systems might
not therefore be triggered in the event
of an accident. Seek the assistance
of a workshop immediately.
Belt tensioners 3 3-6, airbags 3 3-13.
p Charging system
Will illuminate in red when ignition is
switched on. Extinguishes after
engine is started.
If it stays lit after the ignition is
switched on or illuminates during
driving: stop vehicle and switch off
engine. The battery is not being
charged and the engine cooling may
be interrupted. The brake servo unit
may cease to be effective. Interrupt
your journey immediately.
Remove ignition key and check drive
belt condition and tensioning before
seeking the assistance of a
workshop.
s Service transmission 3
Will illuminate briefly in yellow when
the ignition is switched on.
If it flashes, there is a fault in the
automatic transmission. Seek the
assistance of a workshop
immediately.
Automatic transmission 39-3.
R Brake system
Will illuminate in red when ignition is
switched on. Extinguishes after
engine is started.
Illuminates when engine is running if
parking brake is applied and/or fluid
level for brake hydraulics is too low.
Further information 3 9-9,
brake fluid level 3 10-6.
u Anti-lock Brake System
(ABS)
Will illuminate briefly in yellow when
ignition is switched on.
At the same time, the system
performs a self-check. When the
control indicator extinguishes, the
system is ready for operation.
Caution
If it illuminates when the parking
brake is not applied: stop vehicle;
interrupt your journey immediately.
Seek the assistance of a workshop.
Page 82 of 153

8-1 Climate controls
Climate controlsClimate control system
Ventilation, heating and cooling 3 are
combined into one unit that is
designed to provide comfort
regardless of the season, weather or
outside temperature.
Button for cooling n (or A/C) is only
present in version with air
conditioning system3.
Heating and ventilation
controls
TemperatureHeating and ventilation
controls............................... 8-1
Air vents ............................... 8-4
Heated rear window,
heated exterior mirrors 3 .... 8-5
Air intake .............................. 8-6
Pollen filter............................ 8-6
To red = Warm
To blue = Cold
Page 84 of 153

8-3 Climate controls
For simultaneous warming of the
footwell, set air distribution rotary
knob to J.
Switch on air conditioning 3 to
improve defrosting efficiency when
position J or V is selected.
Air recirculation mode 3
During ’normal’ operation, the
heating, ventilation and air
conditioning system 3 uses outside
air. To prevent fumes or unpleasant
odours from entering the vehicle
when in stationary traffic and when
rapid heating or cooling of the
passenger compartment is required, press button 4; control indicator in
the button illuminates and air is
recirculated.
Press button 4 again to turn air
recirculation mode off; control
indicator in the button extinguishes
and outside air is drawn into the
vehicle.
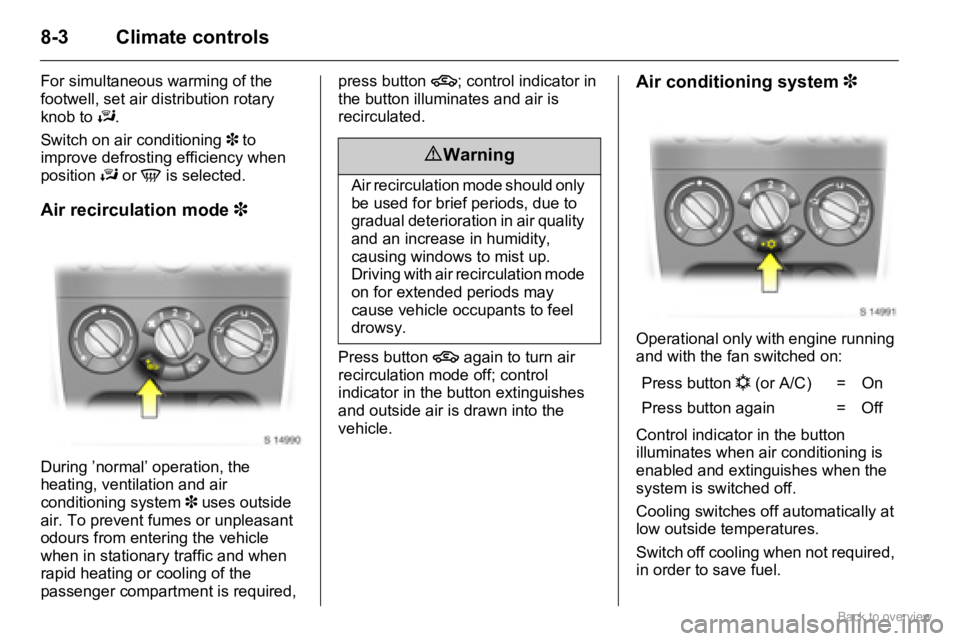
Air conditioning system 3
Operational only with engine running
and with the fan switched on:
Control indicator in the button
illuminates when air conditioning is
enabled and extinguishes when the
system is switched off.
Cooling switches off automatically at
low outside temperatures.
Switch off cooling when not required,
in order to save fuel.
9 Warning
Air recirculation mode should only
be used for brief periods, due to
gradual deterioration in air quality
and an increase in humidity,
causing windows to mist up.
Driving with air recirculation mode
on for extended periods may
cause vehicle occupants to feel
drowsy.
Press button n (or A/C) = On
Press button again = Off
Page 85 of 153

8-4Climate controls
Even with air conditioning on, if
temperature rotary knob is set to
warm, the vehicle will still produce
warm air in the passenger
compartment.
To improve efficiency of the air
conditioning, always close the
windows, to prevent chilled air from
escaping.
In very high temperatures, before
starting the engine, allow hot air to
escape from the vehicle by opening
the windows and switching on the
fan.
When the air conditioning system is
switched on, open adjustable side air
vents so that the evaporator does not
ice up due to lack of air movement.
When cooling (air conditioning
compressor) is switched on,
condensation forms, which is
expelled from the underside of the
vehicle.
To ensure continuously efficient
performance and prolong the life of
the air conditioning system, it must be switched on for a few minutes once a
week, irrespective of the weather and
time of year.
Malfunctions in the system must not
be rectified by the owner: seek the
assistance of a workshop.
Maximum cooling
Open windows briefly and switch fan
on so that warm air can escape
rapidly.
�„Press button n (or A/C)
(to switch on air conditioning
system).
�„Activate air recirculation mode 4.�„Set air distribution rotary knob to M.
�„Turn temperature rotary knob all
the way to blue area for cooling.
�„Set fan to 4.
Air vents
Centre air vents
The air flow can be directed as
desired by tilting the slats up, down
and sideways using the central
adjuster.
The air supply is increased by
switching on the fan.
Page 114 of 153

10-14 Vehicle care
Do not store any objects behind the
cover.
Some circuits may be protected by
several fuses.Diesel engines
The fusebox is located behind the
rear of the battery.
To open, disengage cover and lift
upwards.
No. Circuit
1Heater fan
2Fuel injection
3Air conditioning compressor
4Automatic transmission
5Brake lamp switch
6ABS, ESP
7Starter motor
8-
9Power steering control
module
10Ignition switch
11Radiator fan
12-
13ABS, ESP
14-
15Engine electrics
16Front fog lamps
17Headlamp (left)
18Headlamp (right) No. Circuit
Page 115 of 153

10-15Vehicle care
Some circuits may be protected by
several fuses.
Wheels
Tyres
Factory-fitted tyres are matched to
the chassis and offer optimum driving
comfort and safety.
Winter tyres 3
Tyres of size 165/70 R 14 and
185/60 R 15 may be used as winter
tyres.
Winter tyres improve safety at
temperatures below 7
°C and should
therefore be fitted on all the wheels.
Depending on national regulations, a
notice indicating the maximum
permissible speed for the tyres must
be affixed within the driver's field of
vision.
The maximum permissible speed
varies from country to country on
account of national regulations.
Ensure that winter tyres are inflated
to the correct pressure specified by
the tyre manufacturer. No. Circuit
1Starter motor
2Air conditioning compressor
3Fuel pump
4Fuel injection
5Heater fan
6Radiator fan
7Power steering control
module
8ABS, ESP
9ABS, ESP
10Brake lamp switch
11Headlamp (right)
12Headlamp (left)
13Front fog lamps
14Ignition switch
15Ignition switch, power
windows, wipers, starter No. Circuit
Page 130 of 153

10-30 Vehicle care
Exterior care
Locks
The locks are lubricated with a high-
grade lock cylinder grease at the
factory.
Only use de-icing agents in
emergencies, as they have a
degreasing effect and will impair the
function of the locks. After using a
de-icing agent, have the locks
regreased. Seek the assistance of a
workshop.
Washing the vehicle
The paintwork of your vehicle is
exposed to environmental influences,
e.g. continuous changes in weather
conditions, industrial waste gases
and dust or thawing salts, so wash
and wax your vehicle regularly. When
using automatic car washes, select a
program which includes waxing.
Bird droppings, dead insects, resin,
pollen and the like should be cleaned
off immediately, as they contain
aggressive constituents which can
cause paint damage.If using a car wash, comply with the
pertinent instructions of the car wash
manufacturer. The windscreen
wipers and rear window wiper must
be switched off 3 5-2, 5-3. Remove
detachable rod antenna by
unscrewing it.
Do not use high-pressure jet
cleaners.
If you wash your vehicle by hand,
make sure that the insides of the
wings are also thoroughly rinsed out.
Do not use household dishwashing
liquid, to avoid removing wax from the
paintwork.
Clean edges and folds on opened
doors and flaps as well as the areas
they cover.
Thoroughly rinse off and leather-off
the vehicle. Rinse leather frequently.
Use separate leathers for paint and
window surfaces; remnants of wax on
the windows will impair vision.
Also wash aluminium trim parts,
avoiding the use of abrasive
materials such as automotive or chrome polish, steam or caustic
soap. Washing with water is normally
sufficient.
Observe national regulations.
Exterior lamps/lenses
Headlamp and other protective lamp
bezels are made of plastic. If they
require additional cleaning after the
vehicle has been washed, clean them
with Car Shampoo. Do not use any
abrasive or caustic agents, do not
use an ice scraper, and do not clean
them dry.
Waxing
Wax your vehicle regularly, in
particular after it has been washed
using Car Shampoo and at the latest
when water no longer forms beads on
the paintwork, otherwise the
paintwork will dry out.
Also wax aluminium trim parts, edges
and folds on opened doors and flaps
as well as the areas they cover.