2009 NISSAN TIIDA bumper
[x] Cancel search: bumperPage 470 of 4331
BL
N
O P
SILICONE GREASE
Used instead of UHMW tape that will be visible or not fit.
Note: Will only last a few months.
SILICONE SPRAY
Use when grease cannot be applied.
DUCT TAPE
Use to eliminate movement.
CONFIRM THE REPAIR Confirm that the cause of a noise is repaired by test driving the vehicle. Operate the vehicle under the same
conditions as when the noise originally occurred. Refer to the notes on the Diagnostic Worksheet.
Generic Squeak and Rattle Troubleshooting INFOID:0000000004304978
Refer to Table of Contents for specific component removal and installation information.
INSTRUMENT PANEL Most incidents are caused by contact and movement between:
1. The cluster lid A and instrument panel
2. Acrylic lens and combination meter housing
3. Instrument panel to front pillar garnish
4. Instrument panel to windshield
5. Instrument panel mounting pins
6. Wiring harnesses behind the combination meter
7. A/C defroster duct and duct joint
These incidents can usually be located by tapping or moving the components to duplicate the noise or by
pressing on the components while driving to stop the noi se. Most of these incidents can be repaired by apply-
ing felt cloth tape or silicone spray (in hard to reach areas). Urethane pads can be used to insulate wiring har-
ness.
CAUTION:
Do not use silicone spray to isolate a squeak or ra ttle. If you saturate the area with silicone, you will
not be able to recheck the repair.
CENTER CONSOLE Components to pay attention to include:
1. Shifter assembly cover to finisher
2. A/C control unit and cluster lid C
3. Wiring harnesses behind audio and A/C control unit
The instrument panel repair and isolation pr ocedures also apply to the center console.
DOORS Pay attention to the:
1. Finisher and inner panel making a slapping noise
2. Inside handle escutcheon to door finisher
3. Wiring harnesses tapping
4. Door striker out of alignment causing a popping noise on starts and stops
Tapping or moving the components or pressing on them wh ile driving to duplicate the conditions can isolate
many of these incidents. You can usually insulate the ar eas with felt cloth tape or insulator foam blocks from
the NISSAN Squeak and Rattle Kit (J-43980) to repair the noise.
TRUNK Trunk noises are often caused by a loose jack or loose items put into the trunk by the owner.
In addition look for:
1. Trunk lid bumpers out of adjustment
2. Trunk lid striker out of adjustment
3. The trunk lid torsion bars knocking together
4. A loose license plate or bracket
Page 474 of 4331
BL
N
O P
HOOD
Fitting Adjustment INFOID:0000000004304980
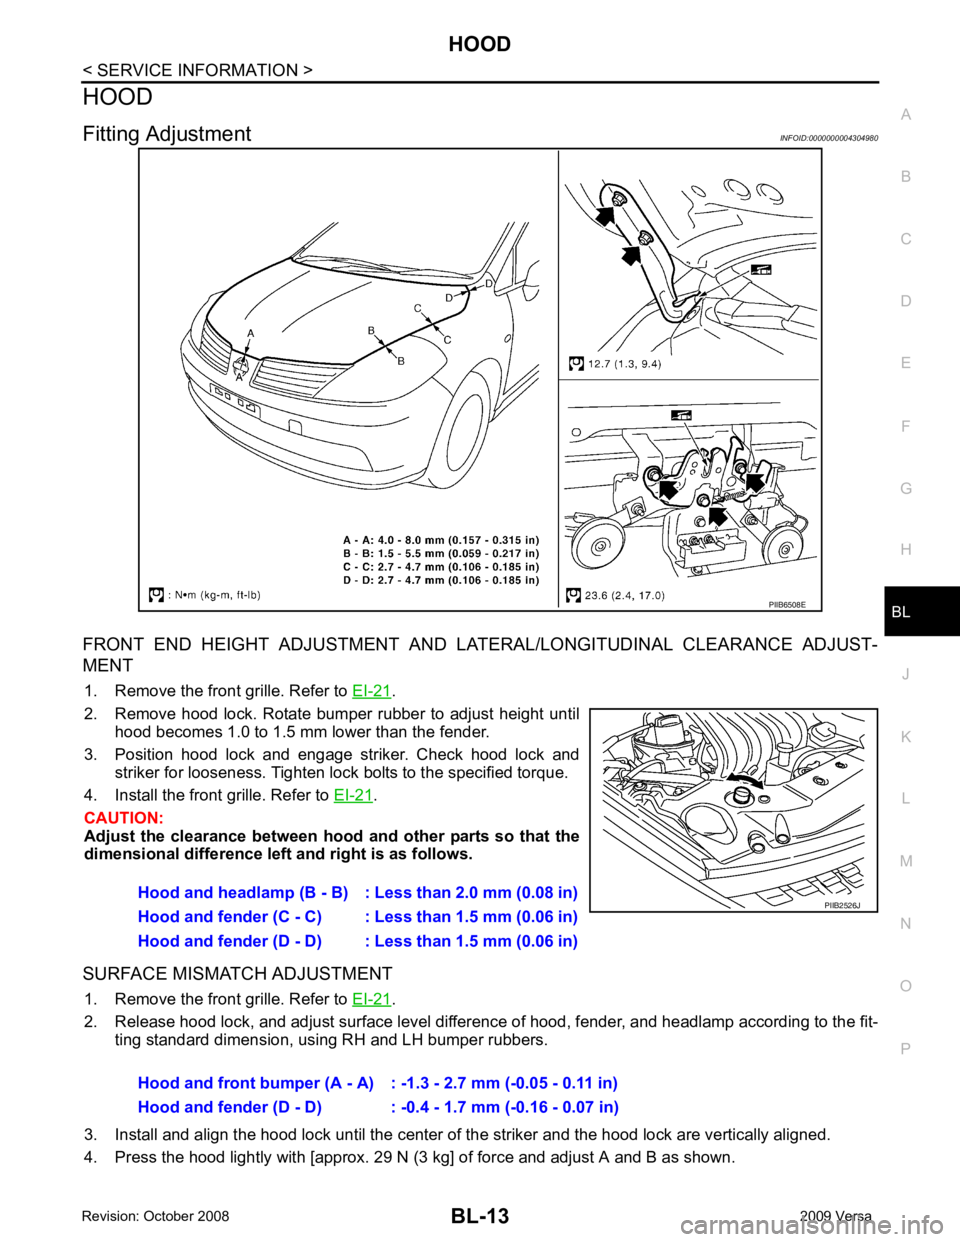
FRONT END HEIGHT ADJUSTMENT AND LA TERAL/LONGITUDINAL CLEARANCE ADJUST-
MENT
1. Remove the front grille. Refer to EI-21 .
2. Remove hood lock. Rotate bumper rubber to adjust height until hood becomes 1.0 to 1.5 mm lower than the fender.
3. Position hood lock and engage striker. Check hood lock and striker for looseness. Tighten lock bolts to the specified torque.
4. Install the front grille. Refer to EI-21 .
CAUTION:
Adjust the clearance between hood and other parts so that the
dimensional difference left and right is as follows.
SURFACE MISMATCH ADJUSTMENT 1. Remove the front grille. Refer to EI-21 .
2. Release hood lock, and adjust surface level difference of hood, fender, and headlamp according to the fit- ting standard dimension, using RH and LH bumper rubbers.
3. Install and align the hood lock until the center of the striker and the hood lock are vertically aligned.
4. Press the hood lightly with [approx. 29 N (3 kg] of force and adjust A and B as shown.
Page 480 of 4331
BL
N
O P
RADIATOR CORE SUPPORT
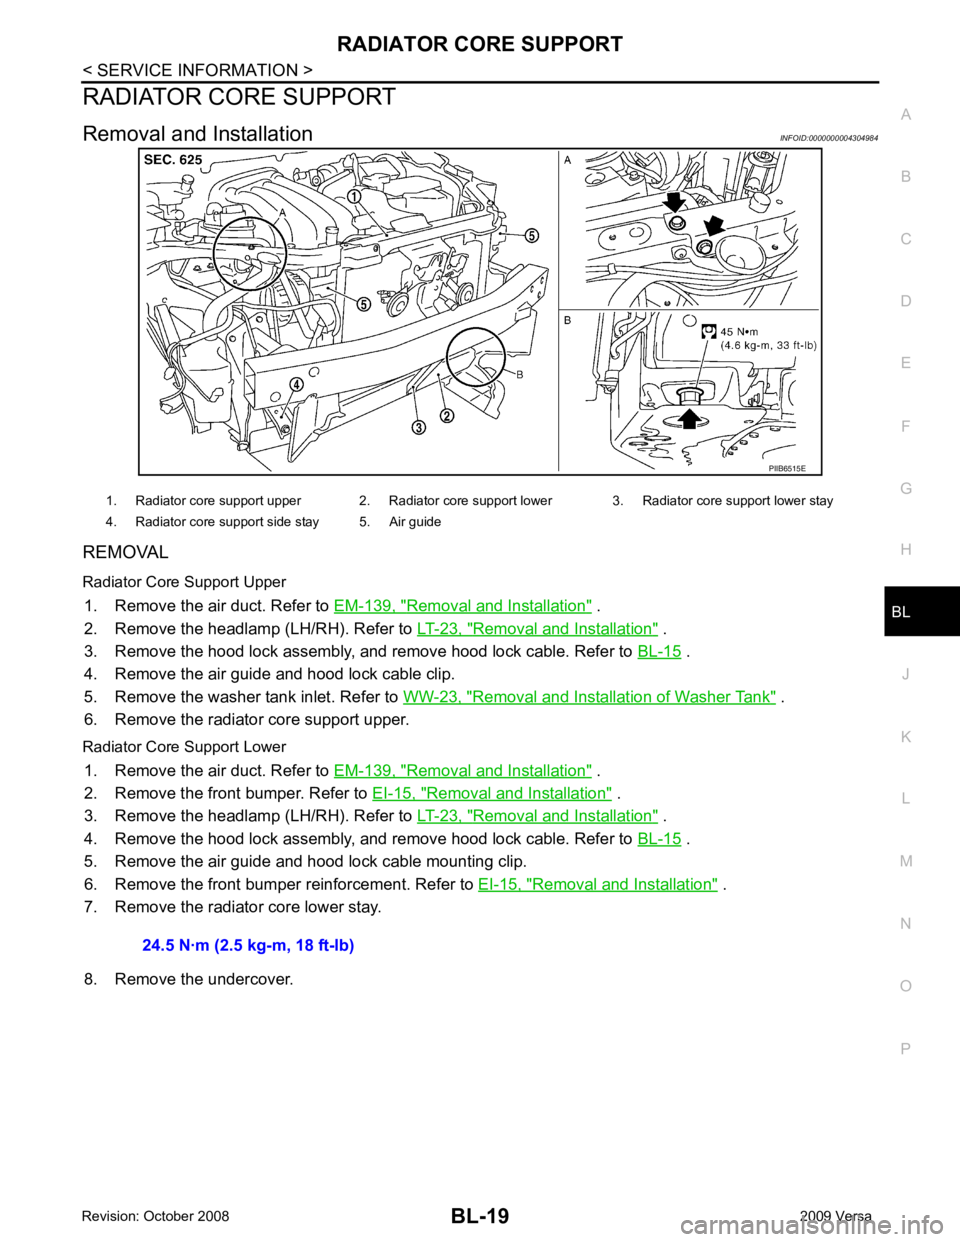
Removal and Installation INFOID:0000000004304984
REMOVAL
Radiator Core Support Upper 1. Remove the air duct. Refer to EM-139, " Removal and Installation " .
2. Remove the headlamp (LH/RH). Refer to LT-23, " Removal and Installation " .
3. Remove the hood lock assembly, and remove hood lock cable. Refer to BL-15 .
4. Remove the air guide and hood lock cable clip.
5. Remove the washer tank inlet. Refer to WW-23, " Removal and Installation of Washer Tank " .
6. Remove the radiator core support upper.
Radiator Core Support Lower 1. Remove the air duct. Refer to EM-139, " Removal and Installation " .
2. Remove the front bumper. Refer to EI-15, " Removal and Installation " .
3. Remove the headlamp (LH/RH). Refer to LT-23, " Removal and Installation " .
4. Remove the hood lock assembly, and remove hood lock cable. Refer to BL-15 .
5. Remove the air guide and hood lock cable mounting clip.
6. Remove the front bumper reinforcement. Refer to EI-15, " Removal and Installation " .
7. Remove the radiator core lower stay.
8. Remove the undercover.
Page 556 of 4331
BL
N
O P
CHANGE SETTINGS FUNCTION
The settings for each function c an be changed with the CONSULT-III.
Changing Settings Using CONSULT-III The settings for the Intelligent Key system func tions can be changed using CONSULT-III (WORK SUPPORT).
Refer to BL-117, " CONSULT-III Application Item " .
NOTE:
Once a function setting is changed, it will remain effective even if the battery is disconnected.
INTELLIGENT KEY REGISTRATION Intelligent Key-ID registration is performed using the CONSULT-III.
CAUTION:
• After a new Intelligent Key-ID is regi stered, be sure to check the function.
• When registering an additional Intelligent Key-ID , take any Intelligent Keys already registered and
Intelligent Keys for any other vehicles out of the vehicle before starting.
CONSULT-III can be used to check and delete Intelligent Key-IDs.
For further information, see the CONS ULT-III Operation Manual NATS.
STEERING LOCK SOLENOID REGISTRATION
Steering Lock Solenoid ID Registration CAUTION:
• The method for registering a st eering lock solenoid ID depends on the status of the steering lock
solenoid and Intelligent Key unit (new or old unit).
• After registration is completed, press ignition switch with an Intelligent Key in the vehicle so that it
can be turned, and confirm that it cannot be turn ed even when ignition switch is pressed without an
Intelligent Key in the vehicle.
For further information, see the CONSULT- III Operation Manual NATS-IVIS/NVIS.
CAN Communication System Description INFOID:0000000004305033
Refer to LAN-8 .
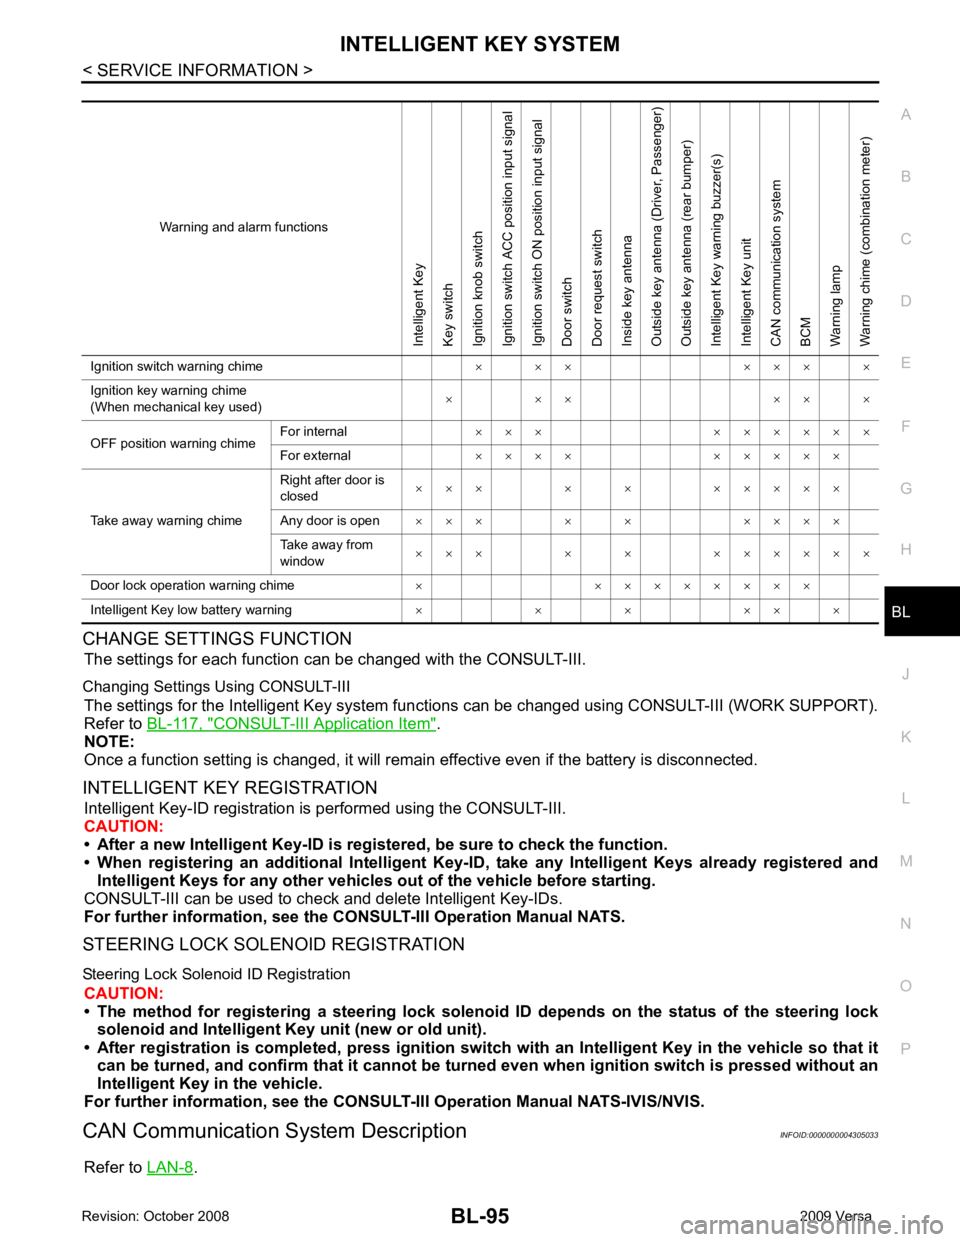
Warning and alarm functionsIntelligent Key
Key switch
Ignition knob switch
Ignition switch ACC position input signal
Ignition switch ON position input signal
Door switch
Door request switch
Inside key antenna
Outside key antenna (Driver, Passenger)
Outside key antenna (rear bumper)
Intelligent Key warning buzzer(s)
Intelligent Key unit
CAN communication system
BCM
Warning lamp
Warning chime (combination meter)
Ignition switch warning chime × × × × × × ×
Ignition key warning chime
(When mechanical key used) × × × × × ×
OFF position warning chime For internal
× × × × × × × × ×
For external × × × × × × × × ×
Take away warning chime Right after door is
closed × × × × × × × × × ×
Any door is open × × × × × × × × ×
Take away from
window × × × × × × × × × × ×
Door lock operation warning chime × × × × × × × × ×
Intelligent Key low battery warning × × × × × ×
Page 570 of 4331
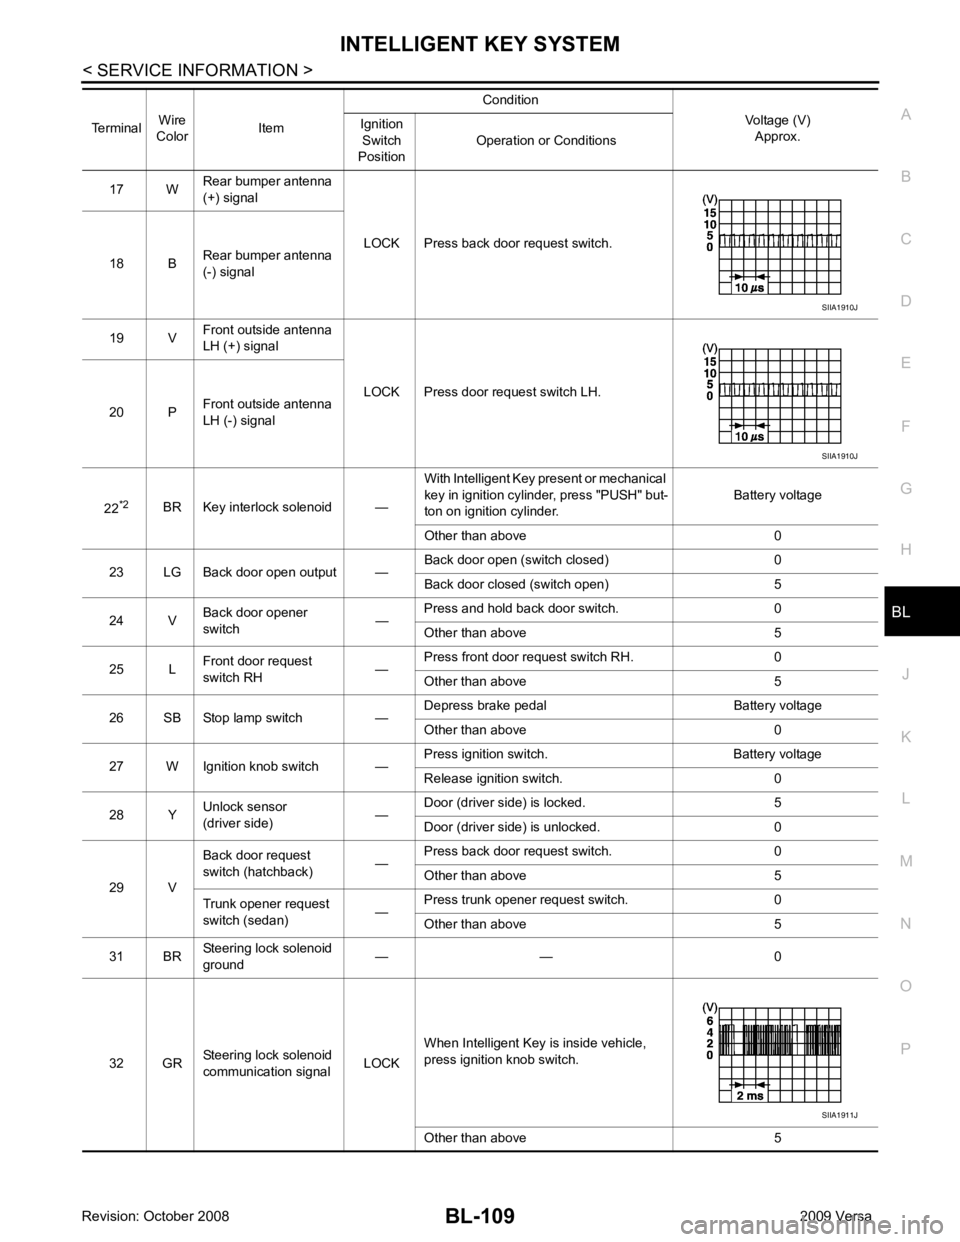
BL
N
O P
17 W
Rear bumper antenna
(+) signal
LOCK Press back door request switch.
18 B Rear bumper antenna
(-) signal
19 V Front outside antenna
LH (+) signal
LOCK Press door request switch LH.
20 P Front outside antenna
LH (-) signal
22 *2
BR Key interlock solenoid — With Intelligent Key present or mechanical
key in ignition cylinder, press "PUSH" but-
ton on ignition cylinder. Battery voltage
Other than above 0
23 LG Back door open output — Back door open (switch closed) 0
Back door closed (switch open) 5
24 V Back door opener
switch —Press and hold back door switch. 0
Other than above 5
25 L Front door request
switch RH —Press front door request switch RH. 0
Other than above 5
26 SB Stop lamp switch — Depress brake pedal Battery voltage
Other than above 0
27 W Ignition knob switch — Press ignition switch. Battery voltage
Release ignition switch. 0
28 Y Unlock sensor
(driver side) —Door (driver si
de) is locked. 5
Door (driver side ) is unlocked. 0
29 V Back door request
switch (hatchback) —Press back door request switch. 0
Other than above 5
Trunk opener request
switch (sedan) —Press trunk opener request switch. 0
Other than above 5
31 BR Steering lock solenoid
ground — — 0
32 GR Steering lock solenoid
communication signal LOCKWhen Intelligent Key is inside vehicle,
press ignition knob switch.
Other than above 5
Terminal
Wire
Color Item Condition
Voltage (V)Approx.
Ignition
Switch
Position Operation or Conditions SIIA1911J
Page 579 of 4331

Test item Description
DOOR LOCK/UNLOCK This test is able to check door lock/unlock operation.
• The all door lock actuators are unlocked when “ALL UNLK” on CONSULT-III screen is touched.
• The all door lock actuators are locked when “LOCK” on CONSULT-III screen is touched.
ANTENNA This test is able to check Intelligent Key antenna operation.
When the following conditions are met, hazard warning lamps flash.
• Inside key antenna (front console) detects Intelligent Key, when “ROOM ANT1” on CONSULT- III screen is touched.
• Inside key antenna (instrument panel and rear floor) detects Intelligent Key, when “ROOM
ANT2” on CONSULT-III screen is touched.
• Outside key antenna (driver side) detects Intelligent Key, when “DRIVER ANT” on CONSULT-III screen is touched.
• Outside key antenna (passenger side) detects Intelligent Key, when “ASSIST ANT” on CON- SULT-III screen is touched.
• Outside key antenna (rear bumper) detects Intelligent Key, when “BK DOOR ANT” on CON-
SULT-III screen is touched.
OUTSIDE BUZZER(S)
(DRIVER DOOR), (TRUNK) *This test is able to check Intelligent Key warning buzzer operation.
Intelligent Key warning buzzer sounds when “ON” on CONSULT-III screen is touched.
INSIDE BUZZER
(CHIME) This test is able to check Intelligent Key warning chime (Instrument panel) operation.
• Take away warning chime sounds when “TAKE OUT” on CONSULT-III screen is touched.
• Ignition switch warning chime sounds when “KNOB” on CONSULT-III screen is touched.
• Ignition key warning chime sounds when “KEY” on CONSULT-III screen is touched.
INDICATOR This test is able to check warning lamp operation.
• “KEY” Warning lamp (Green) illuminates when “BLUE ON” on CONSULT-III screen is touched.
• “KEY” Warning lamp (Red) illuminates when “RED ON” on CONSULT-III screen is touched.
• “LOCK” Warning lamp illuminates when “KNOB ON” on CONSULT-III screen is touched.
• “KEY” Warning lamp (Green) flashes when “BLUE IND” on CONSULT-III screen is touched.
• “KEY” Warning lamp (RED) flashes when “BLUE IND” on CONSULT-III screen is touched.
• “P-SHIFT” Warning lamp flashes when “K NOB ON” on CONSULT-III screen is touched.
Page 583 of 4331
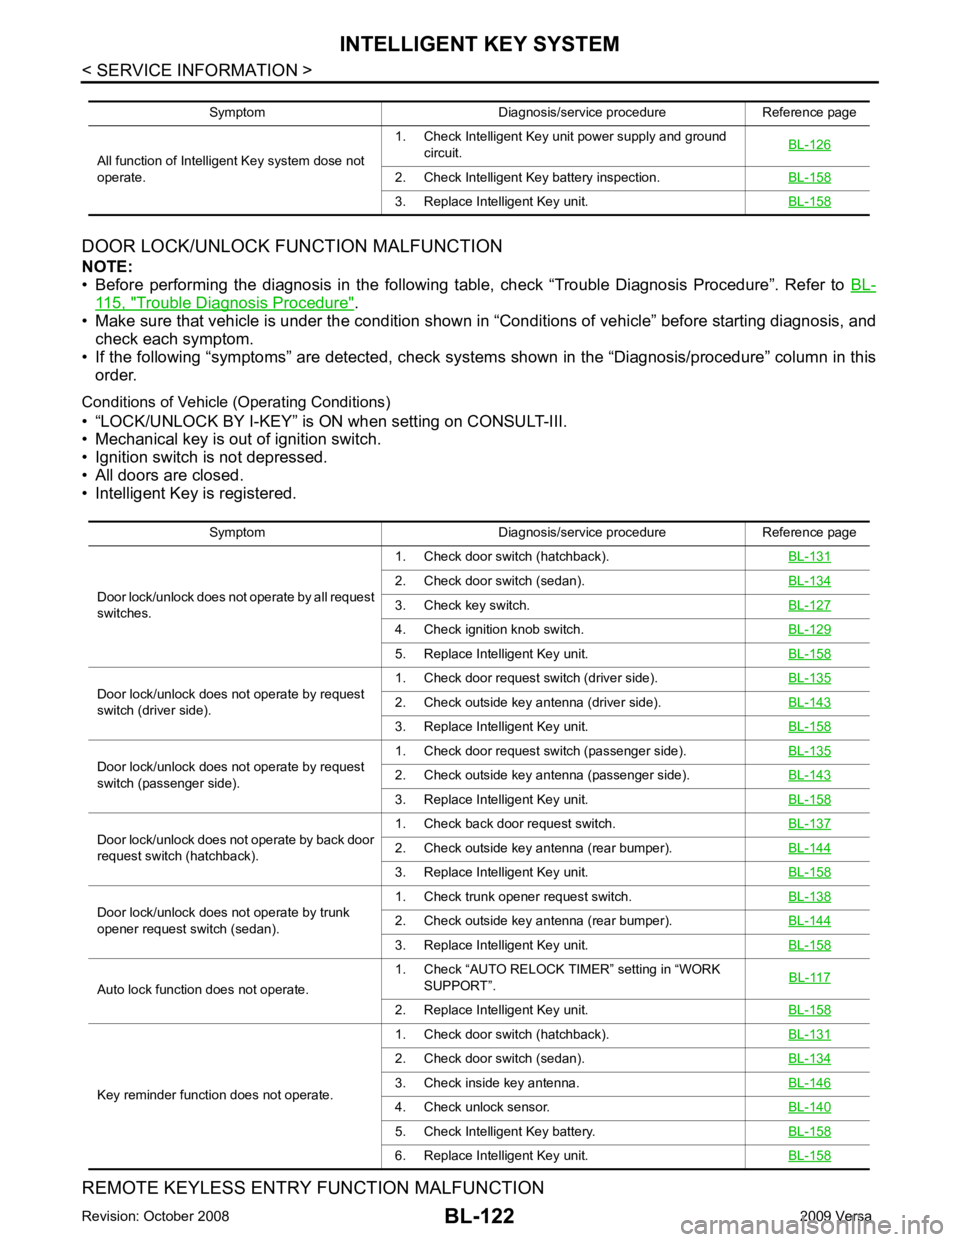
115, " Trouble Diagnosis Procedure " .
• Make sure that vehicle is under the condition shown in “Conditions of vehicle” before starting diagnosis, and
check each symptom.
• If the following “symptoms” are detected, check system s shown in the “Diagnosis/procedure” column in this
order.
Conditions of Vehicle (Operating Conditions)
• “LOCK/UNLOCK BY I-KEY” is ON when setting on CONSULT-III.
• Mechanical key is out of ignition switch.
• Ignition switch is not depressed.
• All doors are closed.
• Intelligent Key is registered.
REMOTE KEYLESS ENTRY FUNCTION MALFUNCTION
Symptom Diagnosis/service procedure Reference page
All function of Intelligent Key system dose not
operate. 1. Check Intelligent Key unit power supply and ground
circuit. BL-126 2. Check Intelligent Key battery inspection.
BL-158 3. Replace Intelligent Key unit.
BL-158Symptom Diagnosis/service procedure Reference page
Door lock/unlock does not operate by all request
switches. 1. Check door switch (hatchback).
BL-131 2. Check door switch (sedan).
BL-134 3. Check key switch.
BL-127 4. Check ignition knob switch.
BL-129 5. Replace Intelligent Key unit.
BL-158Door lock/unlock does not operate by request
switch (driver side). 1. Check door request switch (driver side).
BL-135 2. Check outside key antenna (driver side).
BL-143 3. Replace Intelligent Key unit.
BL-158Door lock/unlock does not operate by request
switch (passenger side). 1. Check door request switch (passenger side).
BL-135 2. Check outside key antenna (passenger side).
BL-143 3. Replace Intelligent Key unit.
BL-158Door lock/unlock does not operate by back door
request switch (hatchback). 1. Check back door request switch.
BL-137 2. Check outside key antenna (rear bumper).
BL-144 3. Replace Intelligent Key unit.
BL-158Door lock/unlock does not operate by trunk
opener request switch (sedan). 1. Check trunk opener request switch.
BL-138 2. Check outside key antenna (rear bumper).
BL-144 3. Replace Intelligent Key unit.
BL-158Auto lock function does not operate.
1. Check “AUTO RELOCK TI
MER” setting in “WORK
SUPPORT”. BL-117 2. Replace Intelligent Key unit.
BL-158Key reminder function does not operate.
1. Check door switch (hatchback).
BL-131 2. Check door switch (sedan).
BL-134 3. Check inside key antenna.
BL-146 4. Check unlock sensor.
BL-140 5. Check Intelligent Key battery.
BL-158 6. Replace Intelligent Key unit.
BL-158
Page 586 of 4331
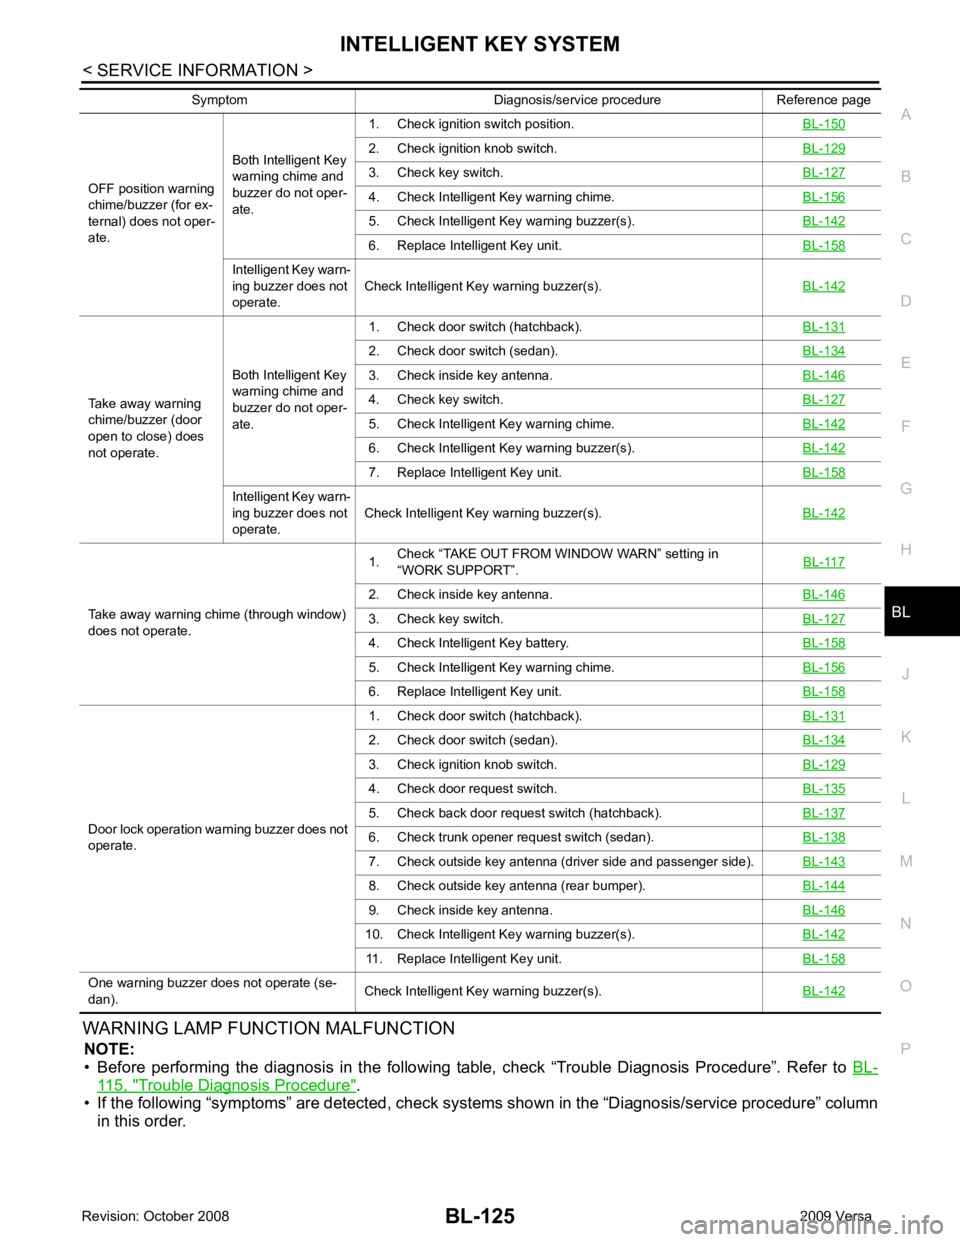
BL
N
O P
WARNING LAMP FUNCTION MALFUNCTION
NOTE:
• Before performing the diagnosis in the following table, check “Trouble Diagnosis Procedure”. Refer to BL-115, " Trouble Diagnosis Procedure " .
• If the following “symptoms” are detected, check syst ems shown in the “Diagnosis/service procedure” column
in this order.
OFF position warning
chime/buzzer (for ex-
ternal) does not oper-
ate. Both Intelligent Key
warning chime and
buzzer do not oper-
ate. 1. Check ignition switch position.
BL-1502. Check ignition knob switch.
BL-1293. Check key switch.
BL-1274. Check Intelligent Key warning chime.
BL-1565. Check Intelligent Ke
y warning buzzer(s). BL-142 6. Replace Intelligent Key unit.
BL-158Intelligent Key warn-
ing buzzer does not
operate. Check Intelligent Key warning buzzer(s).
BL-142Take away warning
chime/buzzer (door
open to close) does
not operate. Both Intelligent Key
warning chime and
buzzer do not oper-
ate. 1. Check door switch (hatchback).
BL-1312. Check door switch (sedan).
BL-1343. Check inside key antenna.
BL-1464. Check key switch.
BL-1275. Check Intelligent Key warning chime.
BL-1426. Check Intelligent Ke
y warning buzzer(s). BL-142 7. Replace Intelligent Key unit.
BL-158Intelligent Key warn-
ing buzzer does not
operate. Check Intelligent Key warning buzzer(s).
BL-142Take away warning chime (through window)
does not operate. 1.
Check “TAKE OUT FROM WINDOW WARN” setting in
“WORK SUPPORT”. BL-1172. Check inside key antenna.
BL-1463. Check key switch.
BL-1274. Check Intelligent Key battery.
BL-1585. Check Intelligent Key warning chime.
BL-1566. Replace Intelligent Key unit.
BL-158Door lock operation warning buzzer does not
operate. 1. Check door switch (hatchback).
BL-1312. Check door switch (sedan).
BL-1343. Check ignition knob switch.
BL-1294. Check door request switch.
BL-1355. Check back door request switch (hatchback).
BL-1376. Check trunk opener request switch (sedan).
BL-1387. Check outside key antenna (driver side and passenger side).
BL-1438. Check outside key antenna (rear bumper).
BL-1449. Check inside key antenna.
BL-14610. Check Intelligent Key warning buzzer(s).
BL-14211. Replace Intelligent Key unit.
BL-158One warning buzzer does not operate (se-
dan). Check Intelligent Key warning buzzer(s).
BL-142Symptom Diagnosis/service procedure Reference page