Page 3786 of 4331

MA
N
O P
M/T OIL : Refilling (RS5F91R)
INFOID:0000000004803422
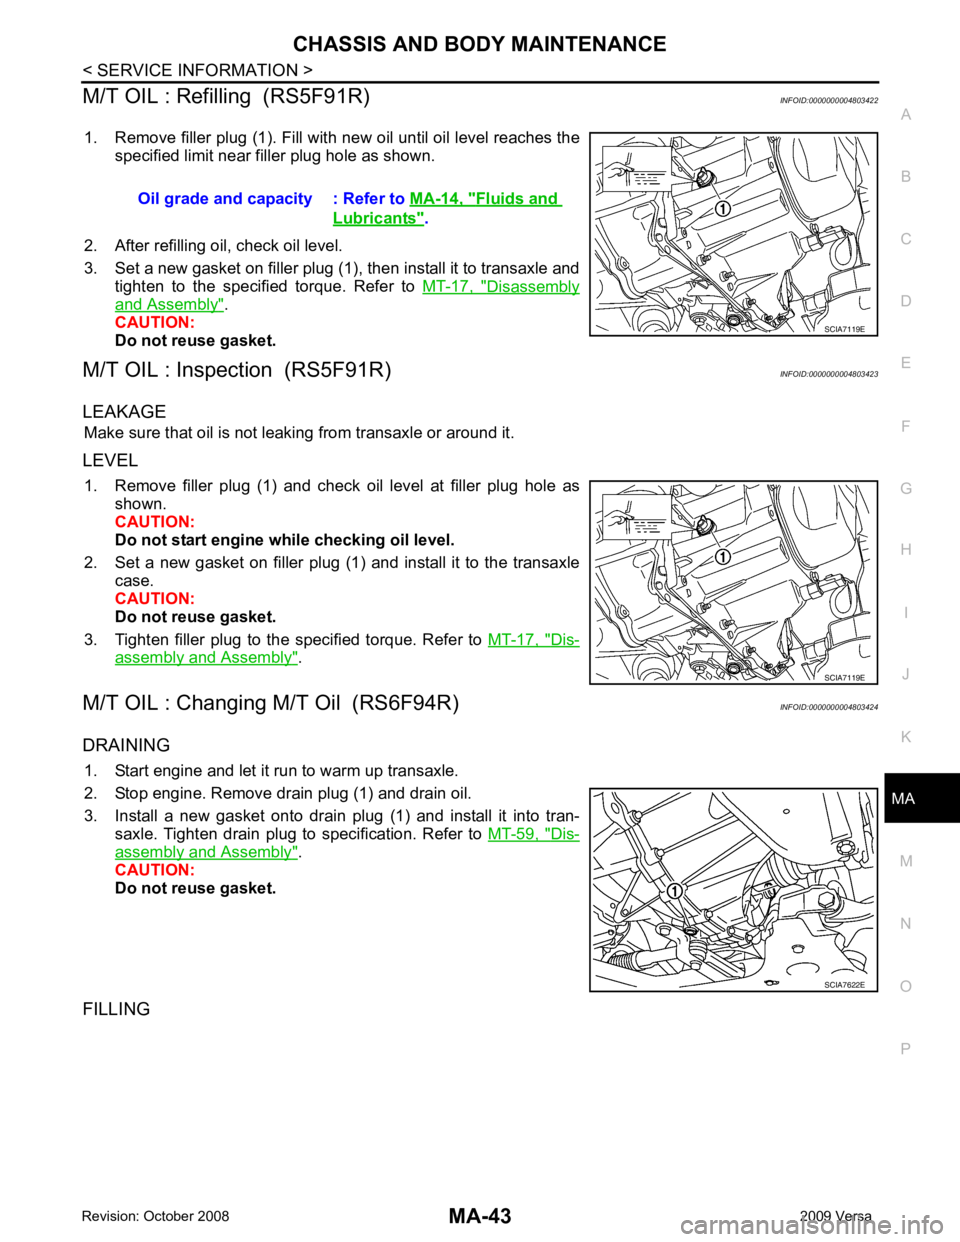
1. Remove filler plug (1). Fill with new oil until oil level reaches the specified limit near filler plug hole as shown.
2. After refilling oil, check oil level.
3. Set a new gasket on filler plug (1), then install it to transaxle and tighten to the specified torque. Refer to MT-17, " Disassembly
and Assembly " .
CAUTION:
Do not reuse gasket.
M/T OIL : Inspection (RS5F91R) INFOID:0000000004803423
LEAKAGE Make sure that oil is not leaking from transaxle or around it.
LEVEL 1. Remove filler plug (1) and check oil level at filler plug hole as shown.
CAUTION:
Do not start engine while checking oil level.
2. Set a new gasket on filler plug (1) and install it to the transaxle case.
CAUTION:
Do not reuse gasket.
3. Tighten filler plug to the specified torque. Refer to MT-17, " Dis-
assembly and Assembly " .
M/T OIL : Changing M/T Oil (RS6F94R) INFOID:0000000004803424
DRAINING 1. Start engine and let it run to warm up transaxle.
2. Stop engine. Remove drain plug (1) and drain oil.
3. Install a new gasket onto drain plug (1) and install it into tran- saxle. Tighten drain plug to specification. Refer to MT-59, " Dis-
assembly and Assembly " .
CAUTION:
Do not reuse gasket.
FILLING Oil grade and capacity : Refer to
MA-14, " Fluids and
Lubricants " .
SCIA7622E
Page 3787 of 4331

Disassembly and Assembly " .
CAUTION:
Do not reuse gasket.
M/T OIL : Checking M/T Oil (RS6F94R) INFOID:0000000004803425
OIL LEAKAGE AND OIL LEVEL
1. Make sure that oil is not leaking from transaxle or around it.
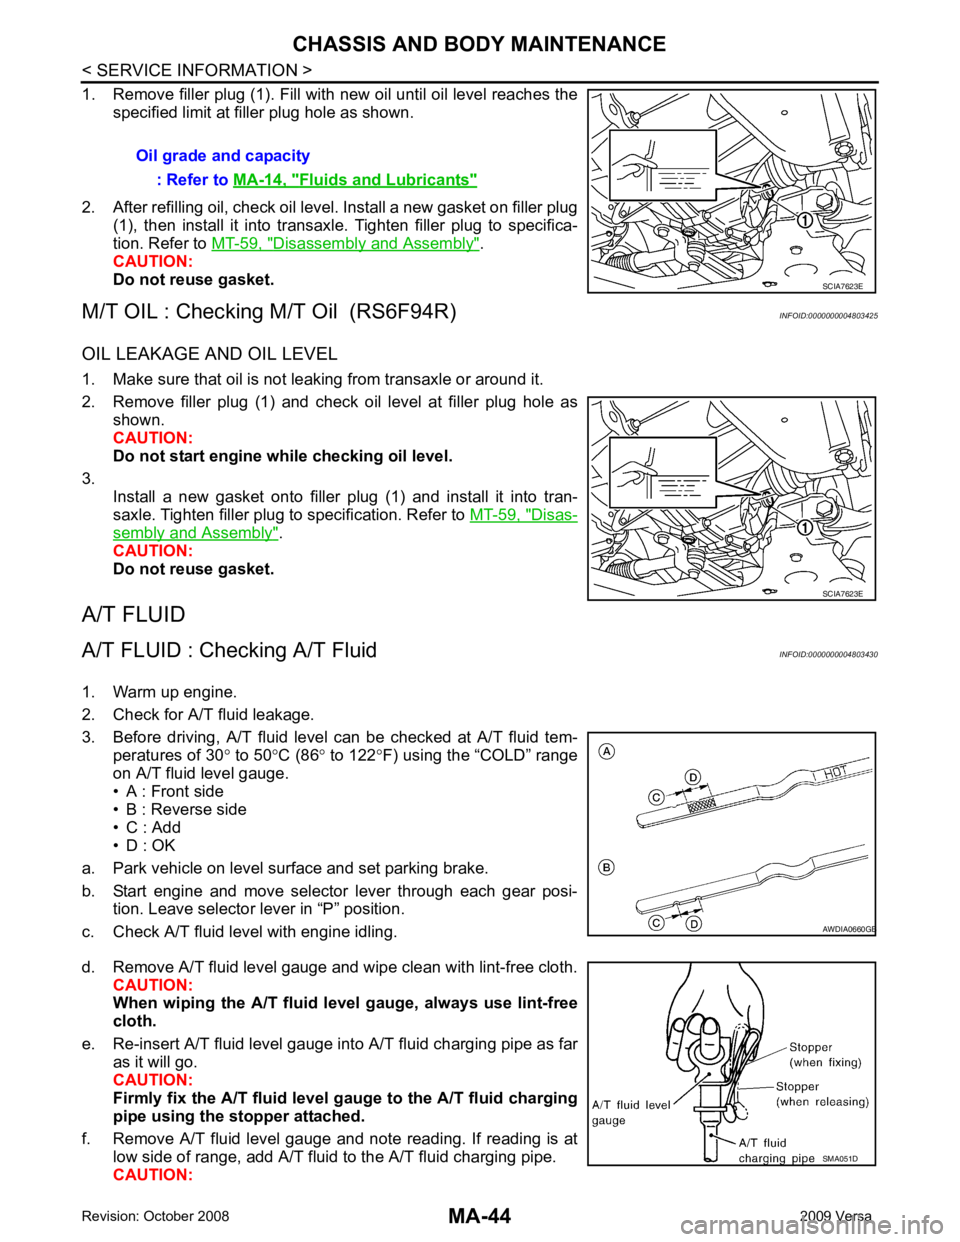
2. Remove filler plug (1) and check oil level at filler plug hole as shown.
CAUTION:
Do not start engine wh ile checking oil level.
3. Install a new gasket onto filler plug (1) and install it into tran-
saxle. Tighten filler plug to specification. Refer to MT-59, " Disas-
sembly and Assembly " .
CAUTION:
Do not reuse gasket.
A/T FLUID
A/T FLUID : Checking A/T Fluid INFOID:0000000004803430
1. Warm up engine.
2. Check for A/T fluid leakage.
3. Before driving, A/T fluid level can be checked at A/T fluid tem- peratures of 30 ° to 50 °C (86 ° to 122 °F) using the “COLD” range
on A/T fluid level gauge.
• A : Front side
• B : Reverse side
• C : Add
• D : OK
a. Park vehicle on level surface and set parking brake.
b. Start engine and move selector lever through each gear posi- tion. Leave selector lever in “P” position.
c. Check A/T fluid level with engine idling.
d. Remove A/T fluid level gauge and wipe clean with lint-free cloth. CAUTION:
When wiping the A/T fluid level gauge, always use lint-free
cloth.
e. Re-insert A/T fluid level gauge into A/T fluid charging pipe as far as it will go.
CAUTION:
Firmly fix the A/T fluid level ga uge to the A/T fluid charging
pipe using the stopper attached.
f. Remove A/T fluid level gauge and note reading. If reading is at low side of range, add A/T fluid to the A/T fluid charging pipe.
CAUTION: Oil grade and capacity
: Refer to MA-14, " Fluids and Lubricants "
SCIA7623E
B
Page 3804 of 4331
![NISSAN TIIDA 2009 Service Repair Manual MT-10< SERVICE INFORMATION >
[RS5F91R]
M/T OIL
M/T OIL
Draining INFOID:0000000004784220
1. Start engine and let it run to warm up transaxle.
2. Stop engine. Remove drain plug (1) and drain oil.
3. Set NISSAN TIIDA 2009 Service Repair Manual MT-10< SERVICE INFORMATION >
[RS5F91R]
M/T OIL
M/T OIL
Draining INFOID:0000000004784220
1. Start engine and let it run to warm up transaxle.
2. Stop engine. Remove drain plug (1) and drain oil.
3. Set](/manual-img/5/57398/w960_57398-3803.png)
MT-10< SERVICE INFORMATION >
[RS5F91R]
M/T OIL
M/T OIL
Draining INFOID:0000000004784220
1. Start engine and let it run to warm up transaxle.
2. Stop engine. Remove drain plug (1) and drain oil.
3. Set a new gasket on drain plug (1) and install it to transaxle and tighten drain plug to the specified torque. Refer to MT-17, " Dis-
assembly and Assembly " .
CAUTION:
Do not reuse gasket.
Refilling INFOID:0000000004784221
1. Remove filler plug (1). Fill with new oil until oil level reaches the specified limit near filler plug hole as shown.
2. After refilling oil, check oil level.
3. Set a new gasket on filler plug (1), then install it to transaxle and tighten to the specified torque. Refer to MT-17, " Disassembly
and Assembly " .
CAUTION:
Do not reuse gasket.
Inspection INFOID:0000000004784222
LEAKAGE
Make sure that oil is not leaking from transaxle or around it.
LEVEL
1. Remove filler plug (1) and check oil level at filler plug hole as shown.
CAUTION:
Do not start engine wh ile checking oil level.
2. Set a new gasket on filler plug (1) and install it to the transaxle case.
CAUTION:
Do not reuse gasket.
3. Tighten filler plug to the specified torque. Refer to MT-17, " Dis-
assembly and Assembly " . PCIB1504E
Oil grade and capacity : Refer to
MA-14, " Fluids and
Lubricants " .
SCIA7119E
SCIA7119E
Page 3837 of 4331
MT
N
O P
SERVICE DATA AND SPECIFICATIONS (SDS)
General Specification INFOID:0000000004784251
TRANSAXLE Transaxle type RS5F91R
Engine type HR16DE
Number of speed 5
Synchromesh type Warner
Shift pattern
Gear ratio 1st 3.7272
2nd 2.0476
3rd 1.3928
4th 1.0294
5th 0.8205
Reverse 3.5454
Final gear 4.0666
Number of teeth Input gear 1st 11 2nd 21
3rd 28
4th 34
5th 39
Reverse 11
Main gear 1st 41 2nd 43
3rd 39
4th 35
5th 32
Reverse 39
Reverse idler gear 26
Final gear Final gear/Pinion 61/15 Side gear/Pinion
mate gear 13/9
Oil capacity (Reference) (US pt, Imp pt)Approx. 2.6 (5-1/2, 4-5/8)
Remarks Reverse synchronizer Installed Double-cone synchronizer 1st and 2nd
Page 3885 of 4331
MT
N
O P
SERVICE DATA AND SPECIFICATIONS (SDS)
General Specification INFOID:0000000004305285
Transaxle type RS6F94R
Engine type MR18DE
Number of speed 6
Synchromesh type Warner
Shift pattern
Gear ratio 1st 3.727
2nd 2.105
3rd 1.452
4th 1.171
5th 0.971
6th 0.811
Reverse 3.687
Final gear 3.933
Number of teeth Input gear 1st 11 2nd 19
3rd 31
4th 35
5th 35
6th 37
Reverse 11
Main gear 1st 41 2nd 40
3rd 45
4th 41
5th 34
6th 30
Reverse 42
Reverse idler gear Input/Output 28/29
Final gear Final gear/Pinion 59/15 Side gear/Pinion
mate gear 21/18
Oil capacity (Reference) (US pt, Imp pt)Approx. 2.0 (4-1/4, 3-1/2)
Remarks Reverse synchronizer Installed Triple-cone synchronizer 1st and 2nd