2009 NISSAN QASHQAI water
[x] Cancel search: waterPage 26 of 297
Downloaded from www.Manualslib.com manuals search engine tened. The seat belt warning shows a filled circle
when the ignition switch is turned to the ON position
and an empty circle when the related seat belt has
been securely fastened, or after approximately 35
seconds after engine start, or when acknowledged
by the driver pushing the steering wheel switch
ji
(where fitted).
NOTE
If there is a change in (2nd row) rear seat belt
status during a journey then the applicable
symbol for any unbuckled seat will show again
for a further 35 seconds.
The front passenger seat belt warning light
will not illuminate if the seat is unoccupied.
Seat belts for 3rd row seats (where fitted) are
not part of the seat belt warning monitoring
system.
PRECAUTIONS ON SEAT BELT
USAGE
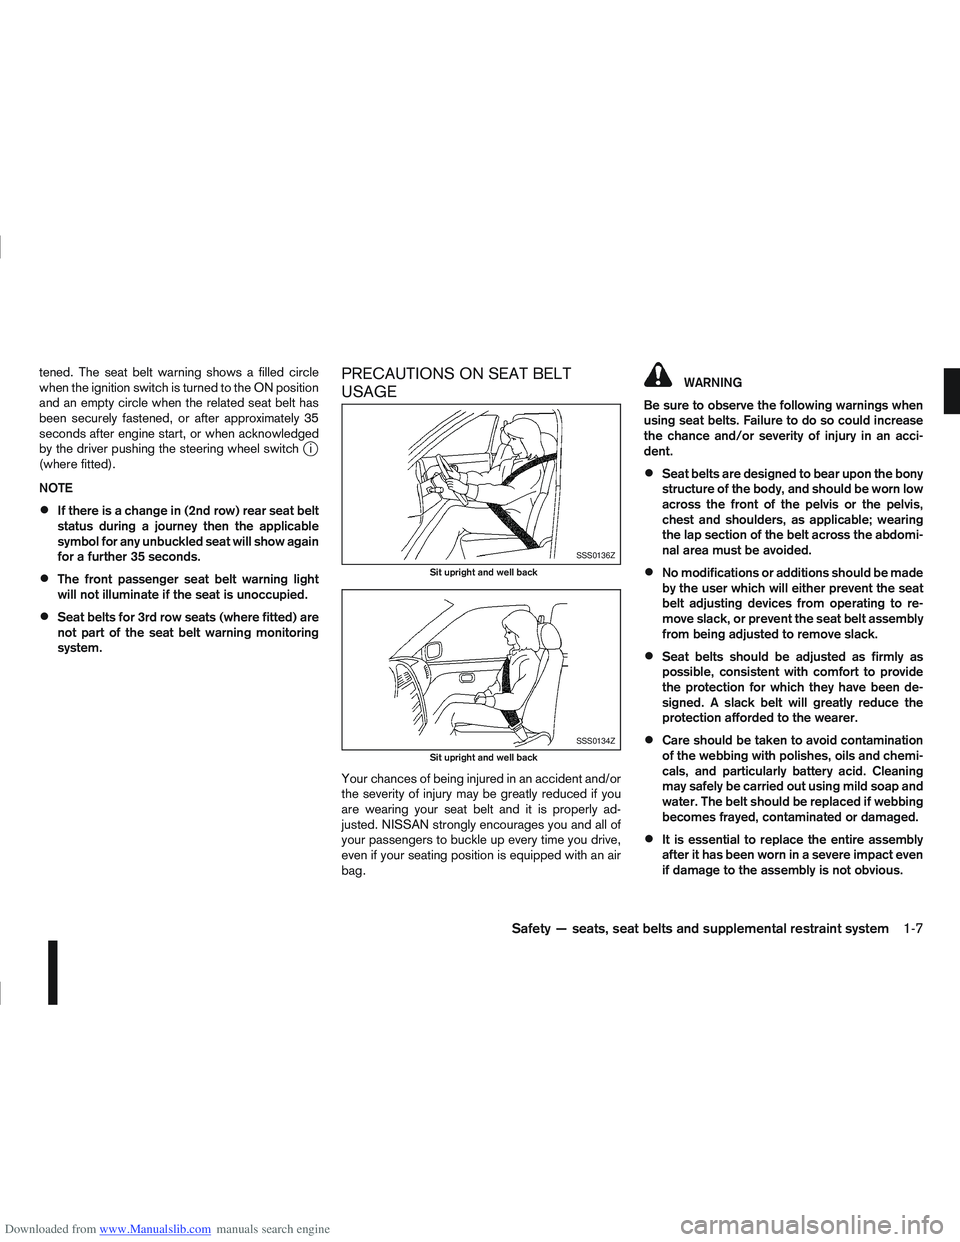
Your chances of being injured in an accident and/or
the severity of injury may be greatly reduced if you
are wearing your seat belt and it is properly ad-
justed. NISSAN strongly encourages you and all of
your passengers to buckle up every time you drive,
even if your seating position is equipped with an air
bag.
WARNING
Be sure to observe the following warnings when
using seat belts. Failure to do so could increase
the chance and/or severity of injury in an acci-
dent.
Seat belts are designed to bear upon the bony
structure of the body, and should be worn low
across the front of the pelvis or the pelvis,
chest and shoulders, as applicable; wearing
the lap section of the belt across the abdomi-
nal area must be avoided.
No modifications or additions should be made
by the user which will either prevent the seat
belt adjusting devices from operating to re-
move slack, or prevent the seat belt assembly
from being adjusted to remove slack.
Seat belts should be adjusted as firmly as
possible, consistent with comfort to provide
the protection for which they have been de-
signed. A slack belt will greatly reduce the
protection afforded to the wearer.
Care should be taken to avoid contamination
of the webbing with polishes, oils and chemi-
cals, and particularly battery acid. Cleaning
may safely be carried out using mild soap and
water. The belt should be replaced if webbing
becomes frayed, contaminated or damaged.
It is essential to replace the entire assembly
after it has been worn in a severe impact even
if damage to the assembly is not obvious.
SSS0136Z
Sit upright and well back
SSS0134Z
Sit upright and well back
Safety — seats, seat belts and supplemental restraint system1-7
Page 52 of 297

Downloaded from www.Manualslib.com manuals search engine Anti-lock Braking System (ABS) warning
light (orange)Seat belt (driver and front passenger) warn-
ing light (red)Low fuel indicator light (orange)
Brake warning light (red)Supplemental Restraint System (SRS) air
bag warning light (red)Slip indicator light (orange)
Charge warning light (red)Water in fuel filter warning light (orange)Front fog light indicator light (green)
Diesel Particulate Filter (DPF) warning light
(orange)4WD warning light (orange)Rear fog light indicator light (orange)
Electronic Power Assisted Steering (EPAS)
warning light (red)Automatic Transmission check indicator light
(AT models) (orange)High beam indicator light (blue)
Engine oil pressure/level warning light (red)Continuously Variable Transmission (CVT)
indicator light (orange)Dipped beam indicator light (green)
Front passenger air bag deactivated (OFF)
warning light (red)Electronic Stability Programme (ESP) OFF
indicator light (orange)Side light and headlight indicator light
(green)
Malfunction warning light (red)
Malfunction Indicator light (orange)4WD mode indicator light (AUTO) (green)SPORT mode indicator light
Master warning light (orange)4WD mode indicator light (LOCK) (orange)Trailer direction indicator light (green)
NATS security warning light (red)Glow plug indicator light (Diesel engine)
(orange)Turn signal/hazard indicator lights (green)
CHECKING BULBS
With all doors closed, apply the handbrake, fasten
the seat belts and turn the ignition switch to the ON
position without starting the engine. The following
lights (where fitted) will come on:
,,,,,
The following lights (where fitted) come on briefly
and then go off:
,,,,,,,
,,,,(M9R engine
only)
If any light fails to come on, it may indicate a burned-
out bulb or an open circuit in the electrical system.
Have the system checked, and repaired promptly by
a NISSAN dealer or qualified workshop.
WARNING LIGHTS
Also see “Vehicle information display” later in this
section.
Anti-lock Braking System (ABS)
warning light
After turning the ignition switch to the ON position,
the light will illuminate. The anti-lock braking system
warning light will turn off after approximately 2 sec-
onds if the system is operational.
WARNING/INDICATOR LIGHTS AND AUDIBLE REMINDERS
Instruments and controls2-3
Page 56 of 297

Downloaded from www.Manualslib.com manuals search engine Do not drive on dry, hard surfaced roads in
the LOCK position.
If the 4WD warning light blinks in the follow-
ing sequence while driving, proceed as in-
structed:
– Blinks rapidly (about twice a second)Pull off the road at a safe place and idle
the engine. The driving mode will change
to 2WD to prevent the 4WD system from
malfunctioning. The vehicle can be driven
again as soon as the warning light turns
off.
– Blinks slowly (about once every 2 seconds) Change the driving mode to 2WD and re-
duce the vehicle speed as soon as safely
possible.
If the warning light is still on after performing the
above operation, have the system checked by a
NISSAN dealer or qualified workshop as soon as
possible.
Water in fuel filter warning light
(where fitted)
If the warning light remains on or flashes irregularly
while the engine is running, there may be water in
the fuel filter. Should this happen, try to drain the
water from the fuel filter, see “Fuel filter (Diesel en-
gine models)” in the “8. Maintenance and
do-it-yourself” section. CAUTION
Failure to drain the water from the fuel filter can
cause serious damage to the engine. Contact a
NISSAN dealer or qualified workshop as soon as
possible.
INDICATOR LIGHTS
Automatic transmission check
indicator light (AT models)
This light indicates both the “Automatic transmis-
sion oil temperature warning” and the “Fail-safe op-
eration”.
Automatic transmission oil temperature
warning:
This light comes on when the automatic transmis-
sion oil temperature is too high. If the light comes on
while driving, reduce the vehicle speed as soon as
safely possible until the light turns off.
Fail-safe operation:
When the ignition switch is turned ON, the light
comes on for 2 seconds. If the light blinks, it may
indicate the automatic transmission is not function-
ing properly. Have your NISSAN dealer or qualified
workshop check and repair the transmission.
CAUTION
Continued vehicle operation when the automatic
transmission check warning light is on may dam-
age the automatic transmission.
Continuously Variable
Transmission (CVT) indicator
light (CVT models)
This light comes on briefly when the ignition is turned
to the ON position.
If the CVT light comes on during normal operation,
it may indicate that something is wrong with the
Continuously Variable Transmission (CVT). Have
your system checked by a NISSAN dealer or quali-
fied workshop.
NOTE
A CVT ELECTRONIC CONTROL SYSTEM WARN-
ING display (centre console — where fitted) will
come on when a malfunction may have occurred
to the transmission control system. The selected
Detailed Information key will then recommend
going to a NISSAN dealer for the system to be
checked.
Electronic Stability Program
(ESP) OFF indicator light
(where fitted)
The light comes on when the Electronic Stability
Programme (ESP) OFF switch is pushed to the OFF
position. This indicates that the ESP system is not
operating.
This light also comes on briefly when the ignition
switch is turned to the ON position. The light will
turn off after approximately 1 second if the ESP sys-
tem is operational.
Instruments and controls2-7
Page 79 of 297
Downloaded from www.Manualslib.com manuals search engine WARNING
Take care as the power outlet and plug may be
hot during or immediately after use.
CAUTION
This power outlet is not designed for use with
a cigarette lighter unit.
Do not use with accessories that exceed a 12
volt, 120 W (10 A) power draw. Do not use
double adaptors or more than one electrical
accessory.
Use this power outlet with the engine running
(do not use for extended periods of time with
the engine stopped or idling).
Avoid using when the air conditioner, head-
lights or rear window defogger are on.
When not in use, be sure that the cap is
closed. Do not allow water to come into con-
tact with the outlet.
Before inserting or disconnecting a plug, be
sure to turn off the power switch of the elec-
trical accessory being used or the Acc power
of the vehicle.
Fully push the plug in sufficiently. If sufficient
contact is not made, the plug may overheat or
the internal temperature fuse may blow.
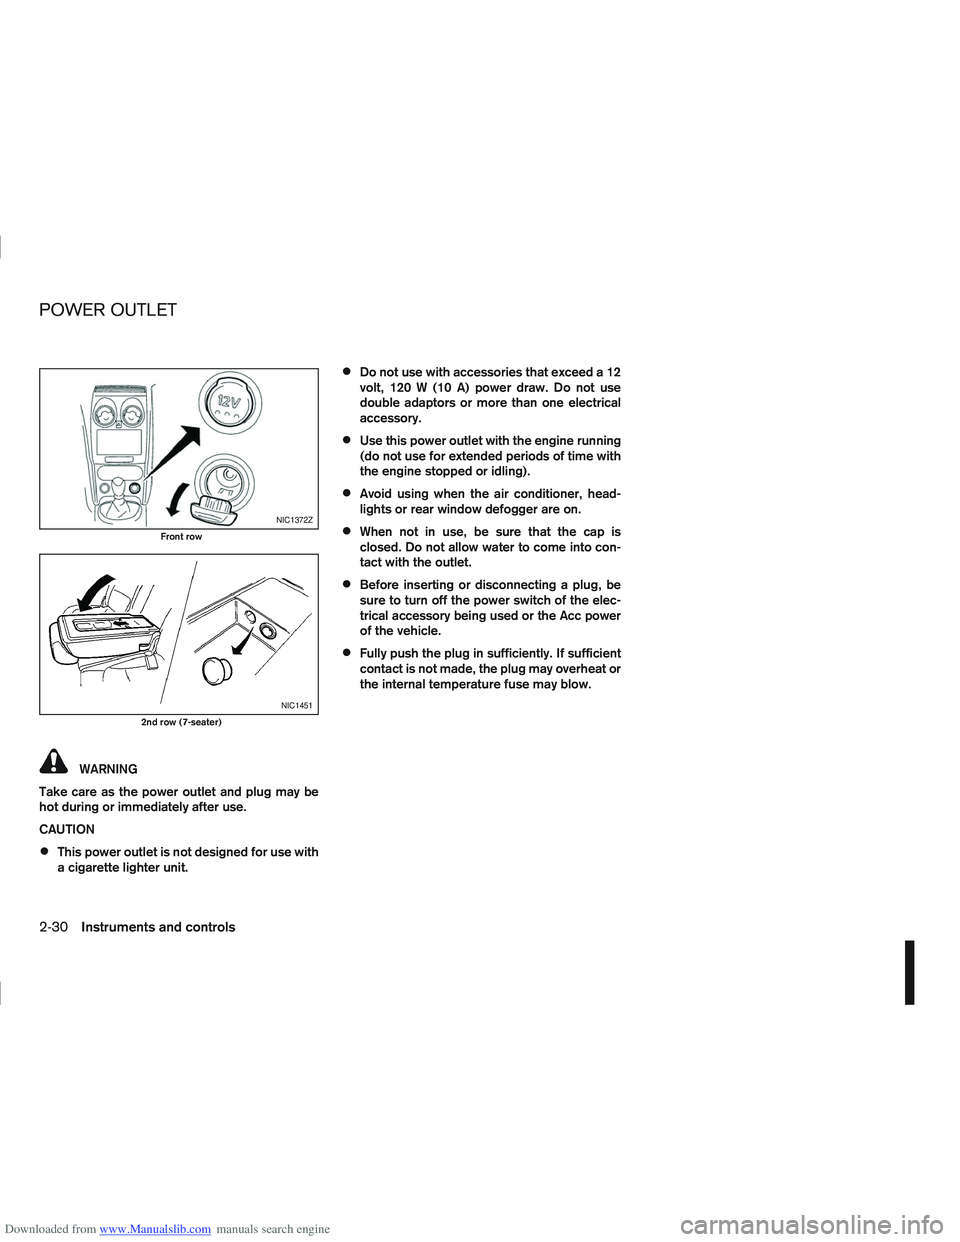
NIC1372Z
Front row
NIC1451
2nd row (7-seater)
POWER OUTLET
2-30Instruments and controls
Page 89 of 297
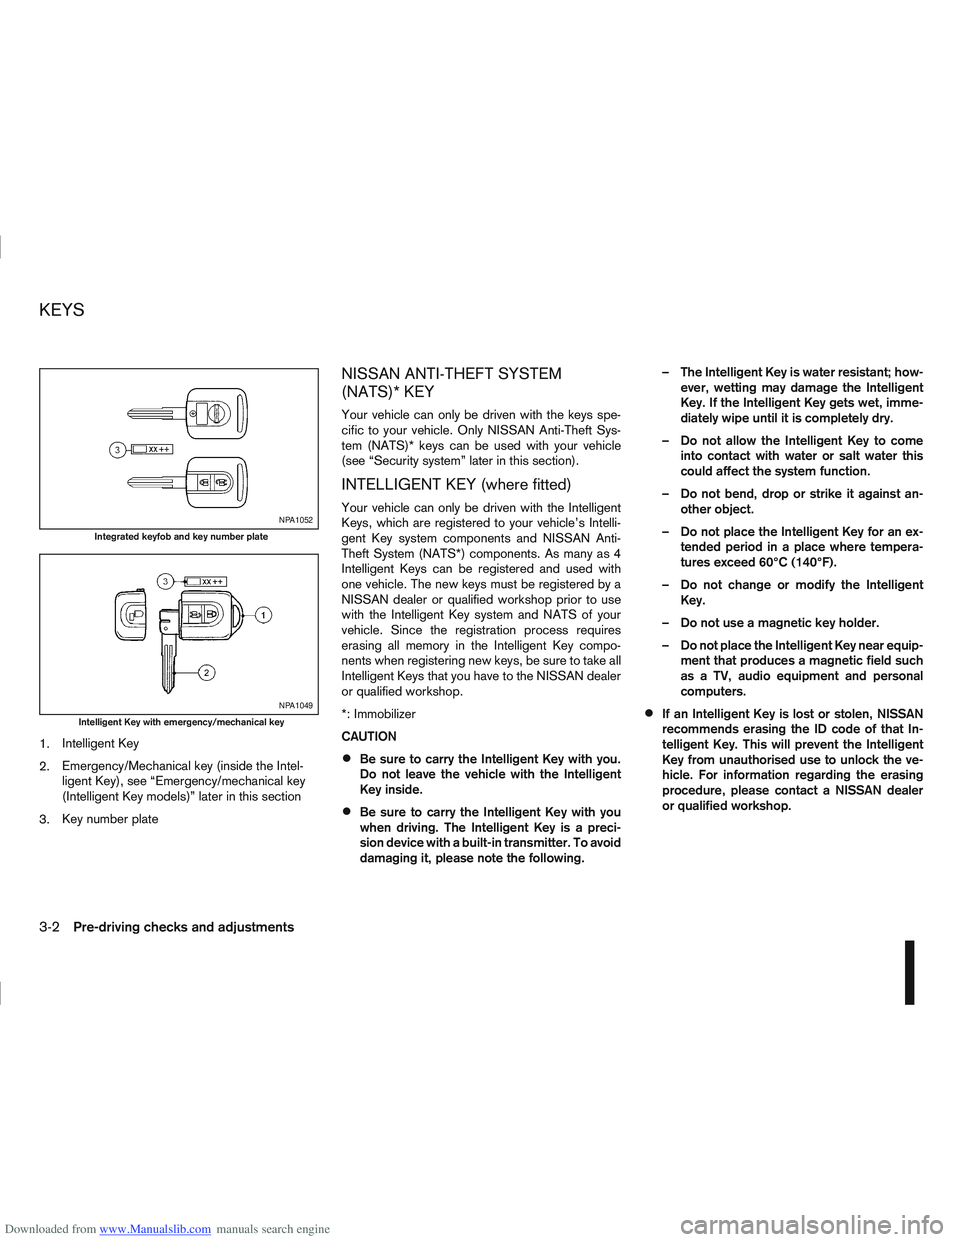
Downloaded from www.Manualslib.com manuals search engine 1.Intelligent Key
2. Emergency/Mechanical key (inside the Intel-
ligent Key), see “Emergency/mechanical key
(Intelligent Key models)” later in this section
3. Key number plate
NISSAN ANTI-THEFT SYSTEM
(NATS)* KEY
Your vehicle can only be driven with the keys spe-
cific to your vehicle. Only NISSAN Anti-Theft Sys-
tem (NATS)* keys can be used with your vehicle
(see “Security system” later in this section).
INTELLIGENT KEY (where fitted)
Your vehicle can only be driven with the Intelligent
Keys, which are registered to your vehicle’s Intelli-
gent Key system components and NISSAN Anti-
Theft System (NATS*) components. As many as 4
Intelligent Keys can be registered and used with
one vehicle. The new keys must be registered by a
NISSAN dealer or qualified workshop prior to use
with the Intelligent Key system and NATS of your
vehicle. Since the registration process requires
erasing all memory in the Intelligent Key compo-
nents when registering new keys, be sure to take all
Intelligent Keys that you have to the NISSAN dealer
or qualified workshop.
*: Immobilizer
CAUTION
Be sure to carry the Intelligent Key with you.
Do not leave the vehicle with the Intelligent
Key inside.
Be sure to carry the Intelligent Key with you
when driving. The Intelligent Key is a preci-
sion device with a built-in transmitter. To avoid
damaging it, please note the following. – The Intelligent Key is water resistant; how-
ever, wetting may damage the Intelligent
Key. If the Intelligent Key gets wet, imme-
diately wipe until it is completely dry.
– Do not allow the Intelligent Key to come into contact with water or salt water this
could affect the system function.
– Do not bend, drop or strike it against an- other object.
– Do not place the Intelligent Key for an ex- tended period in a place where tempera-
tures exceed 60°C (140°F).
– Do not change or modify the Intelligent Key.
– Do not use a magnetic key holder.
– Do not place the Intelligent Key near equip- ment that produces a magnetic field such
as a TV, audio equipment and personal
computers.
If an Intelligent Key is lost or stolen, NISSAN
recommends erasing the ID code of that In-
telligent Key. This will prevent the Intelligent
Key from unauthorised use to unlock the ve-
hicle. For information regarding the erasing
procedure, please contact a NISSAN dealer
or qualified workshop.
NPA1052
Integrated keyfob and key number plate
NPA1049
Intelligent Key with emergency/mechanical key
KEYS
3-2Pre-driving checks and adjustments
Page 91 of 297
Downloaded from www.Manualslib.com manuals search engine use of additional remote controllers, contact a
NISSAN dealer or qualified workshop.
The integrated keyfob will not function under the fol-
lowing conditions:
When the distance between the integrated key-
fob and vehicle is more than approximately 5 m
(15 ft).
When the integrated keyfob battery is
discharged.
When the key is in the ignition switch.
All doors can be locked or unlocked from the out-
side by pressing the “LOCK”
or “UNLOCK”button on the integrated keyfob.
For Super Lock system models only (RHD mod-
els):
When the vehicle is occupied, never lock the
doors with the integrated keyfob. Doing so will
trap the occupants, since the Super Lock system
prevents the doors from being opened from the
inside.
WARNING
Only operate the integrated keyfob lock button in
full and clear view of the vehicle to prevent any-
body being trapped inside the vehicle.
CAUTION
When locking the doors using the integrated
keyfob, be sure not to leave the key in the
vehicle.
Always remove the ignition key or Intelligent
Key, close all windows before operating the
keyfob door lock system.
Ensure that the driver’s door is securely
closed before operating the integrated keyfob
door lock system for correct operation of the
system.
Do not allow the integrated keyfob, which
contains electrical components, to come into
contact with water or salt water. This could
affect the system function.
Do not drop the integrated keyfob.
Do not strike the integrated keyfob sharply
against another object.
Do not place the integrated keyfob for an ex-
tended period in an area where temperatures
exceed 60°C (140°F).
If a integrated keyfob is lost or stolen, NISSAN rec-
ommends erasing the ID code of that integrated
keyfob from the vehicle. This may prevent the unau-
thorised use of the integrated keyfob to unlock the
vehicle. For information regarding the erasing pro-
cedure, contact a NISSAN dealer or qualified work-
shop.
For information regarding the replacement of a bat-
tery, see “Battery” in the “8. Maintenance and
do-it-yourself” section.
SWITCHING FROM CONVENIENCE
MODE TO ANTI-HIJACK MODE
Selective unlock or “Anti-hijack” mode allows the
remote unlocking of only the driver’s door to prevent
an attacker from entering the vehicle via an unlocked
passenger door.
As default, the unlock mode will be set to “Conve-
nience” mode (all doors will unlock). Follow the in-
structions below to switch between convenience
mode and anti-hijack mode.
jA Key with integrated keyfob (from
outside the vehicle)
1. Turn the ignition switch to the “OFF” position.
2. Press and hold both the “LOCK”
and “UN-
LOCK”buttons for 5 seconds.
Setting anti-hijack mode:
– The direction indicators flash once.
Setting convenience mode:
– The direction indicators flash three times.
jB Intelligent Key
1. Turn the ignition switch from ON to LOCK and
exit the vehicle.
2. From outside the vehicle, lock the vehicle using the integrated keyfob “LOCK” button
.
3. Press and hold both the “LOCK”
and “UN-
LOCK”buttons for 10 seconds.
4. Within 3 seconds, press and hold the driver’s
3-4Pre-driving checks and adjustments
Page 103 of 297
Downloaded from www.Manualslib.com manuals search engine the fuel system and emission control system.
An incorrect cap can result in a serious mal-
function and possible injury.
CAUTION
If fuel is spilled on the vehicle body, flush it away
with water to avoid paint damage.
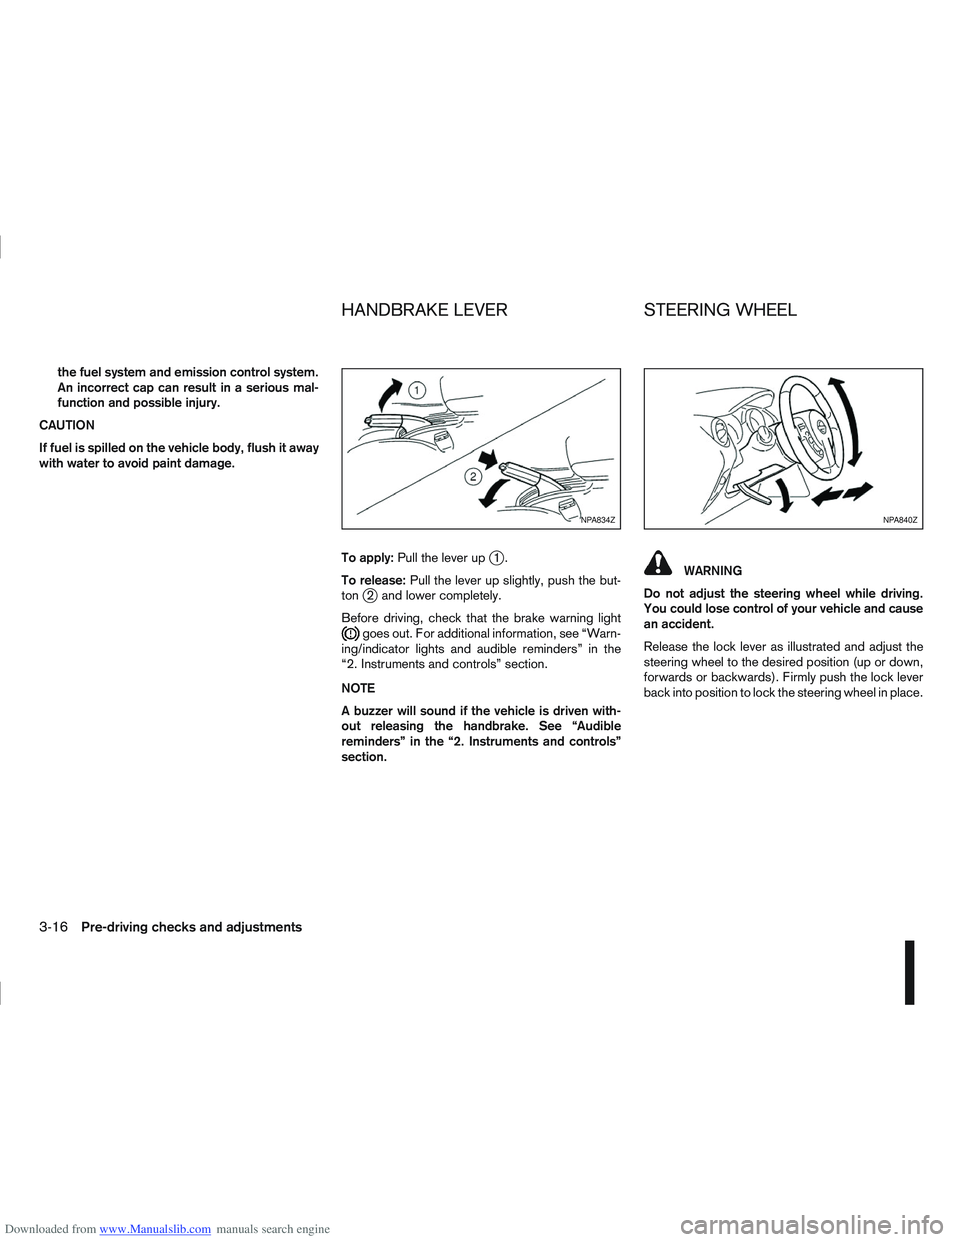
To apply:Pull the lever up
j1.
To release: Pull the lever up slightly, push the but-
ton
j2 and lower completely.
Before driving, check that the brake warning light
goes out. For additional information, see “Warn-
ing/indicator lights and audible reminders” in the
“2. Instruments and controls” section.
NOTE
A buzzer will sound if the vehicle is driven with-
out releasing the handbrake. See “Audible
reminders” in the “2. Instruments and controls”
section.
WARNING
Do not adjust the steering wheel while driving.
You could lose control of your vehicle and cause
an accident.
Release the lock lever as illustrated and adjust the
steering wheel to the desired position (up or down,
forwards or backwards). Firmly push the lock lever
back into position to lock the steering wheel in place.
NPA834ZNPA840Z
HANDBRAKE LEVER STEERING WHEEL
3-16Pre-driving checks and adjustments
Page 109 of 297
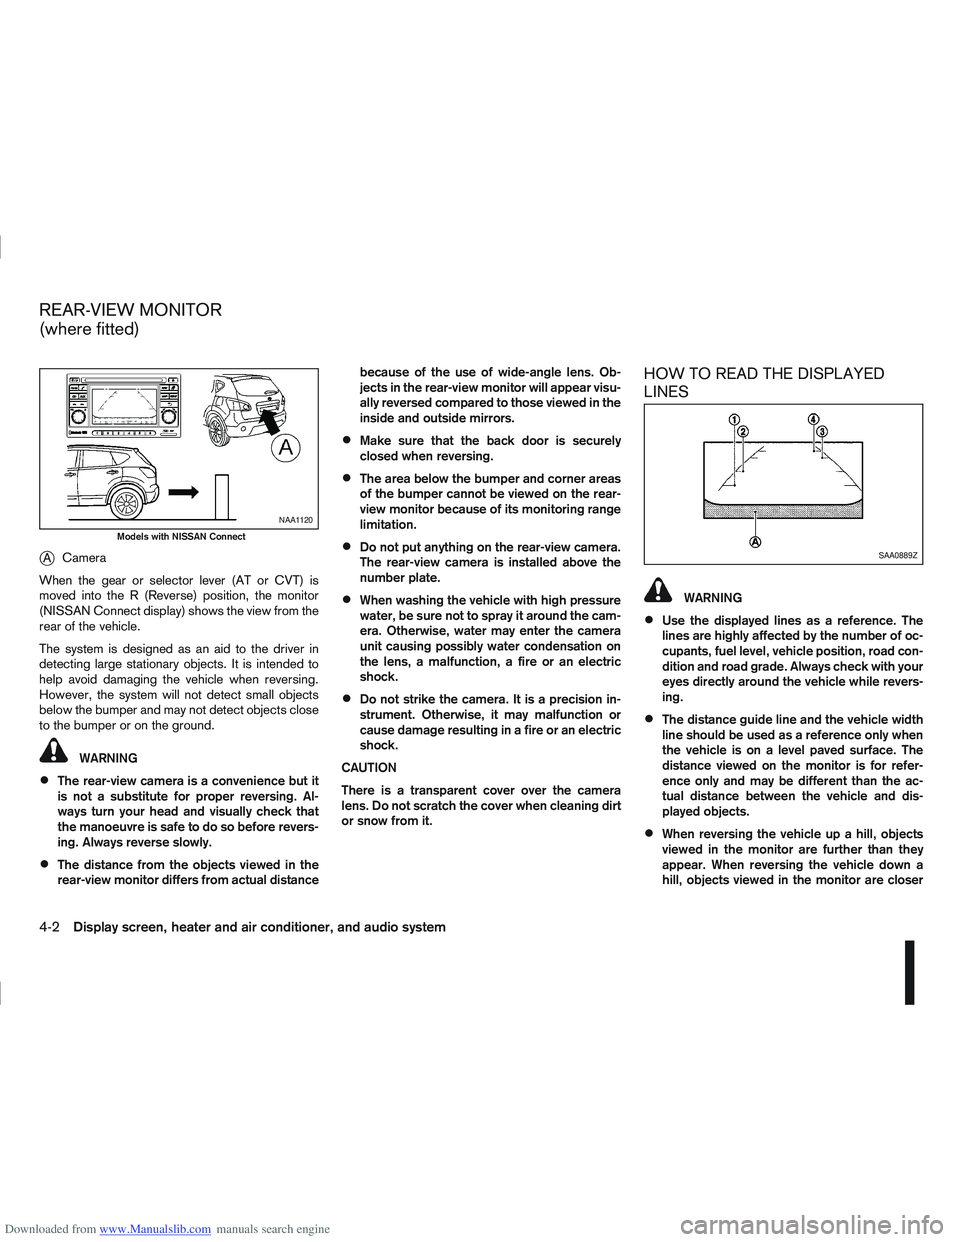
Downloaded from www.Manualslib.com manuals search engine jACamera
When the gear or selector lever (AT or CVT) is
moved into the R (Reverse) position, the monitor
(NISSAN Connect display) shows the view from the
rear of the vehicle.
The system is designed as an aid to the driver in
detecting large stationary objects. It is intended to
help avoid damaging the vehicle when reversing.
However, the system will not detect small objects
below the bumper and may not detect objects close
to the bumper or on the ground.
WARNING
The rear-view camera is a convenience but it
is not a substitute for proper reversing. Al-
ways turn your head and visually check that
the manoeuvre is safe to do so before revers-
ing. Always reverse slowly.
The distance from the objects viewed in the
rear-view monitor differs from actual distance because of the use of wide-angle lens. Ob-
jects in the rear-view monitor will appear visu-
ally reversed compared to those viewed in the
inside and outside mirrors.
Make sure that the back door is securely
closed when reversing.
The area below the bumper and corner areas
of the bumper cannot be viewed on the rear-
view monitor because of its monitoring range
limitation.
Do not put anything on the rear-view camera.
The rear-view camera is installed above the
number plate.
When washing the vehicle with high pressure
water, be sure not to spray it around the cam-
era. Otherwise, water may enter the camera
unit causing possibly water condensation on
the lens, a malfunction, a fire or an electric
shock.
Do not strike the camera. It is a precision in-
strument. Otherwise, it may malfunction or
cause damage resulting in a fire or an electric
shock.
CAUTION
There is a transparent cover over the camera
lens. Do not scratch the cover when cleaning dirt
or snow from it.
HOW TO READ THE DISPLAYED
LINES
WARNING
Use the displayed lines as a reference. The
lines are highly affected by the number of oc-
cupants, fuel level, vehicle position, road con-
dition and road grade. Always check with your
eyes directly around the vehicle while revers-
ing.
The distance guide line and the vehicle width
line should be used as a reference only when
the vehicle is on a level paved surface. The
distance viewed on the monitor is for refer-
ence only and may be different than the ac-
tual distance between the vehicle and dis-
played objects.
When reversing the vehicle up a hill, objects
viewed in the monitor are further than they
appear. When reversing the vehicle down a
hill, objects viewed in the monitor are closer
NAA1120
Models with NISSAN Connect
SAA0889Z
REAR-VIEW MONITOR
(where fitted)
4-2Display screen, heater and air conditioner, and audio system