2009 NISSAN QASHQAI water
[x] Cancel search: waterPage 238 of 297
Downloaded from www.Manualslib.com manuals search engine HR16DE, MR20DE, M9R or R9M
engine
1. Set the heater or air conditioner temperaturecontrol to the maximum “HOT” position.
2. Open the bonnet. For details, see “Bonnet release” in the “3. Pre-driving checks and
adjustments” section.
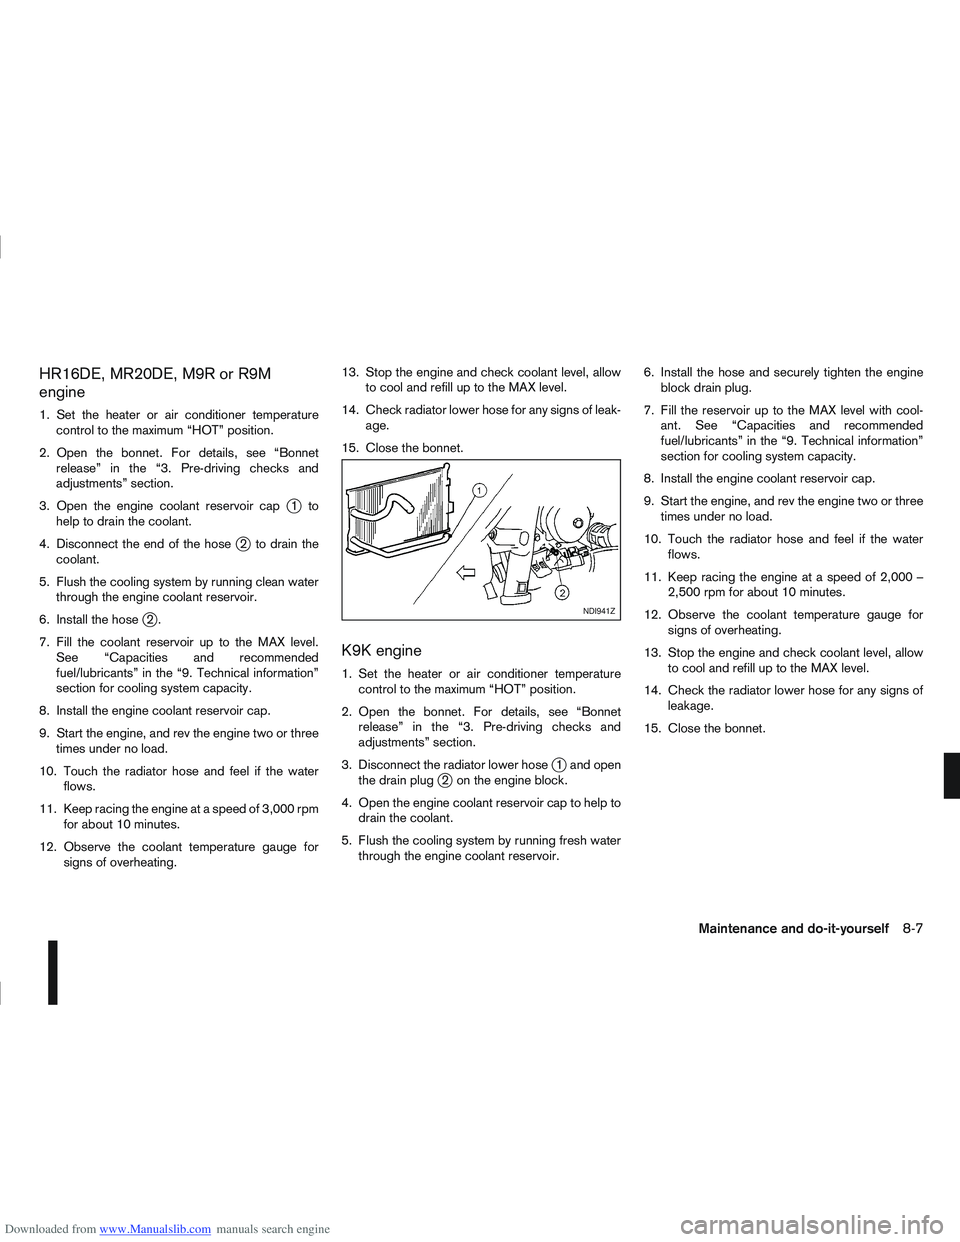
3. Open the engine coolant reservoir cap
j1to
help to drain the coolant.
4. Disconnect the end of the hose
j2 to drain the
coolant.
5. Flush the cooling system by running clean water through the engine coolant reservoir.
6. Install the hose
j2.
7. Fill the coolant reservoir up to the MAX level. See “Capacities and recommended
fuel/lubricants” in the “9. Technical information”
section for cooling system capacity.
8. Install the engine coolant reservoir cap.
9. Start the engine, and rev the engine two or three times under no load.
10. Touch the radiator hose and feel if the water flows.
11. Keep racing the engine at a speed of 3,000 rpm for about 10 minutes.
12. Observe the coolant temperature gauge for signs of overheating. 13. Stop the engine and check coolant level, allow
to cool and refill up to the MAX level.
14. Check radiator lower hose for any signs of leak- age.
15. Close the bonnet.
K9K engine
1. Set the heater or air conditioner temperature control to the maximum “HOT” position.
2. Open the bonnet. For details, see “Bonnet release” in the “3. Pre-driving checks and
adjustments” section.
3. Disconnect the radiator lower hose
j1 and open
the drain plugj2 on the engine block.
4. Open the engine coolant reservoir cap to help to drain the coolant.
5. Flush the cooling system by running fresh water through the engine coolant reservoir. 6. Install the hose and securely tighten the engine
block drain plug.
7. Fill the reservoir up to the MAX level with cool- ant. See “Capacities and recommended
fuel/lubricants” in the “9. Technical information”
section for cooling system capacity.
8. Install the engine coolant reservoir cap.
9. Start the engine, and rev the engine two or three times under no load.
10. Touch the radiator hose and feel if the water flows.
11. Keep racing the engine at a speed of 2,000 – 2,500 rpm for about 10 minutes.
12. Observe the coolant temperature gauge for signs of overheating.
13. Stop the engine and check coolant level, allow to cool and refill up to the MAX level.
14. Check the radiator lower hose for any signs of leakage.
15. Close the bonnet.
NDI941Z
Maintenance and do-it-yourself8-7
Page 240 of 297
Downloaded from www.Manualslib.com manuals search engine 1. Park the vehicle on a level surface and apply thehandbrake.
2. Start the engine. If the engine is cold, start and let the engine idle until it reaches the operational
temperature.
3. Turn the engine off.
4. Wait at least 10 minutes for the engine oil to drain back into the oil pan.
5. Open the bonnet. For details, see “Bonnet release” in the “3. Pre-driving checks and
adjustments” section.
6. Remove the dipstick and wipe it clean. Models with M9R engine: the engine oil dipstick
is attached to the engine oil filler cap. Remove
the engine oil filler cap and wipe the dipstick
clean.
7. Reinsert it all the way. Models with M9R engine: install the engine oil
filler cap.
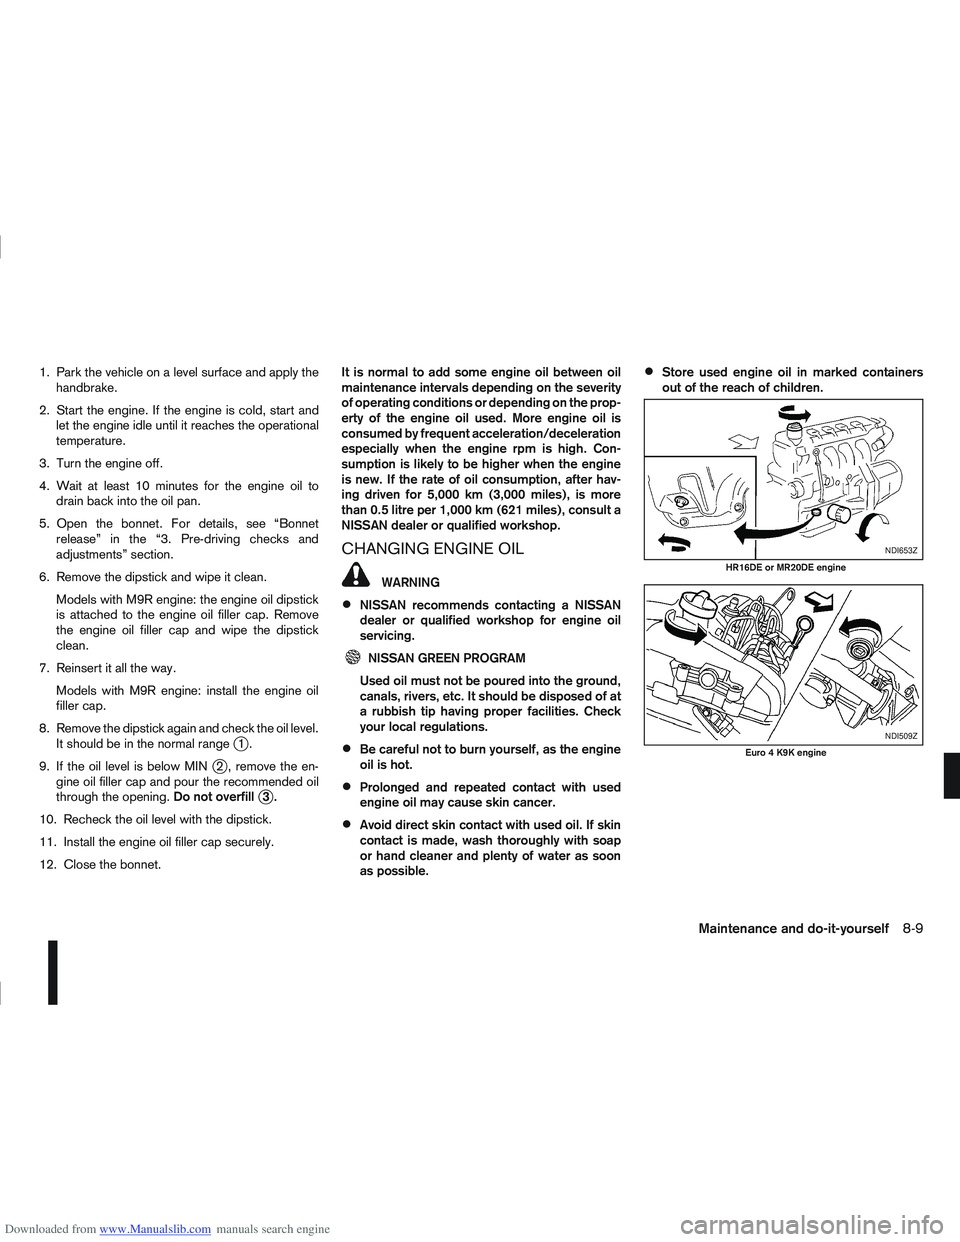
8. Remove the dipstick again and check the oil level. It should be in the normal range
j1.
9. If the oil level is below MIN
j2 , remove the en-
gine oil filler cap and pour the recommended oil
through the opening. Do not overfill
j3.
10. Recheck the oil level with the dipstick.
11. Install the engine oil filler cap securely.
12. Close the bonnet. It is normal to add some engine oil between oil
maintenance intervals depending on the severity
of operating conditions or depending on the prop-
erty of the engine oil used. More engine oil is
consumed by frequent acceleration/deceleration
especially when the engine rpm is high. Con-
sumption is likely to be higher when the engine
is new. If the rate of oil consumption, after hav-
ing driven for 5,000 km (3,000 miles), is more
than 0.5 litre per 1,000 km (621 miles), consult a
NISSAN dealer or qualified workshop.
CHANGING ENGINE OIL
WARNING
NISSAN recommends contacting a NISSAN
dealer or qualified workshop for engine oil
servicing.
NISSAN GREEN PROGRAM
Used oil must not be poured into the ground,
canals, rivers, etc. It should be disposed of at
a rubbish tip having proper facilities. Check
your local regulations.
Be careful not to burn yourself, as the engine
oil is hot.
Prolonged and repeated contact with used
engine oil may cause skin cancer.
Avoid direct skin contact with used oil. If skin
contact is made, wash thoroughly with soap
or hand cleaner and plenty of water as soon
as possible.
Store used engine oil in marked containers
out of the reach of children.
NDI653Z
HR16DE or MR20DE engine
NDI509Z
Euro 4 K9K engine
Maintenance and do-it-yourself8-9
Page 244 of 297

Downloaded from www.Manualslib.com manuals search engine 12. Lower the vehicle carefully to the ground.
13. Close the bonnet.
PROTECT THE ENVIRONMENT
NISSAN GREEN PROGRAM
It is illegal to pollute drains, water courses and soil.
Use authorised waste collection facilities, including
civic amenity sites and garages providing facilities
for the disposal of used oil and used oil filters. If in
doubt, contact your local authority for advice on dis-
posal.
The regulations concerning the pollution of the
environment will vary from country to country.
DRAINING WATER
Drain the water from the fuel filter:
– Every time you perform an engine oil change.
– When the water in fuel filter warning light
(orange) comes on or flashes irregularly.
Except for models with R9M diesel engine.
Proceed as follows:
1. Connect a suitable drain hose
j1 to the drain
plugj2.
2. Place a drain pan
j3 under the hosej1.
3. Loosen manually the drain plug
j2 with4to5
turns and operate the priming pumpj4 to drain
the water out of the fuel filter.
CAUTION
The water from the fuel filter is drained
with fuel. Prepare a larger capacity pan
than the volume of the fuel filter.
Drained water is mixed with fuel and take
precautions to prevent the fuel from ad-
hering to rubber parts such as engine
mounting insulator.
4. After draining, close the drain plug manually. CAUTION
If the drain plug is tightened excessively, it
can be damaged and as a result, fuel will
leak.
Do not use tools to tighten the drain plug.
5. Bleed air from the fuel system. For details, see “Bleeding the fuel system” later in this section.
6. Start the engine and make sure there is no fuel leakage. Correct as required.
For models with R9M diesel engine
Contact a NISSAN dealer or qualified workshop.
NDI916Z
Except for models with R9M diesel engine
FUEL FILTER (Diesel engine
models)
Maintenance and do-it-yourself8-13
Page 246 of 297

Downloaded from www.Manualslib.com manuals search engine CHECKING BRAKE PEDAL
If the brake pedal suddenly goes down further than
normal, the pedal feels “spongy” or the vehicle
seems to take longer to stop, see a NISSAN dealer
or qualified workshop.
CHECKING HANDBRAKE
Periodically check the holding ability of the hand-
brake by parking on a steep hill and restraining the
vehicle by using only the handbrake. If it does not
hold satisfactorily, see a NISSAN dealer or qualified
workshop.
jALHD models
jB RHD models
WARNING
Use only new fluid. Old, inferior, or contami-
nated fluid may damage the brake and clutch
systems. The use of improper fluids can dam-
age the brake system and affect the vehicle’s
stopping ability.
Clean the filler cap before removing.
Brake and clutch fluids are poisonous and
should be stored carefully in marked contain-
ers out of the reach of children.
Check the fluid level in the reservoir. If the fluid level
is between the MIN
j2 and MAXj1 lines or the
brake warning light comes on, add fluid up to the
MAX line. See “Capacities and recommended fuel/lubricants”
in the “9. Technical information” section for the rec-
ommended brake and clutch fluid type.
If fluid must be added frequently, the system should
be thoroughly checked by a NISSAN dealer or quali-
fied workshop.
CAUTION
NISSAN recommends that refilling and check-
ing the brake and clutch systems should be
left to a NISSAN dealer or qualified workshop
who will have the necessary fluids and techni-
cal knowledge.
Do not spill the fluid on painted surfaces. This
will damage the paint. If fluid is spilled, wash
with water.
NDI1038
BRAKES
BRAKE AND CLUTCH FLUID
Maintenance and do-it-yourself8-15
Page 247 of 297
Downloaded from www.Manualslib.com manuals search engine WARNING
Anti-freeze window washer is poisonous and
should be stored carefully in marked containers
out of the reach of children.
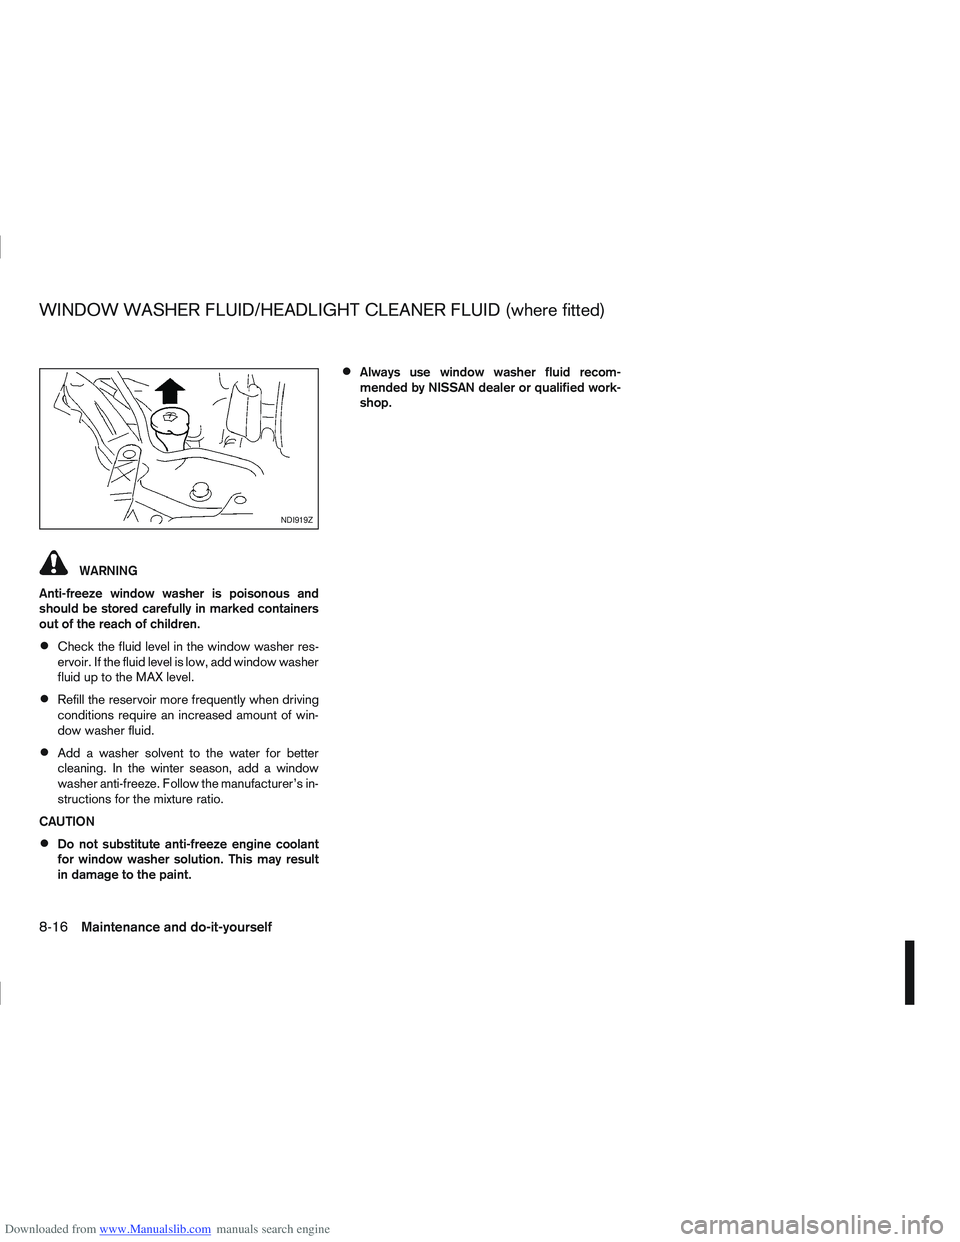
Check the fluid level in the window washer res-
ervoir. If the fluid level is low, add window washer
fluid up to the MAX level.
Refill the reservoir more frequently when driving
conditions require an increased amount of win-
dow washer fluid.
Add a washer solvent to the water for better
cleaning. In the winter season, add a window
washer anti-freeze. Follow the manufacturer’s in-
structions for the mixture ratio.
CAUTION
Do not substitute anti-freeze engine coolant
for window washer solution. This may result
in damage to the paint.
Always use window washer fluid recom-
mended by NISSAN dealer or qualified work-
shop.
NDI919Z
WINDOW WASHER FLUID/HEADLIGHT CLEANER FLUID (where fitted)
8-16Maintenance and do-it-yourself
Page 248 of 297
Downloaded from www.Manualslib.com manuals search engine VEHICLE BATTERY
WARNING
Do not operate the vehicle if the fluid in the bat-
tery is low. Low battery fluid can cause a higher
load on the battery which can generate heat, re-
duce battery life, and in some cases lead to an
explosion.
Keep the battery surface clean and dry. Any cor-
rosion should be washed off with a solution of
baking soda and water.
Make certain the terminal connections are clean
and securely tightened.
If the vehicle is not used for 30 days or longer,
disconnect the “–” negative battery terminal
cable to prevent discharge.
If battery replacement or check is required, con-
tact a NISSAN dealer or qualified workshop.
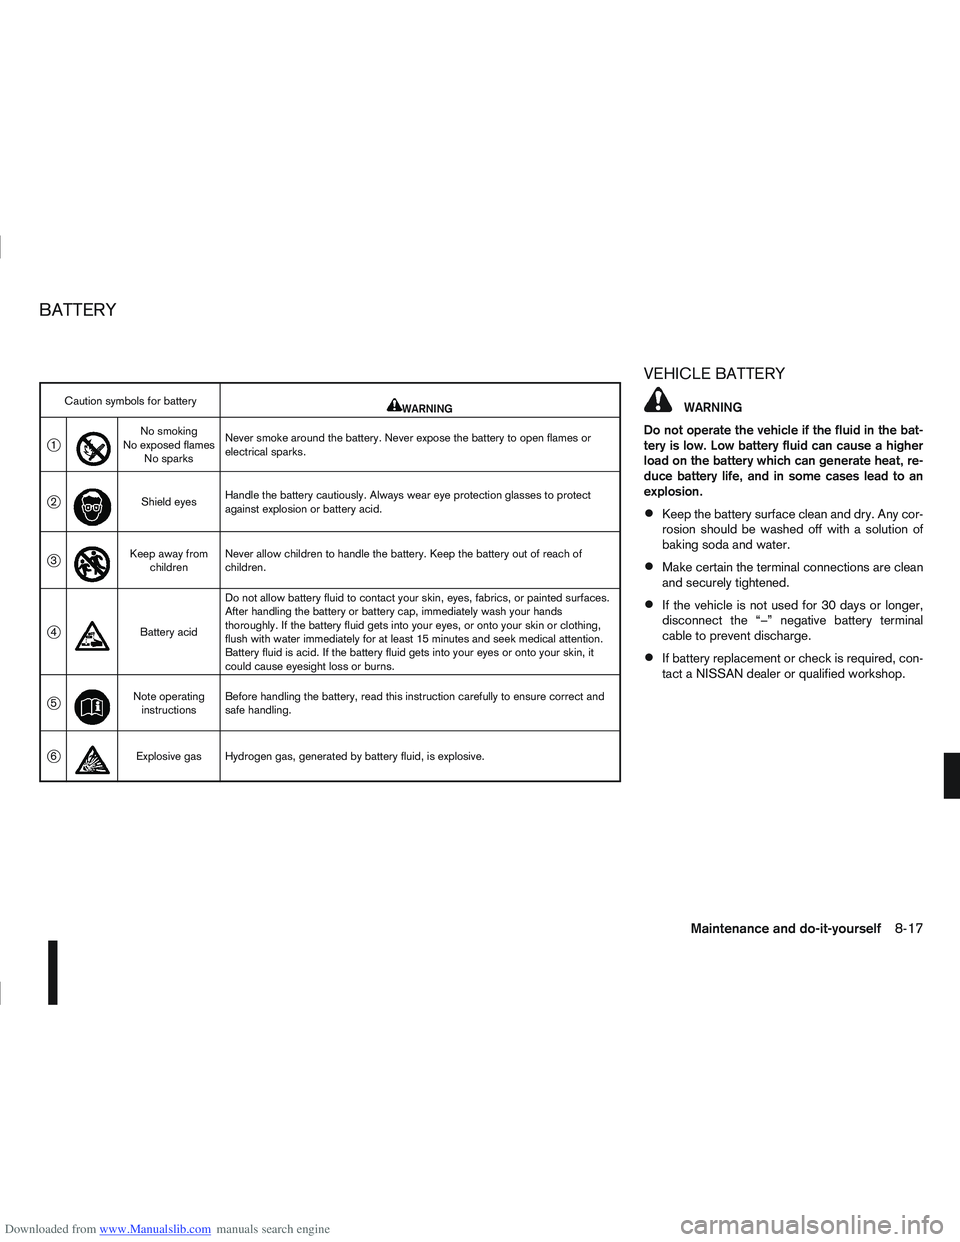
Caution symbols for batterymWARNING
j1
m
No smoking
No exposed flames No sparks Never smoke around the battery. Never expose the battery to open flames or
electrical sparks.
j2
m
Shield eyes
Handle the battery cautiously. Always wear eye protection glasses to protect
against explosion or battery acid.
j3
m
Keep away from
children Never allow children to handle the battery. Keep the battery out of reach of
children.
j4
m
Battery acid Do not allow battery fluid to contact your skin, eyes, fabrics, or painted surfaces.
After handling the battery or battery cap, immediately wash your hands
thoroughly. If the battery fluid gets into your eyes, or onto your skin or clothing,
flush with water immediately for at least 15 minutes and seek medical attention.
Battery fluid is acid. If the battery fluid gets into your eyes or onto your skin, it
could cause eyesight loss or burns.
j5
m
Note operating
instructions Before handling the battery, read this instruction carefully to ensure correct and
safe handling.
j6mExplosive gas Hydrogen gas, generated by battery fluid, is explosive.
BATTERY
Maintenance and do-it-yourself8-17
Page 249 of 297

Downloaded from www.Manualslib.com manuals search engine Battery (Type A)
Check the fluid level in each cell. It should be be-
tween the UPPERj1 and LOWERj2 level lines.
If it is necessary to add fluid, add only distilled water
to bring the level to the indicator in each filler open-
ing. Do not overfill.
1. Remove the cell plugs
jA using a suitable tool.
j1 OK
j2ADD
2. Add distilled water up to the UPPER level line
j1.
If the side of the battery is not clear, check the
electrolyte water level by looking directly above
the cell, as illustrated.
3. Tighten cell plugs.
CAUTION
Do not overfill battery cells. Excessive electrolyte
may leak out of the battery during charging, and
cause paint damage.
Maintenance free battery (Type B)
For a maintenance free battery it is not required to
check the fluid level. However, NISSAN recom-
mends to visually check the green indicator
jA sta-
tus periodically. If it is not visible, replace the battery
as soon as possible.
Reinitialisation procedure after battery
reconnection
If the battery has been reconnected, check the fol-
lowing items:
Re-enter the anti-theft system code (where fit-
ted). For details, see the separately provided
NISSAN Connect Owner’s Manual.
Clock setting. For details, see “Vehicle informa-
tion display” in the “2. Instruments and controls”
section or the separately provided NISSAN Con-
nect (where fitted) Owner’s Manual.
The C-View® sunshade or power window sys-
tem may need to be reinitialised. For details, see
“C-View® glass roof (where fitted)” in the “2. In-
struments and controls” section or “Windows”
in the “2. Instruments and controls” section.
Models with Stop/Start System
Ensure that the battery fitted is the special bat-
tery that is enhanced with regard to the charge-
discharge capacity and life performance. Avoid
using any other battery for the Stop/Start Sys-
tem, as this may cause early deterioration of the
battery or a malfunction of the Stop/Start Sys-
tem. It is recommended that a Genuine NISSAN
battery is fitted. For more information, contact a
NISSAN dealer or qualified workshop.
If the battery terminal is disconnected (for bat-
tery replacement, etc.) and then reconnected,
there may be some delay before the Stop/Start
System reactivates.
DI0137MAZ
NDI688Z
Indicator
NDI920Z
8-18Maintenance and do-it-yourself
Page 253 of 297
Downloaded from www.Manualslib.com manuals search engine Be careful when working on the engine with-
out the air cleaner filter.
VISCOUS PAPER TYPE
The filter elementjA should not be cleaned and
reused.
Replace it according to the maintenance schedule
shown in the separately provided Warranty Informa-
tion & Maintenance Booklet. When replacing the fil-
ter, wipe the inside of the air cleaner housing and
the cover with a damp cloth.
DRY PAPER TYPE (where fitted)
Check the filter elementjA to see if it is dirty. If it is
dirty, shake the element to remove dust.
Clean or replace it according to the maintenance
schedule shown in the separately provided War-
ranty Information & Maintenance Booklet. When
cleaning or replacing the filter, wipe the inside of the
air cleaner housing and the cover with a damp cloth.
CLEANING
If the windscreen or back door window is not clear
after using the window washer or if a wiper blade
chatters when running, wax or other material may be
on the blade or windscreen.
Clean the outside of the windscreen or back door
window with a washer solution or a mild detergent.
The windscreen or back door window is clean if
beads do not form when rinsing with clear water.
Clean the blade by wiping it with a cloth soaked in a
washer solution or a mild detergent. Then rinse the
blade with clear water. If the windscreen or back
door window is still not clear after cleaning the
blades and using the wiper, replace the blades.
CAUTION
After wiper blade replacement, return the
wiper arm to its original position. Otherwise it
may be damaged when the bonnet is opened.
Make sure the wiper blade contacts the glass.
Otherwise, the arm may be damaged from
wind pressure.
Do not open the bonnet when the front wiper
is in the servicing position other wise it can
damage the paint surface of the bonnet.
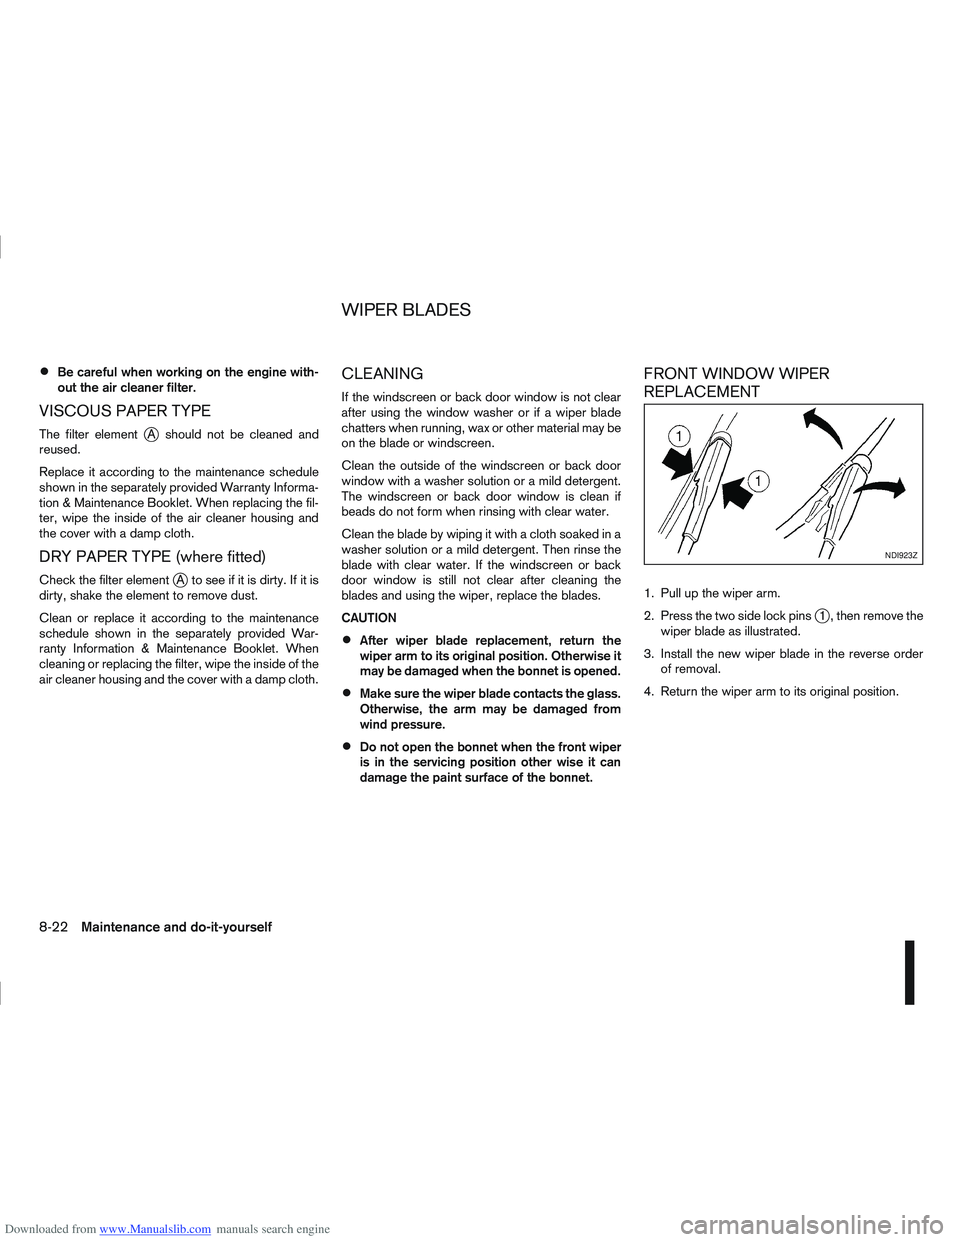
FRONT WINDOW WIPER
REPLACEMENT
1. Pull up the wiper arm.
2. Press the two side lock pins
j1 , then remove the
wiper blade as illustrated.
3. Install the new wiper blade in the reverse order of removal.
4. Return the wiper arm to its original position.
NDI923Z
WIPER BLADES
8-22Maintenance and do-it-yourself