2009 NISSAN QASHQAI Technical
[x] Cancel search: TechnicalPage 4 of 297

Downloaded from www.Manualslib.com manuals search engine ContentsIllustrated table of contents0
Safety — seats, seat belts and supplemental
restraint system1
Instruments and controls2
Pre-driving checks and adjustments3
Display screen, heater and air conditioner, and
audio system4
Starting and driving5
In case of emergency6
Appearance and care7
Maintenance and do-it-yourself8
Technical information9
Index10
Page 53 of 297
Downloaded from www.Manualslib.com manuals search engine If the light comes on while the engine is running, it
may indicate that the anti-lock portion of the braking
system is not functioning properly. Have the system
checked by a NISSAN dealer or qualified workshop.
Brake warning light
This light functions for both the handbrake and the
footbrake systems.
Handbrake indicator:
The light comes on when the handbrake is applied.
Low brake fluid warning:
The light warns of a low brake fluid level. If the light
comes on while the engine is running with the hand-
brake not applied, stop the vehicle and perform the
following procedure:
1. Check the brake fluid level. Add brake fluid asnecessary. See “Brake and clutch fluid” in the
“8. Maintenance and do-it-yourself” section.
WARNING
If the level is below the MIN (minimum) mark
on the brake fluid reservoir, do not drive until
the brake system has been checked at a
NISSAN dealer or qualified workshop.
2. If the brake fluid level is correct: Have the warning system checked by a NISSAN
dealer or qualified workshop.
WARNING
Driving your vehicle could be dangerous. Have
it towed to the nearest NISSAN dealer or quali-
fied workshop.
Depressing the brake pedal with the engine
stopped could increase your stopping dis-
tance and require greater pedal travel dis-
tance and effort.
Charge warning light
If the light comes on while the engine is running, it
may indicate that the charging system is not func-
tioning properly. Turn the engine off and check the
alternator belt. If the belt is loose, broken, missing
or if the light remains on, see a NISSAN dealer or
qualified workshop immediately.
CAUTION
Do not continue driving if the alternator belt is
loose, broken or missing.
Diesel Particulate Filter (DPF)
warning light (where fitted)
WARNING
Be careful not to burn yourself with exhaust
gases.
Do not park the vehicle over flammable mate-
rials such as dry grass, waste paper or rags,
as they may burn easily.
If the vehicle continues to be driven at a low
speed with the DPF warning light illuminated,
the fail-safe will limit engine revolutions and/
or torque. In this case, the engine oil must be
replaced and the process of burning accumu-
lated particulate matter must be carried out
by a NISSAN dealer or qualified workshop.
Service regeneration is a maintenance item
and is not covered by the NISSAN warranty.
Use engine oil for DPF equipped models. For
details, see “Capacities and recommended
fuel/lubricants” in the “9. Technical
information” section.
CAUTION
The DPF becomes extremely hot after burning
particulate matter.
M9R engine only:
When the ignition switch is turned to the ON posi-
tion, the Diesel Particulate Filter (DPF) warning light
illuminates for a few seconds and then goes out.
This indicates that the system is operational.
All diesel engines:
NISSAN GREEN PROGRAM
Some diesel engine models are fitted with a Diesel
Particulate Filter (DPF), which is a device that re-
moves carbon (soot) from the exhaust gas. To oper-
ate effectively, the DPF system must routinely con-
duct a cleaning operation, called regeneration, that
2-4Instruments and controls
Page 167 of 297
Downloaded from www.Manualslib.com manuals search engine Utility vehicles have a significantly higher rollover
rate than other types of vehicles.
They have higher ground clearance than passenger
cars to make them capable of performing in a wide
variety of on-pavement and off-road applications.
This gives them a higher centre of gravity than ordi-
nary cars. An advantage of higher ground clearance
is a better view of the road, allowing you to antici-
pate problems. However, they are not designed for
cornering at the same speeds as conventional two-
wheel drive (2WD) vehicles any more than low-slung
sports cars are designed to perform satisfactorily
under off-road conditions. If possible, avoid sharp
turns or abrupt manoeuvres, particularly at high
speeds. As with other vehicles of this type, failure to
operate this vehicle correctly may result in loss of
control or vehicle rollover. In a rollover accident an
unbelted person is significantly more likely to be
injured than a person who is wearing a seat belt.NISSAN GREEN PROGRAM
The three-way catalyst is an emission control device
installed in the exhaust system. In the converter,
exhaust gases are burned at high temperatures to
help reduce pollutants.
CAUTION
The exhaust gas and the exhaust system are
very hot. While the engine is running, keep
people or flammable materials away from the
exhaust pipe.
Do not stop or park the vehicle over flam-
mable materials such as dry grass, waste pa-
per or rags, as they may burn easily.
When parking, ensure that people or flam-
mable materials are kept away from the ex-
haust pipe.
TO HELP PREVENT DAMAGE
CAUTION
Use UNLEADED PETROL ONLY, specifically
the recommended type. For details, see “Ca-
pacities and recommended fuel/lubricants” in
the “9. Technical information” section.
Do not use leaded petrol. Leaded petrol will
seriously damage three-way catalyst.
Deposits from leaded petrol will seriously re-
duce the three-way catalyst’s ability to help
reduce exhaust pollutants.
Keep your engine tuned up. Malfunctions in
the ignition, fuel injection, or electrical sys-
tems can cause over-rich fuel flow into the
converter, causing it to overheat.
Avoid driving with an extremely low fuel level.
Running out of fuel could cause the engine to
misfire, damaging the three-way catalyst.
Do not keep driving if the engine misfires, or
if noticeable loss of performance or other un-
usual operating conditions are detected. Have
the vehicle inspected promptly by a NISSAN
dealer or qualified workshop.
Do not race the engine while warming it up.
Do not push or tow your vehicle to start the
engine.
ON-PAVEMENT AND OFF-ROAD
DRIVING PRECAUTIONS THREE-WAY CATALYST (Petrol
engine models)
5-4Starting and driving
Page 168 of 297
Downloaded from www.Manualslib.com manuals search engine The turbocharger system uses engine oil for lubrica-
tion and cooling of its rotating components. The tur-
bocharger turbine turns at extremely high speeds
and it can reach an extremely high temperature. It is
essential to maintain a flow of clean oil through the
turbocharger system. A sudden interruption to the
oil supply may cause a malfunction in the turbo-
charger.
To ensure prolonged life and performance of the
turbocharger, it is essential to comply with the fol-
lowing maintenance procedure:
CAUTION
Change the engine oil of the turbo-charged
diesel engine as prescribed. See the sepa-
rately provided Warranty Information & Main-
tenance Booklet for additional information.
Use only the recommended engine oil. See
“Capacities and recommended
fuel/lubricants” in the “9. Technical
information” section.
If the engine has been operating at high rpm
for an extended period of time, let it idle for a
few minutes prior to shutdown.
Do not accelerate the engine to high rpm im-
mediately after starting it.
WARNING
Be careful not to burn yourself with exhaust
gases.
Do not park the vehicle over flammable mate-
rials such as dry grass, waste paper or rags,
as they may burn easily.
If the vehicle continues to be driven at a low
speed with the DPF warning light illuminated,
the fail-safe will limit engine revolutions and/
or torque. In this case, the engine oil must be
replaced and the process of burning accumu-
lated particulate matter must be carried out
by a NISSAN dealer or qualified workshop.
Service regeneration is a maintenance item
and is not covered by the NISSAN warranty.
Use engine oil for DPF equipped models. For
details, see “Capacities and recommended
fuel/lubricants” in the “9. Technical
information” section.
CAUTION
The DPF becomes extremely hot after burning
particulate matter.
NISSAN GREEN PROGRAM
Some diesel engine models are fitted with a Diesel
Particulate Filter (DPF), which is a device that re-
moves carbon (soot) from the exhaust gas. To oper-
ate effectively, the DPF system must routinely con-
duct a cleaning operation, called regeneration, that burns-off the accumulated carbon. This regenera-
tion process is normally automatic and not visible to
the driver.
REGENERATION RESTRICTIONS
Driving conditions such as frequent short journeys
or stop/start driving can result in excessive build up
of carbon in the filter. When this happens the DPF
warning light
will illuminate (and a message
will appear in the vehicle information display, see
“Vehicle information display” later in this section) to
inform you that the vehicle must be driven in a par-
ticular manner to begin regeneration.
When the DPF warning light is illuminated, provided
that legal and safety conditions allow, the vehicle
should be driven at a speed of over 60 km/h (37.5
MPH) until the DPF warning light turns off. This pro-
cess can take up to 30 minutes to complete.
IF REGENERATION FAILS
Failure to react to the DPF warning lightmay
lead to saturation of the DPF system. If this hap-
pens, the Malfunction Indicator (MI)
will also
illuminate to indicate that a Service Regeneration by
a NISSAN dealer or qualified workshop is required.
The engine speed may also be limited to 3,000 rpm
to protect the DPF system.
NOTE
Contact a NISSAN dealer or qualified workshop
to perform a forced regeneration.
TURBOCHARGER SYSTEM
(Diesel engine models) DIESEL PARTICULATE FILTER
(DPF) (where fitted)
Starting and driving5-5
Page 202 of 297

Downloaded from www.Manualslib.com manuals search engine The brake system has two separate hydraulic cir-
cuits. If one circuit malfunctions, you will still have
braking ability with two wheels.
BRAKE PRECAUTIONS
Vacuum assisted brake
The brake booster aids braking by using engine
vacuum. If the engine stops or the drive belt is bro-
ken, you can stop the vehicle by depressing the
brake pedal. However, greater foot pressure on the
brake pedal will be required to stop the vehicle and
the stopping distance will be longer.
Wet brakes
When the vehicle is washed or driven through wa-
ter, the brakes may get wet. As a result, your brak-
ing distance will be longer and the vehicle may pull
to one side during braking.
To dry brakes, drive the vehicle at a safe speed
while lightly pressing the brake pedal to heat up the
brakes. Do this until the brakes return to normal.
Avoid driving the vehicle at high speeds until the
brakes function correctly.
Using the brakes
Avoid resting your foot on the brake pedal while
driving. This will overheat the brakes, wear out the
brake linings and pads faster and reduce fuel
economy performance.
To help reduce brake wear and to prevent the brakes
from overheating, reduce speed and downshift to a
lower gear before going down a slope or long down-hill gradient. Overheated brakes may reduce brak-
ing performance and could result in loss of vehicle
control.
CAUTION
While driving on a slippery surface, be careful
when braking, accelerating or downshifting.
Abrupt braking actions or sudden acceleration
could cause the wheels to skid and result in an
accident.
Be aware that brakes will fade if repeated heavy
brake applications are made.
Driving uphill
When starting on a steep gradient, it is sometimes
difficult to operate the brake (AT or CVT models) or
both the brake and clutch (MT models). Use the
handbrake to hold the vehicle. Do not slip the clutch
(MT models). When ready to start, slowly release
the handbrake while depressing the accelerator
pedal and releasing the clutch (MT models) or de-
pressing the accelerator pedal (AT or CVT models).
Driving downhill
The engine braking action is effective for controlling
the vehicle while descending hills.
The gear lever (MT models) should be placed in a
gear position low enough to obtain sufficient engine
braking.
For the AT or CVT models, a low gear position in
the manual shift mode, low enough to obtain suffi-
cient engine braking, should be selected.
ANTI-LOCK BRAKING SYSTEM (ABS)
WARNING
The Anti-lock Braking System (ABS) is a so-
phisticated device, but it cannot prevent acci-
dents resulting from careless or dangerous
driving techniques. It can help maintain ve-
hicle control during braking on slippery sur-
faces. Remember that stopping distances
may also be longer on rough, gravel or snow
covered roads, or if you are using snow
chains. Always maintain a safe distance from
the vehicle in front of you. Ultimately, the
driver is responsible for safety.
Tyre type and condition may also affect brak-
ing effectiveness.
– When replacing tyres, install the specified
size of tyres on all four wheels.
– When installing a spare tyre, make sure it is the proper size and type as specified on
the tyre placard. See “Vehicle
identification” in the “9. Technical
information” section for the tyre placard
location.
– For detailed information, see “Wheels and tyres” in the “8. Maintenance and
do-it-yourself” section.
The Anti-lock Braking System (ABS) controls the
brakes so that the wheels do not lock during hard
braking or when braking on slippery surfaces. The
system detects the rotation speed at each wheel
BRAKE SYSTEM
Starting and driving5-39
Page 238 of 297
Downloaded from www.Manualslib.com manuals search engine HR16DE, MR20DE, M9R or R9M
engine
1. Set the heater or air conditioner temperaturecontrol to the maximum “HOT” position.
2. Open the bonnet. For details, see “Bonnet release” in the “3. Pre-driving checks and
adjustments” section.
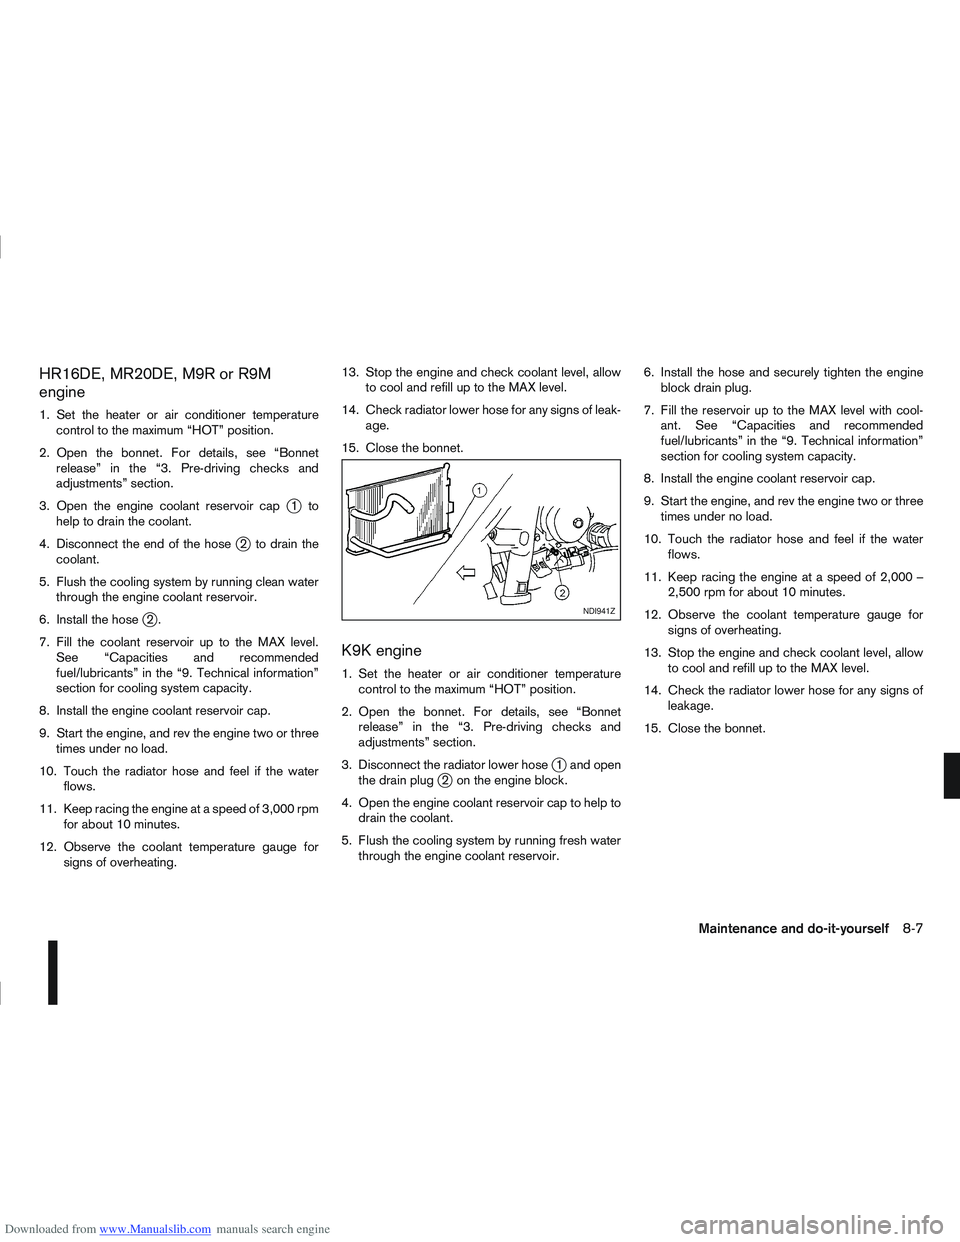
3. Open the engine coolant reservoir cap
j1to
help to drain the coolant.
4. Disconnect the end of the hose
j2 to drain the
coolant.
5. Flush the cooling system by running clean water through the engine coolant reservoir.
6. Install the hose
j2.
7. Fill the coolant reservoir up to the MAX level. See “Capacities and recommended
fuel/lubricants” in the “9. Technical information”
section for cooling system capacity.
8. Install the engine coolant reservoir cap.
9. Start the engine, and rev the engine two or three times under no load.
10. Touch the radiator hose and feel if the water flows.
11. Keep racing the engine at a speed of 3,000 rpm for about 10 minutes.
12. Observe the coolant temperature gauge for signs of overheating. 13. Stop the engine and check coolant level, allow
to cool and refill up to the MAX level.
14. Check radiator lower hose for any signs of leak- age.
15. Close the bonnet.
K9K engine
1. Set the heater or air conditioner temperature control to the maximum “HOT” position.
2. Open the bonnet. For details, see “Bonnet release” in the “3. Pre-driving checks and
adjustments” section.
3. Disconnect the radiator lower hose
j1 and open
the drain plugj2 on the engine block.
4. Open the engine coolant reservoir cap to help to drain the coolant.
5. Flush the cooling system by running fresh water through the engine coolant reservoir. 6. Install the hose and securely tighten the engine
block drain plug.
7. Fill the reservoir up to the MAX level with cool- ant. See “Capacities and recommended
fuel/lubricants” in the “9. Technical information”
section for cooling system capacity.
8. Install the engine coolant reservoir cap.
9. Start the engine, and rev the engine two or three times under no load.
10. Touch the radiator hose and feel if the water flows.
11. Keep racing the engine at a speed of 2,000 – 2,500 rpm for about 10 minutes.
12. Observe the coolant temperature gauge for signs of overheating.
13. Stop the engine and check coolant level, allow to cool and refill up to the MAX level.
14. Check the radiator lower hose for any signs of leakage.
15. Close the bonnet.
NDI941Z
Maintenance and do-it-yourself8-7
Page 241 of 297
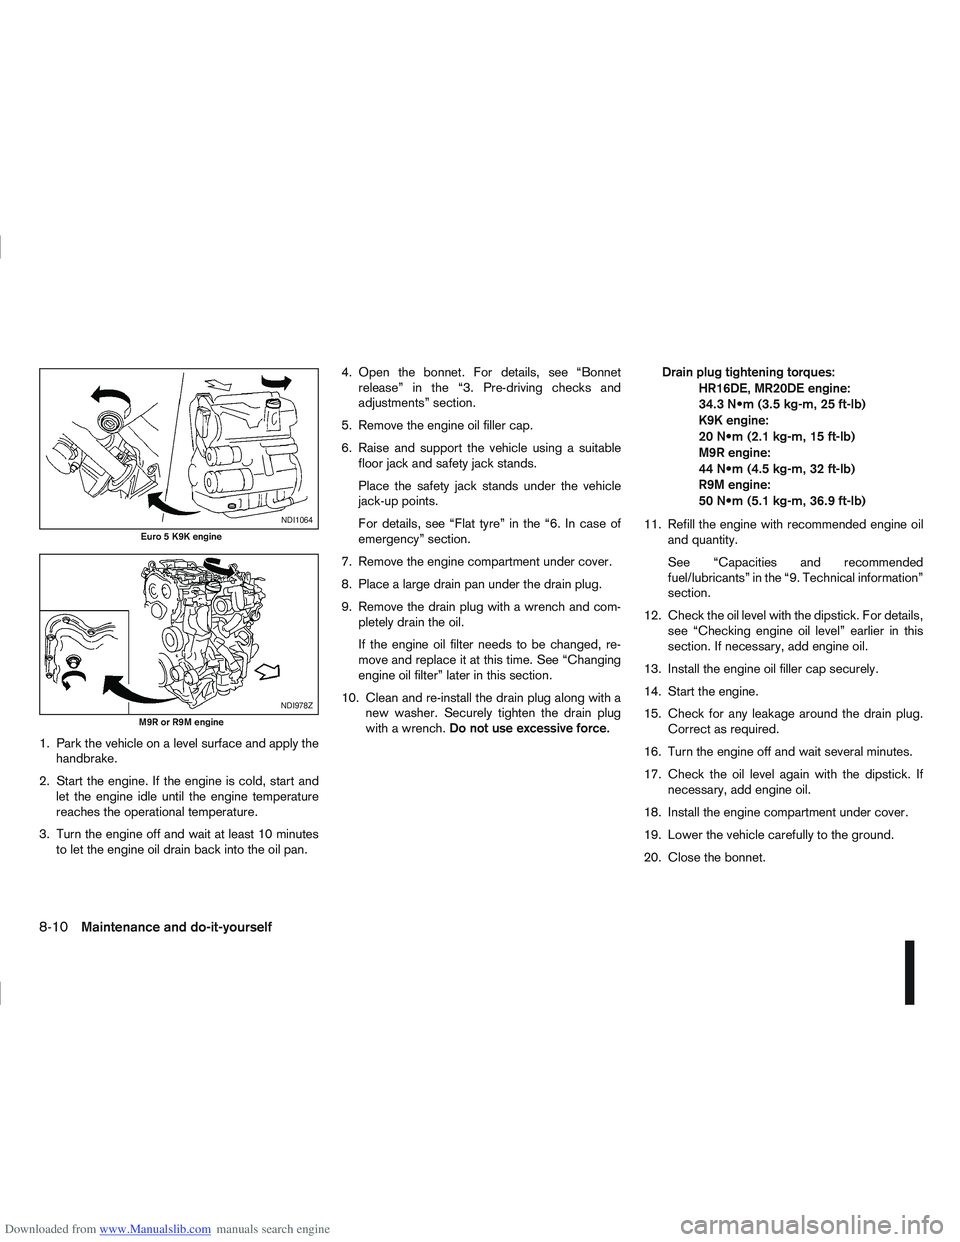
Downloaded from www.Manualslib.com manuals search engine 1. Park the vehicle on a level surface and apply thehandbrake.
2. Start the engine. If the engine is cold, start and let the engine idle until the engine temperature
reaches the operational temperature.
3. Turn the engine off and wait at least 10 minutes to let the engine oil drain back into the oil pan. 4. Open the bonnet. For details, see “Bonnet
release” in the “3. Pre-driving checks and
adjustments” section.
5. Remove the engine oil filler cap.
6. Raise and support the vehicle using a suitable floor jack and safety jack stands.
Place the safety jack stands under the vehicle
jack-up points.
For details, see “Flat tyre” in the “6. In case of
emergency” section.
7. Remove the engine compartment under cover.
8. Place a large drain pan under the drain plug.
9. Remove the drain plug with a wrench and com- pletely drain the oil.
If the engine oil filter needs to be changed, re-
move and replace it at this time. See “Changing
engine oil filter” later in this section.
10. Clean and re-install the drain plug along with a new washer. Securely tighten the drain plug
with a wrench. Do not use excessive force. Drain plug tightening torques:
HR16DE, MR20DE engine:
34.3 (3.5 kg-m, 25 ft-lb)
K9K engine:
20 (2.1 kg-m, 15 ft-lb)
M9R engine:
44 (4.5 kg-m, 32 ft-lb)
R9M engine:
50 (5.1 kg-m, 36.9 ft-lb)
11. Refill the engine with recommended engine oil and quantity.
See “Capacities and recommended
fuel/lubricants” in the “9. Technical information”
section.
12. Check the oil level with the dipstick. For details, see “Checking engine oil level” earlier in this
section. If necessary, add engine oil.
13. Install the engine oil filler cap securely.
14. Start the engine.
15. Check for any leakage around the drain plug. Correct as required.
16. Turn the engine off and wait several minutes.
17. Check the oil level again with the dipstick. If necessary, add engine oil.
18. Install the engine compartment under cover.
19. Lower the vehicle carefully to the ground.
20. Close the bonnet.
NDI1064
Euro 5 K9K engine
NDI978Z
M9R or R9M engine
8-10Maintenance and do-it-yourself
Page 242 of 297
Downloaded from www.Manualslib.com manuals search engine CHANGING ENGINE OIL FILTER
WARNING
NISSAN recommends contacting a NISSAN
dealer or qualified workshop for engine oil fil-
ter servicing.
NISSAN GREEN PROGRAM
A used oil filter should be disposed of at a
rubbish tip having proper facilities.
HR16DE, MR20DE or K9K engine
Removal:
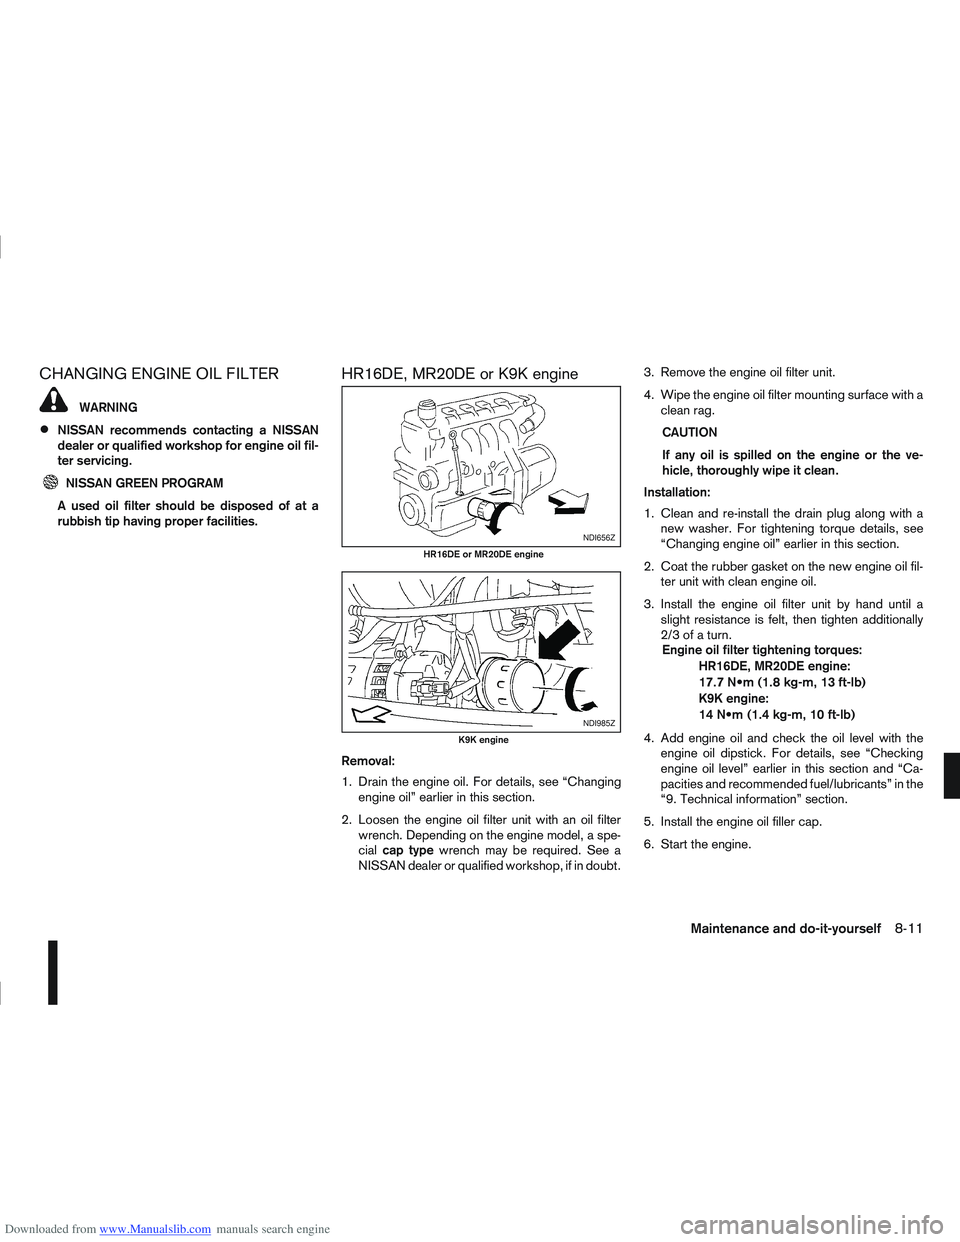
1. Drain the engine oil. For details, see “Changing engine oil” earlier in this section.
2. Loosen the engine oil filter unit with an oil filter wrench. Depending on the engine model, a spe-
cial cap type wrench may be required. See a
NISSAN dealer or qualified workshop, if in doubt. 3. Remove the engine oil filter unit.
4. Wipe the engine oil filter mounting surface with a
clean rag.
CAUTION
If any oil is spilled on the engine or the ve-
hicle, thoroughly wipe it clean.
Installation:
1. Clean and re-install the drain plug along with a new washer. For tightening torque details, see
“Changing engine oil” earlier in this section.
2. Coat the rubber gasket on the new engine oil fil- ter unit with clean engine oil.
3. Install the engine oil filter unit by hand until a slight resistance is felt, then tighten additionally
2/3ofaturn.Engine oil filter tightening torques:
HR16DE, MR20DE engine:
17.7 (1.8 kg-m, 13 ft-lb)
K9K engine:
14 (1.4 kg-m, 10 ft-lb)
4. Add engine oil and check the oil level with the engine oil dipstick. For details, see “Checking
engine oil level” earlier in this section and “Ca-
pacities and recommended fuel/lubricants” in the
“9. Technical information” section.
5. Install the engine oil filler cap.
6. Start the engine.
NDI656Z
HR16DE or MR20DE engine
NDI985Z
K9K engine
Maintenance and do-it-yourself8-11