2009 NISSAN QASHQAI lock
[x] Cancel search: lockPage 65 of 297

Downloaded from www.Manualslib.com manuals search engine ODOMETER/TWIN TRIP ODOMETER
The odometer and twin trip odometer are displayed
when the ignition switch is in the ON position.
Odometer
The odometerjA records the total distance the ve-
hicle has been driven.
Twin trip odometer
The twin trip odometerjB records the distance of 2
individual trips (Trip A and Trip B).
Changing the display:
Briefly press the
switchjC to change the dis-
play as follows.
Trip A→ Trip B→ TripA
Resetting the trip odometer:
Press and hold the
switch for approximately 1
second to reset the selected trip (Trip Aor Trip B).
BRIGHTNESS CONTROL
Rotate theswitchjC anticlockwise to brighten
or clockwise to dim the instrument lighting level.
NOTE
Brightness cannot be set when the headlight
switch is in the OFF position.
TRIP COMPUTER
The trip computer is controlled using theswitch
or the steering wheel switchji (where fitted).
The trip computer contains the following items:
[Fuel Economy] →[Average speed] →[Driving dis-
tance] →[Elapsed time] →[Range] (km or MILES)
→ [Settings][→ CO2 Saved] (where fitted) →[Fuel
Economy]
Short press to change the information that is
being displayed.
Push and hold (up until 3 seconds) resets the
current item that is displayed (except [Settings]
and [Range]).
Push and hold over 3 seconds performs a global
reset. This resets all functions of the display (ex-
cept [Range] and Trip A).
j1 Fuel Economy (l (litre)/100 km or MPG)
The [Fuel Economy] mode shows the current fuel
consumption in a moving bar graph.
The average fuel consumption mode displays the
average fuel consumption since the last reset.
It is shown in 2 ways:
The Ø symbol (average) with the value on the
top right of the bar.
By the position of the ♦icon (diamond) inside
the bar.
NIC1542
NIC1650
2-16Instruments and controls
Page 68 of 297
![NISSAN QASHQAI 2009 Owners Manual Downloaded from www.Manualslib.com manuals search engine [Clock]
Clock adjustment can be set to:
[Set Clock]
Adjust the time (hour and minute) of the clock on
the meter by rotating the
switch.
Push th NISSAN QASHQAI 2009 Owners Manual Downloaded from www.Manualslib.com manuals search engine [Clock]
Clock adjustment can be set to:
[Set Clock]
Adjust the time (hour and minute) of the clock on
the meter by rotating the
switch.
Push th](/manual-img/5/56767/w960_56767-67.png)
Downloaded from www.Manualslib.com manuals search engine [Clock]
Clock adjustment can be set to:
[Set Clock]
Adjust the time (hour and minute) of the clock on
the meter by rotating the
switch.
Push the
switch to set the values
[On] or [Off]
Select this submenu to set the clock display On
or Off.
[24/12 Нr]
Select this submenu to set the 12h/24h time dis-
play mode. To return to the previous screen of the setting mode,
select [Back].
[Units]
The following items can be set to your preference.
[Temperature]
Select this submenu to choose from degrees
Celsius (C) or Fahrenheit (F) on the display.
[Dist./Fuеl]
The fuel consumption units can be set too.
Select this submenu to choose:
– distance in miles, fuel consumption in MPG
– distance in km, fuel consumption in km/l
– distance in km, fuel consumption in l/100km
To return to the previous screen of the setting mode,
select [Back].
[Alarms]
Alerts can be set to notify the following items.
[Driver Alert]
Select this submenu to set the [Driver Alert] pe-
riod.
[Outside temp]
Select this submenu to set the low temperature
alert [On] or [Off].
To return to the top page of the setting mode, select
[Back].
NIC1647
Instruments and controls2-19
Page 72 of 297
Downloaded from www.Manualslib.com manuals search engine REAR WINDOW
WARNING
In freezing temperatures the washer solution
may freeze on the rear window and obscure your
vision. Warm the rear window with the rear win-
dow defogger before you wash the rear window.
CAUTION
Do not operate the washer continuously for
more than 15 seconds.
Do not operate the washer if the reservoir
tank is empty or frozen.
The rear window wiper and washer can be oper-
ated when the ignition switch is in the ON position.
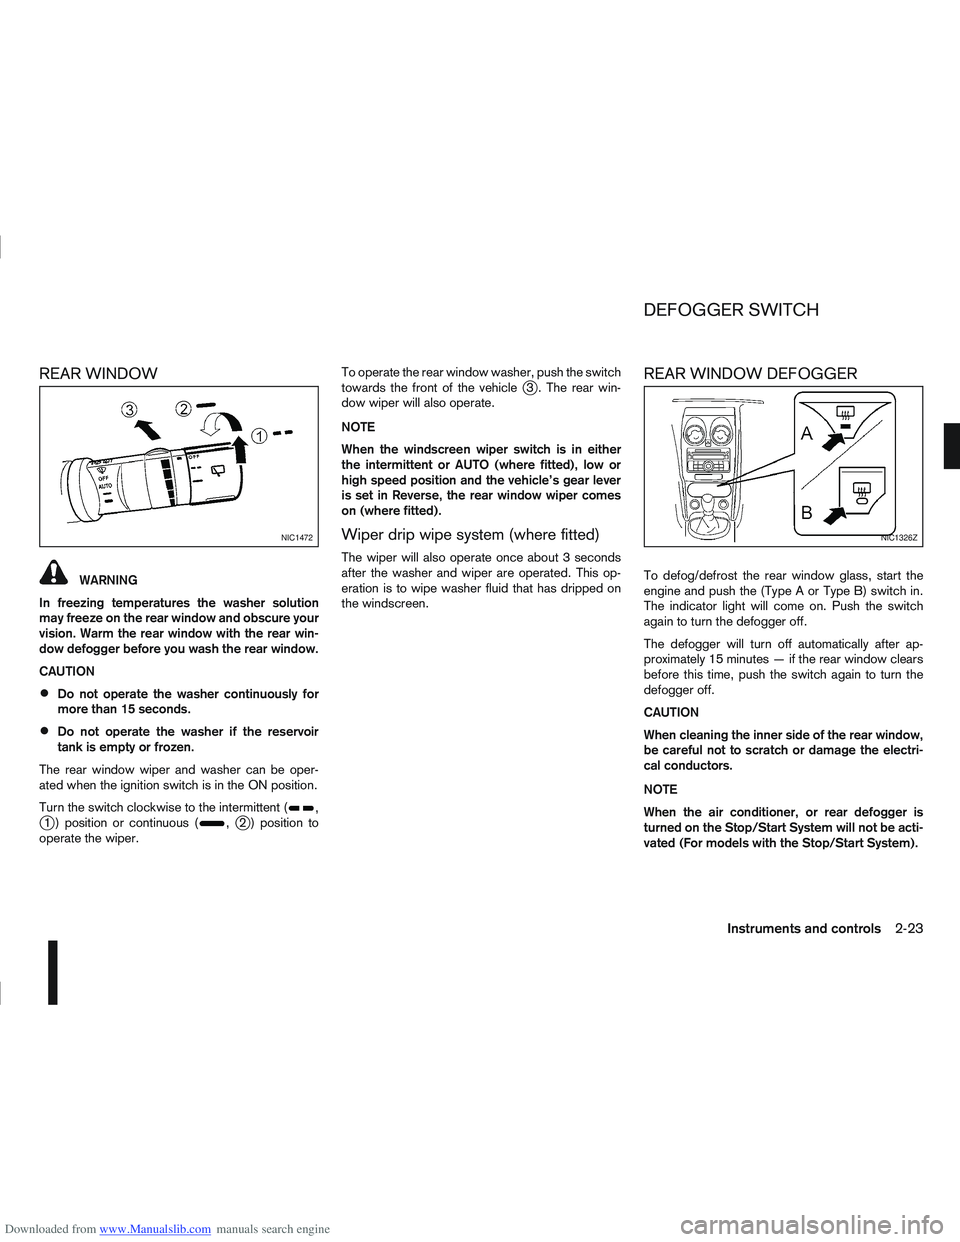
Turn the switch clockwise to the intermittent (
,j1 ) position or continuous (,j2 ) position to
operate the wiper. To operate the rear window washer, push the switch
towards the front of the vehicle
j3 . The rear win-
dow wiper will also operate.
NOTE
When the windscreen wiper switch is in either
the intermittent or AUTO (where fitted), low or
high speed position and the vehicle’s gear lever
is set in Reverse, the rear window wiper comes
on (where fitted).
Wiper drip wipe system (where fitted)
The wiper will also operate once about 3 seconds
after the washer and wiper are operated. This op-
eration is to wipe washer fluid that has dripped on
the windscreen.
REAR WINDOW DEFOGGER
To defog/defrost the rear window glass, start the
engine and push the (Type A or Type B) switch in.
The indicator light will come on. Push the switch
again to turn the defogger off.
The defogger will turn off automatically after ap-
proximately 15 minutes — if the rear window clears
before this time, push the switch again to turn the
defogger off.
CAUTION
When cleaning the inner side of the rear window,
be careful not to scratch or damage the electri-
cal conductors.
NOTE
When the air conditioner, or rear defogger is
turned on the Stop/Start System will not be acti-
vated (For models with the Stop/Start System).
NIC1472NIC1326Z
DEFOGGER SWITCH
Instruments and controls2-23
Page 74 of 297
Downloaded from www.Manualslib.com manuals search engine Daytime light system (where fitted)
Even if the headlight switch is off, the headlight low
beam, front side, rear combination and number plate
lights will come on after starting the engine. How-
ever, you cannot change low beam to high beam
when the light switch is off.
When the light switch is turned to the
position,
the headlight low beam will turn off.
Autolight system (AUTO — where fitted)
The autolight system allows the headlights to be set
so they turn on and off automatically. When active,
the autolight system will:
Turn on the headlights, front side, tail, number
plate and instrument panel lights automatically
when it gets dark.
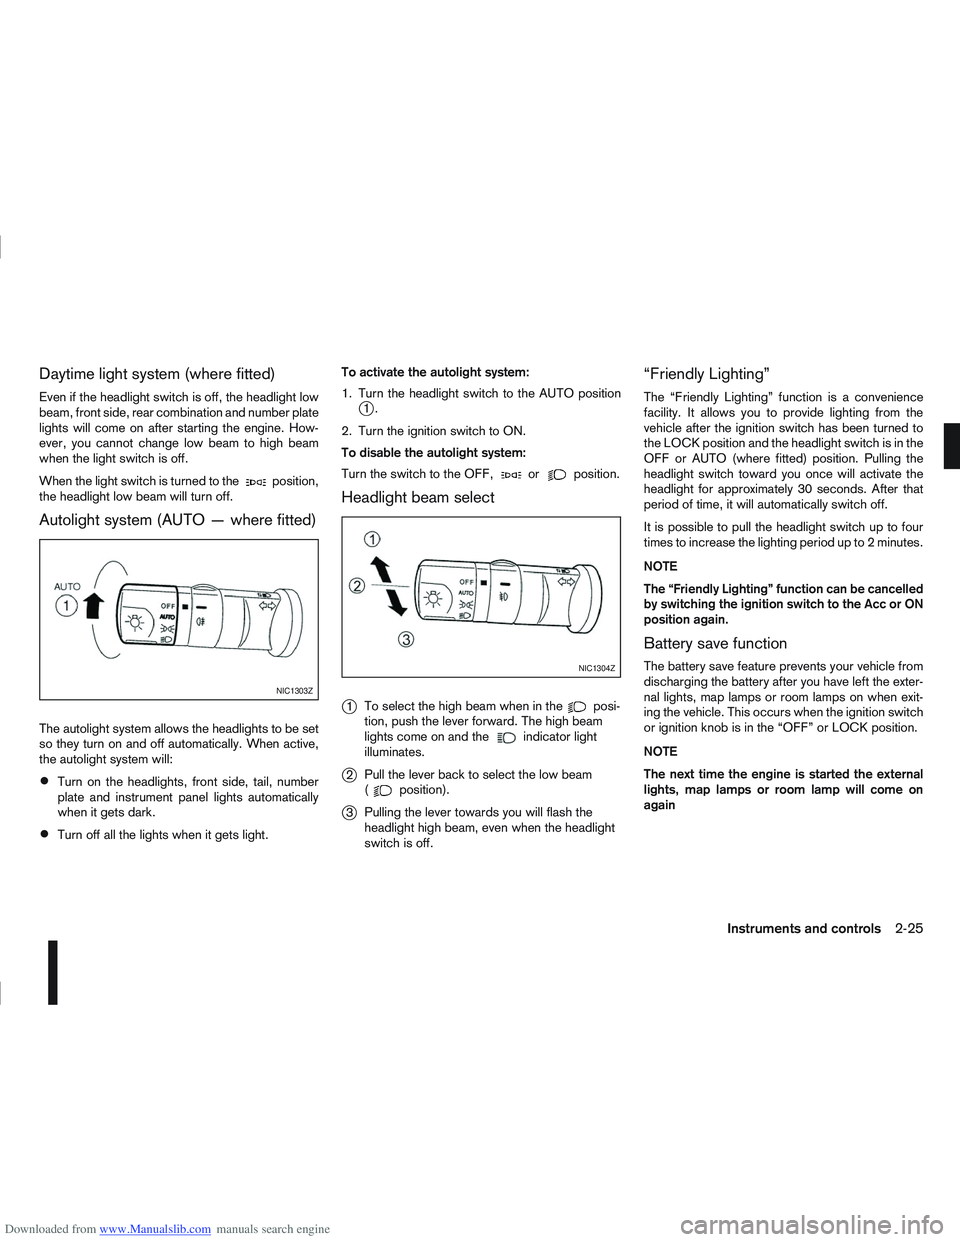
Turn off all the lights when it gets light. To activate the autolight system:
1. Turn the headlight switch to the AUTO position
j1.
2. Turn the ignition switch to ON.
To disable the autolight system:
Turn the switch to the OFF,
orposition.
Headlight beam select
j
1 To select the high beam when in theposi-
tion, push the lever forward. The high beam
lights come on and the
indicator light
illuminates.
j2 Pull the lever back to select the low beam
(position).
j3Pulling the lever towards you will flash the
headlight high beam, even when the headlight
switch is off.
“Friendly Lighting”
The “Friendly Lighting” function is a convenience
facility. It allows you to provide lighting from the
vehicle after the ignition switch has been turned to
the LOCK position and the headlight switch is in the
OFF or AUTO (where fitted) position. Pulling the
headlight switch toward you once will activate the
headlight for approximately 30 seconds. After that
period of time, it will automatically switch off.
It is possible to pull the headlight switch up to four
times to increase the lighting period up to 2 minutes.
NOTE
The “Friendly Lighting” function can be cancelled
by switching the ignition switch to the Acc or ON
position again.
Battery save function
The battery save feature prevents your vehicle from
discharging the battery after you have left the exter-
nal lights, map lamps or room lamps on when exit-
ing the vehicle. This occurs when the ignition switch
or ignition knob is in the “OFF” or LOCK position.
NOTE
The next time the engine is started the external
lights, map lamps or room lamp will come on
again
NIC1303Z
NIC1304Z
Instruments and controls2-25
Page 75 of 297
Downloaded from www.Manualslib.com manuals search engine Battery save function for external lights:
If the ignition switch is turned to the “OFF” position
but the external lights are accidentally left on, the
external lights will automatically be switched off as
soon as the driver’s door is opened.
It is possible to leave the external lights on perma-
nently by switching them back on using the head-
light switch while the ignition switch is still in the
LOCK or “OFF” position. In this case, the light re-
minder chime will sound when the driver’s door is
opened.
Battery save function for interior light:
The interior light will automatically be switched off
after approximately 15 minutes if it has been acci-
dentally left on.
TURN SIGNAL SWITCHLane change signal
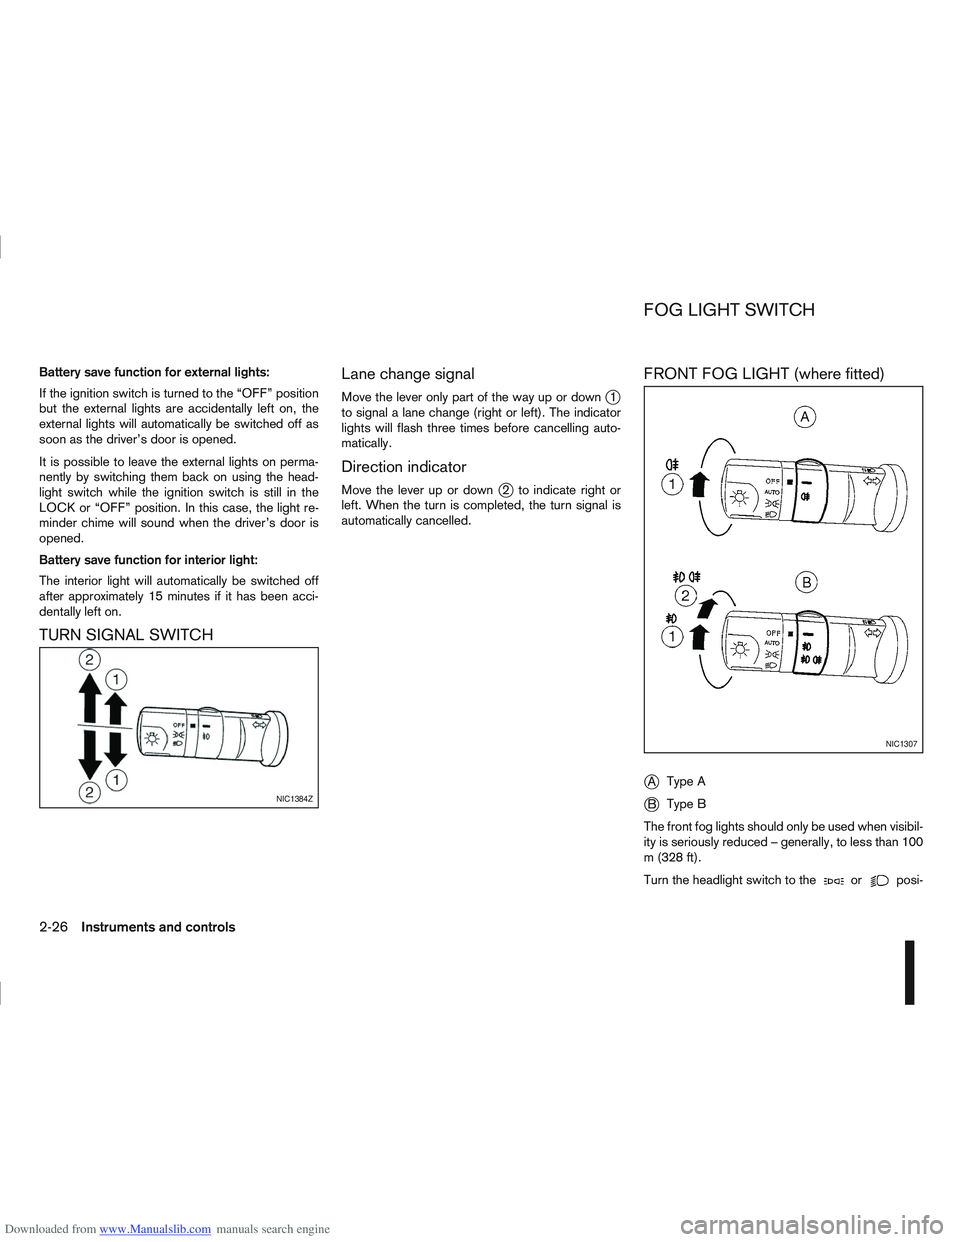
Move the lever only part of the way up or downj1
to signal a lane change (right or left). The indicator
lights will flash three times before cancelling auto-
matically.
Direction indicator
Move the lever up or downj2 to indicate right or
left. When the turn is completed, the turn signal is
automatically cancelled.
FRONT FOG LIGHT (where fitted)
j
A Type A
jB Type B
The front fog lights should only be used when visibil-
ity is seriously reduced – generally, to less than 100
m (328 ft).
Turn the headlight switch to the
orposi-
NIC1384Z
NIC1307
FOG LIGHT SWITCH
2-26Instruments and controls
Page 82 of 297
Downloaded from www.Manualslib.com manuals search engine WARNING
Never put anything on the rear parcel shelf, no
matter how small. Any object on it could cause
an injury in an accident or when the brakes are
applied suddenly.
Removal:
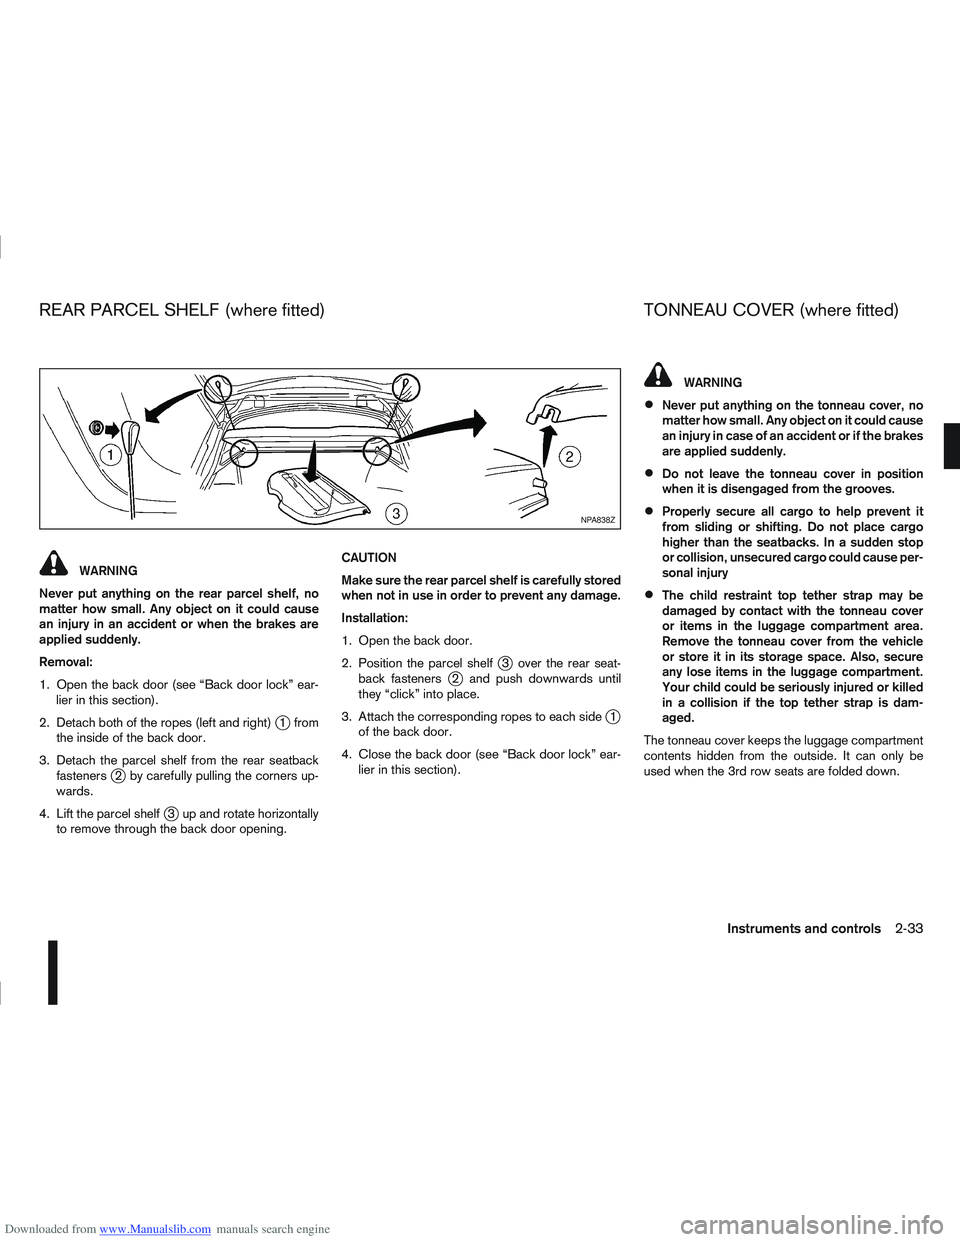
1. Open the back door (see “Back door lock” ear- lier in this section).
2. Detach both of the ropes (left and right)
j1 from
the inside of the back door.
3. Detach the parcel shelf from the rear seatback fasteners
j2 by carefully pulling the corners up-
wards.
4. Lift the parcel shelf
j3 up and rotate horizontally
to remove through the back door opening. CAUTION
Make sure the rear parcel shelf is carefully stored
when not in use in order to prevent any damage.
Installation:
1. Open the back door.
2. Position the parcel shelf
j3 over the rear seat-
back fastenersj2 and push downwards until
they “click” into place.
3. Attach the corresponding ropes to each side
j1
of the back door.
4. Close the back door (see “Back door lock” ear- lier in this section).
WARNING
Never put anything on the tonneau cover, no
matter how small. Any object on it could cause
an injury in case of an accident or if the brakes
are applied suddenly.
Do not leave the tonneau cover in position
when it is disengaged from the grooves.
Properly secure all cargo to help prevent it
from sliding or shifting. Do not place cargo
higher than the seatbacks. In a sudden stop
or collision, unsecured cargo could cause per-
sonal injury
The child restraint top tether strap may be
damaged by contact with the tonneau cover
or items in the luggage compartment area.
Remove the tonneau cover from the vehicle
or store it in its storage space. Also, secure
any lose items in the luggage compartment.
Your child could be seriously injured or killed
in a collision if the top tether strap is dam-
aged.
The tonneau cover keeps the luggage compartment
contents hidden from the outside. It can only be
used when the 3rd row seats are folded down.
NPA838Z
REAR PARCEL SHELF (where fitted) TONNEAU COVER (where fitted)
Instruments and controls2-33
Page 83 of 297
Downloaded from www.Manualslib.com manuals search engine Removal:
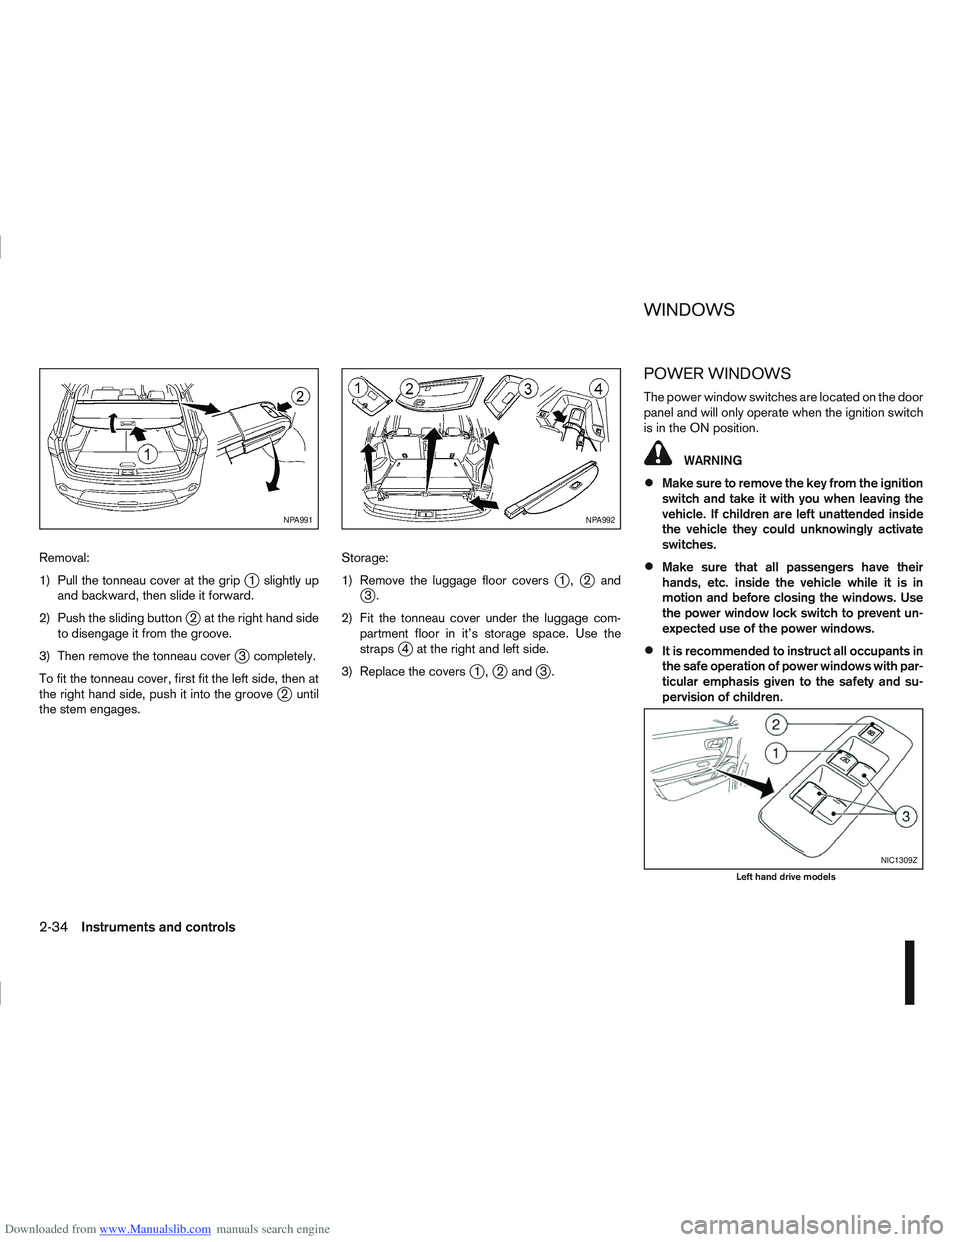
1) Pull the tonneau cover at the grip
j1 slightly up
and backward, then slide it forward.
2) Push the sliding button
j2 at the right hand side
to disengage it from the groove.
3) Then remove the tonneau cover
j3 completely.
To fit the tonneau cover, first fit the left side, then at
the right hand side, push it into the groove
j2 until
the stem engages. Storage:
1) Remove the luggage floor covers
j1,j2andj3.
2) Fit the tonneau cover under the luggage com- partment floor in it’s storage space. Use the
straps
j4 at the right and left side.
3) Replace the covers
j1,j2 andj3.
POWER WINDOWS
The power window switches are located on the door
panel and will only operate when the ignition switch
is in the ON position.
WARNING
Make sure to remove the key from the ignition
switch and take it with you when leaving the
vehicle. If children are left unattended inside
the vehicle they could unknowingly activate
switches.
Make sure that all passengers have their
hands, etc. inside the vehicle while it is in
motion and before closing the windows. Use
the power window lock switch to prevent un-
expected use of the power windows.
It is recommended to instruct all occupants in
the safe operation of power windows with par-
ticular emphasis given to the safety and su-
pervision of children.
NPA991NPA992
NIC1309Z
Left hand drive models
WINDOWS
2-34Instruments and controls
Page 84 of 297
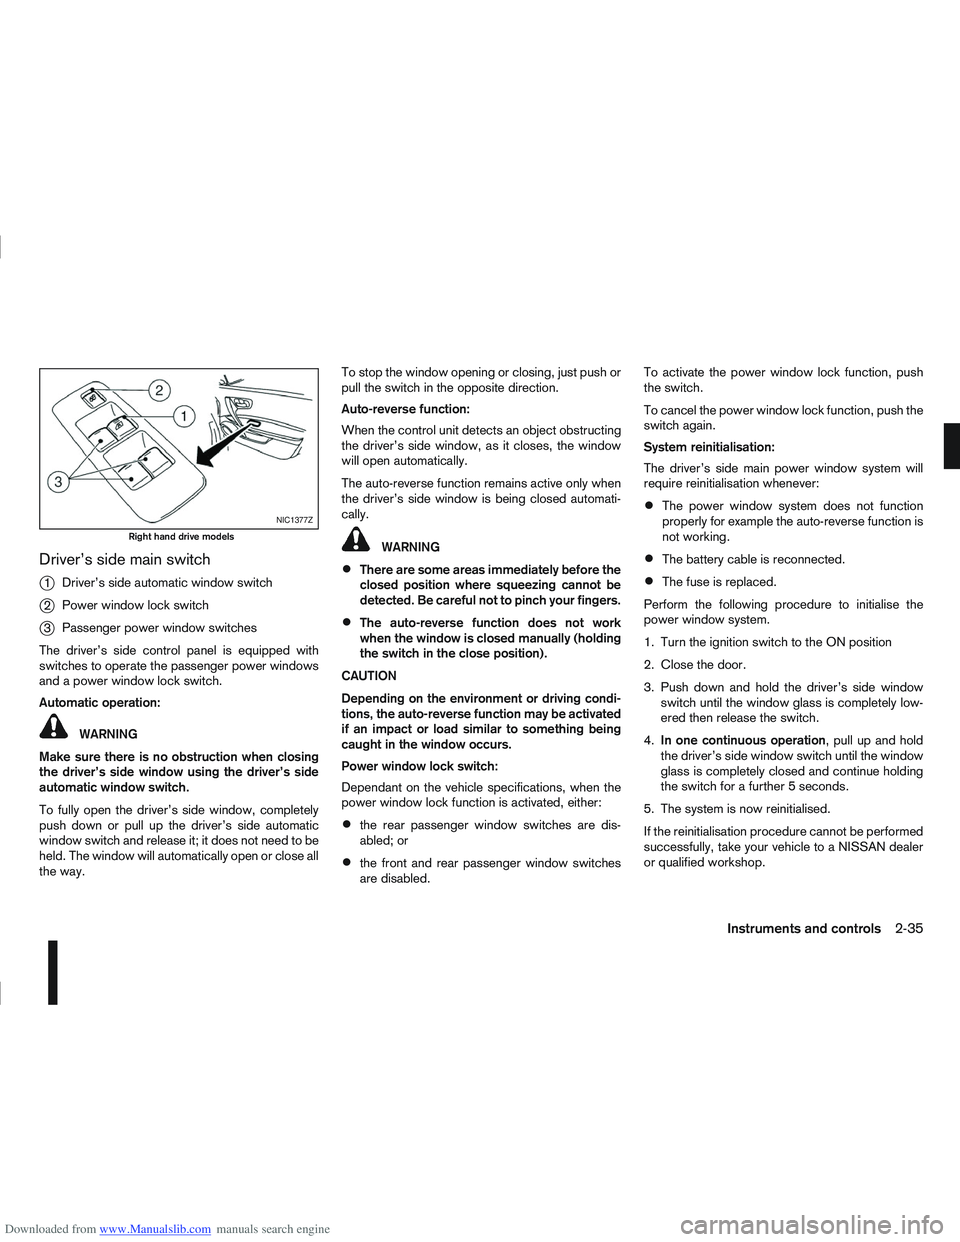
Downloaded from www.Manualslib.com manuals search engine Driver’s side main switch
j
1Driver’s side automatic window switch
j2Power window lock switch
j3Passenger power window switches
The driver’s side control panel is equipped with
switches to operate the passenger power windows
and a power window lock switch.
Automatic operation:
WARNING
Make sure there is no obstruction when closing
the driver’s side window using the driver’s side
automatic window switch.
To fully open the driver’s side window, completely
push down or pull up the driver’s side automatic
window switch and release it; it does not need to be
held. The window will automatically open or close all
the way. To stop the window opening or closing, just push or
pull the switch in the opposite direction.
Auto-reverse function:
When the control unit detects an object obstructing
the driver’s side window, as it closes, the window
will open automatically.
The auto-reverse function remains active only when
the driver’s side window is being closed automati-
cally.
WARNING
There are some areas immediately before the
closed position where squeezing cannot be
detected. Be careful not to pinch your fingers.
The auto-reverse function does not work
when the window is closed manually (holding
the switch in the close position).
CAUTION
Depending on the environment or driving condi-
tions, the auto-reverse function may be activated
if an impact or load similar to something being
caught in the window occurs.
Power window lock switch:
Dependant on the vehicle specifications, when the
power window lock function is activated, either:
the rear passenger window switches are dis-
abled; or
the front and rear passenger window switches
are disabled. To activate the power window lock function, push
the switch.
To cancel the power window lock function, push the
switch again.
System reinitialisation:
The driver’s side main power window system will
require reinitialisation whenever:
The power window system does not function
properly for example the auto-reverse function is
not working.
The battery cable is reconnected.
The fuse is replaced.
Perform the following procedure to initialise the
power window system.
1. Turn the ignition switch to the ON position
2. Close the door.
3. Push down and hold the driver’s side window switch until the window glass is completely low-
ered then release the switch.
4. In one continuous operation , pull up and hold
the driver’s side window switch until the window
glass is completely closed and continue holding
the switch for a further 5 seconds.
5. The system is now reinitialised.
If the reinitialisation procedure cannot be performed
successfully, take your vehicle to a NISSAN dealer
or qualified workshop.
NIC1377Z
Right hand drive models
Instruments and controls2-35