2009 NISSAN QASHQAI side lights
[x] Cancel search: side lightsPage 190 of 297
Downloaded from www.Manualslib.com manuals search engine – Blinks slowly (about once every 2 seconds)Change the driving mode to 2WD and reduce
the vehicle speed as soon as safely possible.
If the warning light is still on after performing
the above operation, have the system
checked by a NISSAN dealer or qualified
workshop as soon as possible.
4WD MODE INDICATOR LIGHTS
4WD mode indicator light ( LOCK):
This light comes on when the ignition switch is
turned to the ON position, and turns off within 1
second. When selecting LOCK mode while the
engine is running, this light will illuminate simul-
taneously along with the 4WD mode indicator
light (AUTO).
4WD mode indicator light ( AUTO):
This light comes on when the ignition switch is
turned to the ON position, and turns off within 1
second. If the engine is running, this light will illu-
minate when selecting AUTO mode.
The 4WD mode indicator light is located in the
tachometer.
The light should turn off within 1 second of the
ignition switch being turned to the ON position.
While the engine is running, the 4WD mode indi-
cator light will display the position selected by
the 4WD mode control. NOTE
The 4WD mode indicator light may blink while
shifting from one drive mode to another. Once
shifting is completed, the 4WD mode indicator
light will come on. If the indicator light does not
come on immediately, make sure that the area
around the vehicle is safe and free from ob-
stacles. Drive the vehicle straight (DO NOT ac-
celerate, decelerate or reverse), then turn the
4WD mode control.
If the 4WD warning lights comes on, the 4WD indi-
cator light(s) will go out.
DRIVING FOUR-WHEEL DRIVE (4WD)
SAFELY
Your NISSAN is designed for both normal and off-
road use. However, avoid driving in deep water or
mud as your NISSAN is mainly designed for leisure
use, unlike a conventional off-road vehicle.
Remember that Two-Wheel drive (2WD) models are
less capable than Four-Wheel Drive (4WD) models
for rough road driving and extrication when stuck,
for example, in deep snow or mud.
Please observe the following precautions:
Drive carefully when off-road and avoid danger-
ous areas. Always wear seat belts to help keep
you and your passengers in position when driv-
ing over rough terrain.
Do not drive across steep slopes. Instead drive
either straight up or straight down the slope. Off- road vehicles can tip over sideways much more
easily than they can forwards or backwards.
Many hills are too steep for any vehicle. If you
drive up them, you may stall. If you drive down
them, you may not be able to control your speed.
If you drive across them, you may roll over.
Do not shift gears when driving on downhill
grades as this could cause loss of control of the
vehicle.
Stay alert when driving to the top of a hill. At the
top there could be a drop-off or other hazard that
could cause an accident.
If the engine of the vehicle stalls or you cannot
make it to the top of a steep grade, never at-
tempt to turn around. Your vehicle could tip or
roll over. Always drive backwards and straight
down in R (Reverse) gear.
Never drive backwards under the following con-
ditions as this could result in loss of control:
– with the gear lever in N (Neutral) and/or with
the clutch depressed and using the brake
(MT models).
– with the selector lever in N (Neutral) and us- ing only the brake (AT or CVT models).
Heavy braking down a hill could cause your
brakes to overheat and fade, resulting in loss of
control and an accident. Apply the brakes lightly
and use a low gear to control your vehicle speed.
Starting and driving5-27
Page 201 of 297
Downloaded from www.Manualslib.com manuals search engine When leaving your vehicle unoccupied:
Always remove the ignition key or Intelligent Key
(where fitted) and take it with you – even in your
own garage.
Close all windows completely and lock all doors.
Always park your vehicle where it can be seen.
At night, park in a well lit area.
If the vehicle is equipped with an alarm or immo-
bilization device, use it – even for short periods.
Do not leave children and pets in the vehicle
unattended.
Do not leave valuables on view to tempt a thief.
Always take your valuables with you. If you must
leave something in your vehicle, lock it in the lug-
gage compartment or hide it out of sight.
Do not leave the vehicle documents in your ve-
hicle. In the unfortunate event of your vehicle
being stolen, the documents will only help a thief
to sell the vehicle.
Do not leave articles on a roof rack as they are
particularly vulnerable. If possible, remove them
from the rack and lock them inside the vehicle.
Do not leave the spare key or Intelligent Key in
the vehicle – keep it in a safe place at home.
Do not leave a note of your vehicle’s key number
in the vehicle. A thief may break into the vehicle,
note the key number and return with a new key
and drive the vehicle.
WARNING
If the Electrically Power Assisted Steering
warning light (EPAS) illuminates while driv-
ing, the power assist for steering will be dis-
abled. Greater steering efforts are required to
operate the steering wheel, especially in
sharp turns and at low speed. Stop the ve-
hicle as soon as safely possible and contact a
NISSAN dealer or qualified workshop for fur-
ther assistance.
In certain circumstances, factors external to
the EPAS system may contribute to the illumi-
nation of the warning light. If the warning light
illuminates, stop the vehicle as soon as safely
possible if driving. Turn the ignition switch to
the “OFF” position and wait for approximately
20 seconds, then turn the ignition switch to
the ON position again. If the light remains illu-
minated, we recommend you to contact a
NISSAN dealer or qualified workshop. See
“Warning/indicator lights and audible
reminders” in the “2. Instruments and
controls” section for further details regarding
the EPAS warning light.
The EPAS (Electrically Power Assisted Steering)
system is designed to assist steering.
The steering may appear to feel slightly stiff follow-
ing parking manoeuvres including a great deal of
steering. This is not a malfunction; it is caused by a
control system designed to prevent the motor from overheating. No servicing is required. The EPAS
system will return to normal operation the next time
the vehicle is driven.
Similarly, the EPAS system may not provide full as-
sistance during periods of reduced battery voltage
but will recover once normal battery voltage is re-
stored.
If the EPAS warning light comes on while the engine
is running, it may indicate that the EPAS system is
not working properly. As result greater steering ef-
forts are required to steer the steering wheel, espe-
cially in sharp turns and at low speeds. Have the
system checked by a NISSAN dealer or qualified
workshop as soon as possible.
NOTE
Incorrectly inflated tyres can lead to poor steer-
ing ability and make the driver suspect a steering
problem: keep the vehicle’s tyres inflated to the
correct pressure at all times.
CAUTION
Any malfunction or accident that could have dam-
aged the steering components (including actual
or attempted theft damage) should be reported
to a NISSAN dealer or qualified workshop.
VEHICLE SECURITY
POWER STEERING SYSTEM
5-38Starting and driving
Page 234 of 297
Downloaded from www.Manualslib.com manuals search engine Lights*:
Clean the headlights on a regular basis. Make sure
that the headlights, stop lights, tail lights, turn signal
lights, and other lights are all operating properly and
installed securely. Also check headlight aim.
Tyres*:
Check the pressure with a gauge periodically when
at a service station (including the spare) and adjust
to the specified pressure if necessary. Check care-
fully for damage, cuts or excessive wear.
Tyre rotation*:
Tyres should be rotated every 10,000 km (6,000
miles) for Two-Wheel Drive (2WD) models and
5,000 km (3,000 miles) for Four-Wheel Drive (4WD)
models. However, the timing for tyre rotation may
vary according to your driving habits and road sur-
face conditions.
Wheel alignment and balance:
If the vehicle pull to either side while driving on a
straight and level road, or if you detect uneven or
abnormal tyre wear, there may be a need for wheel
alignment. If the steering wheel or seat vibrates at
normal highway speeds, wheel balancing may be
needed.
Wheel nuts:
When checking the tyres, make sure no wheel nuts
are missing, and check for any loose wheel nuts.
Tighten if necessary.Windscreen:
Clean the windscreen on a regular basis. Check the
windscreen at least every six months for cracks or
other damage. Have a damaged windscreen re-
paired by a qualified repair facility.
Wiper blades*:
Check for cracks or wear if they do not wipe prop-
erly.
Under the bonnet and vehicle
The maintenance items listed here should be
checked periodically, e.g. each time you check the
engine oil or refuel.
Battery*:
Check if the green indicator on the top of the main-
tenance free battery is visible. If it is not visible,
replace the battery as soon as possible.
Vehicles operated in high temperatures or under
severe conditions, check the fluid level frequently.
Brake and clutch fluid level*:
Make sure that the brake and clutch fluid level is
between the MAX and MIN lines on the reservoir.
Engine coolant level*:
Check the coolant level when the engine is cold.
Engine drive belts*:
Make sure that the drive belts are not frayed, worn,
cracked or oily.Engine oil level*:
Check the level after parking the vehicle on a level
surface and turning off the engine.
Fluid leaks:
Check under the vehicle for fuel, oil, water or other
fluid leaks after the vehicle has been parked for a
while. Water dripping from the air conditioner after
use is normal. If you should notice any leaks or if
petrol fumes are evident, check for the cause and
have it corrected immediately.
Window washer fluid*:
Check that there is adequate fluid in the tank.
Inside the vehicle
The maintenance items listed here should be
checked on a regular basis, such as when perform-
ing periodic maintenance, cleaning the vehicle, etc.
Accelerator pedal:
Check the pedal for smooth operation and make
sure that the pedal does not catch or require uneven
effort. Keep the floor mats away from the pedal.
Brake pedal*:
Check the pedal for smooth operation. If the brake
pedal suddenly goes down further than normal, the
pedal feels spongy or the vehicle seems to take
longer to stop, contact a NISSAN dealer or qualified
workshop immediately. Keep the floor mat away
from the pedal.
Maintenance and do-it-yourself8-3
Page 257 of 297
Downloaded from www.Manualslib.com manuals search engine Only hold the xenon headlight bulb by the
base.
The bulb is manufactured from high-quality
quartz and is under high pressure.
Damage, soiling, and fingerprints should be
avoided and, if necessary, removed with alco-
hol before installing the bulb.
When the headlights are switched on, the
bulbs produce a certain amount of UV radia-
tion. In order to avoid any impairment of health
(burning and conjunctivitis), the bulb should
only be used in closed headlights with appro-
priate UV–absorbing front glass.
Due to the risk of burning, the bulb should be
left to cool down for 3 minutes after switching
off before touching.
Due to the use of mercury and various salts,
the bulb should be treated as special waste
when discarded.
The bulb may only be operated with a suitable
ballast which produces very high voltages
when switched on and during operation.
Contact with bulb and wires should therefore
be avoided and a safe distance of at least 30
mm should be maintained.
Replacing the halogen headlight bulb
CAUTION
High pressure halogen gas is sealed inside
the halogen bulb. The bulb may break if the
glass envelope is scratched or the bulb is
dropped.
When handling the bulb, DO NOT TOUCH THE
GLASS ENVELOPE.
Use the same number type and wattage as
originally installed.
Aiming is usually not necessary after replac-
ing the bulb. When aiming adjustment is nec-
essary, contact a NISSAN dealer or qualified
workshop.
Do not leave the bulb out of the headlight
reflector for a long period of time as dust,
moisture or smoke may enter the headlight
body and affect the performance of the head-
light.
The headlight is a semi-sealed beam type which
uses a replaceable headlight (halogen) bulb. A bulb
can be replaced from inside the engine compart-
ment without removing the headlight assembly.
Contact a NISSAN dealer or qualified workshop, if
you need assistance for bulb replacement.
1. Open the bonnet. For details, see “Bonnet release” in the “3. Pre-driving checks and
adjustments” section.
2. Disconnect the negative (—) battery cable. 3. When the broken bulb is located in the headlight
assembly under the air duct, carefully remove the
clips and rotate the air duct
jc clockwise a 1/4
of a turn.
4. Remove the cap (
jAorjB ) of the headlight as-
sembly.
5. Turn the connector 1/4 of a turn in the anti clock- wise direction and remove the headlight bulb.
6. Install the new bulb in the reverse order of re- moval and make sure that the cap is securely
sealed with the headlight body.
7. Where removed (step 3.), re-install the air duct
jc and clips in the order of removal.
8. Reconnect the negative (—) battery cable and close the bonnet.
NOTE
Fog may temporarily form inside the lens of the
exterior lights in the rain or in a car wash. The fog
is caused by a temperature difference between
the inside and the outside of the lens. This is not
a malfunction. If large droplets can be seen, then
contact a NISSAN dealer or qualified workshop.
8-26Maintenance and do-it-yourself
Page 258 of 297
Downloaded from www.Manualslib.com manuals search engine EXTERIOR LIGHTS
ItemWattage (W)
Headlight (Low or high beam:
type H7) 55
Front turn signal light 21
Front side light 5
Front fog light (H11 type, where
fitted) *1 55
Side turn signal light 5
Rear combination light Turn signal light 21
Stop/Tail light *1 LED
Reverse light *1 21
High-mounted stop light *1 LED
Number plate light 5
Rear fog light 21
*1: If replacement is required, contact a NISSAN dealer or qualified workshop.
INTERIOR LIGHTS
Item Wattage
(W)
Room light/Map lights (where fitted)
Foot well light (where fitted) 5
3
Room light — rear (where fitted) 5
Reading lights — rear (where fitted) 8
Luggage compartment light (where fitted) 5
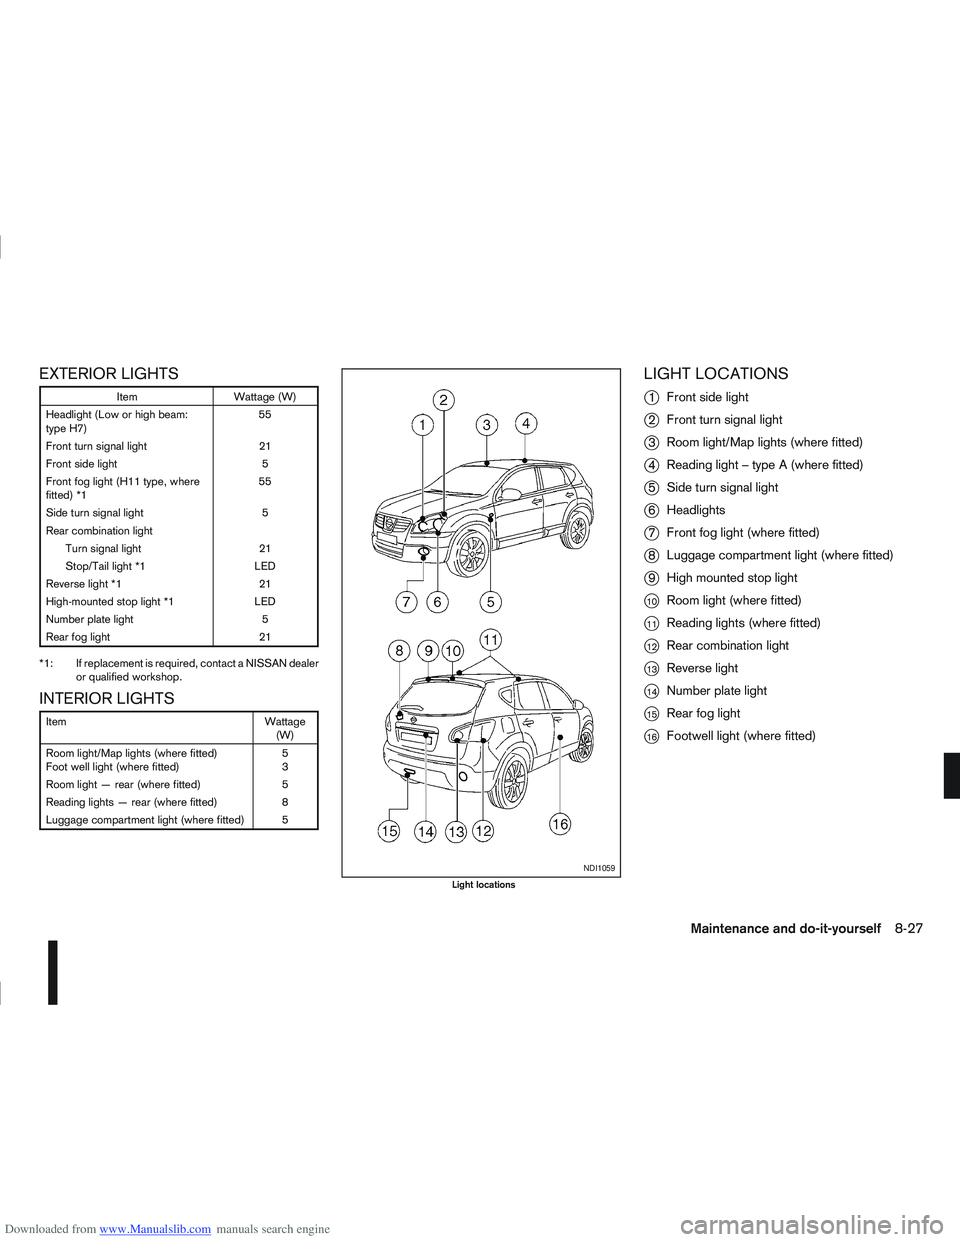
LIGHT LOCATIONS
j
1 Front side light
j2Front turn signal light
j3Room light/Map lights (where fitted)
j4Reading light – type A (where fitted)
j5Side turn signal light
j6Headlights
j7Front fog light (where fitted)
j8Luggage compartment light (where fitted)
j9High mounted stop light
j10Room light (where fitted)
j11Reading lights (where fitted)
j12Rear combination light
j13Reverse light
j14Number plate light
j15Rear fog light
j16Footwell light (where fitted)
NDI1059
Light locations
Maintenance and do-it-yourself8-27
Page 259 of 297

Downloaded from www.Manualslib.com manuals search engine Replacing procedures
m
NDI707
All other lights are either type A, B, C or D.
When replacing a bulb, first remove the lens
and/or cover.
mREMOVE
mINSTALLNDI930
Front side light
NDI931
Front turn signal light
8-28Maintenance and do-it-yourself
Page 260 of 297
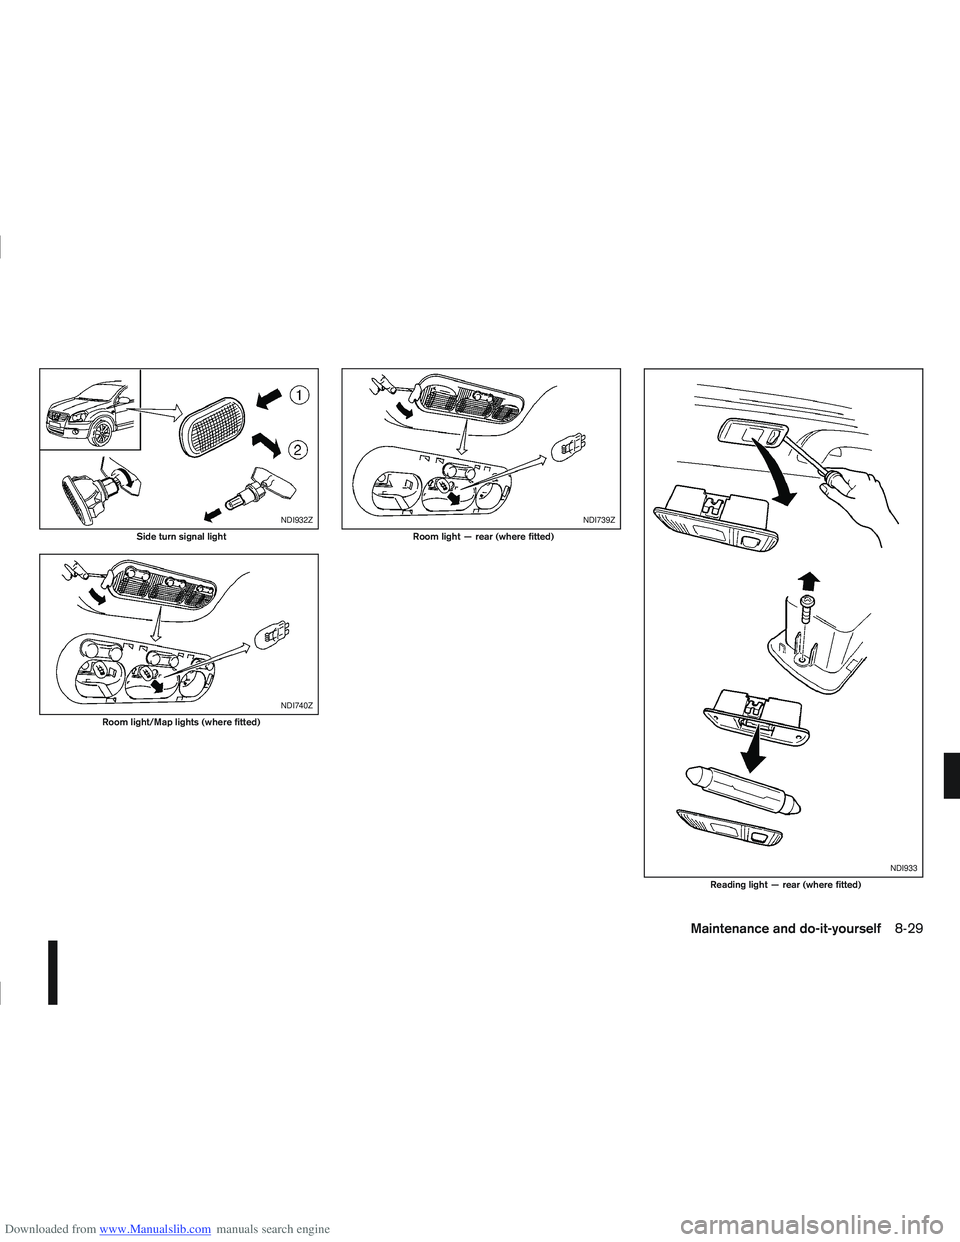
Downloaded from www.Manualslib.com manuals search engine NDI932Z
Side turn signal light
NDI740Z
Room light/Map lights (where fitted)
NDI739Z
Room light — rear (where fitted)
NDI933
Reading light — rear (where fitted)
Maintenance and do-it-yourself8-29
Page 285 of 297

Downloaded from www.Manualslib.com manuals search engine Four-wheel drive (4WD) ...................................................... 5-24
– Driving four-wheel drive (4WD) safely ............................ 5-27
– Four-wheel drive (4WD) model (Tyres) .......................... 8-33
– Four-wheel drive mode indicator light ............................. 5-27
– Four-wheel drive warning light ....................................... 5-26
Front passenger air bag deactivation system ....................... 1-17
Front passenger air bag indicator light ................................. 1-17
Fuel
– Bleeding the fuel system ................................................ 8-14
– Capacities and recommended fuel/lubricants ................... 9-2
– Draining water (Fuel filter) .............................................. 8-13
– Fuel filter (Diesel engine models) ................................... 8-13
– Fuel gauge ...................................................................... 2-2
– Fuel recommendation ...................................................... 9-5
Fuel filler lid
– Cap ........................................................................\
....... 3-15
– Opener lever ................................................................. 3-15
Fuses ........................................................................\
.......... 8-23
– Engine compartment ...................................................... 8-24
– Passenger compartment ................................................ 8-23G
Gauges
– Engine coolant temperature gauge ................................... 2-2
– Fuel gauge ...................................................................... 2-2
– Meters and gauges .......................................................... 2-2
Glove box ........................................................................\
.... 2-31
Guide lines ........................................................................\
.... 4-7
H
Handbrake lever .................................................................. 3-16
Hazard warning flasher switch ............................................. 2-28 Head restraint
– Active head restraints ...................................................... 1-6
– Adjustment ...................................................................... 1-5
Headlight
– Headlight aiming control switch ..................................... 2-27
– Headlight and turn signal switch .................................... 2-24
– Headlight cleaner .......................................................... 2-28
– Headlight switch ............................................................ 2-24
– Headlights (bulb replacement) ....................................... 8-26
– Replacement (bulb) ....................................................... 8-25
– Turn signal switch .......................................................... 2-26
– Xenon ........................................................................\
... 2-24
Heated seats ....................................................................... 2-29
Heater and air conditioner ................................................... 4-12
Horn ........................................................................\
........... 2-29
How to adjust the screen view ............................................. 4-11
I
Ignition
– Ignition knob (Intelligent Key equipped models) ................ 5-8
– Ignition switch ................................................................. 5-6
Immobilizer
– NATS immobilizer radio approval number ....................... 9-10
– NISSAN Anti-Theft System (NATS) ............................... 3-13
Indicator lights ....................................................................... 2-3
Injured persons ..................................................................... 1-9
Inside rear-view mirror ......................................................... 3-17
Instrument and control layout
– LHD and RHD models ..................................................... 0-5
Integrated keyfob (remote control system) ............................. 3-3
– Battery replacement ...................................................... 8-19
– Ignition switch ................................................................. 5-6
– Keyfob operation failure ................................................... 3-6
– Locking the doors ............................................................ 3-5
– Setting the unlock mode .................................................. 3-4
10-4Index