2009 NISSAN MURANO Arnes
[x] Cancel search: ArnesPage 37 of 443
Black plate (35,1)
Model "Z51-D" EDITED: 2007/ 10/ 2
loads imposed by correctly fitted
child restraints. Under no circum-
stances are they to be used for adult
seat belts or harnesses.
.Adjustable seatbacks should be
positioned to fit the child restraint,
but as upright as possible.
.After attaching the child restraint,
test it before you place the child in
it. Push it from side to side while
holding the seat near the LATCH
attachment or by the seat belt path.
Try to tug it forward and check to
see if the belt holds the restraint in
place. The child restraint should not
move more than 1 in (25 mm) . If the
restraint is not secure, tighten the
belt as necessary, or put the re-
straint in another seat and test it
again. You may need to try a differ-
ent child restraint. Not all child
restraints fit in all types of vehicles.
.When your child restraint is not in
use, keep it secured with the LATCH
System or a seat belt to prevent it
from being thrown around in case of
a sudden stop or accident.CAUTION
Remember that a child restraint left in a
closed vehicle can become very hot.
Check the seating surface and buckles
before placing your child in the child
restraint.
This vehicle is equipped with a universal child
restraint lower anchor system, referred to as the
Lower Anchors and Tethers for CHildren System
or LATCH. Some child restraints include two
rigid or webbing-mounted attachments that can
be connected to these lower anchors. For
details, see “Lower Anchors and Tethers for
CHildren SYSTEM (LATCH)” later in this sec-
tion.
If you do not have a LATCH compatible child
restraint, the vehicle seat belts can be used.
(See “CHILD RESTRAINT INSTALLATION
USING THE SEAT BELTS” later in this section.)
In general, child restraints are also designed to
be installed with the lap portion of a lap/shoulder
seat belt.
Several manufacturers offer child restraints for
infants and small children of various sizes. When
selecting any child restraint, keep the following
points in mind:
.Choose only a restraint with a label certifying
that it complies with Federal Motor VehicleSafety Standard 213 or Canadian Motor
Vehicle Safety Standard 213.
.Check the child restraint in your vehicle to
be sure it is compatible with the vehicle’s
seat and seat belt system.
.If the child restraint is compatible with your
vehicle, place your child in the child restraint
and check the various adjustments to be
sure the child restraint is compatible with
your child. Choose a child restraint that is
designed for your child’s height and weight.
Always follow all recommended procedures.
All U.S. states and Canadian provinces or
territories require that infants and small
children be restrained in an approved child
restraint at all times while the vehicle is
being operated.
Lower Anchors and Tethers for CHildren
SYSTEM (LATCH)
Your vehicle is equipped with special anchor
points that are used with Lower Anchors and
Tethers for CHildren System (LATCH) compa-
tible child restraints. This system may also be
referred to as the ISOFIX or ISOFIX compatible
system. With this system, you do not have to use
a vehicle seat belt to secure the child restraint.
The LATCH anchor points are provided to install
child restraints in the rear outboard seating
Safety — Seats, seat belts and supplemental restraint system1-23
Page 38 of 443
Black plate (36,1)
Model "Z51-D" EDITED: 2007/ 10/ 2
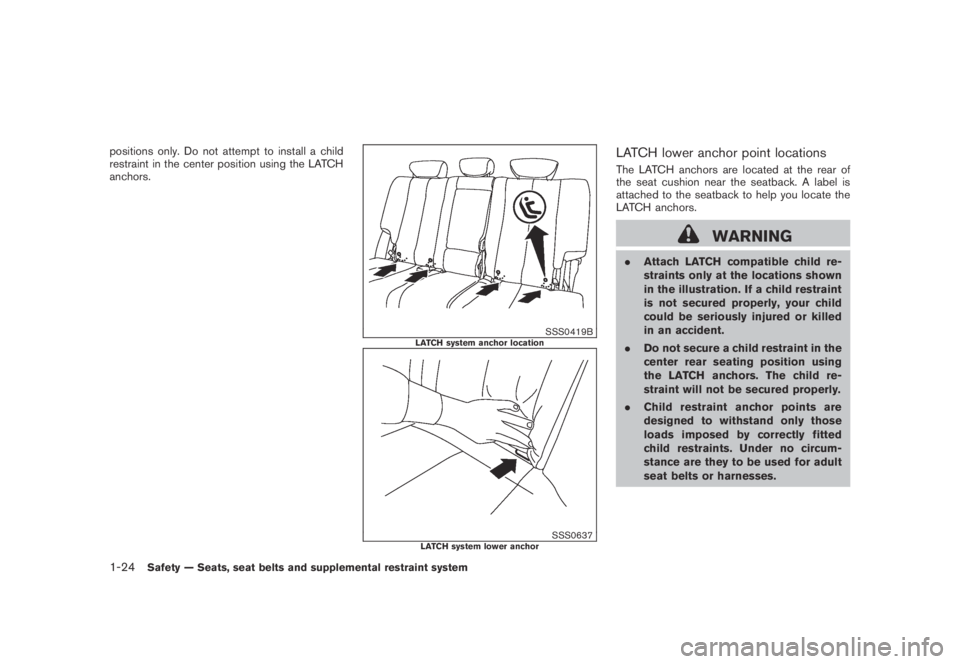
positions only. Do not attempt to install a child
restraint in the center position using the LATCH
anchors.
SSS0419BLATCH system anchor location
SSS0637LATCH system lower anchor
LATCH lower anchor point locations
The LATCH anchors are located at the rear of
the seat cushion near the seatback. A label is
attached to the seatback to help you locate the
LATCH anchors.
WARNING
.Attach LATCH compatible child re-
straints only at the locations shown
in the illustration. If a child restraint
is not secured properly, your child
could be seriously injured or killed
in an accident.
.Do not secure a child restraint in the
center rear seating position using
the LATCH anchors. The child re-
straint will not be secured properly.
.Child restraint anchor points are
designed to withstand only those
loads imposed by correctly fitted
child restraints. Under no circum-
stance are they to be used for adult
seat belts or harnesses.
1-24Safety — Seats, seat belts and supplemental restraint system
Page 39 of 443
Black plate (37,1)
Model "Z51-D" EDITED: 2007/ 10/ 2
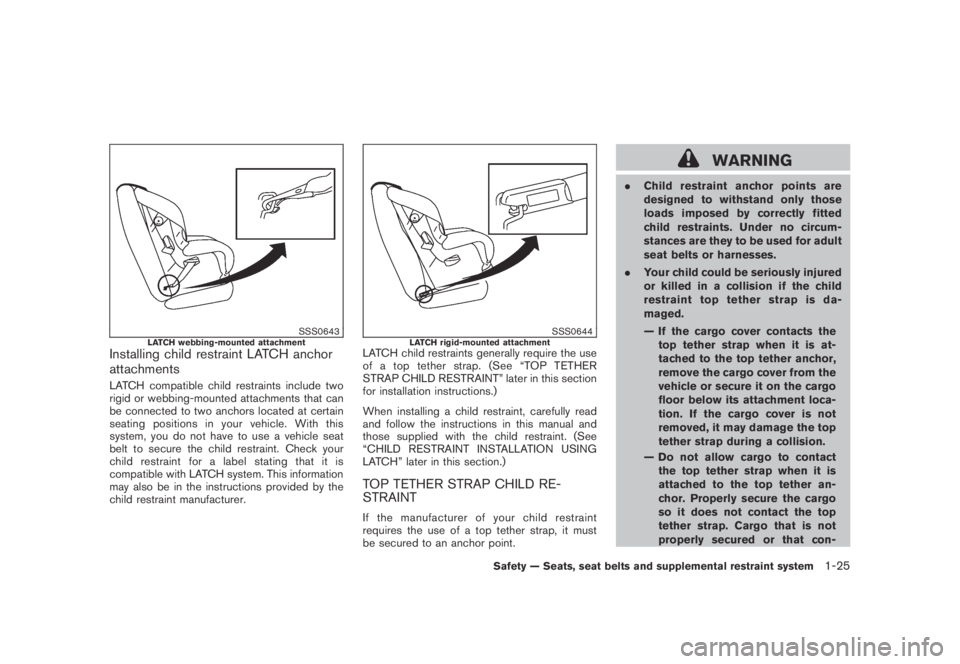
SSS0643LATCH webbing-mounted attachmentInstalling child restraint LATCH anchor
attachments
LATCH compatible child restraints include two
rigid or webbing-mounted attachments that can
be connected to two anchors located at certain
seating positions in your vehicle. With this
system, you do not have to use a vehicle seat
belt to secure the child restraint. Check your
child restraint for a label stating that it is
compatible with LATCH system. This information
may also be in the instructions provided by the
child restraint manufacturer.
SSS0644LATCH rigid-mounted attachmentLATCH child restraints generally require the use
of a top tether strap. (See “TOP TETHER
STRAP CHILD RESTRAINT” later in this section
for installation instructions.)
When installing a child restraint, carefully read
and follow the instructions in this manual and
those supplied with the child restraint. (See
“CHILD RESTRAINT INSTALLATION USING
LATCH” later in this section.)
TOP TETHER STRAP CHILD RE-
STRAINT
If the manufacturer of your child restraint
requires the use of a top tether strap, it must
be secured to an anchor point.
WARNING
.Child restraint anchor points are
designed to withstand only those
loads imposed by correctly fitted
child restraints. Under no circum-
stances are they to be used for adult
seat belts or harnesses.
.Your child could be seriously injured
or killed in a collision if the child
restraint top tether strap is da-
maged.
— If the cargo cover contacts the
top tether strap when it is at-
tached to the top tether anchor,
remove the cargo cover from the
vehicle or secure it on the cargo
floor below its attachment loca-
tion. If the cargo cover is not
removed, it may damage the top
tether strap during a collision.
— Do not allow cargo to contact
the top tether strap when it is
attached to the top tether an-
chor. Properly secure the cargo
so it does not contact the top
tether strap. Cargo that is not
properly secured or that con-
Safety — Seats, seat belts and supplemental restraint system1-25
Page 40 of 443
Black plate (38,1)
Model "Z51-D" EDITED: 2007/ 10/ 2
tacts the top tether strap may
damage the top tether strap
during a collision.
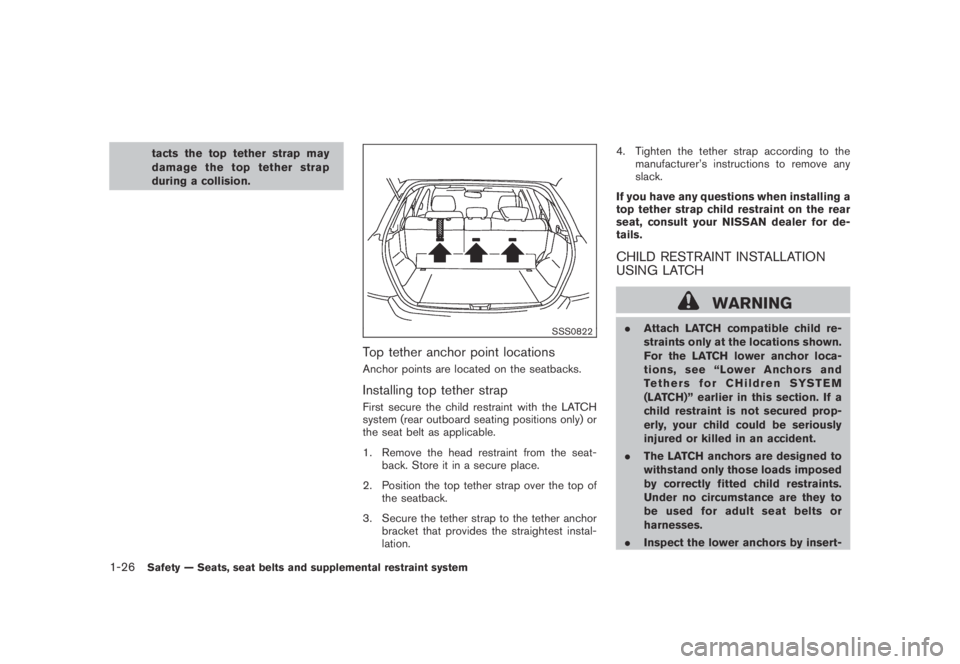
SSS0822
Top tether anchor point locations
Anchor points are located on the seatbacks.
Installing top tether strap
First secure the child restraint with the LATCH
system (rear outboard seating positions only) or
the seat belt as applicable.
1. Remove the head restraint from the seat-
back. Store it in a secure place.
2. Position the top tether strap over the top of
the seatback.
3. Secure the tether strap to the tether anchor
bracket that provides the straightest instal-
lation.4. Tighten the tether strap according to the
manufacturer’s instructions to remove any
slack.
If you have any questions when installing a
top tether strap child restraint on the rear
seat, consult your NISSAN dealer for de-
tails.
CHILD RESTRAINT INSTALLATION
USING LATCH
WARNING
.Attach LATCH compatible child re-
straints only at the locations shown.
For the LATCH lower anchor loca-
tions, see “Lower Anchors and
Tethers for CHildren SYSTEM
(LATCH)” earlier in this section. If a
child restraint is not secured prop-
erly, your child could be seriously
injured or killed in an accident.
.The LATCH anchors are designed to
withstand only those loads imposed
by correctly fitted child restraints.
Under no circumstance are they to
be used for adult seat belts or
harnesses.
.Inspect the lower anchors by insert-
1-26Safety — Seats, seat belts and supplemental restraint system
Page 65 of 443
Black plate (63,1)
Model "Z51-D" EDITED: 2007/ 10/ 2
placing material over the steering
wheel pad and above the instrument
panel or by installing additional trim
material around the air bag system.
.Modifying or tampering with the
front passenger seat may result in
serious personal injury. For exam-
ple, do not change the front seats by
placing material on the seat cushion
or by installing additional trim ma-
terial, such as seat covers, on the
seat that is not specifically designed
to assure proper air bag operation.
Additionally, do not stow any ob-
jects under the front passenger seat
or the seat cushion and seatback.
Such objects may interfere with the
proper operation of the occupant
classification sensor.
.No unauthorized changes should be
made to any components or wiring
of the seat belt system. This may
affect the front air bag system.
Tampering with the seat belt system
may result in serious personal in-
jury.
.Work on and around the front air
bag system should be done by a
NISSAN dealer. Installation of elec-trical equipment should also be
done by a NISSAN dealer. The
Supplemental Restraint System
(SRS) wiring should not be modified
or disconnected. Unauthorized elec-
trical test equipment and probing
devices should not be used on the
air bag system.
.A cracked windshield should be
replaced immediately by a qualified
repair facility. A cracked windshield
could affect the function of the
supplemental air bag system.
.The SRS wiring harness connectors
are yellow and orange for easy
identification.
When selling your vehicle, we request that you
inform the buyer about the front air bag system
and guide the buyer to the appropriate sections
in this Owner’s Manual.
SSS0848
FRONT SEAT-MOUNTED SIDE-IM-
PACT SUPPLEMENTAL AIR BAG AND
ROOF-MOUNTED CURTAIN SIDE-IM-
PACT AND ROLLOVER SUPPLEMEN-
TAL AIR BAG SYSTEMS
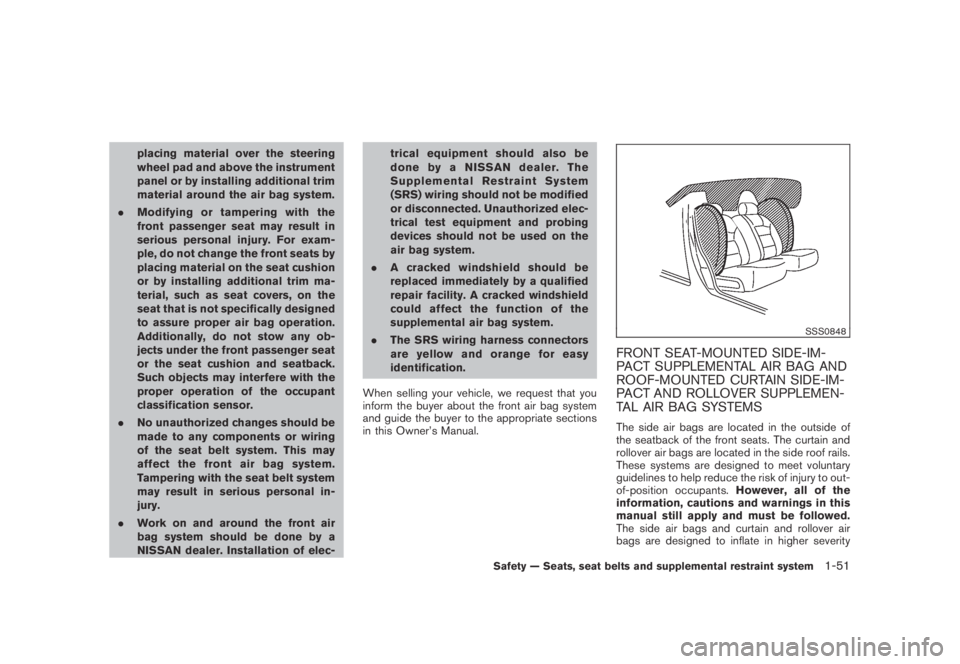
The side air bags are located in the outside of
the seatback of the front seats. The curtain and
rollover air bags are located in the side roof rails.
These systems are designed to meet voluntary
guidelines to help reduce the risk of injury to out-
of-position occupants.However, all of the
information, cautions and warnings in this
manual still apply and must be followed.
The side air bags and curtain and rollover air
bags are designed to inflate in higher severity
Safety — Seats, seat belts and supplemental restraint system1-51
Page 67 of 443
Black plate (65,1)
Model "Z51-D" EDITED: 2007/ 10/ 2
installing additional trim material,
such as seat covers, around the side
air bag.
.Work around and on the side air bag
and curtain and rollover air bag
systems should be done by a
NISSAN dealer. Installation of elec-
trical equipment should also be
done by a NISSAN dealer. The SRS
wiring harnesses* should not be
modified or disconnected. Un-
authorized electrical test equipment
and probing devices should not be
used on the side air bag and curtain
and rollover air bag systems.
*The SRS wiring harnesses connec-
tors are yellow and orange for easy
identification.
When selling your vehicle, we request that you
inform the buyer about the side air bag and
curtain and rollover air bag systems and guide
the buyer to the appropriate sections in this
Owner’s Manual.SEAT BELTS WITH PRETENSIONERS
(front seats)
WARNING
.The pretensioners cannot be reused
after activation. They must be re-
placed together with the retractor
and buckle as a unit.
.If the vehicle becomes involved in a
frontal collision but a pretensioner
is not activated, be sure to have the
pretensioner system checked and, if
necessary, replaced by a NISSAN
dealer.
.No unauthorized changes should be
made to any components or wiring
of the pretensioner system. This is
to prevent damage to or accidental
activation of the pretensioners.
Tampering with the pretensioner
system may result in serious perso-
nal injury.
.Work around and on the preten-
sioner system should be done by a
NISSAN dealer. Installation of elec-
trical equipment should also be
done by a NISSAN dealer. Un-
authorized electrical test equipmentand probing devices should not be
used on the pretensioner system.
.If you need to dispose of a preten-
sioner or scrap the vehicle, contact a
NISSAN dealer. Correct preten-
sioner disposal procedures are set
forthintheappropriateNISSAN
Service Manual. Incorrect disposal
procedures could cause personal
injury.
The pretensioner system activates in conjunc-
tion with the front air bag system. The preten-
sioner system also activates with the curtain and
rollover air bags in certain types of rollover
collisions or near rollovers. Working with the
seat belt retractor, it helps tighten the seat belt
when the vehicle becomes involved in certain
types of collisions, helping to restrain front seat
occupants.
The pretensioner is encased with the seat belt
retractor. These seat belts are used the same
way as conventional seat belts.
When a pretensioner activates, smoke is re-
leased and a loud noise may be heard. The
smoke is not harmful and does not indicate a
fire. Care should be taken not to inhale it, as it
may cause irritation and choking. Those with a
history of a breathing condition should get fresh
air promptly.
Safety — Seats, seat belts and supplemental restraint system1-53
Page 238 of 443
Black plate (236,1)
Model "Z51-D" EDITED: 2007/ 10/ 2
.A new disc may be rough on its
inner and outer edges. Remove the
rough edges using the side of a pen
or pencil as illustrated.
.Never attempt to use a DVD that has
been cracked, deformed, or repaired
using adhesive. Doing so may cause
damage to the equipment.
.Handle the DVD carefully to avoid contam-
ination or flaws. Otherwise, signals may not
be read properly.
.Do not write, draw or attach anything on any
side of the DVD.
.Do not store the DVD in locations with direct
sunlight or in high temperatures or humidity.
.Always place discs in the storage case
when they are not being used.
.Do not put on any sticker or write anything
on either surface of the DVD.When installing a car phone or a CB radio in
your NISSAN, be sure to observe the following
cautions, otherwise the new equipment may
adversely affect the electronic control modules
and electronic control system harness.
WARNING
.A cellular telephone should not be
used while driving so full attention
may be given to vehicle operation.
Some jurisdictions prohibit the use
of cellular telephones while driving.
.If you must make a call while your
vehicle is in motion, the hands-free
cellular phone operational mode (if
so equipped) is highly recom-
mended. Exercise extreme caution
at all times so full attention may be
given to vehicle operation.
.If a conversation in a moving vehicle
requires you to take notes, pull off
the road to a safe location and stop
your vehicle before doing so.
CAUTION
.Keep the antenna as far away as
possible from the electronic control
modules.
.Keep the antenna wire more than 8
in (20 cm) away from the electronic
control system harness. Do not
route the antenna wire next to any
harness.
.Adjust the antenna standing-wave
ratio as recommended by the man-
ufacturer.
.Connect the ground wire from the
CB radio chassis to the body.
.For details, consult a NISSAN deal-
er.
CAR PHONE OR CB RADIO
4-74Monitor, heater, air conditioner, audio, phone and voice recognition systems
Page 369 of 443
Black plate (371,1)
Model "Z51-D" EDITED: 2007/ 10/ 2
When performing any inspection or mainte-
nance work on your vehicle, always take care
to prevent serious accidental injury to yourself or
damage to the vehicle. The following are general
precautions which should be closely observed.
WARNING
.Park the vehicle on a level surface,
apply the parking brake securely
and block the wheels to prevent
the vehicle from moving. Move the
selector lever to P (Park) .
.Be sure the ignition switch is in the
OFF or LOCK position when per-
forming any parts replacement or
repairs.
.If you must work with the engine
running, keep your hands, clothing,
hair and tools away from moving
fans, belts and any other moving
parts.
.It is advisable to secure or remove
any loose clothing and remove any
jewelry, such as rings, watches, etc.
before working on your vehicle.
.Always wear eye protection when-
ever you work on your vehicle.
.If you must run the engine in anenclosed space such as a garage, be
sure there is proper ventilation for
exhaust gases to escape.
.Never get under the vehicle while it
is supported only by a jack. If it is
necessary to work under the vehicle,
support it with safety stands.
.Keep smoking materials, flame and
sparks away from fuel tank and the
battery.
.The fuel filter or fuel lines should be
serviced by a NISSAN dealer be-
cause the fuel lines are under high
pressure even when the engine is
off.
CAUTION
.Do not work under the hood while
the engine is hot. Turn the engine
off and wait until it cools down.
.Avoid direct contact with used en-
gine oil and coolant. Improperly
disposed engine oil, and engine
coolant and/or other vehicle fluids
can damage the environment. Al-
ways conform to local regulations
for disposal of vehicle fluid..Never leave the engine or the CVT
related component harnesses dis-
connected while the ignition switch
is in the ON position.
.Never connect or disconnect the
battery or any transistorized com-
ponent while the ignition switch is
in the ON position.
.Your vehicle is equipped with an
automatic engine cooling fan. It may
come on at any time without warn-
ing, even if the ignition key is in the
OFF position and the engine is not
running. To avoid injury, always
disconnect the negative battery
cable before working near the fan.
This “8. Maintenance and do-it-yourself” section
gives instructions regarding only those items
which are relatively easy for an owner to perform.
A genuine NISSAN Service Manual is also
available. (See “OWNER’S MANUAL/SERVICE
MANUAL ORDER INFORMATION” in the “9.
Technical and consumer information” section.)
Youshouldbeawarethatincompleteor
improper servicing may result in operating
difficulties or excessive emissions, and could
affect warranty coverage.If in doubt about
any servicing, we recommend that it be
MAINTENANCE PRECAUTIONS
Maintenance and do-it-yourself8-5