2009 NISSAN FRONTIER lock
[x] Cancel search: lockPage 179 of 366

SATELLITE RADIO RECEPTION (if so
equipped)
When the satellite radio is first installed or the
battery has been replaced, the satellite radio may
not work properly. This is not a malfunction. Wait
more than 10 minutes with satellite radio ON and
the vehicle outside of any metal or large building
for satellite radio to receive all of the necessary
data.
No satellite radio reception is available and “NO
SAT” is displayed when the SAT band option is
selected unless optional satellite receiver and
antenna are installed and an XMTsatellite radio
service subscription is active. Satellite radio can
only be installed in vehicles that were factory
pre-wired for satellite radio. Satellite radio is not
available in Alaska, Hawaii and Guam.
Satellite radio performance may be affected if
cargo carried on the roof blocks the satellite radio
signal.
If possible, do not put cargo over the satellite
antenna.
A build up of ice on the satellite radio antenna can
affect satellite radio performance. Remove the
ice to restore satellite radio reception
AUDIO OPERATION PRECAUTIONSCompact disc (CD) player
CAUTION
cDo not force a compact disc into the CD
insert slot. This could damage the CD
and/or CD changer/player.
cTrying to load a CD with the CD door
closed could damage the CD and/or CD
changer.
cOnly one CD can be loaded into the CD
player at a time.
cOnly use high quality 4.7 in (12 cm)
round discs that have the “COMPACT
disc DIGITAL AUDIO” logo on the disc
or packaging.
cDuring cold weather or rainy days, the
player may malfunction due to the hu-
midity. If this occurs, remove the CD
and dehumidify or ventilate the player
completely.
cThe player may skip while driving on
rough roads.
cThe CD player sometimes cannot func-
tion when the compartment tempera-
ture is extremely high or low.
Decrease/increase the temperature
before use.
LHA0099
Heater, air conditioner, audio and phone systems4-19
ZREVIEW COPYÐ2009 08+ Truck/Frontier(fro)
Owners ManualÐUSA_English(nna)
05/27/08Ðdebbie
X
Page 186 of 366

MENU button (BASS, TREBLE, FADE, BAL-
ANCE and CLOCK):
Press the MENU button to change the mode as
follows:
BAS!TRE!FAD!BAL!CLOCK!Audio
!BAS
To adjust Bass, Treble, Fade and Balance, press
the MENU button until the desired mode appears
in the display. Press the SEEK button to adjust
Bass and Treble to the desired level. You can also
use the SEEK button to adjust Fade and Balance
modes. Fade adjusts the sound level between the
front and rear speakers and Balance adjusts the
sound between the right and left speakers.
Once you have adjusted the sound quality to the
desired level, press the MENU button repeatedly
until the radio or CD display reappears. Other-
wise, the radio or CD display will automatically
reappear after about 10 seconds.
NOTE:
If the clock is enabled, pressing the MENU
button will change the mode as follows:
BAS!TRE!FAD!BAL!CLOCK!
Hour adjustment!Minute adjustment!
Audio!BAS
For more information on setting the clock, see
“Clock set” later in this section.Clock operation
Press the MENU button until CLOCK is dis-
played; use the SEEK button to turn the clock
display on (CLK ON) or off (CLK OFF) .
Clock set
If the clock is not displayed with the ignition
switch in the ACC or ON position, you need to
select the CLK ON mode. Press the MENU but-
ton repeatedly until CLOCK is displayed. Use the
SEEK button to enable CLK ON mode.
1. Press the MENU button repeatedly until
CLOCK mode appears; press the SEEK
button until CLK ON appears.
2. Press the MENU button again; the hours will
start flashing.
3. Press the SEEK button
orto
adjust the hour.
4. Press the MENU button again; the display
will switch to the minute adjustment mode.
5. The minutes will start flashing. Press SEEK
button
orto adjust the minutes.
6. Press the MENU button again to exit the
clock set mode.The display will return to the regular clock display
after 10 seconds, or press the MENU button
again to return to the regular clock display.
Resetting the time
Hold the MENU button down and then press the
TUNE/SEEK button; the time will reset as fol-
lows:
cIf the displayed minutes before the reset are
in the range of :00 - :29, the hour displayed
before the reset will stay the same and the
minutes will be reset to :00.
cIf the displayed minutes before the reset are
in the range of :30 - :59, the hour displayed
before the reset will advance by one hour
and the minutes will be reset to :00.
For example, if the MENU button and the TUNE/
SEEK button are pressed while the time dis-
played is between 8:00 and 8:29, the display will
be reset to 8:00. If the buttons were pressed
while the time was between 8:30 and 8:59, the
display will be reset to 9:00. At the same time the
display will return to the audio.FM/AM radio operation
FM·AM button:
Press the FM·AM button to change from AMÃ!
FM reception.
4-26Heater, air conditioner, audio and phone systems
ZREVIEW COPYÐ2009 08+ Truck/Frontier(fro)
Owners ManualÐUSA_English(nna)
05/27/08Ðdebbie
X
Page 189 of 366
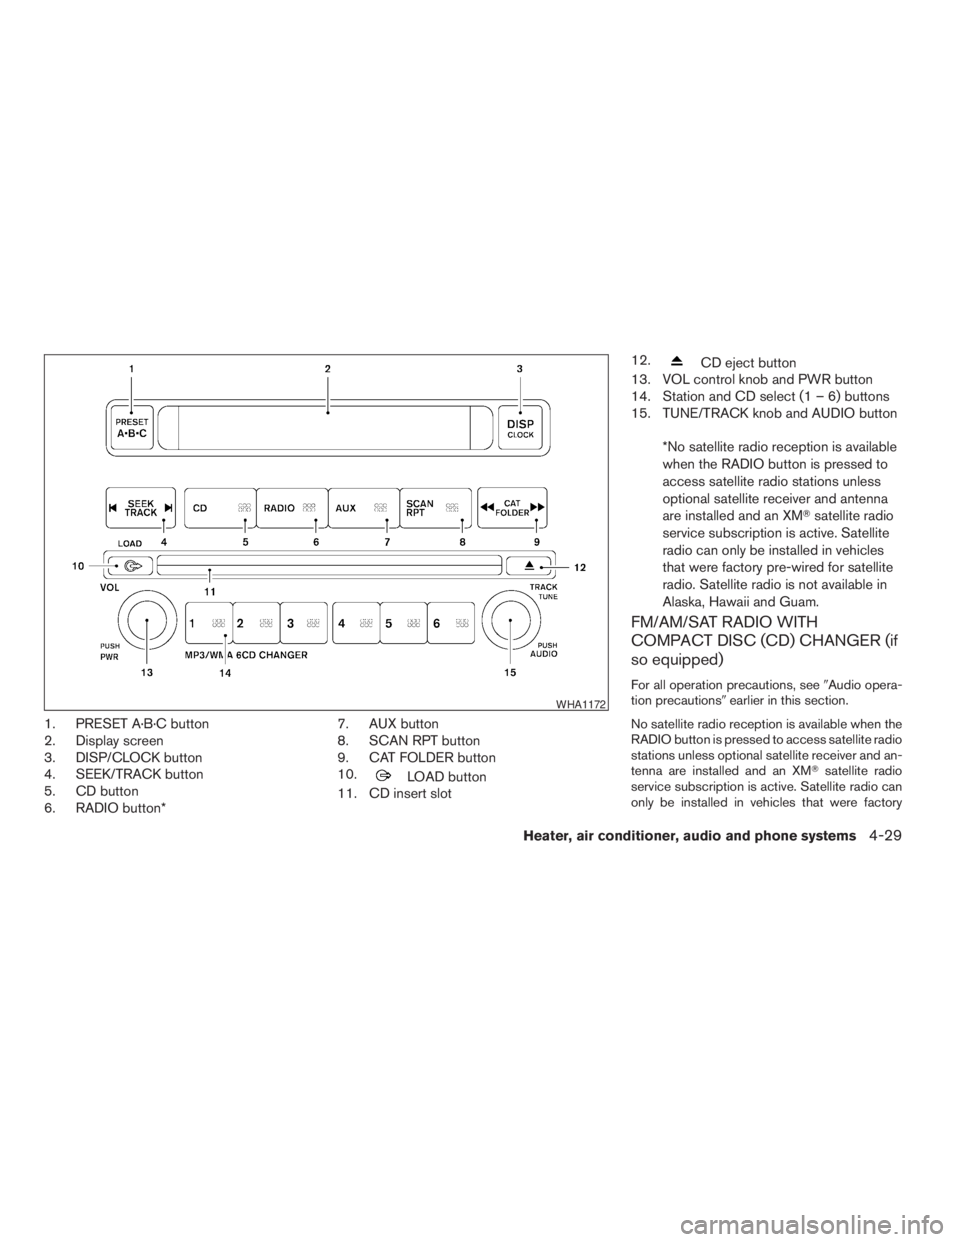
1. PRESET A·B·C button
2. Display screen
3. DISP/CLOCK button
4. SEEK/TRACK button
5. CD button
6. RADIO button*7. AUX button
8. SCAN RPT button
9. CAT FOLDER button
10.
LOAD button
11. CD insert slot12.
CD eject button
13. VOL control knob and PWR button
14. Station and CD select (1 – 6) buttons
15. TUNE/TRACK knob and AUDIO button
*No satellite radio reception is available
when the RADIO button is pressed to
access satellite radio stations unless
optional satellite receiver and antenna
are installed and an XMTsatellite radio
service subscription is active. Satellite
radio can only be installed in vehicles
that were factory pre-wired for satellite
radio. Satellite radio is not available in
Alaska, Hawaii and Guam.
FM/AM/SAT RADIO WITH
COMPACT DISC (CD) CHANGER (if
so equipped)
For all operation precautions, see9Audio opera-
tion precautions9earlier in this section.
No satellite radio reception is available when the
RADIO button is pressed to access satellite radio
stations unless optional satellite receiver and an-
tenna are installed and an XMTsatellite radio
service subscription is active. Satellite radio can
only be installed in vehicles that were factory
WHA1172
Heater, air conditioner, audio and phone systems4-29
ZREVIEW COPYÐ2009 08+ Truck/Frontier(fro)
Owners ManualÐUSA_English(nna)
05/27/08Ðdebbie
X
Page 190 of 366
pre-wired for satellite radio. Satellite radio is not
available in Alaska, Hawaii and Guam.
Audio main operation
POWER/VOLUME control:
Turn the ignition switch to ACC or ON, and then
press the PWR/VOL control knob while the sys-
tem is off to call up the mode (radio or CD) which
was playing immediately before the system was
turned off.
To turn the system off, press the PWR/VOL con-
trol knob.
Turn the PWR/VOL control knob to adjust the
volume.
This vehicle may be equipped with Speed Sen-
sitive Volume (SSV) for audio. The audio volume
changes as the driving speed changes.
AUDIO knob (BASS, MIDRANGE, TREBLE,
FADE, BALANCE and SSV if so equipped):
Press the AUDIO control knob to change the
mode as follows:
BASS!MID!TREBLE!FADE!BALANCE
!SSV (if so equipped)
To adjust Bass, Mid (Midrange) , Treble, Fade and
Balance, press the AUDIO knob until the desired
mode appears in the display. Turn the Tuning
knob to adjust Bass and Treble to the desiredlevel. You can also use the Tuning knob to adjust
Fade and Balance modes. Fader adjusts the
sound level between the front and rear speakers
and Balance adjusts the sound between the right
and left speakers.
To change the SSV mode to OFF, LOW, MID or
HIGH, turn the Tuning knob to the right or left.
Once you have adjusted the sound quality to the
desired level, press the AUDIO knob repeatedly
until the radio or CD display reappears. Other-
wise, the radio or CD display will automatically
reappear after about 10 seconds.
Clock set
1. Press the DISP/CLOCK button until it
beeps (>1.5 seconds) .
2. The hours will start flashing. Press the CAT
FOLDER
orbutton or SEEK
TRACK
orbutton to adjust the
hours.
3. Press the DISP/CLOCK button again to
switch to the minute adjustment.
4. Press the CAT FOLDER
or
button or SEEK TRACKorbutton to adjust the minutes.
5. Press the DISP/CLOCK button again to exit
the clock set mode.The display will return to the regular clock display
after 7 seconds, or you may press the DISP/
CLOCK button again to return to the regular
clock display.
DISP (display) button:
This DISP (display) button will show text about
MP3, SAT or CD information in the audio display.
CD display mode
To change the text displayed while playing a CD
with text, press the DISP button. The DISP button
will allow you to scroll through CD text as follows:
Disc titleÃ!Track numberÃ!Track title.
To change the default display mode, press the
AUDIO knob repeatedly until DISPLAY MODE
appears on the display, then rotate the knob to
select the following display modes: Disc number
Ã!Folder number.
Once the display mode is selected, press the
AUDIO knob again to store the setting. If the
AUDIO knob is not pressed within 8 seconds, the
display will refresh with the last selected display
mode setting.
cTrack title mode displays the title of the se-
lected CD track.
cDisc title mode displays the title of the CD
being played.
4-30Heater, air conditioner, audio and phone systems
ZREVIEW COPYÐ2009 08+ Truck/Frontier(fro)
Owners ManualÐUSA_English(nna)
05/27/08Ðdebbie
X
Page 196 of 366
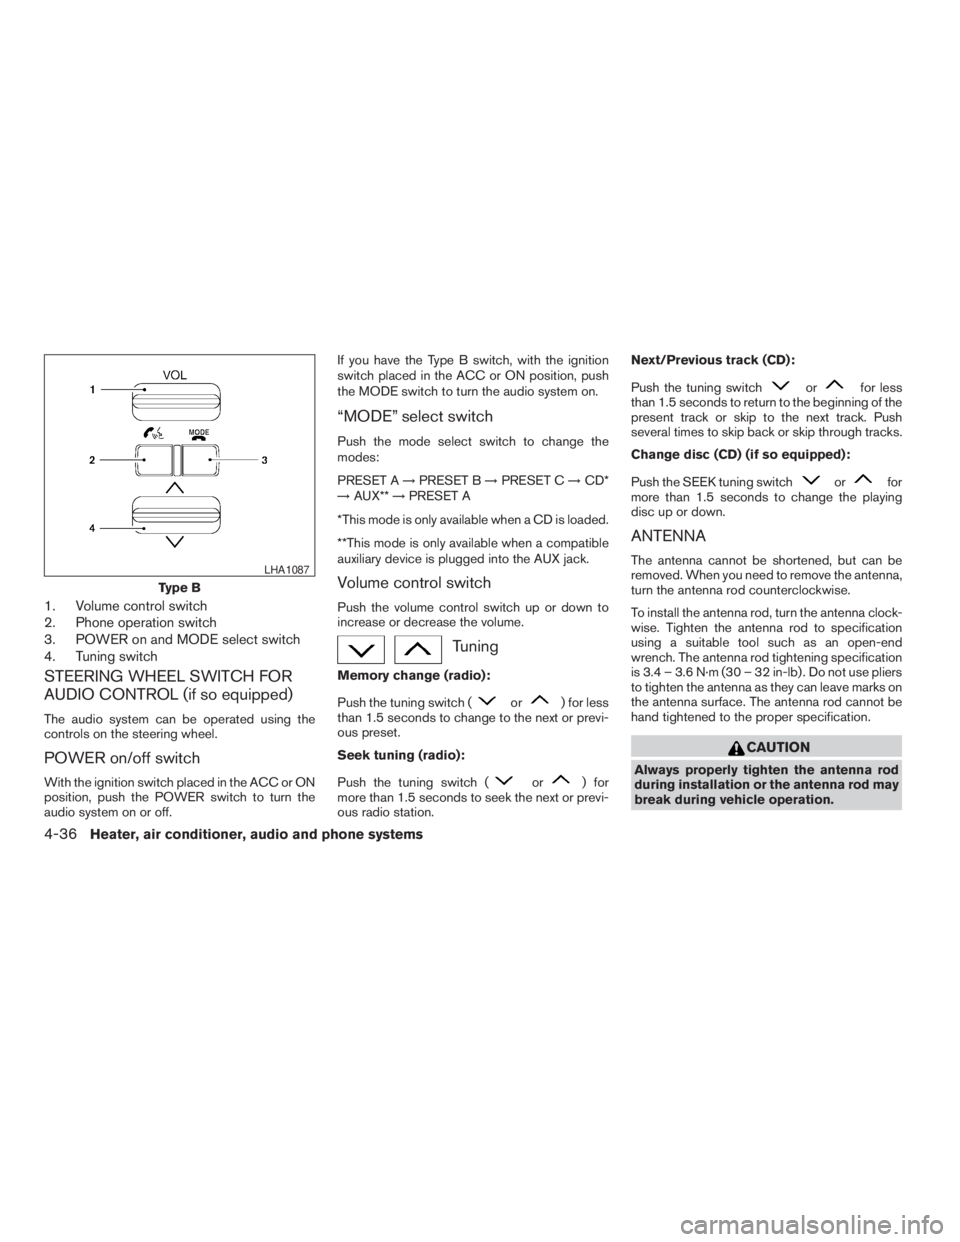
1. Volume control switch
2. Phone operation switch
3. POWER on and MODE select switch
4. Tuning switch
STEERING WHEEL SWITCH FOR
AUDIO CONTROL (if so equipped)
The audio system can be operated using the
controls on the steering wheel.
POWER on/off switch
With the ignition switch placed in the ACC or ON
position, push the POWER switch to turn the
audio system on or off.If you have the Type B switch, with the ignition
switch placed in the ACC or ON position, push
the MODE switch to turn the audio system on.
“MODE” select switch
Push the mode select switch to change the
modes:
PRESET A!PRESET B!PRESET C!CD*
!AUX**!PRESET A
*This mode is only available when a CD is loaded.
**This mode is only available when a compatible
auxiliary device is plugged into the AUX jack.
Volume control switch
Push the volume control switch up or down to
increase or decrease the volume.
Tuning
Memory change (radio):
Push the tuning switch (
or) for less
than 1.5 seconds to change to the next or previ-
ous preset.
Seek tuning (radio):
Push the tuning switch (
or) for
more than 1.5 seconds to seek the next or previ-
ous radio station.Next/Previous track (CD):
Push the tuning switch
orfor less
than 1.5 seconds to return to the beginning of the
present track or skip to the next track. Push
several times to skip back or skip through tracks.
Change disc (CD) (if so equipped):
Push the SEEK tuning switch
orfor
more than 1.5 seconds to change the playing
disc up or down.
ANTENNA
The antenna cannot be shortened, but can be
removed. When you need to remove the antenna,
turn the antenna rod counterclockwise.
To install the antenna rod, turn the antenna clock-
wise. Tighten the antenna rod to specification
using a suitable tool such as an open-end
wrench. The antenna rod tightening specification
is 3.4 – 3.6 N·m (30 – 32 in-lb) . Do not use pliers
to tighten the antenna as they can leave marks on
the antenna surface. The antenna rod cannot be
hand tightened to the proper specification.
CAUTION
Always properly tighten the antenna rod
during installation or the antenna rod may
break during vehicle operation.
Type B
LHA1087
4-36Heater, air conditioner, audio and phone systems
ZREVIEW COPYÐ2009 08+ Truck/Frontier(fro)
Owners ManualÐUSA_English(nna)
05/27/08Ðdebbie
X
Page 199 of 366
– Your cellular phone is locked to prevent it
from being dialed.
cWhen the radio wave condition is not ideal
or ambient sound is too loud, it may be
difficult to hear the other person’s voice dur-
ing a call.
cDo not place the cellular phone in an area
surrounded by metal or far away from the
in-vehicle phone module to prevent tone
quality degradation and wireless connection
disruption.
cWhile a cellular phone is connected through
the BluetoothTwireless connection, the bat-
tery power of the cellular phone may dis-
charge quicker than usual. The BluetoothT
Hands-Free Phone System cannot charge
cellular phones.
cIf the hands-free phone system seems to be
malfunctioning, see “Troubleshooting guide”
later in this section. You can also visit
www.nissanusa.com/bluetooth for trouble-
shooting help.
cSome cellular phones or other devices may
cause interference or a buzzing noise to
come from the audio system speakers. Stor-
ing the device in a different location may
reduce or eliminate the noise.cRefer to the cellular phone Owner’s Manual
regarding the telephone charges, cellular
phone antenna and body, etc.
REGULATORY INFORMATION
FCC Regulatory information
– CAUTION: To maintain compliance with
FCC’s RF exposure guidelines, use only the
supplied antenna. Unauthorized antenna,
modification, or attachments could damage
the transmitter and may violate FCC regula-
tions.
– Operation is subject to the following two con-
ditions:
1. This device may not cause interference and
2. this device must accept any interference,
including interference that may cause un-
desired operation of the device.
IC Regulatory information
– Operation is subject to the following two con-
ditions: (1) this device may not cause interfer-
ence, and (2) this device must accept any
interference, including interference that may
cause undesired operation of the device.
– This Class B digital apparatus meets all re-
quirements of the Canadian Interference-
Causing Equipment Regulations.
BLUETOOTHtis a
trademark owned by
Bluetooth SIG, Inc.,
U.S.A. and licensed to
Visteon.
USING THE SYSTEM
The NISSAN Voice Recognition system allows
hands-free operation of the BluetoothTPhone
System.
If the vehicle is in motion, some commands may
not be available so full attention may be given to
vehicle operation.
Initialization
When the ignition switch is placed in the ON
position, NISSAN Voice Recognition is initialized,
which takes a few seconds. When completed,
the amber light on the overhead console illumi-
nates and the system is ready to accept voice
commands. If the
button is pressed before
the initialization completes, the system will an-
nounce “Hands-free phone system not ready”
and will not react to voice commands.
Heater, air conditioner, audio and phone systems4-39
ZREVIEW COPYÐ2009 08+ Truck/Frontier(fro)
Owners ManualÐUSA_English(nna)
05/27/08Ðdebbie
X
Page 210 of 366
6. Voice memory A or memory B is selected
automatically. If both memory locations are
already in use, the system will prompt you to
overwrite one. Follow the instructions pro-
vided by the system.
7. When preparation is complete and you are
ready to begin, press the
button.
8. The SA mode will be explained. Follow the
instructions provided by the system.
9. When training is finished, the system will tell
you an adequate number of phrases have
been recorded.
10. The system will ask you to say your name.
Follow the instructions to register your
name.
11. The system will announce that speaker ad-
aptation has been completed and the sys-
tem is ready.
The SA mode will stop if:
cThe
button is pressed for more than 5
seconds in SA mode.
cThe vehicle begins moving during SA mode.
cThe ignition switch is turned to the OFF or
LOCK position.
Training phrases
During the SA mode, the system instructs the
trainer to say the following phrases. (The system
will prompt you for each phrase.)
cphone book new entry
cdial three oh four two nine
cdelete call back number
csetup pair phone
cmemo pad play
ceight pause nine three two pause seven
cdelete all entries
ccall seven two four zero nine
cphone book delete entry
cmemo pad record
cdial star two one seven oh
cYe s
cNo
cselect ring tone
cdial eight five six nine two
cBluetooth on
csetup change priority
ccall three one nine oh twocnine seven pause pause three oh eight
cCancel
ccall back number
ccall star two zero nine five
cdelete phone
cdial eight three zero five one
cHome
cfour three pause two nine pause zero
cdelete redial number
cphone book list names
ccall eight oh five four one
cCorrection
csetup change ring tone
cdial seven four oh one eight
csetup main menu
cDelete
cdial nine seven two six six
cmemo pad delete
ccall seven six three oh one
cgo back
ccall five six two eight zero
cdial six six four three seven
4-50Heater, air conditioner, audio and phone systems
ZREVIEW COPYÐ2009 08+ Truck/Frontier(fro)
Owners ManualÐUSA_English(nna)
05/27/08Ðdebbie
X
Page 212 of 366
5 Starting and driving
Precautions when starting and driving................5-2
Exhaust gas (carbon monoxide)..................5-2
Three-way catalyst..............................5-3
Tire Pressure Monitoring System (TPMS)..........5-3
On-pavement and off-road driving
precautions....................................5-5
Avoiding collision and rollover....................5-6
Off-road recovery...............................5-6
Rapid air pressure loss..........................5-6
Drinking alcohol/drugs and driving................5-7
Driving safety precautions.......................5-7
Ignition switch.....................................5-9
Automatic transmission (if so equipped)..........5-10
Manual transmission (if so equipped)............5-11
Key positions.................................5-11
Nissan Vehicle Immobilizer System
(if so equipped)...............................5-11
Before starting the engine.........................5-12
Starting the engine...............................5-12
Driving the vehicle................................5-13
Automatic transmission (if so equipped)..........5-13
Manual transmission (if so equipped)............5-17
Parking brake....................................5-19Cruise control (if so equipped).....................5-20
Precautions on cruise control...................5-20
Cruise control operations.......................5-20
Break-in schedule................................5-21
Increasing fuel economy...........................5-22
Using four wheel drive (4WD).............5-22
Transfer case shifting procedures...............5-23
Electronic locking rear differential (E-Lock) system
(if so equipped)..................................5-30
Parking/parking on hills............................5-31
Power steering...................................5-32
Brake system....................................5-32
Brake precautions.............................5-32
Anti-lock Braking System (ABS).................5-33
Active brake limited slip (ABLS) system.............5-34
Vehicle Dynamic Control (VDC) system
(if so equipped)..................................5-34
Hill descent control system (if so equipped).........5-36
Hill start assist system (if so equipped)..............5-37
Cold weather driving..............................5-37
Freeing a frozen door lock......................5-37
Anti-freeze....................................5-37
Battery.......................................5-37
ZREVIEW COPYÐ2009 08+ Truck/Frontier(fro)
Owners ManualÐUSA_English(nna)
05/27/08Ðdebbie
X