2009 NISSAN ARMADA inflation pressure
[x] Cancel search: inflation pressurePage 76 of 465

on the driver’s side of the instrument panel, will
blink. Have the system checked by a NISSAN
dealer.
Other supplemental front-impact air bag
precautions
WARNING
cDo not place any objects on the steer-
ing wheel pad or on the instrument
panel. Also, do not place any objects
between any occupant and the steering
wheel or instrument panel. Such ob-
jects may become dangerous projec-
tiles and cause injury if the front air
bags inflate.
cImmediately after inflation, several
front air bag system components will be
hot. Do not touch them; you may se-
verely burn yourself.
cNo unauthorized changes should be
made to any components or wiring of
the supplemental air bag system. This is
to prevent accidental inflation of the
supplemental air bag or damage to the
supplemental air bag system.cDo not make unauthorized changes to
your vehicle’s electrical system, sus-
pension system or front end structure.
This could affect proper operation of
the front air bag system.
cTampering with the front air bag system
may result in serious personal injury.
Tampering includes changes to the
steering wheel and the instrument
panel assembly by placing material
over the steering wheel pad and above
the instrument panel or by installing
additional trim material around the air
bag system.
cModifying or tampering with the front
passenger seat may result in serious
personal injury. For example, do not
change the front seats by placing mate-
rial on the seat cushion or by installing
additional trim material, such as seat
covers, on the seat that are not specifi-
cally designed to assure proper air bag
operation. Additionally, do not stow any
objects under the front passenger seat
or the seat cushion and seatback. Such
objects may interfere with the proper
operation of the occupant classifica-
tion sensor (pressure sensor) .cNo unauthorized changes should be
made to any components or wiring of
the seat belt system. This may affect the
front air bag system. Tampering with
the seat belt system may result in seri-
ous personal injury.
cWork on and around the front air bag
system should be done by a NISSAN
dealer. Installation of electrical equip-
ment should also be done by a NISSAN
dealer. The Supplemental Restraint
System (SRS) wiring should not be
modified or disconnected. Unautho-
rized electrical test equipment and
probing devices should not be used on
the air bag system.
cA cracked windshield should be re-
placed immediately by a qualified re-
pair facility. A cracked windshield could
affect the function of the supplemental
air bag system.
cThe SRS wiring harness connectors are
yellow and orange for easy
identification.
When selling your vehicle, we request that you
inform the buyer about the front air bag system
and guide the buyer to the appropriate sections
in this Owner’s Manual.
1-60Safety—Seats, seat belts and supplemental restraint system
ZREVIEW COPYÐ2009 Armada(wzw)
Owners ManualÐUSA_English(nna)
02/26/08Ðdebbie
X
ProCarManuals.com
Page 325 of 465
CAUTION
cDo not use leaded gasoline. Deposits
from leaded gasoline will seriously re-
duce the three-way catalyst’s ability to
help reduce exhaust pollutants.
cKeep your engine tuned up. Malfunc-
tions in the ignition, fuel injection, or
electrical systems can cause overrich
fuel flow into the three-way catalyst,
causing it to overheat. Do not keep driv-
ing if the engine misfires, or if notice-
able loss of performance or other un-
usual operating conditions are
detected. Have the vehicle inspected
promptly by a NISSAN dealer.
cAvoid driving with an extremely low fuel
level. Running out of fuel could cause
the engine to misfire, damaging the
three-way catalyst.
cDo not race the engine while warming it
up.
cDo not push or tow your vehicle to start
the engine.
ON-PAVEMENT AND OFF-ROAD
DRIVING PRECAUTIONS
Utility vehicles have a significantly higher
rollover rate than other types of vehicles.
They have higher ground clearance than passen-
ger cars to make them capable of performing in a
variety of on-pavement and off-road applications.
This gives them a higher center of gravity than
ordinary cars. An advantage of higher ground
clearance is a better view of the road, allowing
you to anticipate problems. However, they are not
designed for cornering at the same speeds as
conventional two-wheel drive vehicles any more
than low-slung sports cars are designed to per-
form satisfactorily under off-road conditions. If at
all possible, avoid sharp turns at high speeds. As
with other vehicles of this type, failure to operate
this vehicle correctly may result in loss of control
or vehicle rollover. In a rollover crash, an unbelted
person is significantly more likely to die than a
person wearing a seat belt.
Be sure to read the driving safety precautions
later in this section.
TIRE PRESSURE MONITORING
SYSTEM (TPMS)
Each tire, including the spare (if provided) ,
should be checked monthly when cold and in-
flated to the inflation pressure recommended by
the vehicle manufacturer on the vehicle placard
or tire inflation pressure label. (If your vehicle has
tires of a different size than the size indicated on
the vehicle placard or tire inflation pressure label,
you should determine the proper tire inflation
pressure for those tires.)
As an added safety feature, your vehicle has been
equipped with a Tire Pressure Monitoring System
(TPMS) that illuminates a low tire pressure telltale
when one or more of your tires is significantly
under-inflated. Accordingly, when the low tire
pressure telltale illuminates, you should stop and
check your tires as soon as possible, and inflate
them to the proper pressure. Driving on a signifi-
cantly under-inflated tire causes the tire to over-
heat and can lead to tire failure. Under-inflation
also reduces fuel efficiency and tire tread life, and
may affect the vehicle’s handling and stopping
ability.
Please note that the TPMS is not a substitute for
proper tire maintenance, and it is the driver’s
responsibility to maintain correct tire pressure,
Starting and driving5-3
ZREVIEW COPYÐ2009 Armada(wzw)
Owners ManualÐUSA_English(nna)
02/26/08Ðdebbie
X
ProCarManuals.com
Page 326 of 465
even if under-inflation has not reached the level to
trigger illumination of the TPMS low tire pressure
telltale.
Your vehicle has also been equipped with a
TPMS malfunction indicator to indicate when the
system is not operating properly. The TPMS mal-
function indicator is combined with the low tire
pressure telltale. When the system detects a
malfunction, the telltale will flash for approxi-
mately one minute and then remain continuously
illuminated. This sequence will continue upon
subsequent vehicle start-ups as long as the mal-
function exists. When the malfunction indicator is
illuminated, the system may not be able to detect
or signal low tire pressure as intended. TPMS
malfunctions may occur for a variety of reasons,
including the installation of replacement or alter-
nate tires or wheels on the vehicle that prevent
the TPMS from functioning properly. Always
check the TPMS malfunction telltale after replac-
ing one or more tires or wheels on your vehicle to
ensure that the replacement or alternate tires and
wheels allow the TPMS to continue to function
properly.
Additional information:
cThe TPMS does not monitor the tire pres-
sure of the spare tire.
cThe TPMS will activate only when the vehicle
is driven at speeds above 16 MPH(25 km/h). Also, this system may not detect a
sudden drop in tire pressure (for example a
flat tire while driving) .
cThe low tire pressure warning light does not
automatically turn off when the tire pressure
is adjusted. After the tire is inflated to the
recommended pressure, the vehicle must be
driven at speeds above 16 MPH (25 km/h)
to activate the TPMS and turn off the low tire
pressure warning light. Use a tire pressure
gauge to check the tire pressure.
cTire pressure rises and falls depending on
the heat caused by the vehicle’s operation
and the outside temperature. Low outside
temperature can lower the temperature of
the air inside the tire which can cause a
lower tire inflation pressure. This may cause
the low tire pressure warning light to illumi-
nate. If the warning light illuminates in low
ambient temperature, check the tire pres-
sure for all four tires.
cYou can also check the pressure of all tires
(except the spare tire) on the display screen.
The order of the tire pressure figures dis-
played on the screen does not correspond
with the actual order of the tire position. See
“Tire pressure information” in the “Monitor,
climate, audio, phone and voice recognition
systems” section.For additional information, see “Low tire pressure
warning light” in the “Instruments and controls”
section, “Tire Pressure Monitoring System
(TPMS)” in the “In case of emergency” section.
WARNING
cIf the low tire pressure warning light
illuminates while driving, avoid sudden
steering maneuvers or abrupt braking,
reduce vehicle speed, pull off the road
to a safe location and stop the vehicle
as soon as possible. Driving with under-
inflated tires may permanently damage
the tires and increase the likelihood of
tire failure. Serious vehicle damage
could occur and may lead to an acci-
dent and could result in serious per-
sonal injury. Check the tire pressure for
all four tires. Adjust the tire pressure to
the recommended COLD tire pressure
shown on the Tire and Loading Informa-
tion label to turn the low tire pressure
warning light OFF. If you have a flat tire,
replace it with a spare tire as soon as
possible. (See “Flat tire” in the “In case
of emergency” section for changing a
flat tire.)
5-4Starting and driving
ZREVIEW COPYÐ2009 Armada(wzw)
Owners ManualÐUSA_English(nna)
02/26/08Ðdebbie
X
ProCarManuals.com
Page 413 of 465
and voice recognition systems” section,
“Tire Pressure Monitoring System
(TPMS)” in the “Starting and driving” sec-
tion, and “Flat tire” in the “In case of emer-
gency” section.
Tire inflation pressure
Check the tire pressures (including the
spare) often and always prior to long dis-
tance trips. The recommended tire pres-
sure specifications are shown on the
F.M.V.S.S./C.M.V.S.S. certification label
or the Tire and Loading Information label
under the “Cold Tire Pressure” heading.
The Tire and Loading Information label is
affixed to the driver side center pillar. Tire
pressures should be checked regularly
because:
cMost tires naturally lose air over time.
cTires can lose air suddenly when
driven over potholes or other objects
or if the vehicle strikes a curb while
parking.The tire pressures should be checked
when the tires are cold. The tires are
considered COLD after the vehicle has
been parked for 3 or more hours, or driven
less than 1 mile (1.6 km) at moderate
speeds.
Incorrect tire pressure, including un-
der inflation, may adversely affect
tire life and vehicle handling.
WARNING
cImproperly inflated tires can fail
suddenly and cause an accident.
cThe Gross Vehicle Weight Rating
(GVWR) is located on the
F.M.V.S.S./C.M.V.S.S. certifica-
tion label. The vehicle weight ca-
pacity is indicated on the Tire and
Loading Information label (if so
equipped) . Do not load your ve-
hicle beyond this capacity. Over-
loading your vehicle may result in
reduced tire life, unsafe operat-
ing conditions due to premature
tire failure, or unfavorable han-
dling characteristics and couldalso lead to a serious accident.
Loading beyond the specified ca-
pacity may also result in failure of
other vehicle components.
cBefore taking a long trip, or
whenever you heavily load your
vehicle, use a tire pressure gauge
to ensure that the tire pressures
are at the specified level.
cDo not drive your vehicle over
85 MPH (137 km/h) unless it is
equipped with high speed rated
tires. Driving faster than 85 MPH
(137 km/h) may result in tire fail-
ure, loss of control and possible
injury.
cFor additional information re-
garding tires, refer to “Important
Tire Safety Information” (US) or
“Tire Safety Information”
(Canada) in the Warranty Infor-
mation Booklet.
Maintenance and do-it-yourself8-35
ZREVIEW COPYÐ2009 Armada(wzw)
Owners ManualÐUSA_English(nna)
02/26/08Ðdebbie
X
ProCarManuals.com
Page 414 of 465
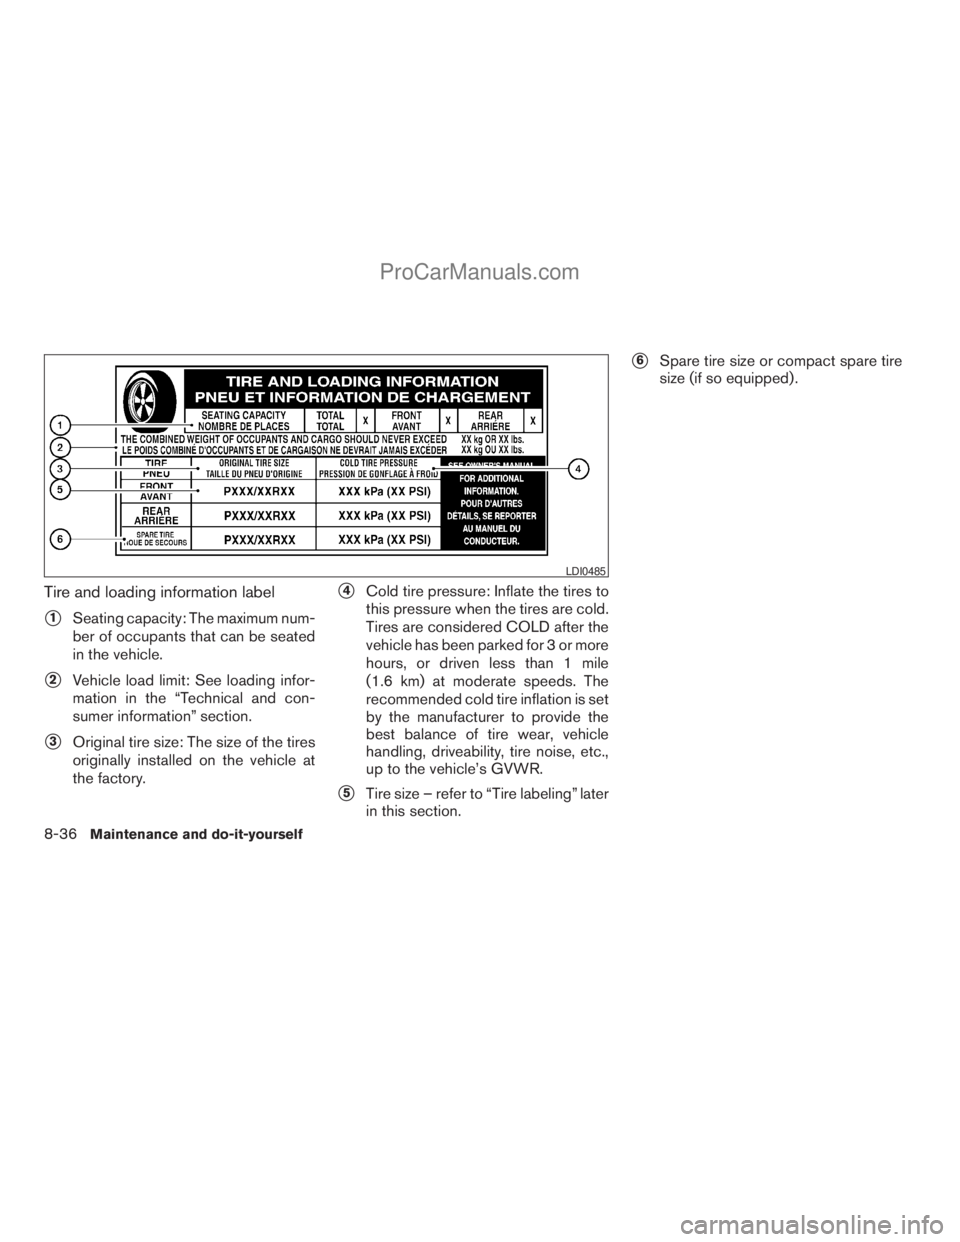
Tire and loading information label
s1Seating capacity: The maximum num-
ber of occupants that can be seated
in the vehicle.
s2Vehicle load limit: See loading infor-
mation in the “Technical and con-
sumer information” section.
s3Original tire size: The size of the tires
originally installed on the vehicle at
the factory.
s4Cold tire pressure: Inflate the tires to
this pressure when the tires are cold.
Tires are considered COLD after the
vehicle has been parked for 3 or more
hours, or driven less than 1 mile
(1.6 km) at moderate speeds. The
recommended cold tire inflation is set
by the manufacturer to provide the
best balance of tire wear, vehicle
handling, driveability, tire noise, etc.,
up to the vehicle’s GVWR.
s5Tire size – refer to “Tire labeling” later
in this section.
s6Spare tire size or compact spare tire
size (if so equipped) .
LDI0485
8-36Maintenance and do-it-yourself
ZREVIEW COPYÐ2009 Armada(wzw)
Owners ManualÐUSA_English(nna)
02/26/08Ðdebbie
X
ProCarManuals.com
Page 415 of 465
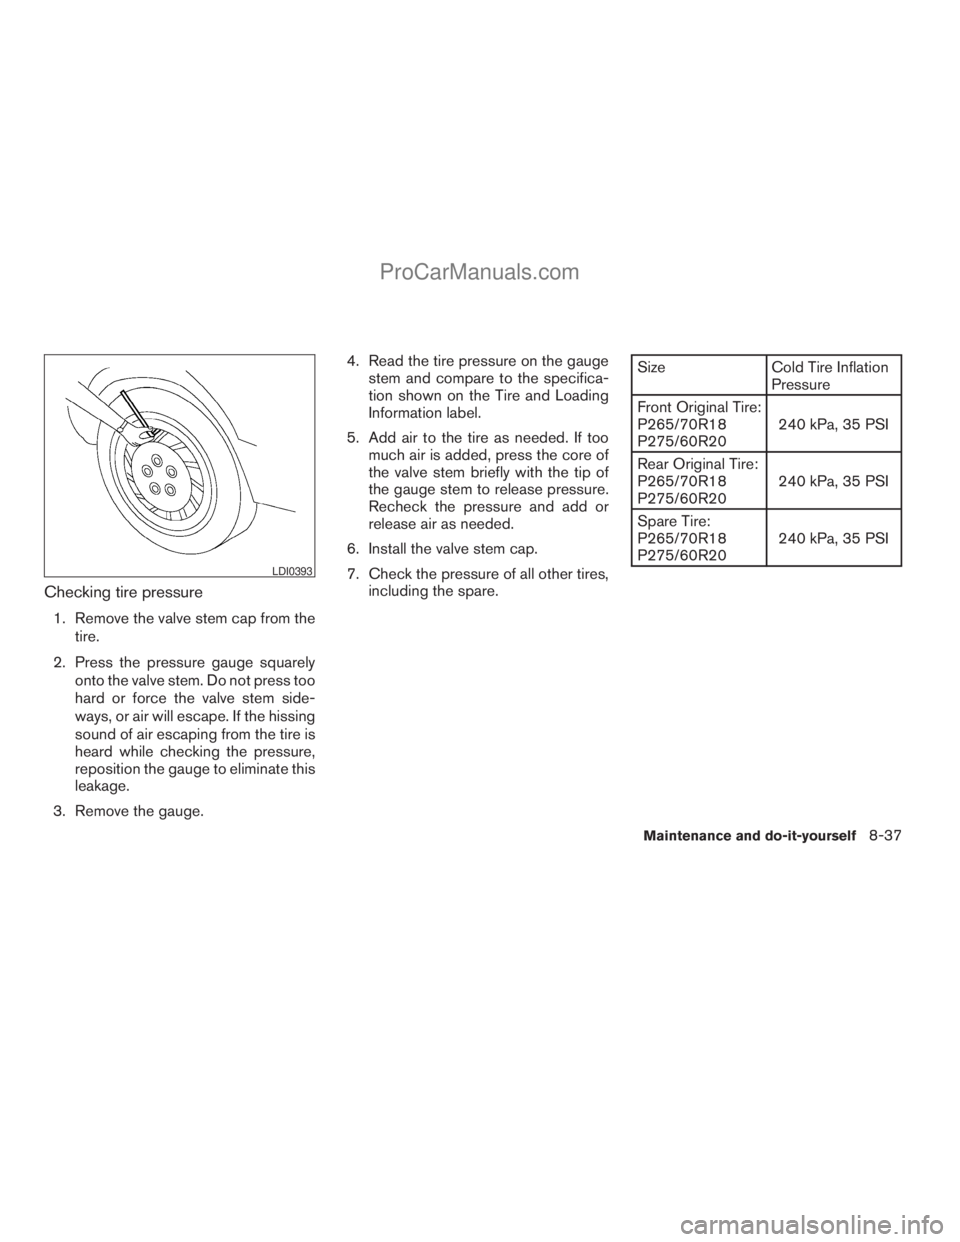
Checking tire pressure
1. Remove the valve stem cap from the
tire.
2. Press the pressure gauge squarely
onto the valve stem. Do not press too
hard or force the valve stem side-
ways, or air will escape. If the hissing
sound of air escaping from the tire is
heard while checking the pressure,
reposition the gauge to eliminate this
leakage.
3. Remove the gauge.4. Read the tire pressure on the gauge
stem and compare to the specifica-
tion shown on the Tire and Loading
Information label.
5. Add air to the tire as needed. If too
much air is added, press the core of
the valve stem briefly with the tip of
the gauge stem to release pressure.
Recheck the pressure and add or
release air as needed.
6. Install the valve stem cap.
7. Check the pressure of all other tires,
including the spare.
Size Cold Tire Inflation
Pressure
Front Original Tire:
P265/70R18
P275/60R20240 kPa, 35 PSI
Rear Original Tire:
P265/70R18
P275/60R20240 kPa, 35 PSI
Spare Tire:
P265/70R18
P275/60R20240 kPa, 35 PSI
LDI0393
Maintenance and do-it-yourself8-37
ZREVIEW COPYÐ2009 Armada(wzw)
Owners ManualÐUSA_English(nna)
02/26/08Ðdebbie
X
ProCarManuals.com
Page 417 of 465
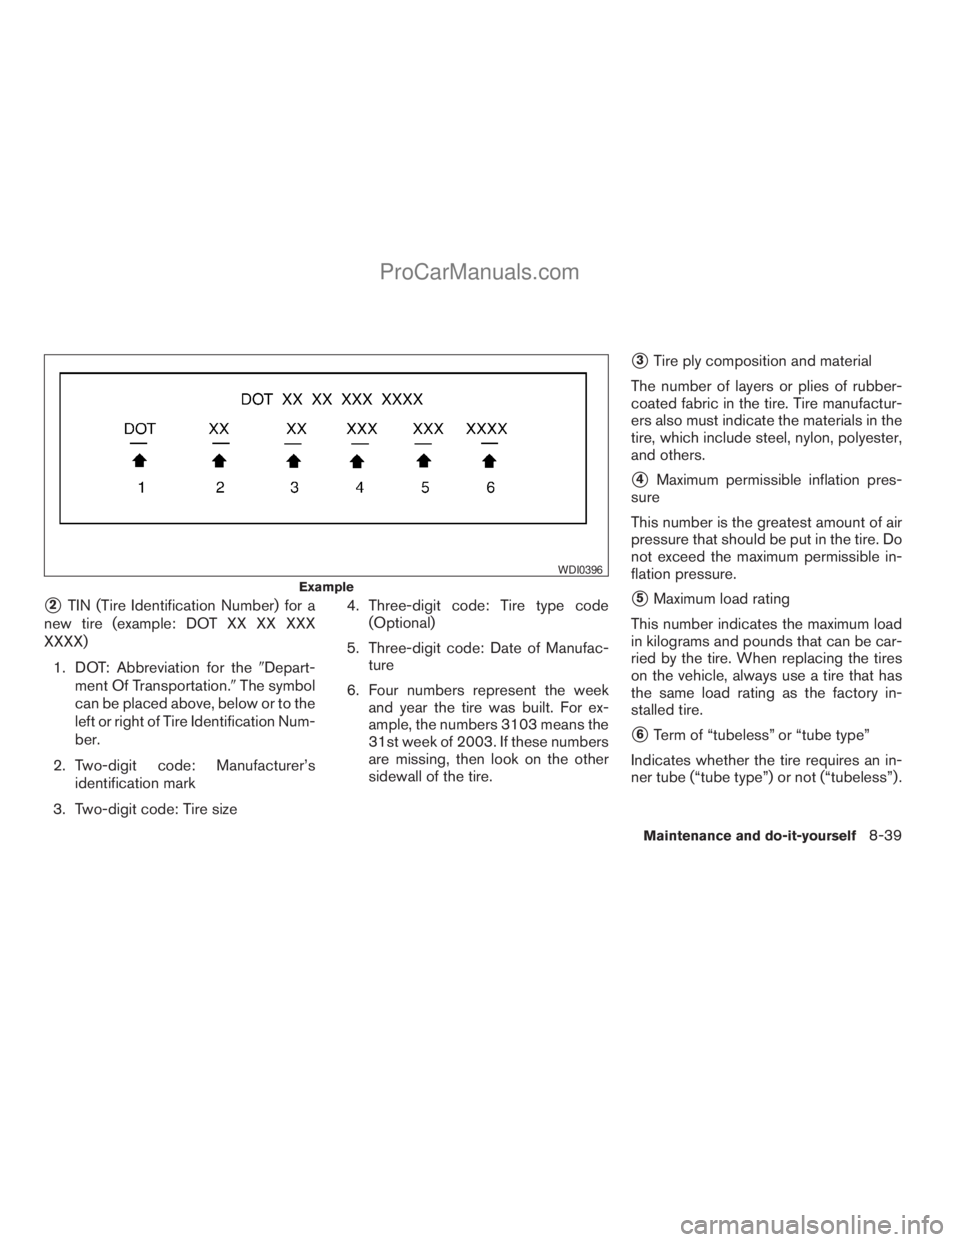
s2TIN (Tire Identification Number) for a
new tire (example: DOT XX XX XXX
XXXX)
1. DOT: Abbreviation for the9Depart-
ment Of Transportation.9The symbol
can be placed above, below or to the
left or right of Tire Identification Num-
ber.
2. Two-digit code: Manufacturer’s
identification mark
3. Two-digit code: Tire size4. Three-digit code: Tire type code
(Optional)
5. Three-digit code: Date of Manufac-
ture
6. Four numbers represent the week
and year the tire was built. For ex-
ample, the numbers 3103 means the
31st week of 2003. If these numbers
are missing, then look on the other
sidewall of the tire.
s3Tire ply composition and material
The number of layers or plies of rubber-
coated fabric in the tire. Tire manufactur-
ers also must indicate the materials in the
tire, which include steel, nylon, polyester,
and others.
s4Maximum permissible inflation pres-
sure
This number is the greatest amount of air
pressure that should be put in the tire. Do
not exceed the maximum permissible in-
flation pressure.
s5Maximum load rating
This number indicates the maximum load
in kilograms and pounds that can be car-
ried by the tire. When replacing the tires
on the vehicle, always use a tire that has
the same load rating as the factory in-
stalled tire.
s6Term of “tubeless” or “tube type”
Indicates whether the tire requires an in-
ner tube (“tube type”) or not (“tubeless”) .
Example
WDI0396
Maintenance and do-it-yourself8-39
ZREVIEW COPYÐ2009 Armada(wzw)
Owners ManualÐUSA_English(nna)
02/27/08Ðtbrooks
X
ProCarManuals.com
Page 445 of 465
CAUTION
cSpecial hitches which include frame re-
inforcements are required for towing
above 2,000 lb (907 kg) . Suitable genu-
ine NISSAN hitches, ball mounts and
hitch balls for pickup trucks and sport
utility vehicles are available at a
NISSAN dealer.
cThe hitch should not be attached to or
affect the operation of the impact-
absorbing bumper.
cDo not use axle-mounted hitches.
cDo not modify the vehicle exhaust sys-
tem, brake system, etc. to install a
trailer hitch.
cTo reduce the possibility of additional
damage if your vehicle is struck from
the rear, where practical, remove the
receiver when not in use.
cRegularly check that all trailer hitch
mounting bolts are securely mounted.
cWhen towing with the hitch ball
mounted to the rear bumper, do not
make sharp turns. The trailer may con-
tact the bumper and cause damage to
the bumper or trailer.
Tire pressures
cWhen towing a trailer, inflate the ve-
hicle tires to the recommended cold
tire pressure indicated on the tire
placard.
cTrailer tire condition, size, load rating
and proper inflation pressure should
be in accordance with the trailer and
tire manufacturer’s specifications.
Safety chains
Always use suitable safety chains between your
vehicle and the trailer. The safety chains should
be crossed and should be attached to the hitch,
not to the vehicle bumper or axle. The safety
chains can be attached to the bumper if the hitch
ball is mounted to the bumper. Be sure to leave
enough slack in the chains to permit turning
corners.
Trailer lights
CAUTION
When splicing into the vehicle electrical
system, a commercially available power-
type module/converter must be used to
provide power for all trailer lighting. This
unit uses the vehicle battery as a direct
power source for all trailer lights while
using the vehicle tail light, stoplight and
turn signal circuits as a signal source. The
module/converter must draw no more
that 15 milliamps from the stop and tail
lamp circuits. Using a module/converter
that exceeds these power requirements
may damage the vehicle’s electrical sys-
tem. See a reputable trailer dealer to ob-
tain the proper equipment and to have it
installed.
Trailer lights should comply with federal and/or
local regulations. For assistance in hooking up
trailer lights, contact a NISSAN dealer or repu-
table trailer dealer. Vehicles equipped with the
optional trailer tow package are equipped with a
7-pin trailer harness connector. If your trailer is
equipped with a flat 4-pin connector, an adapter
will be needed to connect the trailer lights to the
vehicle. Adapters are available at NISSAN deal-
ers as well as auto parts stores and hitch retail-
ers.
Technical and consumer information9-23
ZREVIEW COPYÐ2009 Armada(wzw)
Owners ManualÐUSA_English(nna)
02/27/08Ðtbrooks
X
ProCarManuals.com