Page 73 of 313

After 100 hours, the time will start from the reset
display again.Even if the display is switched to the other mode
while the time is starting, the stopwatch contin-
ues to advance until you stop the time in the
stopwatch mode. When the ignition switch is
turned to the OFF position, the time is reset.
Up-shift indicator setting (rpm) (for
manual transmission models)The up-shift indicator setting mode is used to
set the desired engine speed (rpm) for the
up-shift indicator (situated in the tachometer) to
illuminate. When the engine speed approaches
or reaches the set figure, the up-shift indicator
will flash or illuminate to show the driver the
timing for shifting into a higher gear. See “Driving
the vehicle” in the “5. Starting and driving”
section for the use of the up-shift indicator.
When the up-shift indicator setting mode is
selected, the rpm indicator blinks and the engine
speed currently set is displayed. (The initial
factory setting is 7,500 rpm.) The figure can be
changed between 2,000 and 9,000 rpm by
pushing trip computer setting switch
�B. Press-
ing the switch for less than approximately 1
second will add the figure by 100 rpm. If pushing
for more than approximately 1 second, the figure
will increase by 500 rpm.
If the battery cable is disconnected, the set
engine speed will be returned to the initial figure
(7,500 rpm).
Display priorityIf a low outside air temperature warning,
low dte (distance to empty) range warning
and low tire pressure warning occur simul-
taneously, other display modes switch au-
tomatically to the outside air temperature
display.
When trip computer mode switch
�A
is
pressed, the display switches to the mode
chosen before the warning display, but the
ICY indicator will continue blinking.
2-10
Instruments and controls
Page 94 of 313
or
side will
advance the time and the
or
side
will turn back the time.
3. Push the DISP button
�A
(Type A), or RPT
�B
button (Type B) to finish the adjustment.
ResettingType A (audio with 1 CD player):
Push the DISP
�A
and TUNE
�D
buttons.
Type B (audio with 6 CD changer):
Push the RPT
�B
and TUNE
�D
buttons.
The time will be set to a time signal.
For example, if these buttons are pushed while
the time is between 8:00 and 8:29, the display
will be reset to 8:00. If pushed while it is
between 8:30 and 8:59, the display will be reset
to 9:00. At the same time the display will return
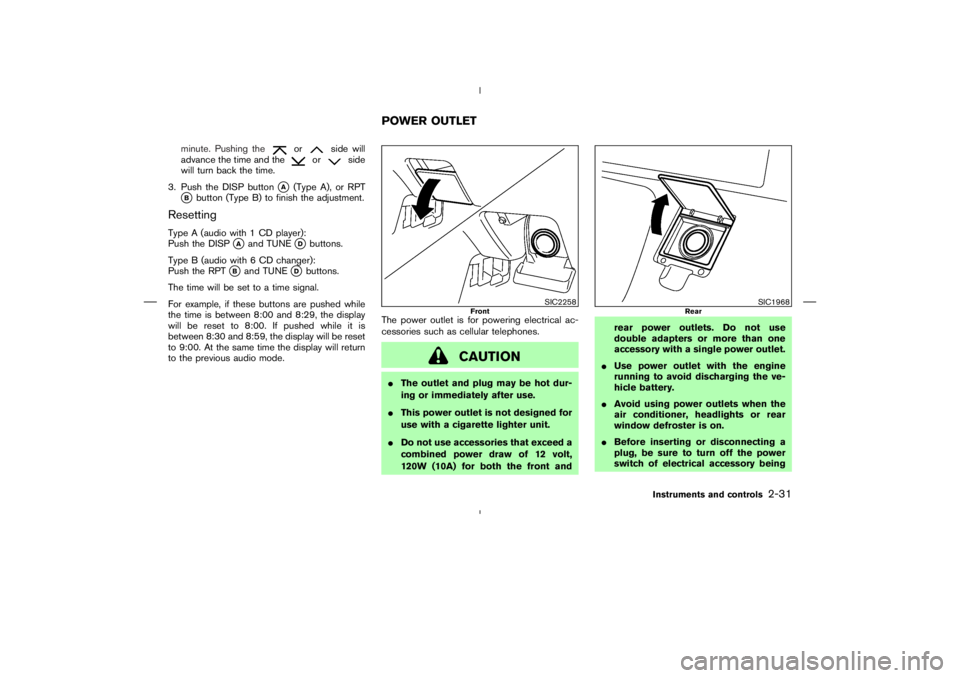
to the previous audio mode.The power outlet is for powering electrical ac-
cessories such as cellular telephones.
Page 165 of 313
 selection mode.
It is possible to shift the PTY (CAT) name by
one step, with one push of the up/down
TUNE button
or
.
After selecting a PTY (CAT) name, push the
SEEK button or SCAN")
or
in
the PTY (CAT) selection mode.
It is possible to shift the PTY (CAT) name by
one step, with one push of the up/down
TUNE button
or
.
After selecting a PTY (CAT) name, push the
SEEK button or SCAN button within 10
seconds. Tuning to the PTY (CAT) station will
start. If you do not push the TUNE button
within the 10 second period, the PTY (CAT)
mode will be cancelled.
PTY (CAT) name selection can also be
achieved by pushing the preset buttons.
Initial PTY (CAT) names are stored in the
preset buttons, but these can be changed bypushing the preset buttons for more than 1.5
seconds when the desired PTY (CAT) name
is in the display.
or
within 10 sec-
onds. Tuning to the PTY (CAT) station will
start. If you do not push the SEEK button
within the 10 second period, the PTY (CAT)
mode will be cancelled.3. PTY (CAT) SCAN tuning mode
Push the SCAN tuning button to tune the
PTY (CAT) name station, and stop at each
broadcasting station for 5 seconds. Pushing
the button again during this 5 second period
will stop SCAN tuning and the radio will
remain tuned to that station. If the SCAN
tuning button is not pushed within 5 seconds,
SCAN tuning moves to the next station.
Compact disc (CD) changer
operationTurn the ignition key to the ACC or ON position,
push the LOAD button and insert the compact
disc into the slot with the label side facing up.
The compact disc will be guided automatically
into the slot and start playing.
After loading the disc, the number of tracks on
the disc will appear on the display.
If the radio is already operating, it will automati-
cally turn off and the compact disc will play.
Page 177 of 313

button on the steering
wheel to mute the receiving voice and enter
commands.
�“Help” — The system announces the avail-
able commands.
�“Go back/Correction” — The system an-
nounces “Go back,” ends the VR session and
returns to the call.
�“Cancel/Quit” — The system announces
“Cancel,” ends the VR session and returns to
the call.
�“Send/Enter/Call/Dial” — Use the Send com-
mand to enter numbers during a call. For
example, if you were directed to dial an
extension by an automated system:
Say: “Send one two three four.”
The system acknowledges the command and
sends the tones associated with the num-
bers. The system then ends the VR session
and returns to the call.
�“Transfer call” — Use the Transfer Call com-
mand to transfer the call from the Bluetooth
Hands-Free Phone System to the cellular
phone when privacy is desired.
The system announces, “Transfer call. Call
transferred to privacy mode.” The system
then ends the VR session.
You can also issue the Transfer Call com-
mand again to return to a hands-free call
through the vehicle.
�“Mute” — Use the Mute command to mute
your voice so the other party cannot hear it.
Use the mute command again to unmute your
voice.
NOTE:
If the other party ends the call or the
cellular phone network connection is lost
while the Mute feature is on, the Mute
feature may need to be reset to “off.”
“Phone book”
4-38
Display screen, heater, air conditioner and audio systems