Page 106 of 313

Universal Transceiver provides a
convenient way to consolidate the functions of
up to three individual hand-held transmitters into
one built-in device.
HomeLink
Universal Transceiver:
�Will operate most Radio Frequency (RF)
devices such as garage doors, gates, home
and office lighting, entry door locks and se-
curity systems.
�Is powered by your vehicle’s battery. No
separate batteries are required. If the vehi-
cle’s battery is discharged or is discon-
nected, HomeLink
will retain all program-
ming.
Once the HomeLinkUniversal Transceiver
is programmed, retain the original trans-
mitter for future programming procedures
(for example, new vehicle purchases).
Upon sale of the vehicle, the programmed
HomeLink
Universal Transceiver buttons
should be erased for security purposes.
For additional information, refer to “Pro-
gramming HomeLink
” later in this sec-
tion.
WARNING
�Do not use the HomeLink
Universal
Transceiver with any garage door
opener that lacks safety stop and
reverse features as required by fed-
eral safety standards. (These stan-
dards became effective for opener
models manufactured after April 1,
1982). A garage door opener which
cannot detect an object in the path of
a closing garage door and then auto-
matically stop and reverse, does not
meet current federal safety stan-
dards. Using a garage door opener
without these features increases the
risk of serious injury or death.
�During the programming procedure,
your garage door or security gate will
open or close (if the transmitter is
within range). Make sure that people
and objects are clear of the garage
door, gate, etc. that you are
programming.�Your vehicle’s engine should be
turned off while programming the
HomeLink
Universal Transceiver.
PROGRAMMING HomeLinkTo program your HomeLink
Transceiver to op-
erate a garage door, gate, or entry door opener,
home or office lighting, you need to be at the
same location as the device. Note: Garage door
openers (manufactured after 1996) have “rolling
code protection”. To program a garage door
opener equipped with “rolling code protection”;
you will need to use a ladder to get up to the
garage door opener motor to be able to access
the training button.
HomeLink
UNIVERSAL
TRANSCEIVER (if so equipped)
Instruments and controls
2-43
Page 117 of 313

button on the keyfob is pushed even
though a door remains open and/or the
ignition switch is in the ON position.
5. The hazard indicator flashes twice and the
horn chirps once.
�When the LOCK
button is pushed with
all doors locked, the hazard indicator flashes
twice and the horn chirps once as a reminder
that the doors are already locked.
*1: Doors lock with the keyfob while a key is in
the ignition switch. However, the panic
alarm and the rear hatch/trunk lid release will
not activate when the key is in the ignition
switch.
*2: Doors lock with the keyfob while the ignition
switch is in the ON position. However, the
hazard indicator and horn will not function.
*3: Doors lock with the keyfob while any door is
open. However, the hazard indicator and
horn will not function.
Unlocking doors1. Push the UNLOCK
button on the key-
fob once.�The driver’s door and rear hatch/trunk lid
unlock.
�The hazard indicator flashes once if all doors
are completely closed with the ignition switch
in any position except the ON position.
�The interior light turns on and the light timer
activates for 30 seconds when the switch is
in the DOOR position with the ignition switch
in any position except the ON position.
2. Push the UNLOCK
button on the key-
fob again within 5 seconds.
�Passenger’s door unlocks.
�The hazard indicator flashes once if all doors
are completely closed.
All doors will be locked automatically unless one
of the following operations is performed within 1
minute of pushing the UNLOCK
button.
�Any door or rear hatch/trunk lid is opened.
�The ignition switch is turned to the ON
position.
The interior light can be turned off without
waiting for 30 seconds by turning the ignition
switch to the ON position or by locking the
doors with the keyfob.
Opening the windowsPush the UNLOCK
button on the keyfob
and the driver’s door will unlock.
Continue to push the UNLOCK
button for
3 seconds. All the door windows will start to be
lowered. Keep pushing the UNLOCK
but-
ton until the windows are fully open.
To stop lowering the windows, release the UN-
LOCK
button. To start lowering the win-
dows again, push the UNLOCK
button
again for 3 more seconds.
Releasing the rear hatch/trunk lid1. Push the HATCH/TRUNK
button on
the keyfob for longer than 0.5 second with
the key removed from the ignition switch.
2. The rear hatch (Coupe) or trunk lid (Road-
ster) opens.
Using the panic alarmIf you are near your vehicle and feel threatened,
you may activate the alarm to call attention by
pushing and holding the PANIC
button on
the keyfob forlonger than 0.5 second(with
the key removed from the ignition switch).
The theft warning alarm and headlights will stay
on for 30 seconds.
3-6
Pre-driving checks and adjustments
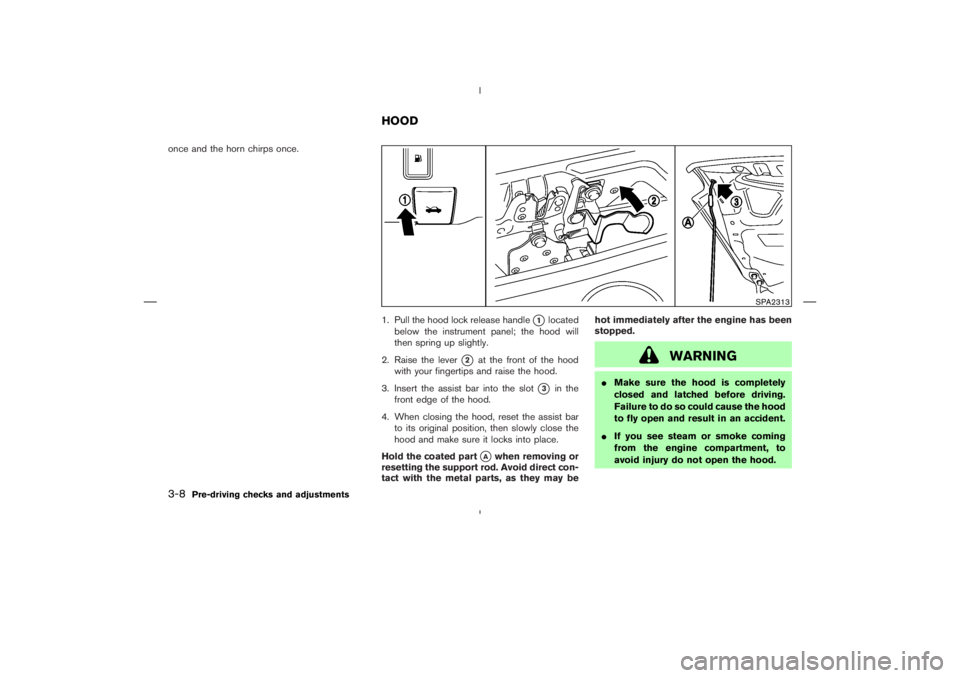
Page 119 of 313
WARNING
�Make sure the hood is completely
closed and latched before driving.
Failure to do so could cause the hood
to fly open and result in an accident.
�If you see steam or smoke coming
from the engine compartment, to
avoid injury do not open the hood.
Page 121 of 313

WARNING
�Do not drive with the trunk lid open.
This could allow dangerous exhaust
gases to be drawn into the vehicle.
See “Precautions when starting and
driving” in the “5. Starting and driv-
ing” section for exhaust gas.
�Closely supervise children when they
are around cars to prevent them from
playing and becoming locked in the
trunk where they could be seriously
injured. Keep the car locked, with the
trunk closed when not in use, and
prevent children’s access to car keys.
OPENER OPERATIONThe trunk lid release switch is located between
the license plate lights.
To open the trunk lid, unlock it with one of the
following operations then push the release
switch:
�Push the UNLOCK
button on the key-
fob once. (Pushing the HATCH/TRUNK
button on the keyfob can open the
trunk lid at once without pushing the release
switch.)
�Insert the key into the door key cylinder and
turn it counterclockwise once.
SPA1556
SPA1685
TRUNK LID (Roadster models)
3-10
Pre-driving checks and adjustments
Page 124 of 313
WARNING
�Park the vehicle in a safe and level
place and apply the parking brake.
�Make sure the area is clear of ob-
stacles and there is enough clear-
ance over the top (for example, in a
garage or a covered area). More than
approximately 6.6 ft (2 m) from the
ground is required to open or close
the top safely. Otherwise, the top
may damage any objects above it
Page 170 of 313
 away from the electronic con-
trol system harnesses. Do not route
t")
CAUTION
�Keep the antenna as far away as
possible from the electronic control
modules.
�Keep the antenna wire more than 8 in
(20 cm) away from the electronic con-
trol system harnesses. Do not route
the antenna wire next to any harness.
�Adjust the antenna standing-wave
ratio as recommended by the manu-
facturer.
�Connect the ground wire from the CB
radio chassis to the body.
�For details, consult a NISSAN dealer.
WARNING
�Use a phone after stopping your ve-
hicle in a safe location. If you have to
use a phone while driving, exercise
extreme caution at all times so full
attention may be given to vehicle
operation.
�If you find yourself unable to devote
full attention to vehicle operation
while talking on the phone, pull off
the road to a safe location and stop
your vehicle before doing so.
CAUTION
To avoid draining the vehicle battery,
use a phone after starting the engine.
CAR PHONE OR CB RADIOBLUETOOTH
HANDS-FREE
PHONE SYSTEM WITH NISSAN
VOICE RECOGNITION (if so
equipped)
Display screen, heater, air conditioner and audio systems
4-31
Page 190 of 313
 on the
windo")
CAUTION
�The TPMS may not function properly
when the wheels are equipped with
tire chains or the wheels are buried in
snow.
�Do not place metalized film or any
metal parts (antenna, etc.) on the
windows. This may cause poor recep-
tion of the signals from the tire pres-
sure sensors, and the TPMS will not
function properly.
Some devices and transmitters may temporarily
interfere with the operation of the TPMS and
cause the low tire pressure warning light to
illuminate. Some examples are:
�Facilities or electric devices using similar
radio frequencies are near the vehicle.
�If a transmitter set to similar frequencies is
being used in or near the vehicle.
�If a computer (or similar equipment) or a
DC/AC converter is being used in or near the
vehicle.FCC Notice:
Changes or modifications not expressly
approved by the party responsible for com-
pliance could void the user’s authority to
operate the equipment.
This device complies with Part 15 of the
FCC Rules and RSS-210 of Industry
Canada.
Operation is subject to the following two
conditions: (1) This device may not cause
harmful interference, and (2) this device
must accept any interference received, in-
cluding interference that may cause undes-
ired operation of the device.
AVOIDING COLLISION AND
ROLLOVER
Page 201 of 313

WARNING
Do not use the cruise control when driv-
ing under the following conditions:
�When it is not possible to keep the
vehicle at a set speed.
�In heavy traffic or in traffic that varies
in speed.
�On winding or hilly roads.
�On slippery roads (rain, snow, ice,
etc.).
�In very windy areas.
Doing so could cause a loss of vehicle
control and result in an accident.
CAUTION
On manual transmission models, do not
shift into N (Neutral) without depressing
the clutch pedal when the cruise control
is set. Should this occur, depress the
clutch pedal and turn the main switch
off immediately. Failure to do so maycause engine damage.
PRECAUTIONS ON CRUISE
CONTROL�If the cruise control system malfunctions, it
cancels automatically. The SET indicator light
on the meter panel then blinks to warn the
driver.
�If the engine coolant temperature becomes
excessively high, the cruise control system
will be canceled automatically.
�If the SET indicator light blinks, turn the
cruise control MAIN (ON⋅OFF) switch off and
have the system checked by a NISSAN
dealer.
�The SET indicator light may blink when the
cruise control MAIN switch is turned on while
pushing the RES/ACCEL, COAST/SET, or
CANCEL switch. To properly set the cruise
control system, perform the preceding steps
in the order indicated.
CRUISE CONTROL (if so
equipped)
5-16
Starting and driving