2009 MITSUBISHI ASX set clock
[x] Cancel search: set clockPage 18 of 368
CAUTION
l
Since the fuel system may be under pres-
sure, remove the fuel cap slowly. This re-
lieves any pressure or vacuum that might
have built up in the fuel tank. If you hear
a hissing sound from the cap, wait until it
stops before removing the cap. Other-
wise, fuel may spray out, injuring you or
others.
5. Insert
the gun in the tank port as far as it goes. CAUTION
l
Do not tilt the gun.
6. When
the gun stops automatically, do not fill with fuel any more.
7. Close the fuel cap. To close, turn the fuel cap slowly clockwise
until you hear clicking sounds, then gently
push the fuel tank filler door closed. Installation of accessories
E00200300963
We
recommend you to consult a MITSUBISHI
MOTORS Authorized Service Point.
l The installation of accessories, optional
parts, etc., should only be carried out within
the limits prescribed by law in your country,
and in accordance with the guidelines and
warnings contained within the documents ac-
companying this vehicle.
l Installing electric components incorrectly
could lead to a fire. Please refer to Modifica-
tion/alteration to the electrical or fuel sys-
tems section within this owner’s manual.
l Using a cellular phone or radio set inside the
vehicle without an external antenna may
cause electrical system interference, which
could lead to unsafe vehicle operation.
l Tyres and wheels which do not meet specifi-
cations must not be used.
Refer to the “Specifications” section for in-
formation regarding wheel and tyre sizes.
Important points!
Due to large number of accessory and replacement
parts of different manufactures available in the mar-
ket, it is not possible, not only for MITSUBISHI
MOTORS, but also for a MITSUBISHI MOTORS
Authorized Service Point, to check whether the at-
tachment or installation of such parts affects the
overall safety of your MITSUBISHI-vehicle.
Even when such parts are officially authorized, for
example
by a “general operators permit” (an ap-
praisal for the part) or through the execution of the
part in an officially approved manner of construc-
tion, or when a single operation permit following
the attachment or installation of such parts, it can-
not be deduced from that alone, that the driving safe-
ty of your vehicle has not been affected.
Consider also that there basically exists no liability
on the part of the appraiser or the official. Maxi-
mum safety can only be ensured with parts recom-
mended, sold and fitted or installed by a
MITSUBISHI MOTORS Authorized Service Point
(MITSUBISHI MOTORS genuine replacement
parts and MITSUBISHI MOTORS accessories).
The same also pertains to modifications of
MITSUBISHI vehicles with respect to the produc-
tion specifications. For safety reasons, do not at-
tempt any modifications other than those that fol-
low the recommendations of a MITSUBISHI
MOTORS Authorized Service Point. General information
04
Page 212 of 368
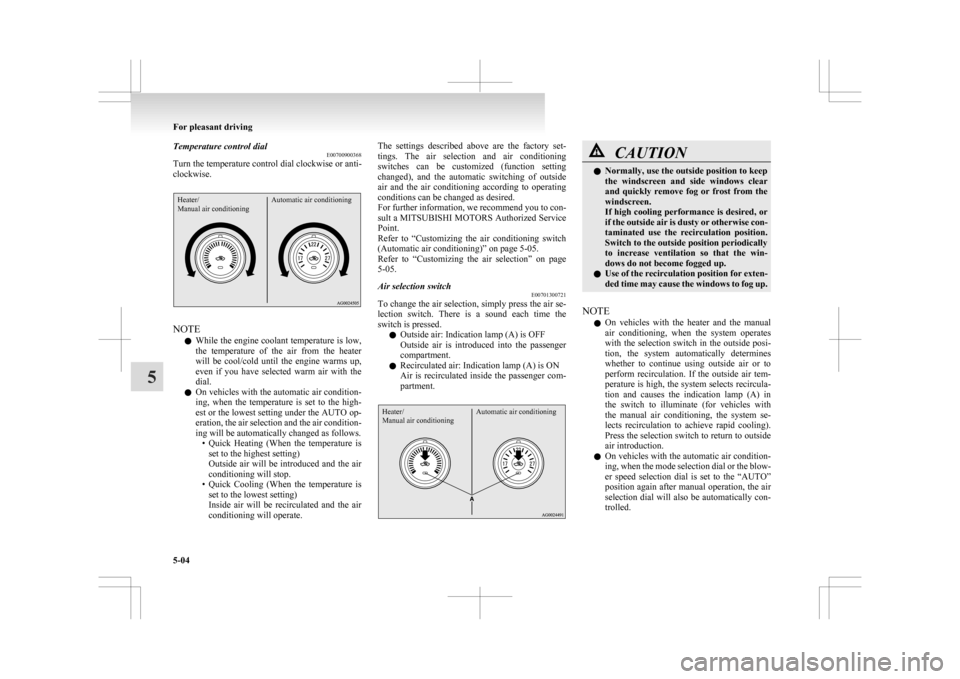
Temperature control dial
E00700900368
Turn the temperature control dial clockwise or anti-
clockwise.Heater/
Manual air conditioning Automatic air conditioningNOTE
l While
the engine coolant temperature is low,
the temperature of the air from the heater
will be cool/cold until the engine warms up,
even if you have selected warm air with the
dial.
l On vehicles with the automatic air condition-
ing, when the temperature is set to the high-
est or the lowest setting under the AUTO op-
eration, the air selection and the air condition-
ing will be automatically changed as follows.
• Quick Heating (When the temperature isset to the highest setting)
Outside air will be introduced and the air
conditioning will stop.
• Quick Cooling (When the temperature is set to the lowest setting)
Inside air will be recirculated and the air
conditioning will operate. The settings described above are the factory set-
tings.
The air selection and air conditioning
switches can be customized (function setting
changed), and the automatic switching of outside
air and the air conditioning according to operating
conditions can be changed as desired.
For further information, we recommend you to con-
sult a MITSUBISHI MOTORS Authorized Service
Point.
Refer to “Customizing the air conditioning switch
(Automatic air conditioning)” on page 5-05.
Refer to “Customizing the air selection” on page
5-05.
Air selection switch E00701300721
To change the air selection, simply press the air se-
lection
switch. There is a sound each time the
switch is pressed.
l Outside air: Indication lamp (A) is OFF
Outside air is introduced into the passenger
compartment.
l Recirculated air: Indication lamp (A) is ON
Air is recirculated inside the passenger com-
partment.
Heater/
Manual air conditioning Automatic air conditioning CAUTION
l
Normally, use the outside position to keep
the
windscreen and side windows clear
and quickly remove fog or frost from the
windscreen.
If high cooling performance is desired, or
if the outside air is dusty or otherwise con-
taminated use the recirculation position.
Switch to the outside position periodically
to increase ventilation so that the win-
dows do not become fogged up.
l Use of the recirculation position for exten-
ded time may cause the windows to fog up.
NOTE l On
vehicles with the heater and the manual
air conditioning, when the system operates
with the selection switch in the outside posi-
tion, the system automatically determines
whether to continue using outside air or to
perform recirculation. If the outside air tem-
perature is high, the system selects recircula-
tion and causes the indication lamp (A) in
the switch to illuminate (for vehicles with
the manual air conditioning, the system se-
lects recirculation to achieve rapid cooling).
Press the selection switch to return to outside
air introduction.
l On vehicles with the automatic air condition-
ing, when the mode selection dial or the blow-
er speed selection dial is set to the “AUTO”
position again after manual operation, the air
selection dial will also be automatically con-
trolled. For pleasant driving
5-04
5
Page 214 of 368
l
Enable automatic air conditioning control:
If the mode selection dial or blower speed se-
lection
dial is turned to the “AUTO” posi-
tion, or the temperature control dial is set to
the minimum temperature, the air condition-
ing switch is controlled automatically.
l Disable automatic air conditioning control:
The air conditioning switch is not controlled
automatically as long as the air conditioning
switch is not operated.
l Setting change method
Hold down the air conditioning switch for
about 10 seconds or more.
When the setting is changed, a sound is emit-
ted and the indication lamp flashes.
• When the setting is changed from enableto disable 3 sounds are emitted and the in-
dication lamp flashes 3 times.
• When the setting is changed from disable to enable 2 sounds are emitted and the in-
dication lamp flashes 3 times.
NOTE l The factory setting is “Enable automatic air
conditioning control”.
l When you turn the mode selection dial to
“ ”,
in order to prevent misting of the win-
dows the air conditioning operates automati-
cally even if “Disable automatic air condition-
ing control” is set.
Operating the air conditioning system E00701800436
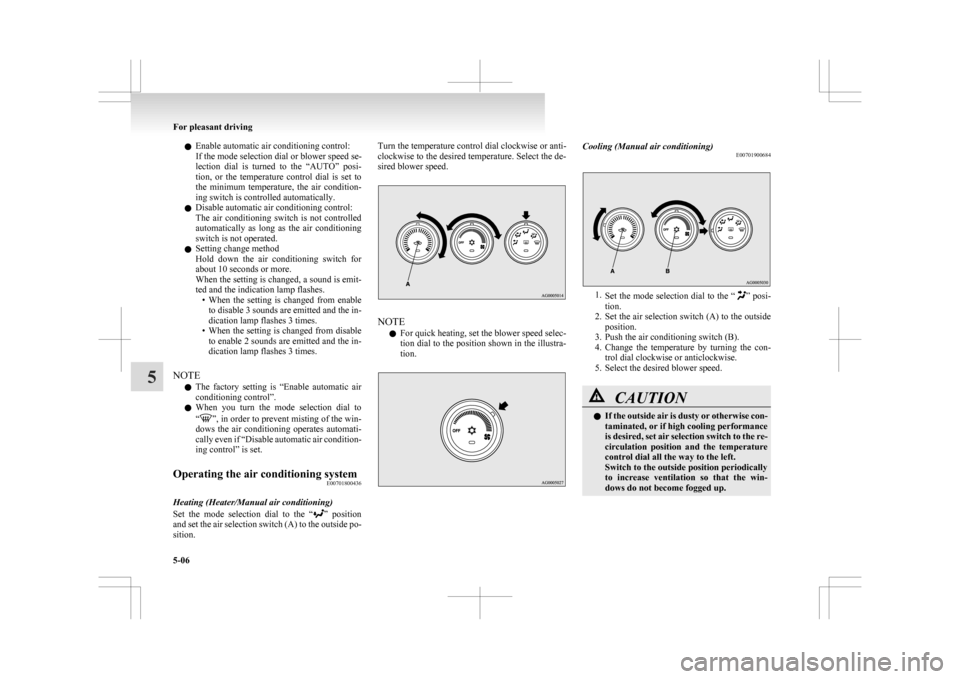
Heating (Heater/Manual air conditioning)
Set
the mode selection dial to the “ ”
position
and set the air selection switch (A) to the outside po-
sition. Turn the temperature control dial clockwise or anti-
clockwise
to the desired temperature. Select the de-
sired blower speed. NOTE
l For
quick heating, set the blower speed selec-
tion dial to the position shown in the illustra-
tion. Cooling (Manual air conditioning)
E00701900684 1.
Set
the mode selection dial to the “ ” posi-
tion.
2. Set the air selection switch (A) to the outside position.
3. Push the air conditioning switch (B).
4. Change the temperature by turning the con- trol dial clockwise or anticlockwise.
5. Select the desired blower speed. CAUTION
l
If
the outside air is dusty or otherwise con-
taminated, or if high cooling performance
is desired, set air selection switch to the re-
circulation position and the temperature
control dial all the way to the left.
Switch to the outside position periodically
to increase ventilation so that the win-
dows do not become fogged up. For pleasant driving
5-06
5
Page 217 of 368
l
For vehicles with the Auto Stop & Go
(AS&G) system, if the mode selection dial is
set to the demister position shown in the illus-
tration, the Auto Stop & Go (AS&G) system
will not operate and the engine will not stop
automatically even if the vehicle is stopped.
This is to ensure that good visibility is main-
tained.
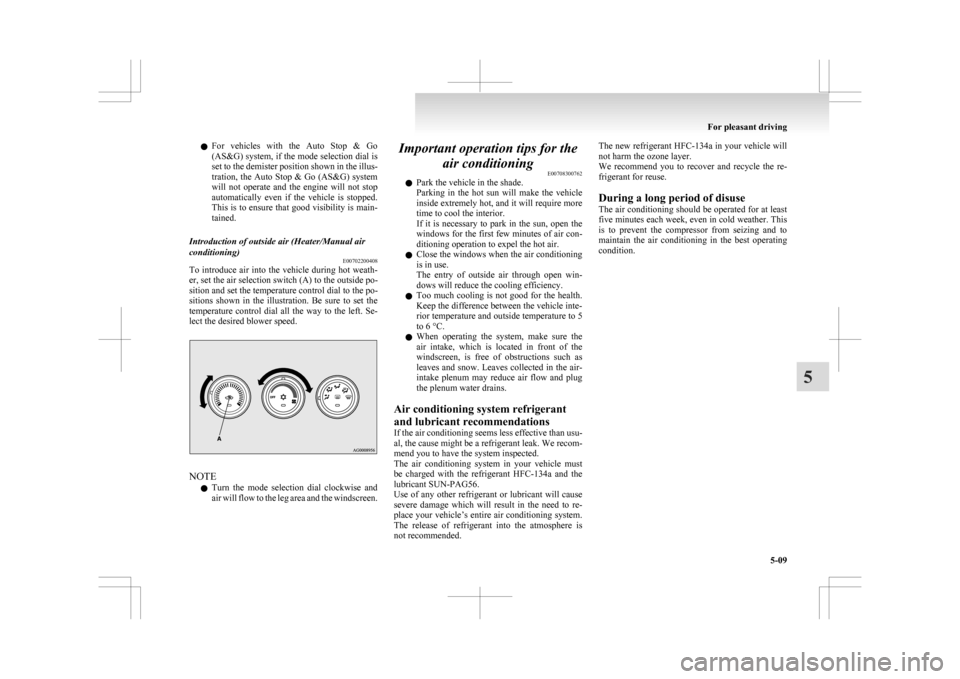
Introduction of outside air (Heater/Manual air
conditioning) E00702200408
To introduce air into the vehicle during hot weath-
er, set the air selection switch (A) to the outside po-
sition and set the temperature control dial to the po-
sitions
shown in the illustration. Be sure to set the
temperature control dial all the way to the left. Se-
lect the desired blower speed. NOTE
l Turn
the mode selection dial clockwise and
air will flow to the leg area and the windscreen. Important operation tips for the
air conditioning E00708300762
l Park the vehicle in the shade.
Parking
in the hot sun will make the vehicle
inside extremely hot, and it will require more
time to cool the interior.
If it is necessary to park in the sun, open the
windows for the first few minutes of air con-
ditioning operation to expel the hot air.
l Close the windows when the air conditioning
is in use.
The entry of outside air through open win-
dows will reduce the cooling efficiency.
l Too much cooling is not good for the health.
Keep the difference between the vehicle inte-
rior temperature and outside temperature to 5
to 6 °C.
l When operating the system, make sure the
air intake, which is located in front of the
windscreen, is free of obstructions such as
leaves and snow. Leaves collected in the air-
intake plenum may reduce air flow and plug
the plenum water drains.
Air conditioning system refrigerant
and lubricant recommendations
If the air conditioning seems less effective than usu-
al, the cause might be a refrigerant leak. We recom-
mend you to have the system inspected.
The air conditioning system in your vehicle must
be charged with the refrigerant HFC-134a and the
lubricant SUN-PAG56.
Use of any other refrigerant or lubricant will cause
severe damage which will result in the need to re-
place your vehicle’s entire air conditioning system.
The release of refrigerant into the atmosphere is
not recommended. The new refrigerant HFC-134a
in your vehicle will
not harm the ozone layer.
We recommend you to recover and recycle the re-
frigerant for reuse.
During a long period of disuse
The air conditioning should be operated for at least
five minutes each week, even in cold weather. This
is to prevent the compressor from seizing and to
maintain the air conditioning in the best operating
condition. For pleasant driving
5-09 5
Page 219 of 368
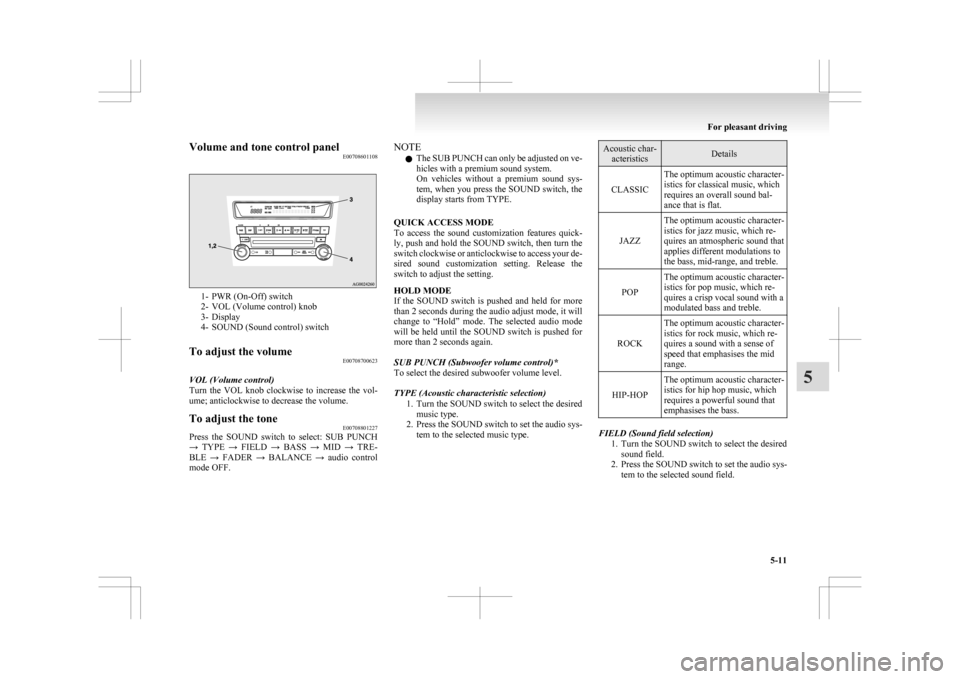
Volume and tone control panel
E007086011081- PWR (On-Off) switch
2-
VOL (Volume control) knob
3- Display
4- SOUND (Sound control) switch
To adjust the volume E00708700623
VOL (Volume control)
Turn
the VOL knob clockwise to increase the vol-
ume; anticlockwise to decrease the volume.
To adjust the tone E00708801227
Press the SOUND switch to select: SUB PUNCH
→
TYPE → FIELD → BASS → MID → TRE-
BLE → FADER → BALANCE → audio control
mode OFF. NOTE
l The
SUB PUNCH can only be adjusted on ve-
hicles with a premium sound system.
On vehicles without a premium sound sys-
tem, when you press the SOUND switch, the
display starts from TYPE.
QUICK ACCESS MODE
To access the sound customization features quick-
ly, push and hold the SOUND switch, then turn the
switch clockwise or anticlockwise to access your de-
sired sound customization setting. Release the
switch to adjust the setting.
HOLD MODE
If the SOUND switch is pushed and held for more
than 2 seconds during the audio adjust mode, it will
change to “Hold” mode. The selected audio mode
will be held until the SOUND switch is pushed for
more than 2 seconds again.
SUB PUNCH (Subwoofer volume control)*
To select the desired subwoofer volume level.
TYPE (Acoustic characteristic selection) 1. Turn the SOUND switch to select the desiredmusic type.
2. Press the SOUND switch to set the audio sys- tem to the selected music type. Acoustic char-
acteristics Details
CLASSIC The optimum acoustic character-
istics for classical music, which
requires an overall sound bal-
ance that is flat.
JAZZ The optimum acoustic character-
istics for jazz music, which re-
quires an atmospheric sound that
applies different modulations to
the bass, mid-range, and treble.
POP The optimum acoustic character-
istics for pop music, which re-
quires a crisp vocal sound with a
modulated bass and treble.
ROCK The optimum acoustic character-
istics for rock music, which re-
quires a sound with a sense of
speed that emphasises the mid
range.
HIP-HOP The optimum acoustic character-
istics for hip hop music, which
requires a powerful sound that
emphasises the bass. FIELD (Sound field selection)
1. Turn
the SOUND switch to select the desired
sound field.
2. Press the SOUND switch to set the audio sys- tem to the selected sound field. For pleasant driving
5-11 5
Page 221 of 368
To tune the radio
E00709100624
Automatic tuning
After
pressing the SEEK button, a receivable sta-
tion will be automatically selected and reception of
the station will begin.
Manual tuning
The frequency changes every time the TUNE
switch is turned. Turn the switch to select the de-
sired radio broadcasting station.
To enter frequencies into the memory E00716101144
Manual setting
You
can assign to the memory select buttons a max-
imum of 18 stations in the FM band (6 FM1, 6
FM2 and 6 FM3 stations) and 6 stations each in the
MW and LW band. (Stations already assigned to
the memory select buttons are replaced by any new-
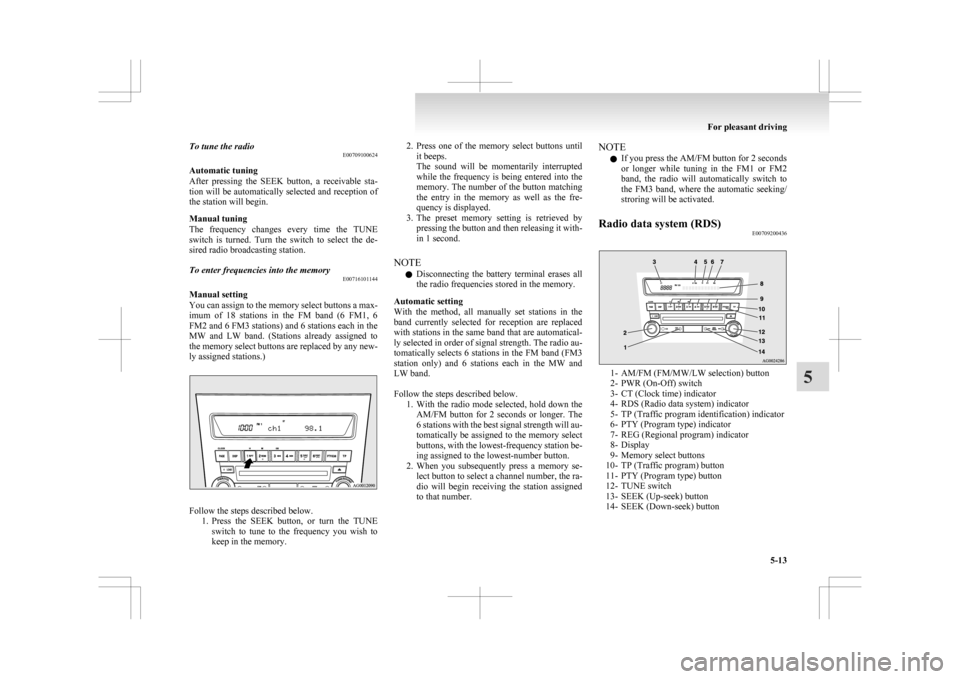
ly assigned stations.) Follow the steps described below.
1. Press
the SEEK button, or turn the TUNE
switch to tune to the frequency you wish to
keep in the memory. 2. Press
one of the memory select buttons until
it beeps.
The sound will be momentarily interrupted
while the frequency is being entered into the
memory. The number of the button matching
the entry in the memory as well as the fre-
quency is displayed.
3. The preset memory setting is retrieved by pressing the button and then releasing it with-
in 1 second.
NOTE l Disconnecting the battery terminal erases all
the radio frequencies stored in the memory.
Automatic setting
With the method, all manually set stations in the
band currently selected for reception are replaced
with stations in the same band that are automatical-
ly selected in order of signal strength. The radio au-
tomatically selects 6 stations in the FM band (FM3
station only) and 6 stations each in the MW and
LW band.
Follow the steps described below. 1. With the radio mode selected, hold down theAM/FM button for 2 seconds or longer. The
6 stations with the best signal strength will au-
tomatically be assigned to the memory select
buttons, with the lowest-frequency station be-
ing assigned to the lowest-number button.
2. When you subsequently press a memory se- lect button to select a channel number, the ra-
dio will begin receiving the station assigned
to that number. NOTE
l If you press the AM/FM button for 2 seconds
or
longer while tuning in the FM1 or FM2
band, the radio will automatically switch to
the FM3 band, where the automatic seeking/
stroring will be activated.
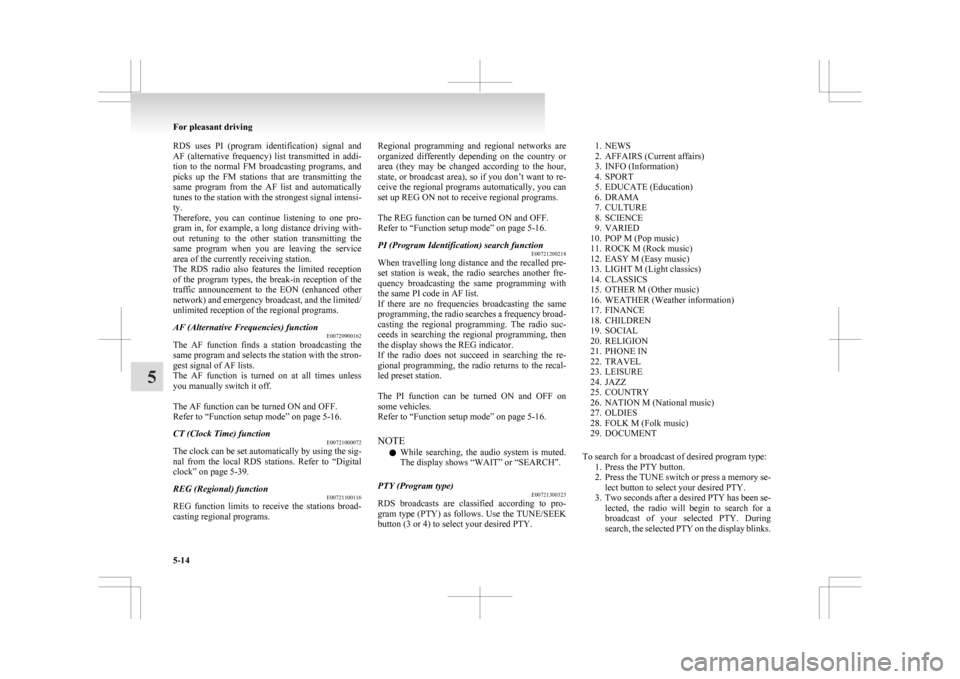
Radio data system (RDS) E00709200436 1- AM/FM (FM/MW/LW selection) button
2-
PWR (On-Off) switch
3- CT (Clock time) indicator
4- RDS (Radio data system) indicator
5- TP (Traffic program identification) indicator
6- PTY (Program type) indicator
7- REG (Regional program) indicator
8- Display
9- Memory select buttons
10- TP (Traffic program) button
11- PTY (Program type) button
12- TUNE switch
13- SEEK (Up-seek) button
14- SEEK (Down-seek) button For pleasant driving
5-13 5
Page 222 of 368
RDS uses PI (program identification) signal and
AF
(alternative frequency) list transmitted in addi-
tion to the normal FM broadcasting programs, and
picks up the FM stations that are transmitting the
same program from the AF list and automatically
tunes to the station with the strongest signal intensi-
ty.
Therefore, you can continue listening to one pro-
gram in, for example, a long distance driving with-
out retuning to the other station transmitting the
same program when you are leaving the service
area of the currently receiving station.
The RDS radio also features the limited reception
of the program types, the break-in reception of the
traffic announcement to the EON (enhanced other
network) and emergency broadcast, and the limited/
unlimited reception of the regional programs.
AF (Alternative Frequencies) function E00720900162
The AF function finds a station broadcasting the
same
program and selects the station with the stron-
gest signal of AF lists.
The AF function is turned on at all times unless
you manually switch it off.
The AF function can be turned ON and OFF.
Refer to “Function setup mode” on page 5-16.
CT (Clock Time) function E00721000072
The clock can be set automatically by using the sig-
nal
from the local RDS stations. Refer to “Digital
clock” on page 5-39.
REG (Regional) function E00721100116
REG function limits to receive the stations broad-
casting regional programs. Regional programming and regional networks are
organized
differently depending on the country or
area (they may be changed according to the hour,
state, or broadcast area), so if you don’t want to re-
ceive the regional programs automatically, you can
set up REG ON not to receive regional programs.
The REG function can be turned ON and OFF.
Refer to “Function setup mode” on page 5-16.
PI (Program Identification) search function E00721200218
When travelling long distance and the recalled pre-
set
station is weak, the radio searches another fre-
quency broadcasting the same programming with
the same PI code in AF list.
If there are no frequencies broadcasting the same
programming, the radio searches a frequency broad-
casting the regional programming. The radio suc-
ceeds in searching the regional programming, then
the display shows the REG indicator.
If the radio does not succeed in searching the re-
gional programming, the radio returns to the recal-
led preset station.
The PI function can be turned ON and OFF on
some vehicles.
Refer to “Function setup mode” on page 5-16.
NOTE
l While searching, the audio system is muted.
The display shows “WAIT” or “SEARCH”.
PTY (Program type) E00721300323
RDS broadcasts are classified according to pro-
gram
type (PTY) as follows. Use the TUNE/SEEK
button (3 or 4) to select your desired PTY.
1. NEWS
2.
AFFAIRS (Current affairs)
3. INFO (Information)
4. SPORT
5. EDUCATE (Education)
6. DRAMA
7. CULTURE
8. SCIENCE
9. VARIED
10. POP M (Pop music)
11. ROCK M (Rock music)
12. EASY M (Easy music)
13. LIGHT M (Light classics)
14. CLASSICS
15. OTHER M (Other music)
16. WEATHER (Weather information)
17. FINANCE
18. CHILDREN
19. SOCIAL
20. RELIGION
21. PHONE IN
22. TRAVEL
23. LEISURE
24. JAZZ
25. COUNTRY
26. NATION M (National music)
27. OLDIES
28. FOLK M (Folk music)
29. DOCUMENT
To search for a broadcast of desired program type: 1. Press the PTY button.
2. Press the TUNE switch or press a memory se-lect button to select your desired PTY.
3. Two seconds after a desired PTY has been se- lected, the radio will begin to search for a
broadcast of your selected PTY. During
search, the selected PTY on the display blinks. For pleasant driving
5-14
5
Page 247 of 368

Notes on CD-Rs/RWs
E00725100055
l You
may have trouble playing back some
CD-R/RW discs recorded on CD recorders
(CD-R/RW drives), either due to their record-
ing characteristics or dirt, fingerprints,
scratches, etc. on the disc surface.
l CD-R/RW discs are less resistant to high tem-
peratures and high humidity than ordinary mu-
sic CDs and can therefore be damaged and
rendered unplayable if left inside your vehi-
cle for a long time.
l Depending on the combination of the writing
software, the CD recorder (CD-R/RW drive),
and the disc used to create a CD-R/RW, the
disc might not play successfully.
l This player cannot play the CD-R/RW discs
if the session is not closed.
l This player cannot play CD-R/RW discs
which contain other than CD-DA or MP3 da-
ta (Video CD, etc.).
l Be sure to observe the handling instructions
for the CD-R/RW disc. WARNING
l Operating
the CD player in a manner oth-
er than specifically instructed herein may
result in hazardous radiation exposure.
Do not remove the cover and attempt to
repair the CD player by yourself. There
are no user serviceable parts inside. If the
CD player is not working correctly, it is
recommended that you have it inspected. Antenna
E00710500543
To remove
Turn the pole (A) anticlockwise. To install
Screw
the pole (A) clockwise into the base (B) un-
til it is securely retained.
NOTE
l Be sure to remove the roof antenna in the fol-
lowing cases:
• When using an automatic car wash.
• When placing a car cover over the vehicle.
• When driving into a structure that has alow ceiling. Digital clock*
E00711800455
Automatic
mode and manual mode is available for
digital clock adjustment.
Select the automatic mode or the manual mode by
performing the following operations: A- PWR switch
B-
TUNE switch
1. Press the PWR switch (A) to turn ON the au- dio system.
2. Enter the function setup mode by pressing the TUNE switch (B) for 2 seconds or longer.
3. Press the TUNE switch (B) repeatedly to se- lect the CT (Clock Time) mode.
The order is: AF CT REG TP-S
PI-S Language of PTY display
SCV PHONE Function setup mode
OFF For pleasant driving
5-39 5