2009 MITSUBISHI ASX change language
[x] Cancel search: change languagePage 97 of 368
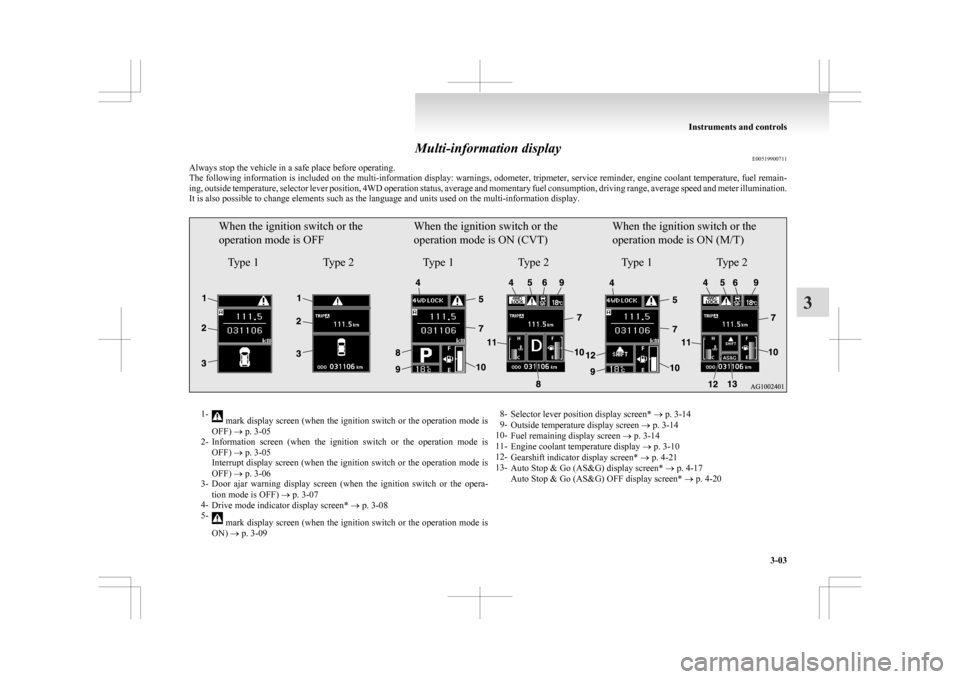
Multi-information display
E00519900711
Always stop the vehicle in a safe place before operating.
The
following information is included on the multi-information display: warnings, odometer, tripmeter, service reminder, engine coolant temperature, fuel remain-
ing, outside temperature, selector lever position, 4WD operation status, average and momentary fuel consumption, driving range, average speed and meter illumination.
It is also possible to change elements such as the language and units used on the multi-information display.
When the ignition switch or the
operation mode is OFF
Type 1 Type 2When the ignition switch or the
operation mode is ON (CVT)
Type 1 Type 2When the ignition switch or the
operation mode is ON (M/T)
Type 1 Type 21-
mark display screen (when the ignition switch or the operation mode is
OFF) ® p. 3-05
2- Information
screen (when the ignition switch or the operation mode is
OFF) ® p. 3-05
Interrupt display screen (when the ignition switch or the operation mode is
OFF) ® p. 3-06
3- Door ajar warning display screen (when the ignition switch or the opera-
tion mode is OFF) ® p. 3-07
4- Drive mode indicator display screen* ® p. 3-08
5- mark display screen (when the ignition switch or the operation mode is
ON) ® p. 3-09 8-
Selector lever position display screen* ® p. 3-14
9- Outside temperature display screen ® p. 3-14
10- Fuel remaining display screen ® p. 3-14
11- Engine coolant temperature display ® p. 3-10
12- Gearshift indicator display screen* ® p. 4-21
13- Auto Stop & Go (AS&G) display screen* ® p. 4-17
Auto Stop & Go (AS&G) OFF display screen* ® p. 4-20 Instruments and controls
3-03 3
Page 98 of 368
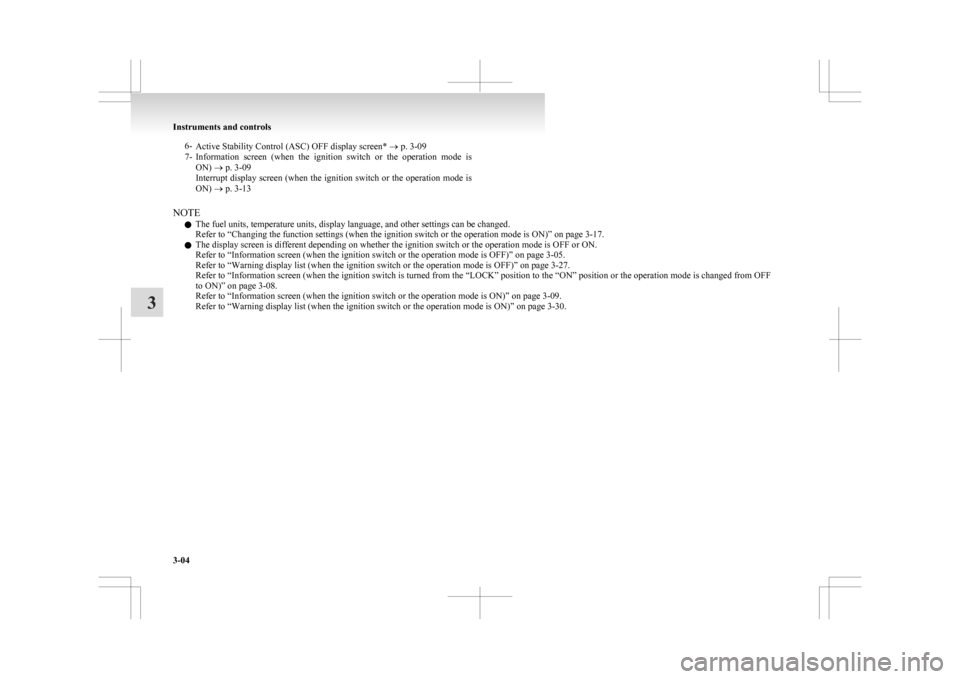
6-
Active Stability Control (ASC) OFF display screen* ® p. 3-09
7- Information screen (when the ignition switch or the operation mode is
ON) ® p. 3-09
Interrupt display screen (when the ignition switch or the operation mode is
ON) ® p. 3-13
NOTE l The fuel units, temperature units, display language, and other settings can be changed.
Refer to “Changing the function settings (when the ignition switch or the operation mode is ON)” on page
3-17.
l The display screen is different depending on whether the ignition switch or the operation mode is OFF or ON.
Refer to “Information screen (when the ignition switch or the operation mode is OFF)” on page
3-05.
Refer to “Warning display list (when the ignition switch or the operation mode is OFF)” on page 3-27.
Refer to “Information screen (when the ignition switch is turned from the “LOCK” position to the “ON” position or the operation mode is changed from OFF
to ON)” on page 3-08.
Refer to “Information screen (when the ignition switch or the operation mode is ON)” on page 3-09.
Refer to “Warning display list (when the ignition switch or the operation mode is ON)” on page 3-30.Instruments and controls
3-04
3
Page 99 of 368
Multi-information meter switch
E00520000608
Each
time the multi-information meter switch is op-
erated, a sound is emitted and the multi-informa-
tion display changes between information such as
warnings, odometer (Type 1), tripmeter, service re-
minder, engine coolant temperature (Type 1), aver-
age and momentary fuel consumption, driving
range, and average speed.
It is also possible to change elements such as the
language and units used on the multi-information
display by operating the multi-information meter
switch. mark display screen (when
the ignition switch or the oper-
ation mode is OFF) E00520100553
If
you press the multi-information meter
switch and return from the warning dis-
play screen to the previous screen, the mark is displayed.
Refer
to “To return to the screen dis-
played before the warning display” on
page 3-06. This mark is also displayed if there is an-
other
warning other than the one dis-
played. When the cause of the warning
display is eliminated, the mark goes
out automatically.
NOTE
l When
the mark is displayed,
the
warning display screen can be
redisplayed on the information
screen.
Refer to “Information screen
(when the ignition switch or the op-
eration mode is OFF)” on page
3-05.
Refer to “Information screen
(when the ignition switch or the op-
eration mode is ON)” on page
3-09. Information screen (when the ignition
switch or the operation mode is OFF)
E00520200570
Each
time you lightly press the multi-information
meter switch, the display screen switches in the fol-
lowing order.
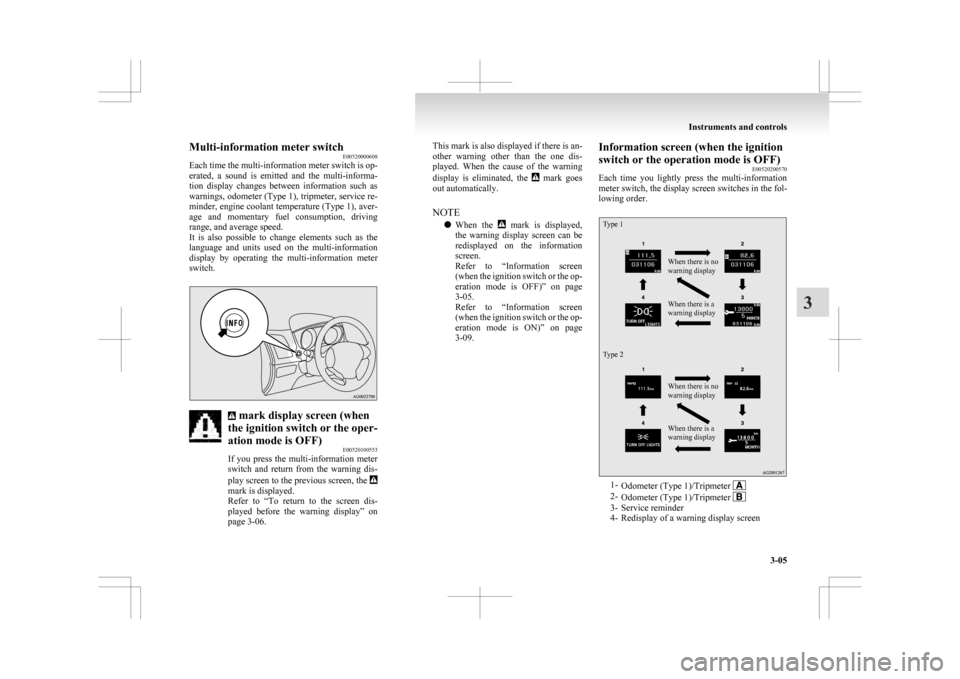
Type 1
Type 2 When there is no
warning display
When there is a
warning display
When there is no
warning display
When there is a
warning display
1-
Odometer (Type 1)/Tripmeter 2-
Odometer (Type 1)/Tripmeter 3- Service reminder
4-
Redisplay of a warning display screen Instruments and controls
3-05 3
Page 107 of 368

NOTE
l The
average speed display and the average
fuel consumption display can be reset individ-
ually for the auto reset mode and manual re-
set mode.
l “---” is displayed when the average fuel con-
sumption cannot be measured.
l The initial (default) setting is “Auto reset
mode”.
l The average fuel consumption depends on
the driving condition (road condition, driving
behavior, etc.). The displayed fuel consump-
tion may vary from the actual fuel consump-
tion. Treat the fuel consumption displayed as
just a rough guideline.
l The memory of the auto reset mode or man-
ual reset mode for the average fuel consump-
tion display is erased if the battery is discon-
nected.
l The display setting can be changed to the pre-
ferred units {km/L, mpg (US), mpg (UK) or
L/100 km}. Refer to “Changing the function
settings (when the ignition switch or the op-
eration mode is ON)” on page 3-17. Momentary fuel consumption display
E00521800430
While
driving, this displays the momentary fuel con-
sumption, using a bar graph.
Type 1 Type 2 When the momentary fuel consumption surpasses
the
average fuel consumption, the momentary fuel
consumption is displayed with a green bar graph.
(Type 2)
Be conscious that when maintaining the momenta-
ry fuel consumption above the average fuel con-
sumption, driving with better fuel consumption can
be possible.
NOTE
l When the momentary fuel consumption can-
not be measured, the bar graph is not dis-
played. l
The
display setting can be changed to the pre-
ferred units {km/L, mpg (US), mpg (UK) or
L/100 km}. Refer to “Changing the function
settings (when the ignition switch or the op-
eration mode is ON)” on page 3-17.
l It is possible to cancel the green bar graph.
Refer to “Changing the function settings
(when the ignition switch or the operation
mode is ON)” on page 3-17. Function setting screen
E00521900271
The
“Display language”, “Temperature
unit”, “Fuel consumption unit”, and
“Average fuel consumption and speed re-
set method” etc. settings can be modi-
fied as desired.
Refer to “Changing the function settings
(when the ignition switch or the opera-
tion mode is ON)” on page 3-17 for fur-
ther details.
Interrupt display screen (when the ig-
nition switch or the operation mode is
ON) E00522000673
Warning display
When
there is information to be announced, such
as a system fault, a sound is emitted and the infor-
mation screen switches to the warning display
screen.
Refer to the warning list and take the necessary
measures.
Refer to “Warning display list (when the ignition
switch or the operation mode is ON)” on page
3-30.
When the cause of the warning display is elimina-
ted, the warning display goes out automatically. Instruments and controls
3-13 3
Page 112 of 368

4. Select the item to change on the menu screen
and change to the desired setting. Refer to
the following items for further details on the
operation methods.
Refer to “Changing the reset mode for aver-
age fuel consumption and average speed” on
page 3-18.
Refer to “Changing the fuel consumption dis-
play unit” on page 3-19.
Refer to “Changing the temperature unit” on
page 3-20.
Refer to “Changing the display language” on
page 3-20.
Refer to “Changing the language cooperative
control” on page 3-21.
Refer to “Operation sound setting” on page
3-21.
Refer to “Changing the time until “REST RE-
MINDER” is displayed” on page 3-22.
Refer to “Changing the turn-signal sound”
on page 3-23.
Refer to “Changing the momentary fuel con-
sumption display” on page 3-23.
Refer to “Returning to the factory settings”
on page 3-23.
Changing the reset mode for average fuel con-
sumption and average speed E00522900601
The mode conditions for the average fuel consump-
tion
and average speed display can be switched be-
tween “Auto reset” and “Manual reset”. 1. Press
and hold the multi-information meter
switch for about 2 seconds or more to switch
from the setting mode screen to the menu
screen.
Refer to “Changing the function settings
(when the ignition switch or the operation
mode is ON)” on page 3-17.
2. Lightly press the multi-information meter switch to select “AVG” (average fuel con-
sumption and average speed setting).
Type 1
Type 2 3. Press
and hold the multi-information meter
switch for about 2 seconds or more to switch
in sequence from A (Auto reset mode) → M
(Manual reset mode) → A (Auto reset mode).
The setting is changed to the selected mode
condition. Manual reset mode
• When
the average fuel consumption and
average speed are being displayed, if you
hold down the multi-information meter
switch, the average fuel consumption and
average speed displayed at that time are
reset.
• When the following operation is per- formed, the mode setting is automatically
switched from manual to auto.
[Except for vehicles equipped with key-
less operation system]
Turn the ignition switch from the “ACC”
or “LOCK” position to the “ON” position.
[For vehicles equipped with the keyless
operation system] Change the operation
mode from ACC or OFF to ON.
Switching to auto occurs automatically.
If switching to manual mode is done, how-
ever, the data from the last reset is dis-
played.
Auto reset mode l When the average fuel consumption and aver-
age speed are being displayed, if you hold
down the multi-information meter switch,
the average fuel consumption and average
speed displayed at that time are reset. Instruments and controls
3-18
3
Page 114 of 368
Fuel consump-
tion Distance
(driving range) Speed
(average speed)
L/100 km km km/h
mpg (US) mile(s) mph
mpg (UK) mile(s) mph km/L kmkm/hChanging the temperature unit
E00523100466
The display unit for temperature can be switched.
1. Press and hold the multi-information meter
switch for about 2 seconds or more to switch
from the setting mode screen to the menu
screen.
Refer to “Changing the function settings
(when the ignition switch or the operation
mode is ON)” on page 3-17.
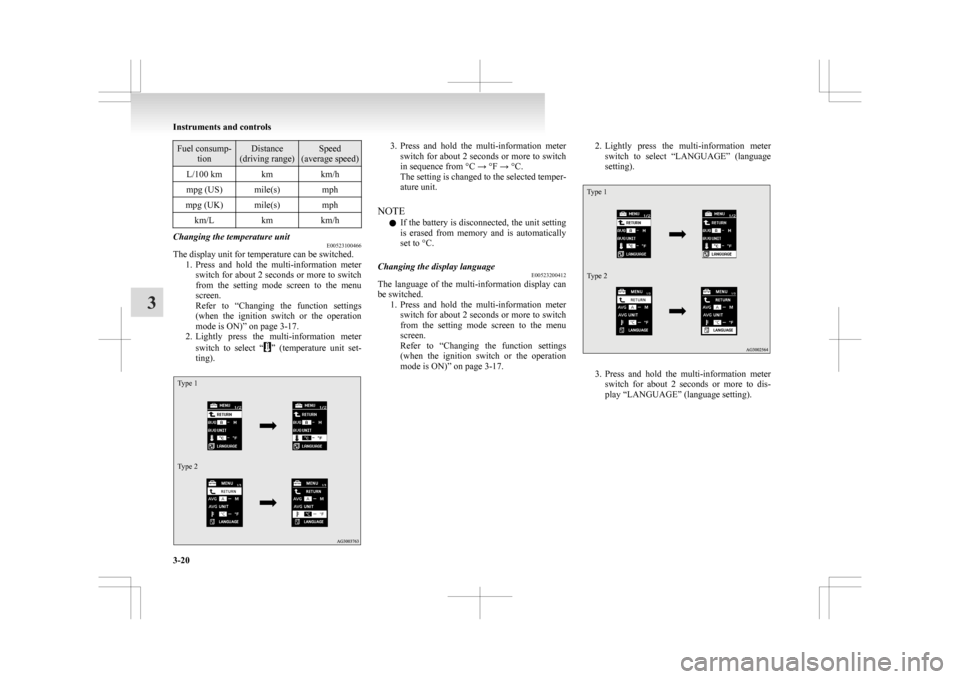
2. Lightly press the multi-information meter
switch to select “ ”
(temperature unit set-
ting).
Type 1
Type 2 3. Press
and hold the multi-information meter
switch for about 2 seconds or more to switch
in sequence from °C → °F → °C.
The setting is changed to the selected temper-
ature unit.
NOTE l If the battery is disconnected, the unit setting
is erased from memory and is automatically
set to °C.
Changing the display language E00523200412
The language of the multi-information display can
be switched.
1. Press
and hold the multi-information meter
switch for about 2 seconds or more to switch
from the setting mode screen to the menu
screen.
Refer to “Changing the function settings
(when the ignition switch or the operation
mode is ON)” on page 3-17. 2. Lightly
press the multi-information meter
switch to select “LANGUAGE” (language
setting).
Type 1
Type 2 3. Press
and hold the multi-information meter
switch for about 2 seconds or more to dis-
play “LANGUAGE” (language setting). Instruments and controls
3-20
3
Page 115 of 368
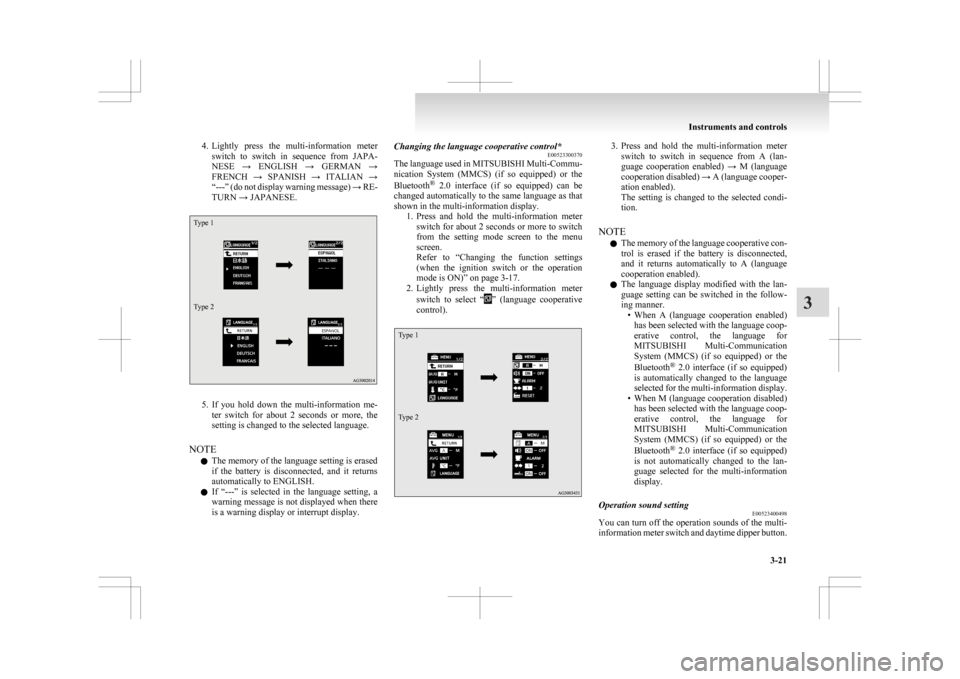
4. Lightly press the multi-information meter
switch to switch in sequence from JAPA-
NESE → ENGLISH → GERMAN →
FRENCH → SPANISH → ITALIAN →
“---” (do not display warning message) → RE-
TURN → JAPANESE.
Type 1
Type 2 5. If
you hold down the multi-information me-
ter switch for about 2 seconds or more, the
setting is changed to the selected language.
NOTE l The memory of the language setting is erased
if the battery is disconnected, and it returns
automatically to ENGLISH.
l If “---” is selected in the language setting, a
warning message is not displayed when there
is a warning display or interrupt display. Changing the language cooperative control*
E00523300370
The
language used in MITSUBISHI Multi-Commu-
nication System (MMCS) (if so equipped) or the
Bluetooth ®
2.0 interface (if so equipped) can be
changed automatically to the same language as that
shown in the multi-information display. 1. Press and hold the multi-information meterswitch for about 2 seconds or more to switch
from the setting mode screen to the menu
screen.
Refer to “Changing the function settings
(when the ignition switch or the operation
mode is ON)” on page 3-17.
2. Lightly press the multi-information meter
switch to select “ ”
(language cooperative
control).
Type 1
Type 2 3. Press
and hold the multi-information meter
switch to switch in sequence from A (lan-
guage cooperation enabled) → M (language
cooperation disabled) → A (language cooper-
ation enabled).
The setting is changed to the selected condi-
tion.
NOTE l The memory of the language cooperative con-
trol is erased if the battery is disconnected,
and it returns automatically to A (language
cooperation enabled).
l The language display modified with the lan-
guage setting can be switched in the follow-
ing manner.
• When A (language cooperation enabled)has been selected with the language coop-
erative control, the language for
MITSUBISHI Multi-Communication
System (MMCS) (if so equipped) or the
Bluetooth ®
2.0 interface (if so equipped)
is automatically changed to the language
selected for the multi-information display.
• When M (language cooperation disabled) has been selected with the language coop-
erative control, the language for
MITSUBISHI Multi-Communication
System (MMCS) (if so equipped) or the
Bluetooth ®
2.0 interface (if so equipped)
is not automatically changed to the lan-
guage selected for the multi-information
display.
Operation sound setting E00523400498
You can turn off the operation sounds of the multi-
information
meter switch and daytime dipper button. Instruments and controls
3-21 3
Page 223 of 368
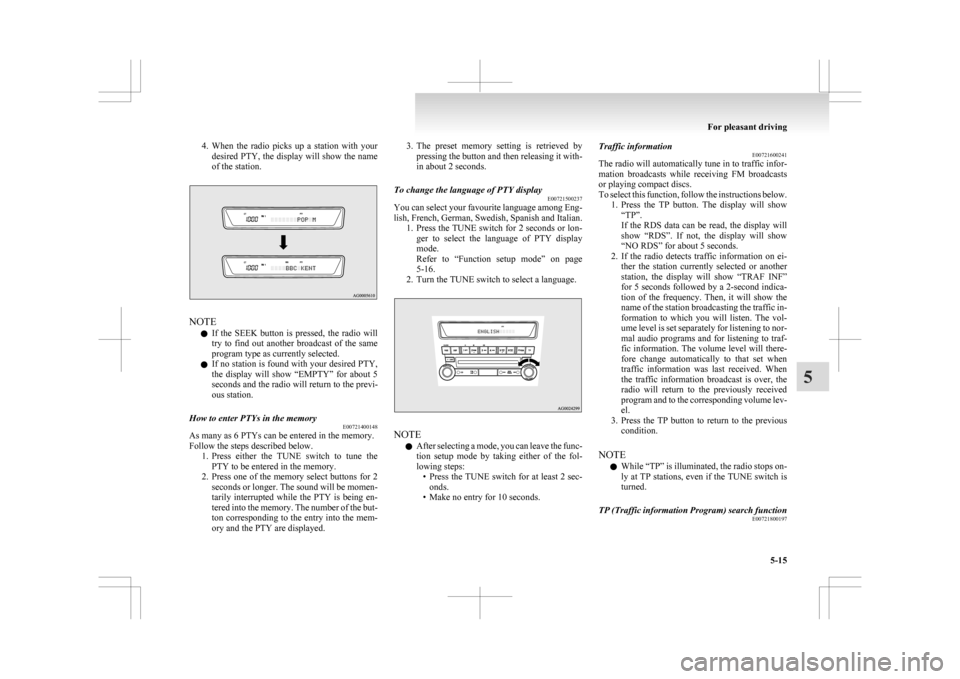
4. When the radio picks up a station with your
desired PTY, the display will show the name
of the station. NOTE
l If
the SEEK button is pressed, the radio will
try to find out another broadcast of the same
program type as currently selected.
l If no station is found with your desired PTY,
the display will show “EMPTY” for about 5
seconds and the radio will return to the previ-
ous station.
How to enter PTYs in the memory E00721400148
As many as 6 PTYs can be entered in the memory.
Follow the steps described below.
1. Press
either the TUNE switch to tune the
PTY to be entered in the memory.
2. Press one of the memory select buttons for 2 seconds or longer. The sound will be momen-
tarily interrupted while the PTY is being en-
tered into the memory. The number of the but-
ton corresponding to the entry into the mem-
ory and the PTY are displayed. 3. The
preset memory setting is retrieved by
pressing the button and then releasing it with-
in about 2 seconds.
To change the language of PTY display E00721500237
You can select your favourite language among Eng-
lish,
French, German, Swedish, Spanish and Italian.
1. Press the TUNE switch for 2 seconds or lon- ger to select the language of PTY display
mode.
Refer to “Function setup mode” on page
5-16.
2. Turn the TUNE switch to select a language. NOTE
l After
selecting a mode, you can leave the func-
tion setup mode by taking either of the fol-
lowing steps: • Press the TUNE switch for at least 2 sec-onds.
• Make no entry for 10 seconds. Traffic information
E00721600241
The
radio will automatically tune in to traffic infor-
mation broadcasts while receiving FM broadcasts
or playing compact discs.
To select this function, follow the instructions below. 1. Press the TP button. The display will show“TP”.
If the RDS data can be read, the display will
show “RDS”. If not, the display will show
“NO RDS” for about 5 seconds.
2. If the radio detects traffic information on ei- ther the station currently selected or another
station, the display will show “TRAF INF”
for 5 seconds followed by a 2-second indica-
tion of the frequency. Then, it will show the
name of the station broadcasting the traffic in-
formation to which you will listen. The vol-
ume level is set separately for listening to nor-
mal audio programs and for listening to traf-
fic information. The volume level will there-
fore change automatically to that set when
traffic information was last received. When
the traffic information broadcast is over, the
radio will return to the previously received
program and to the corresponding volume lev-
el.
3. Press the TP button to return to the previous condition.
NOTE l While “TP” is illuminated, the radio stops on-
ly at TP stations, even if the TUNE switch is
turned.
TP (Traffic information Program) search function E00721800197
For pleasant driving
5-15 5