Page 330 of 368

Outside
E01003302527Front1- Front turn-signal lamps: 21 W (WY21W)
2-
Headlamps, high-beam: 60 W (HB3)
3- Type 1 Front fog lamps: 35 W (H8)
Daytime running lamps: 13 W (P13W)
Type 2 Daytime running lamps: 13 W (P13W)
Type 3 Front fog lamps: 55 W (H11)
4- Headlamps, low beam Halogen: 55 W (H11)
High intensity discharge *2
: 35 W
5- Position lamps: 5 W (W5W)
6- Side turn-signal lamps (on fender) *1
,*2
: 5 W
7- Side turn-signal lamps (on outside rear-view
mirror) *1
*1 : if so equipped
*2 : Have the lamps bulbs replaced at a
MITSUBISHI MOTORS
Authorized
Service Point.
Codes in parentheses indicate bulb types. WARNING
l Always
consult a specialist when repair-
ing or replacing the bulbs of high intensi-
ty discharge headlamps.
This is because the power circuit, bulbs
and electrodes generate a high voltage
that could cause an electric shock.
NOTE l An
LED, not a bulb, is used in the side turn-
signal lamp (on outside rear-view mirror).
Contact a MITSUBISHI MOTORS Author-
ized Service Point when there is a need for re-
pair or replacement.
l For the side turn-signal lamp (on fender), it
is not possible to repair or replace just the bulb.
Contact a MITSUBISHI MOTORS Author-
ized Service Point when there is a need for re-
pair or replacement.
Rear 8- High-mounted stop lamp
9-
Licence plate lamps: 5 W (W5W)
10- Rear fog lamp: 21 W (W21W)
11- Reversing lamps: 16 W (W16W) 12- Rear turn-signal lamps: 21 W (W21W)
13-
Stop and tail lamps
Codes in parentheses indicate bulb types.
NOTE l An LED, not a bulb, is used in the stop lamp/
tail lamp and high-mounted stop lamp. Con-
tact a MITSUBISHI MOTORS Authorized
Service Point when there is a need for repair
or replacement.
Inside E01003401749 1- Room lamp (rear)*: 8 W
2-
Vanity mirror lamps*: 3 W
3- Room lamp (front) & map lamps: 8 W
4- Luggage room lamp: 5 W
5- Glove box lamp: 1.4 W
*: if so equipped Maintenance
8-24
8
Page 331 of 368
Headlamps (low beam, except for vehi-
cles
with high intensity discharge head-
lamps) E01009300163
1. When replacing the bulb on the left side of
the vehicle in the case of diesel-powered ve-
hicles, remove the bolt (A) holding down the
relay box and move the relay box towards
the rear of the vehicle. *: Front of the vehicle 2. When replacing the bulb on the right side of
the vehicle in the case of diesel-powered ve-
hicles, remove the bolts (B) holding down
the reservoir tank and move the reservoir tank. *: Front of the vehicle
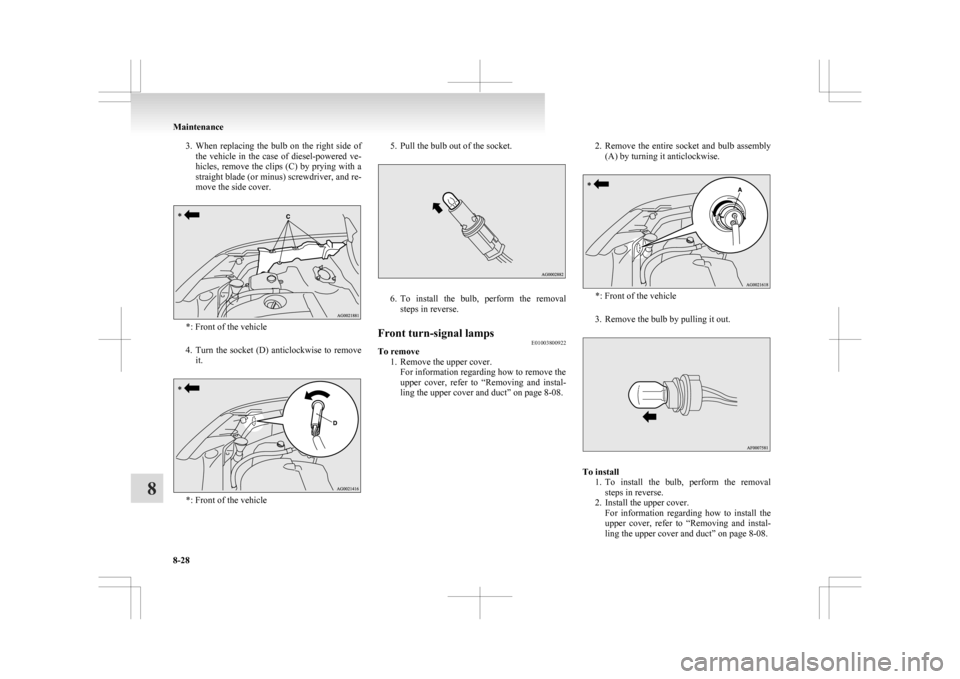
3. When
replacing the bulb on the right side of
the vehicle in the case of diesel-powered ve-
hicles, remove the clips (C) by prying with a
straight blade (or minus) screwdriver, and re-
move the side cover. *: Front of the vehicle4. Turn the cap (D) anticlockwise to remove it.
*: Front of the vehicle
5.
Turn the bulb (E) anticlockwise to remove it. *: Front of the vehicle Maintenance
8-25 8
Page 332 of 368

6. While holding down the tab (F), pull out the
socket (G). 7. To
install the bulb, perform the removal
steps in reverse. CAUTION
l
Handle
halogen lamp bulbs with care.
The gas inside halogen lamp bulbs is high-
ly pressurized, so dropping, knocking, or
scratching a halogen lamp bulb can cause
it to shatter.
l Never hold the halogen lamp bulb with a
bare hand, dirty glove, etc.
The oil from your hand could cause the
bulb to break the next time the head-
lamps are operated.
If the glass surface is dirty, it must be
cleaned with alcohol, paint thinner, etc.,
and refit it after drying it thoroughly. Headlamps (low beam, for vehicles
with high intensity discharge head-
lamps)
E01010100132
Do not attempt to disassemble or repair headlamps,
and do not attempt to replace their bulbs. WARNING
l A high voltage is present in the power cir-
cuit
and in the bulbs and bulb terminals.
To avoid the risk of an electric shock, con-
tact a MITSUBISHI MOTORS Author-
ized Service Point whenever repair or re-
placement is necessary. Headlamps (High-beam)
E01009400135
1. When
replacing the bulb on the left side of
the vehicle in the case of diesel-powered ve-
hicles, remove the bolt (A) holding down the
relay box and move the relay box towards
the rear of the vehicle. *: Front of the vehicle
2.
Turn the cap (B) anticlockwise to remove it. *: Front of the vehicleMaintenance
8-26
8
Page 333 of 368

3. Turn the bulb (C) anticlockwise to remove it.
*: Front of the vehicle
4. While holding down the tab (D), pull out the
socket (E). 5. To
install the bulb, perform the removal
steps in reverse. CAUTION
l
Handle
halogen lamp bulbs with care.
The gas inside halogen lamp bulbs is high-
ly pressurized, so dropping, knocking, or
scratching a halogen lamp bulb can cause
it to shatter.
l Never hold the halogen lamp bulb with a
bare hand, dirty glove, etc.
The oil from your hand could cause the
bulb to break the next time the head-
lamps are operated.
If the glass surface is dirty, it must be
cleaned with alcohol, paint thinner, etc.,
and refit it after drying it thoroughly. Position lamps
E01003700947
1. When
replacing the bulb on the left side of
the vehicle in the case of diesel-powered ve-
hicles, remove the bolt (A) holding down the
relay box and move the relay box towards
the rear of the vehicle. *: Front of the vehicle
2. When
replacing the bulb on the right side of
the vehicle in the case of diesel-powered ve-
hicles, remove the bolts (B) holding down
the reservoir tank and move the reservoir tank. *: Front of the vehicle Maintenance
8-27 8
Page 334 of 368

3. When replacing the bulb on the right side of
the vehicle in the case of diesel-powered ve-
hicles, remove the clips (C) by prying with a
straight blade (or minus) screwdriver, and re-
move the side cover. *: Front of the vehicle
4. Turn
the socket (D) anticlockwise to remove
it. *: Front of the vehicle 5. Pull the bulb out of the socket.
6. To
install the bulb, perform the removal
steps in reverse.
Front turn-signal lamps E01003800922
To remove
1.
Remove the upper cover.For information regarding how to remove the
upper cover, refer to “Removing and instal-
ling the upper cover and duct” on page 8-08. 2. Remove
the entire socket and bulb assembly
(A) by turning it anticlockwise. *: Front of the vehicle
3.
Remove the bulb by pulling it out. To install
1. To
install the bulb, perform the removal
steps in reverse.
2. Install the upper cover. For information regarding how to install the
upper cover, refer to “Removing and instal-
ling the upper cover and duct” on page 8-08. Maintenance
8-28
8
Page 335 of 368

Side turn-signal lamps (on fender)*
E01003900516
NOTE l For
the side turn-signal lamps (on fender), it
is not possible to repair or replace just the bulb.
l Contact a MITSUBISHI MOTORS Author-
ized Service Point when there is a need for re-
pair or replacement.
Side turn-signal lamps (on outside rear-
view mirror)* E01003900529
NOTE l An
LED, not a bulb, is used in the side turn-
signal lamps (on outside rear-view mirror).
Contact a MITSUBISHI MOTORS Author-
ized Service Point when there is a need for re-
pair or replacement.
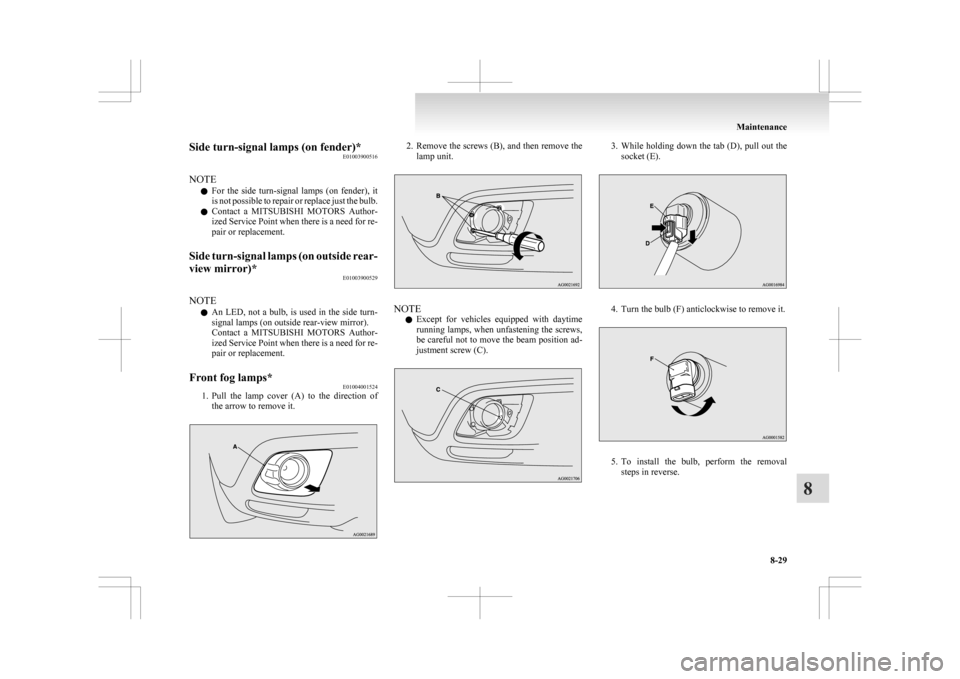
Front fog lamps* E01004001524
1. Pull
the lamp cover (A) to the direction of
the arrow to remove it. 2. Remove
the screws (B), and then remove the
lamp unit. NOTE
l Except
for vehicles equipped with daytime
running lamps, when unfastening the screws,
be careful not to move the beam position ad-
justment screw (C). 3. While
holding down the tab (D), pull out the
socket (E). 4. Turn the bulb (F) anticlockwise to remove it.
5. To
install the bulb, perform the removal
steps in reverse. Maintenance
8-29 8
Page 336 of 368
CAUTION
l
Handle halogen lamp bulbs with care.
The gas inside halogen lamp bulbs is high-
ly pressurized, so dropping, knocking, or
scratching a halogen lamp bulb can cause
it to shatter.
l Never hold the halogen lamp bulb with a
bare hand, dirty glove, etc.
The oil from your hand could cause the
bulb to break the next time the fog lamps
are operated.
If the glass surface is dirty, it must be
cleaned with alcohol, paint thinner, etc.,
and refit it after drying it thoroughly. Daytime running lamps*
E01011200055
1. Pull
the lamp cover (A) to the direction of
the arrow to remove it. 2. Remove
the screws (B), and then remove the
lamp unit. 3. Turn the bulb (C) anticlockwise to remove it.
Type 1
Type 2 4. While
holding down the tab (D), pull out the
socket (E). 5. To
install the bulb, perform the removal
steps in reverse. Maintenance
8-30
8
Page 337 of 368
Rear fog lamp
E01004100456
1.
When removing the lamp unit (A), push it to-wards the left side of the vehicle body. 2. Remove
the socket (B) and bulb assembly by
turning it anticlockwise. 3. Remove the bulb by pulling it out.
4. To
install the bulb, perform the removal
steps in reverse.
NOTE l If the wiring harness is pulled off the 2 har-
ness guides on the lamp unit while replacing
the bulb, make sure to secure the wiring har-
ness to the harness guides.
l When installing the lamp unit, first insert the
tab (C) into the groove (D) on the body, and
then push on the lamp unit to fit it into place. Rear combination lamps
E01004201366
1. Remove
the screws (A) that hold the lamp
unit and remove the lamp unit. 2. Turn the socket and bulb assembly anticlock-
wise to remove it. B- Stop and tail lamp (LED) - cannot be replaced
C- Rear turn-signal lamp Maintenance
8-31 8