2009 MITSUBISHI ASX seats
[x] Cancel search: seatsPage 80 of 368
Installing a child restraint system to
the lower anchorage (ISOFIX child re-
straint mountings) and tether anchor-
age
E00406900673
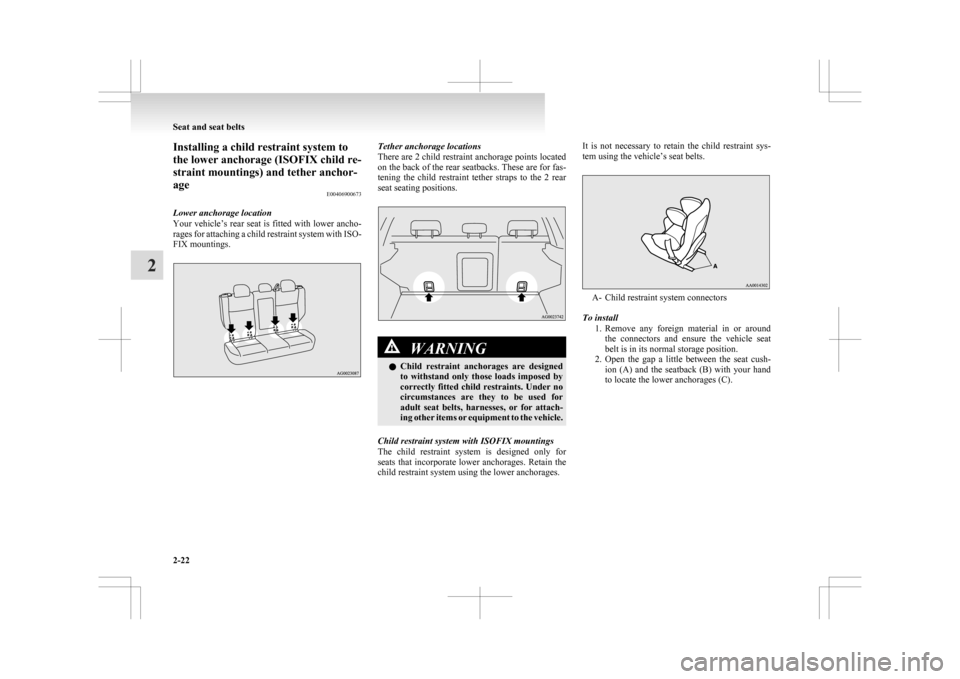
Lower anchorage location
Your
vehicle’s rear seat is fitted with lower ancho-
rages for attaching a child restraint system with ISO-
FIX mountings. Tether anchorage locations
There
are 2 child restraint anchorage points located
on the back of the rear seatbacks. These are for fas-
tening the child restraint tether straps to the 2 rear
seat seating positions. WARNING
l Child
restraint anchorages are designed
to withstand only those loads imposed by
correctly fitted child restraints. Under no
circumstances are they to be used for
adult seat belts, harnesses, or for attach-
ing other items or equipment to the vehicle.
Child restraint system with ISOFIX mountings
The
child restraint system is designed only for
seats that incorporate lower anchorages. Retain the
child restraint system using the lower anchorages. It is not necessary to retain the child restraint sys-
tem using the vehicle’s seat belts.
A- Child restraint system connectors
To install 1. Remove
any foreign material in or around
the connectors and ensure the vehicle seat
belt is in its normal storage position.
2. Open the gap a little between the seat cush- ion (A) and the seatback (B) with your hand
to locate the lower anchorages (C). Seat and seat belts
2-22
2
Page 91 of 368
Because the side airbags and curtain airbags do not
protect
the occupant in all types of side collisions,
be sure to always properly wear your seat belts.
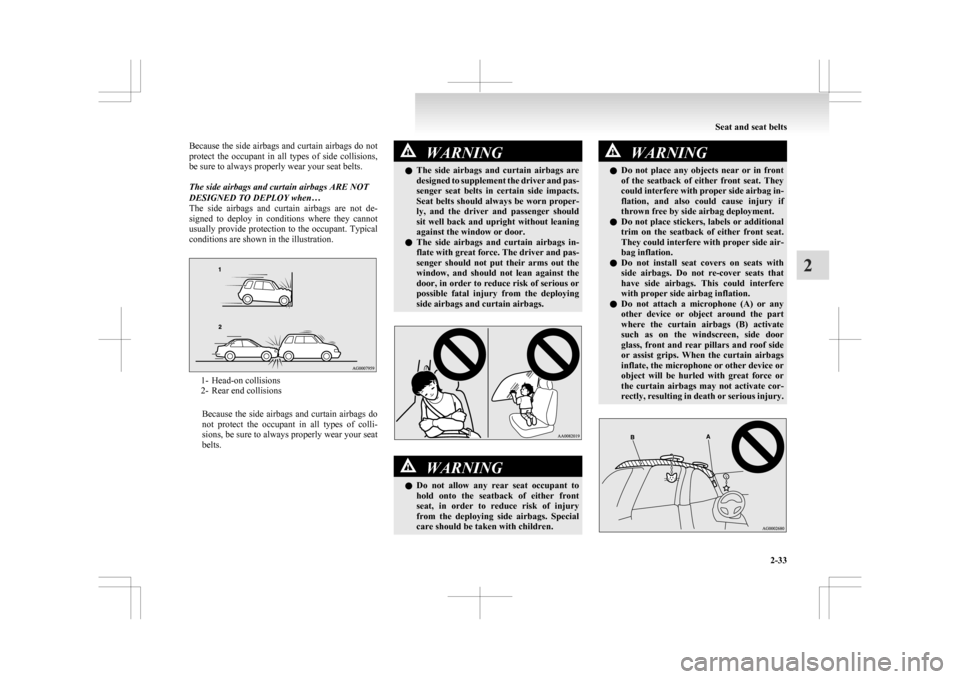
The side airbags and curtain airbags ARE NOT
DESIGNED TO DEPLOY when…
The side airbags and curtain airbags are not de-
signed to deploy in conditions where they cannot
usually provide protection to the occupant. Typical
conditions are shown in the illustration. 1- Head-on collisions
2-
Rear end collisions
Because the side airbags and curtain airbags do
not protect the occupant in all types of colli-
sions, be sure to always properly wear your seat
belts. WARNING
l The
side airbags and curtain airbags are
designed to supplement the driver and pas-
senger seat belts in certain side impacts.
Seat belts should always be worn proper-
ly, and the driver and passenger should
sit well back and upright without leaning
against the window or door.
l The side airbags and curtain airbags in-
flate with great force. The driver and pas-
senger should not put their arms out the
window, and should not lean against the
door, in order to reduce risk of serious or
possible fatal injury from the deploying
side airbags and curtain airbags. WARNING
l Do
not allow any rear seat occupant to
hold onto the seatback of either front
seat, in order to reduce risk of injury
from the deploying side airbags. Special
care should be taken with children. WARNING
l Do
not place any objects near or in front
of the seatback of either front seat. They
could interfere with proper side airbag in-
flation, and also could cause injury if
thrown free by side airbag deployment.
l Do not place stickers, labels or additional
trim on the seatback of either front seat.
They could interfere with proper side air-
bag inflation.
l Do not install seat covers on seats with
side airbags. Do not re-cover seats that
have side airbags. This could interfere
with proper side airbag inflation.
l Do not attach a microphone (A) or any
other device or object around the part
where the curtain airbags (B) activate
such as on the windscreen, side door
glass, front and rear pillars and roof side
or assist grips. When the curtain airbags
inflate, the microphone or other device or
object will be hurled with great force or
the curtain airbags may not activate cor-
rectly, resulting in death or serious injury. Seat and seat belts
2-33 2
Page 93 of 368
WARNING
l Do not modify your steering wheel, seat
belt retractor or any other SRS compo-
nents. For example, replacement of the
steering wheel, or modifications to the
front bumper or body structure can ad-
versely affect SRS performance and lead
to possible injury.
l If your vehicle has sustained any damage,
we recommend you to have the SRS in-
spected to ensure it is in proper working
order.
l On vehicles with the side airbags, do not
modify your front seats, centre pillar and
centre console.
It can adversely affect SRS performance
and lead to possible injury.
If you found any tear, scratch, crack or
damage to the seat fabric near the side air-
bag, the portion of the front and rear pil-
lars and roof side rail, you should have
the SRS inspected by a MITSUBISHI
MOTORS Authorized Service Point.
NOTE l When
you transfer ownership of the vehicle
to some other person, we urge you to alert
the new owner that it is equipped with the
SRS and refer the new owner to the applica-
ble section in this owner’s manual.
l If your vehicle has to be scrapped, do this in
line with local legislation and contact a
MITSUBISHI MOTORS Authorized Service
Point to safely dismantle the airbag system. Seat and seat belts
2-35 2
Page 155 of 368
Safe driving techniques
E00600300446
Driving
safety and protection against injury cannot
be fully ensured. However, we recommend that
you pay extra attention to the following:
Seat belts
Before starting the vehicle, make sure that you and
your passengers have fastened your seat belts.
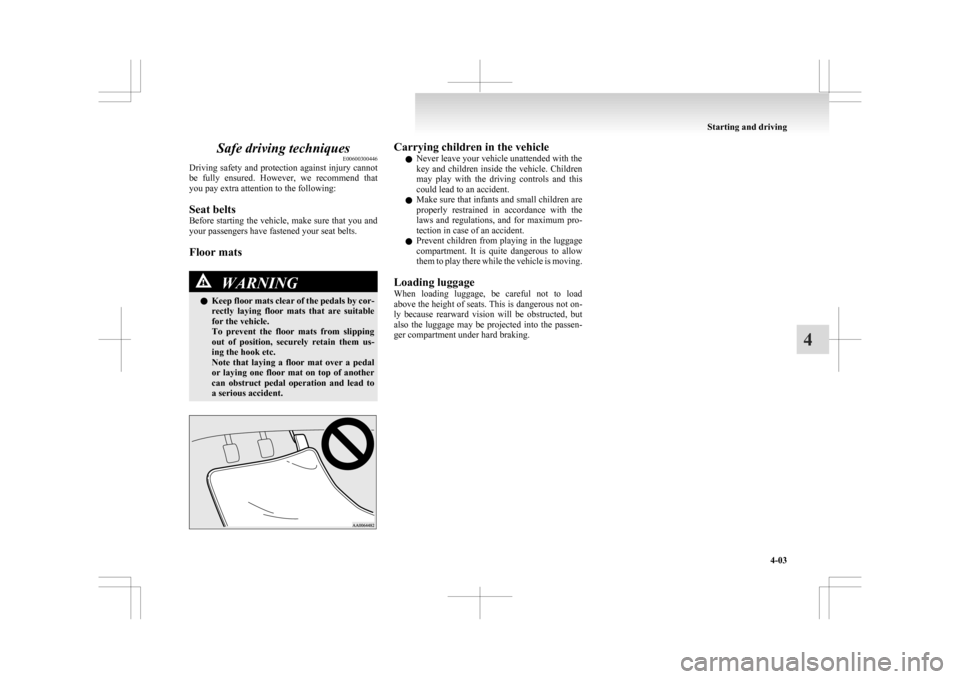
Floor mats WARNING
l Keep
floor mats clear of the pedals by cor-
rectly laying floor mats that are suitable
for the vehicle.
To prevent the floor mats from slipping
out of position, securely retain them us-
ing the hook etc.
Note that laying a floor mat over a pedal
or laying one floor mat on top of another
can obstruct pedal operation and lead to
a serious accident. Carrying children in the vehicle
l Never leave your vehicle unattended with the
key
and children inside the vehicle. Children
may play with the driving controls and this
could lead to an accident.
l Make sure that infants and small children are
properly restrained in accordance with the
laws and regulations, and for maximum pro-
tection in case of an accident.
l Prevent children from playing in the luggage
compartment. It is quite dangerous to allow
them to play there while the vehicle is moving.
Loading luggage
When loading luggage, be careful not to load
above the height of seats. This is dangerous not on-
ly because rearward vision will be obstructed, but
also the luggage may be projected into the passen-
ger compartment under hard braking. Starting and driving
4-03 4
Page 294 of 368
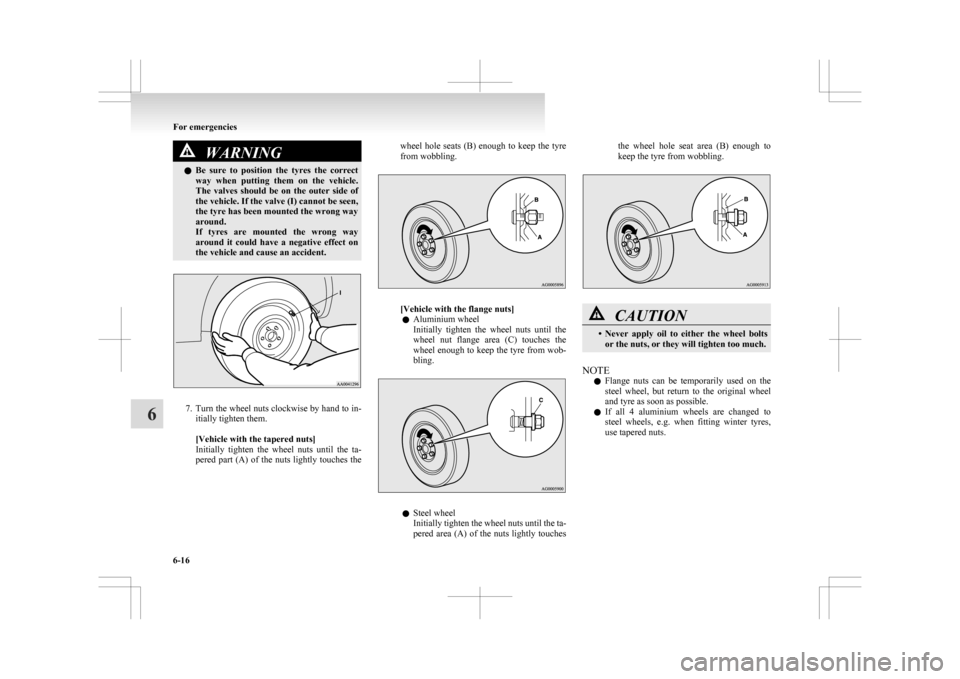
WARNING
l Be sure to position the tyres the correct
way when putting them on the vehicle.
The valves should be on the outer side of
the vehicle. If the valve (I) cannot be seen,
the tyre has been mounted the wrong way
around.
If tyres are mounted the wrong way
around it could have a negative effect on
the vehicle and cause an accident. 7. Turn
the wheel nuts clockwise by hand to in-
itially tighten them.
[Vehicle with the tapered nuts]
Initially tighten the wheel nuts until the ta-
pered part (A) of the nuts lightly touches the wheel hole seats (B) enough to keep the tyre
from wobbling.
[Vehicle with the flange nuts]
l Aluminium wheel
Initially
tighten the wheel nuts until the
wheel nut flange area (C) touches the
wheel enough to keep the tyre from wob-
bling. l
Steel wheel
Initially
tighten the wheel nuts until the ta-
pered area (A) of the nuts lightly touches the wheel hole seat area (B) enough to
keep the tyre from wobbling.
l
CAUTION
• Never
apply oil to either the wheel bolts
or the nuts, or they will tighten too much.
NOTE l Flange
nuts can be temporarily used on the
steel wheel, but return to the original wheel
and tyre as soon as possible.
l If all 4 aluminium wheels are changed to
steel wheels, e.g. when fitting winter tyres,
use tapered nuts. For emergencies
6-16
6
Page 302 of 368
Vehicle care precautions
E00900100548
In
order to maintain the value of your vehicle, it is
necessary to perform regular maintenance using the
proper procedures.
Always maintain your vehicle in compliance with
environmental pollution control regulations.
Carefully select the materials used for washing,
etc., to be sure that they do not contain corrosives.
If in doubt, we recommend you to consult a special-
ist for selection of these materials. CAUTION
l
Cleaning
products can be dangerous. Al-
ways follow the instructions of the clean-
ing product supplier.
l To avoid damage, never use the following
to clean your vehicle:
• Petrol
• Paint Thinner
• Benzine
• Kerosene
• Turpentine
• Naphtha
• Lacquer Thinner
• Carbon Tetrachloride
• Nail Polish Remover
• Acetone Cleaning the interior of your
vehicle E00900200220
After
cleaning the interior of your vehicle with wa-
ter, cleaner or similar, wipe and dry in a shady, well-
ventilated area. CAUTION
l
Do
not use organic substances (solvents,
benzine, kerosene, alcohol, petrol, etc.) or
alkaline or acidic solutions.
These chemicals can cause discolouring,
staining or cracking of the surface.
If you use cleaners or polishing agents,
make sure their ingredients do not in-
clude the substances mentioned above.
Plastic, vinyl leather, fabric and
flocked parts E00900300263
1. Gently
wipe off with a sponge, gauze or oth-
er soft cloth soaked with a 3% aqueous solu-
tion of neutral detergent.
2. Dip cloth in fresh water and wring it out well. Using this cloth, wipe off the detergent
thoroughly.
NOTE l Do not use cleaners, conditioners, and protec-
tants containing silicons or wax.
Such products may cause annoying reflec-
tions and obscure vision. Upholstery
E00900500076
1. To
maintain the value of your new vehicle,
handle the upholstery carefully and keep the
interior clean.
Use a vacuum cleaner and brush to clean the
seats. If stained, vinyl and synthetic leather
should be cleaned with an appropriate clean-
er. Cloth fabrics can be cleaned with either
upholstery cleaner or a 3% aqueous solution
of neutral detergent in lukewarm water.
2. Clean the carpeting with a vacuum cleaner and remove any stains with carpet cleaner.
Oil and grease can be removed by lightly dab-
bing with a clean colourfast cloth and stain re-
mover.
Genuine leather* E00900600804
1. Gently
wipe off with gauze or other soft
cloth soaked with a 5 % aqueous solution of
neutral detergent.
2. Dip cloth in fresh water and wring it out well. Using this cloth, wipe off the detergent
thoroughly.
3. Apply leather protecting agent to the genuine leather surface.
NOTE l If genuine leather is wet with water or is wash-
ed in water, wipe off water as quickly as pos-
sible with a dry, soft cloth. If left damp, mil-
dew may grow.
l The genuine leather surface may be damaged
if a nylon brush or synthetic fibre is rubbed
hard against it. Vehicle care
7-02
7
Page 327 of 368

No. Symbol Electrical system Capaci-
ties
7 Radio 15 A
8 Control unit relay 7.5 A
9 Interior lamps
(Room lamps) 15 A
10 Hazard warning
flasher 15 A
11 Rear window wiper 15 A
12 Instruments 7.5 A
13 Cigarette lighter/
Accessory socket 15 A
14 Ignition switch 10 A
15 Sunroof 20 A
16 Outside rear-view
mirrors 10 A
17 4-wheel drive sys-
tem 10 A
18 Reversing lamps
(Backup lamps) 7.5 A
19 Accessory socket 15 A
20 Electric window
control 30 A*
21 Rear window de-
mister 30 A*
22 Heated door mirror 7.5 A
23 AC power supply 15 A No. Symbol Electrical system Capaci-
ties
24 Power seats 25 (20) A
25 Heated seat 30 A
*: Fusible link
l Some
fuses may not be installed on your ve-
hicle, depending on the vehicle model or spec-
ifications.
l The table above shows the main equipment
corresponding to each fuse.
Engine compartment fuse location table
Engine compartment fuse location
Behind of the fuse block cover No. Symbol Electrical system Capaci-
ties
1 Front fog lamps 15 A
2 Engine 7.5 A
3 Automatic trans-
mission 20 A
4 Horn 10 A
5 Alternator 7.5 A
6 Headlamp washer 20 A
7 Air conditioning 10 A
8 ETV/Oil cooler fan
(Twin Clutch SST) 15 A
9 Security horn 20 A
10 Wiper de-icer 15 A
11 — ——
12 Electric tailgate 30 A
13 Daytime running
lamps 10 A
14 Headlamp high-
beam (left) 10 A
15 Headlamp high-
beam (right) 10 A
16 Head-
lamp low
beam (left) Dis-
charge 20 A Maintenance
8-21 8
Page 358 of 368

Used engine oils safety instructions and disposal
information 05
Exterior and interior lamp operation
8-17
F Fluid capacities and lubricants 9-14
Fluid
Automatic transmission fluid
9-14
Brake fluid 8-07,9-14
Clutch fluid 8-07
CVT fluid 9-14
Engine coolant 8-06,9-14
Power steering fluid 9-14
Twin Clutch SST fluid 9-14
Washer fluid 8-07,9-14
For cold and snowy weather 8-17
Front fog lamps Bulb capacity 8-24
Replacement 8-29
Switch 3-50
Front room lamp Bulb capacity 8-24
Front seat 2-03
Front turn-signal lamps Bulb capacity 8-24
Replacement 8-28
Fuel consumption 9-13
Fuel Filling the fuel tank 03
Fuel selection 02
Modification/alterations to the electrical or fuel
systems 05
Tank capacity 03
Fuses 8-18
Fusible links 8-18 GGeneral maintenance 8-17
General vehicle data
9-04
Genuine parts 05
Glove box lamp Bulb capacity 8-24
H Hazard warning flasher switch 3-50
Hazard warning indication lamps
3-40
Head restraints 2-07
Headlamp levelling switch 3-48
Headlamp washer switch 3-56
Headlamps Bulb capacity 8-23
Headlamp flasher 3-47
Replacement 8-25,8-26
Switch 3-44
Heated mirror 4-10
Heated seats 2-06
Heater 5-03
High-mounted stop lamp Bulb capacity 8-24
Replacement 8-33
Hill start assist 4-35
Hinges and latches lubrication 8-17
Horn switch 3-57
I If the vehicle breaks down 6-02
Ignition switch 4-11
Indication lamps
3-40
Information screen display 3-42
Inside rear-view mirror 4-08
Inside tailgate release 1-27 Inspection and maintenance following rough road
operation 4-33
Instruments 3-02
Interior lamps 5-62
Map lamps 5-63
J Jack 6-06
Storage 6-06
Jump starting (Emergency starting)
6-02
K Key slot 1-17
Keyless entry system 1-04,1-18
Keyless operation system 1-07
Keys 1-02
L Labeling 9-02
Lamp monitor buzzer
3-46
Leakage (Fuel, engine coolant, oil and exhaust
gas) 8-17
Licence plate lamps Bulb capacity 8-24
Replacement 8-33
Link System 5-41
Lubricants 9-14
Luggage hooks 5-70
Luggage room lamp 5-63 Bulb capacity 8-24
M Making a luggage compartment 2-08
Manual transmission 4-21
Map lamps 5-62,5-63Alphabetical index
2