2009 MINI COOPER CONVERTIBLE manual radio set
[x] Cancel search: manual radio setPage 14 of 172

Cockpit
12
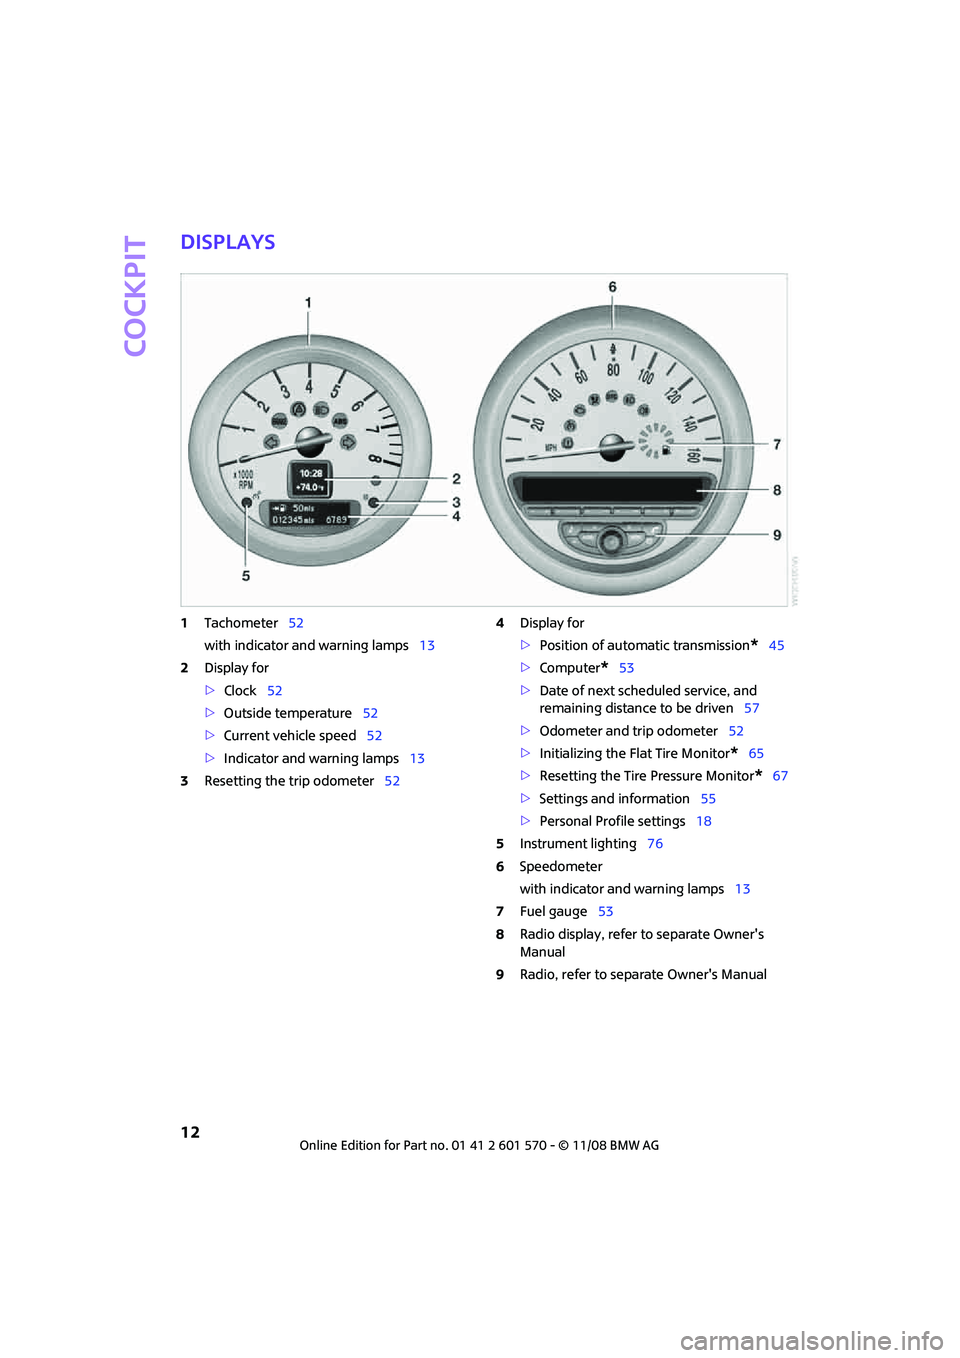
Displays
1Tachometer52
with indicator and warning lamps13
2Display for
>Clock52
>Outside temperature52
>Current vehicle speed52
>Indicator and warning lamps13
3Resetting the trip odometer524Display for
>Position of automatic transmission
*45
>Computer
*53
>Date of next scheduled service, and
remaining distance to be driven57
>Odometer and trip odometer52
>Initializing the Flat Tire Monitor
*65
>Resetting the Tire Pressure Monitor
*67
>Settings and information55
>Personal Profile settings18
5Instrument lighting76
6Speedometer
with indicator and warning lamps13
7Fuel gauge53
8Radio display, refer to separate Owner's
Manual
9Radio, refer to separate Owner's Manual
Page 62 of 172

Everything under control
60
6.Wait for the display to change to month.
7.Set the month and year in the same way.
8.Wait for the display to change.
The settings are stored.
Check Control
The concept
The Check Control monitors vehicle functions
and alerts you to any malfunctions in the sys-
tems monitored. Check Control messages
involve indicator or warning lamps in the dis-
plays and, in some circumstances, an acoustic
signal. To adjust the volume of the signal, refer
to the Owner's Manual for Radio.
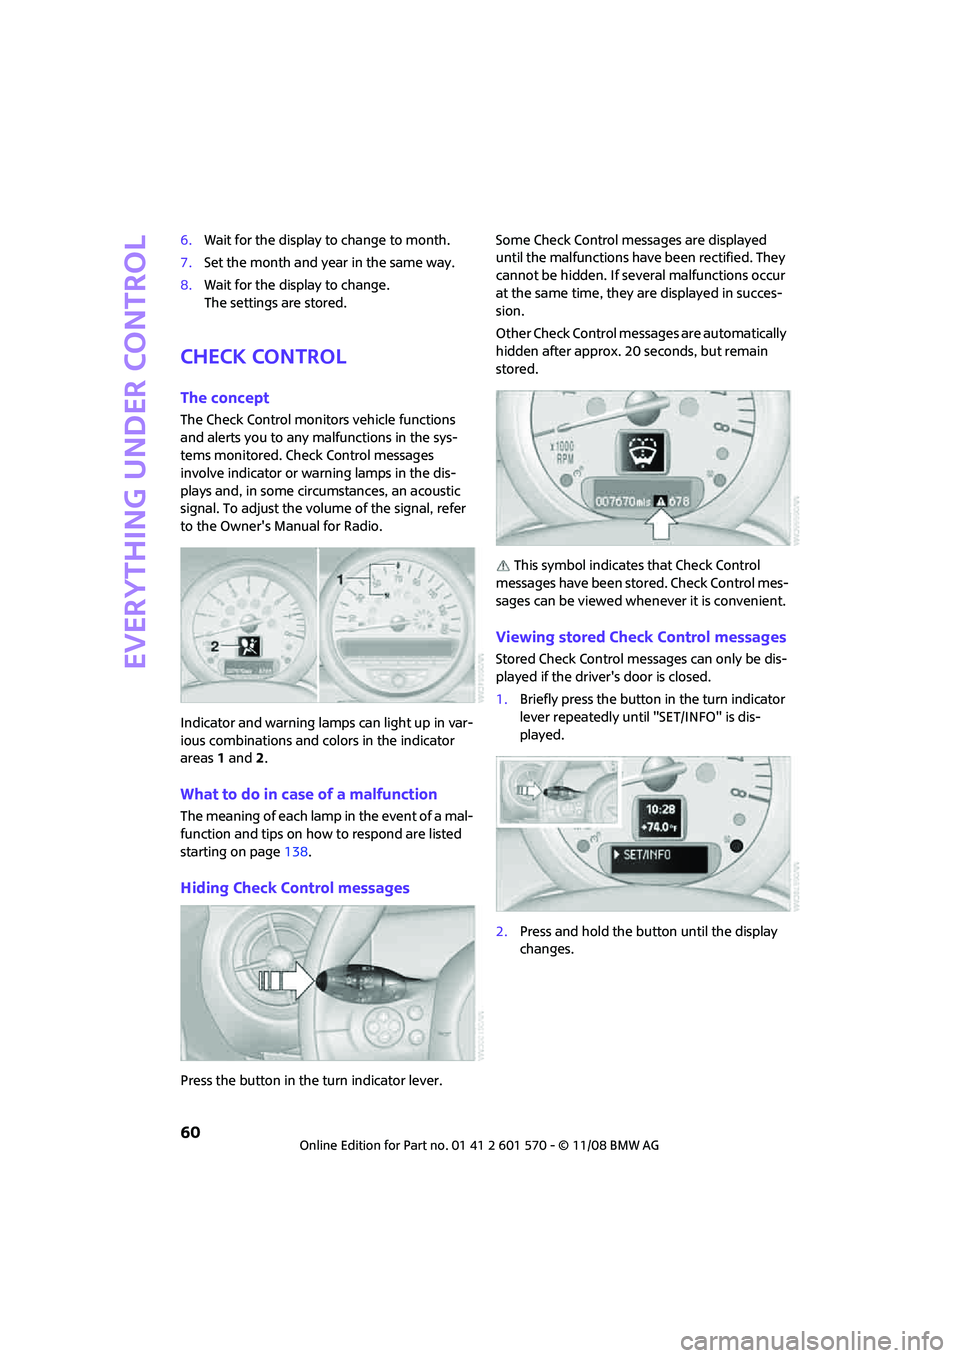
Indicator and warning lamps can light up in var-
ious combinations and colors in the indicator
areas 1 and2.
What to do in case of a malfunction
The meaning of each lamp in the event of a mal-
function and tips on how to respond are listed
starting on page138.
Hiding Check Control messages
Press the button in the turn indicator lever.Some Check Control messages are displayed
until the malfunctions have been rectified. They
cannot be hidden. If several malfunctions occur
at the same time, they are displayed in succes-
sion.
Other Check Control messages are automatically
hidden after approx. 20 seconds, but remain
stored.
This symbol indicates that Check Control
messages have been stored. Check Control mes-
sages can be viewed whenever it is convenient.
Viewing stored Check Control messages
Stored Check Control messages can only be dis-
played if the driver's door is closed.
1.Briefly press the button in the turn indicator
lever repeatedly until "SET/INFO" is dis-
played.
2.Press and hold the button until the display
changes.
Page 70 of 172

Technology for driving comfort and safety
68
1.Reduce speed and stop the vehicle with cau-
tion. Avoid sudden braking and steering
maneuvers.
2.Check whether your vehicle is equipped
with normal tires or Run-Flat Tires.
The symbol identifying Run-Flat Tires
is a circle with the letters RSC on the
sidewall, refer to the Owner's Manual for
Vehicle.<
Normal tires
1.Determine which tire is damaged.
If this cannot be determined, contact
your MINI Dealer.<
2.Repair the flat tire or change the damaged
tire, refer to page129.
Run-Flat Tires*
1.Cautiously reduce speed to below
50 mph/80 km/h. Avoid sudden braking and
steering maneuvers. Do not exceed a speed
of 50 mph/80 km/h.
Do not continue driving if the vehicle is
not equipped with Run-Flat Tires, oth-
erwise a serious accident could result.<
2.In the event of complete tire pressure loss,
0 psi/0 kPa, you can estimate the possible
distance for continued driving on the basis
of the following guidelines:
>With a light load:
1 to 2 persons without luggage:
approx. 155 miles/250 km
>With a medium load:
2 persons, cargo bay full, or 4 persons
without luggage:
approx. 94 miles/150 km
>With a full load:
4 persons, load compartment full:
approx. 30 miles/50 kmDrive cautiously and do not exceed a
speed of 50 mph/80 km/h, otherwise an
accident may occur. In the event of pressure
loss, vehicle handling changes. This includes
reduced tracking stability in braking, extended
braking distance and altered natural steering
characteristics.
If unusual vibration or loud noises occur during
the journey, this may be an indication that the
damaged tire has finally failed. Reduce the vehi-
cle speed and stop as soon as possible. Other-
wise, sections of the tire may come loose and
cause accidents. Do not continue driving and
contact your MINI Dealer.<
Malfunction
The small warning lamp flashes in yel-
low and then lights up continuously; the
larger warning lamp comes on in yel-
low.
On the onboard monitor, the tires are shown in
gray and a message appears. No punctures can
be detected.
This type of message is shown in the following
situations:
>If there is a malfunction.
Have the system checked.
>If a wheel without TPM electronics has been
mounted.
>If TPM is temporarily malfunctioning due to
other systems or devices using the same
radio frequency.
Message for unsuccessful system reset
Both warning lamps come on in yellow.
The system is not reset after a tire has
been changed, for example.
Check the tire inflation pressure and
reset the system, refer to the Owner's Manual
for Vehicle.
Page 134 of 172

Replacing components
132
1.Place the jack at the jacking point closest to
the wheel.
The jack base must be perpendicular to the
surface beneath the jacking point.
2.During jacking up, insert the jack head in the
square recess of the jacking point.
3.Jack the vehicle up until the wheel you are
changing is raised off the ground.
Mounting the space-saver spare tire
1.Unscrew the lug bolts and remove the
wheel.
2.Remove accumulations of mud or dirt from
the mounting surfaces of the wheel and
hub. Clean the lug bolts.
3.Lift the new wheel into place.
4.Screw at least two lug bolts finger-tight into
opposite bolt holes.
5.Screw in the remaining bolts.
6.Tighten all the lug bolts firmly in a diagonal
pattern.
7.Lower the vehicle.
8.Remove the jack.
Tightening the lug bolts
Tighten the lug bolts in a diagonal pattern.
Immediately have the wheels checked
with a calibrated torque wrench to ensure
that the lug bolts are firmly seated. Otherwise,
incorrectly tightened lug bolts can present a
safety hazard.<
Tightening torque: 103.3 lb ft or 140 Nm.
Replace the defective tire as soon as possible
and have the new wheel/tire assembly bal-
anced.
Vehicle battery
Have any work on the battery, including
battery replacement, carried out only by a
MINI Dealer or a workshop that has specially
trained personnel working in accordance with
the specifications of the MINI manufacturer.<
Battery care
The battery is 100 % maintenance-free, the
electrolyte will last for the life of the battery
when the vehicle is operated in a temperate cli-
mate.
Charging the battery
Only charge the battery in the vehicle when the
engine is off. Connections, refer to Jump starting
on page134.
Disposal
After replacing old batteries, return the
used batteries to your MINI Dealer or to a
recycling point. Maintain the battery in an
upright position for transport and storage.
Always secure the battery against tipping over
during transport.<
Power failure
After a temporary power loss, some equipment
may not be fully functional and may require ini-
tialization. Individual settings are also lost and
must be reprogrammed:
>Time and date
These values must be updated, page59.
>Radio
Stations must be stored again, refer to the
separate Owner's Manual for Radio.
>Glass sunroof, electric
It may only be possible to raise the sunroof,
if applicable. The system must be initialized.
Contact your nearest MINI Dealer.