2009 Mercury Mariner Hybrid instrument panel
[x] Cancel search: instrument panelPage 36 of 333

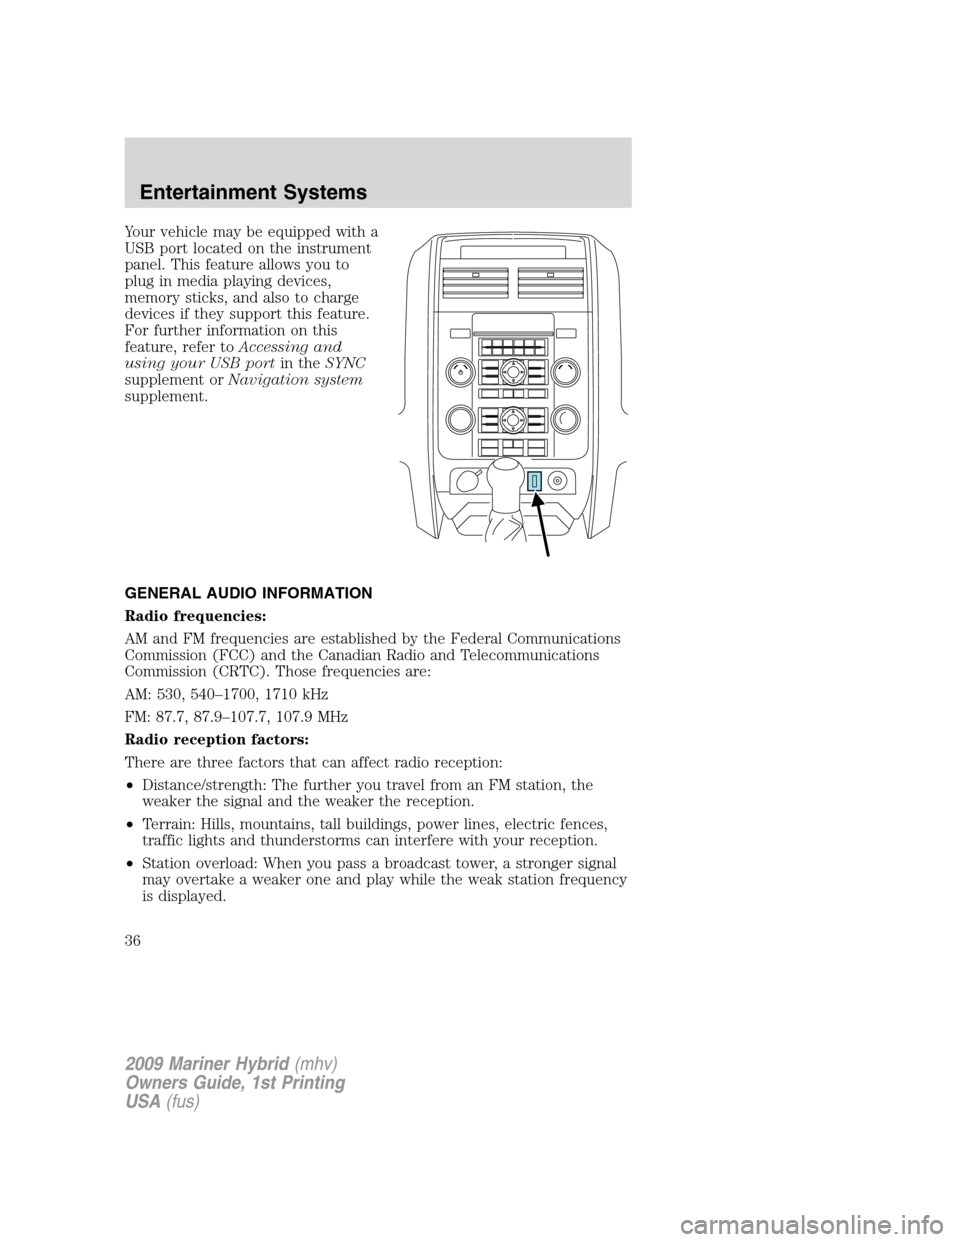
Your vehicle may be equipped with a
USB port located on the instrument
panel. This feature allows you to
plug in media playing devices,
memory sticks, and also to charge
devices if they support this feature.
For further information on this
feature, refer toAccessing and
using your USB portin theSYNC
supplement orNavigation system
supplement.
GENERAL AUDIO INFORMATION
Radio frequencies:
AM and FM frequencies are established by the Federal Communications
Commission (FCC) and the Canadian Radio and Telecommunications
Commission (CRTC). Those frequencies are:
AM: 530, 540–1700, 1710 kHz
FM: 87.7, 87.9–107.7, 107.9 MHz
Radio reception factors:
There are three factors that can affect radio reception:
•Distance/strength: The further you travel from an FM station, the
weaker the signal and the weaker the reception.
•Terrain: Hills, mountains, tall buildings, power lines, electric fences,
traffic lights and thunderstorms can interfere with your reception.
•Station overload: When you pass a broadcast tower, a stronger signal
may overtake a weaker one and play while the weak station frequency
is displayed.
2009 Mariner Hybrid(mhv)
Owners Guide, 1st Printing
USA(fus)
Entertainment Systems
36
Page 44 of 333

4.Defrost/Floor:Distributes air through the windshield defroster
vents, demister vents, floor vents and rear seat floor vents. The system
will automatically provide outside air to reduce window fogging. On days
where the outside temperature is approximately freezing or higher, the
engine will run continuously in this mode.
5.
Power/:Press to activate/deactivate the climate control
system. When the system is off, outside air is shut out. Turn to manually
increase/decrease the fan speed. The manual fan speed setting will
appear on the left side of the display. Press AUTO to return to full
automatic control.
6.
Panel:Distributes air through the instrument panel vents.
7.
Panel/Floor:Distributes air through the instrument panel vents,
demister vents, floor vents and rear seat floor vents.
8.
Floor:Distributes air through the demister vents, floor vents and
rear seat floor vents.
9.Passenger temperature:Press to engage/disengage separate
passenger side temperature control. Turn to increase/decrease the
temperature on the passenger side of the vehicle. The recommended
initial setting is between 72°F (22°C) and 75°F (24°C), then adjust for
comfort. The passenger side temperature setting will appear in the upper
right corner of the display.
10.
Passenger heated seat control (if equipped):Press to
activate/deactivate the passenger heated seat. SeeHeated seatsin the
Seating and Safety Restraintschapter.
11.
Recirculated air:Press to activate/deactivate air recirculation
in the vehicle. Recirculated air may reduce the amount of time needed to
cool down the interior of the vehicle, may reduce the energy needed to
keep the interior of the vehicle cool, and may also help reduce undesired
outside odors from reaching the interior of the vehicle. Recirculated air
is controlled automatically when AUTO is selected or can be engaged
manually in any airflow mode except
(defrost). Recirculated air
may turn off automatically in some airflow modes to reduce window
fogging potential. When the ignition switch is turned off and back on, the
climate system will return to the recirculated air mode only if the A/C
button LED is illuminated and the air distribution selection is either
AUTO,
(panel) or(panel/floor).
2009 Mariner Hybrid(mhv)
Owners Guide, 1st Printing
USA(fus)
Climate Controls
44
Page 46 of 333

For maximum cooling performance:
•Automatic operation:
1. Press AUTO for full automatic operation.
2. Do not override A/C or
(recirculated air).
3. Set the temperature to 60°F (16°C).
Make sure ECON mode is deactivated.
•Manual operation:
1. Select A/C.
2. Select
or.
3. Select
(recirculated air) to provide colder airflow.
4. Set the temperature to 60°F (16°C).
5. Set highest fan setting initially, then adjust to maintain comfort.
Make sure ECON mode is deactivated.
To aid in side window defogging/demisting in cold weather:
1. Select
.
2. Select A/C.
3. Adjust the temperature control to maintain comfort.
4. Set the fan speed to the highest setting.
5. Direct the outer instrument panel vents towards the side windows.
To increase airflow to the outer instrument panel vents, close the vents
located in the middle of the instrument panel.
REAR WINDOW DEFROSTER
R
The rear defroster control is located on the climate control panel and
works to clear the rear window of fog and thin ice.
The vehicle must be on to operate the rear window defroster.
Press
Rto turn the rear window defroster on. An indicator light on the
button will illuminate when active. The rear window defroster turns off
automatically after approximately 15 minutes. If a low battery condition
is detected or the ignition is turned off or to the accessory position, the
rear window defroster will not function. To manually turn off the rear
window defroster at any time, press
Ragain.
If your vehicle is equipped with both rear defroster and heated mirrors,
the same button will activate both. Refer toHeated outside mirrorsin
theDriver Controlschapter.
2009 Mariner Hybrid(mhv)
Owners Guide, 1st Printing
USA(fus)
Climate Controls
46
Page 50 of 333

High beams
Push the lever toward the
instrument panel to activate. Pull
the lever towards you to deactivate.
Flash to pass
Pull toward you slightly to activate
and release to deactivate.
Daytime running lamps (DRL) (if equipped)
Turns the lowbeam headlamps on with a reduced output.
To activate:
•the ignition must be in the on position.
•the headlamp control must be in the off , parking lamps or autolamp
position.
•the transmission is not in P (Park),
WARNING:Always remember to turn on your headlamps at
dusk or during inclement weather. The Daytime Running Lamp
(DRL) system does not activate the tail lamps and generally may not
provide adequate lighting during these conditions. Failure to activate
your headlamps under these conditions may result in a collision.
2009 Mariner Hybrid(mhv)
Owners Guide, 1st Printing
USA(fus)
Lights
50
Page 51 of 333

PANEL DIMMER CONTROL
Use to adjust the brightness of the
instrument panel and all applicable
switches in the vehicle during
headlamp and parking lamp
operation.
Move the control to the full upright
position, past detent, to turn on the
interior lamps.
Rotate to full down position (past
detent) to prevent interior lamps
from illuminating when the doors are opened.
Note:If the battery is disconnected, discharged, or a new battery is
installed, the dimmer switch requires re-calibration. Rotate the dimmer
switch from the full dim position to the full Dome/ON position to reset.
This will ensure that your displays are visible under all lighting
conditions.
AIMING THE HEADLAMPS
The headlamps on your vehicle are properly aimed at the assembly plant.
If your vehicle has been in an accident, the alignment of your headlamps
should be checked by your authorized dealer.
Vertical aim adjustment
1. Park the vehicle directly in front of a wall or screen on a level surface,
approximately 25 feet (7.6 meters) away.
•(1) 8 feet (2.4 meters)
•(2) Center height of lamp to
ground
•(3) 25 feet (7.6 meters)
•(4) Horizontal reference line
2. Measure the height from the
center of your headlamp to the
ground and mark an 8 foot
(2.4 meter) horizontal reference line
on the vertical wall or screen at this
height (a piece of masking tape works well). The center of the lamp is
marked by a 3.0 mm circle on the headlamp lens.
3. Turn on the low beam headlamps to illuminate the wall or screen and
open the hood. Cover the left-hand headlamp with an opaque cloth.
2009 Mariner Hybrid(mhv)
Owners Guide, 1st Printing
USA(fus)
Lights
51
Page 53 of 333

The dome lamp control has three
positions:
•OFF: In this position, the lamp
will not illuminate when the doors
are open or when attempting to
turn the dome lamp on by fully
rotating the dimmer control
located on the instrument panel.
•DOOR: In this position, the dome lamp will illuminate only when a
door is opened and will remain illuminated for 25 seconds after the
door is shut.
•ON: In this position, the lamp will remain illuminated.
The map lamp controls (without
moon roof) are located on the dome
lamp. Press the button on either
side of each map lamp to illuminate
the lamps. Push the button again to
turn off the lamps.
For models equipped with a moon
roof, the map lamps are located on
the moon roof control panel. Press
the button on either side of each
map lamp to illuminate the lamps.
Push the button again to turn off
the lamps.
The map lamps will illuminate
whenever a door is opened. After
the door is shut, the lamps will remain illuminated for 25 seconds.
Cargo and dome lamp
Rear cargo lamp equipped with an
ON/OFF/DOOR control will light
when:
•the doors are closed and the
control is in the ON position.
•the control is in the DOOR
position and any door is open.
When the control is in the OFF position, it will not illuminate when you
open the doors.
2009 Mariner Hybrid(mhv)
Owners Guide, 1st Printing
USA(fus)
Lights
53
Page 55 of 333

Take your vehicle to dealer for service if any of the above conditions of
unacceptable moisture are present.
Using the right bulbs
Replacement bulbs are specified in the chart below. Headlamp bulbs
must be marked with an authorized “D.O.T.” for North America and an
“E” for Europe to ensure lamp performance, light brightness and pattern
and safe visibility. The correct bulbs will not damage the lamp assembly
or void the lamp assembly warranty and will provide quality bulb burn
time.
Function Number of bulbs Trade number
Headlamps (high and
low beams)2
H13
Park/turn/sidemarker
lamps (front)2
3457AK (amber)
Side turn (fender) 2 WY5W (amber)
Rear
stop/turn/tail/sidemarker2
3157K / 4157K
Backup lamp 2 921
Fog lamp (front) 2 9145
Center High-mount
stop lamp5
W5WL
Rear license plate
lamp2
168
All replacement bulbs are clear in color except where noted.
To replace all instrument panel lights - see your authorized dealer
Replacing the interior bulbs
Check the operation of all bulbs frequently.
Replacing exterior bulbs
Check the operation of all the bulbs frequently.
2009 Mariner Hybrid(mhv)
Owners Guide, 1st Printing
USA(fus)
Lights
55
Page 65 of 333

The sliding tray and inside bin can
be hooked on the side or rear of the
console for extra storage.
AUXILIARY POWER POINT (12V)
Power outlets are designed for accessory plugs only. Do not insert
any other object in the power outlet as this will damage the
outlet and blow the fuse. Do not hang any type of accessory or
accessory bracket from the plug. Improper use of the power
outlet can cause damage not covered by your warranty.
The auxiliary power point is located
in the instrument panel.
A second auxiliary power point is
located on the rear side of the
center console.
Do not use the power point for
operating the cigarette lighter
element (if equipped).
To prevent the fuse from being
blown, do not use the power
point(s) over the vehicle capacity of 12 VDC/180W. If the power point or
cigar lighter socket is not working, a fuse may have blown. Refer to
Fuses and relaysin theRoadside Emergencieschapter for information
on checking and replacing fuses.
To have full capacity usage of your power point, the engine is required to
be running to avoid unintentional discharge of the battery. To prevent
the battery from being discharged:
•do not use the power point longer than necessary when the engine is
not running,
•do not leave battery chargers, video game adapters, computers and
other devices plugged in overnight or when the vehicle is parked for
extended periods.
Always keep the power point caps closed when not being used.
2009 Mariner Hybrid(mhv)
Owners Guide, 1st Printing
USA(fus)
Driver Controls
65