Page 134 of 426
�
Move the selection marker with button
æ orç to the
Time
submenu.
�
Press buttonj ork repeatedly
until you see this message in the left")
134 Controls in detailControl systemSetting time (minutes)�
Move the selection marker with button
æ orç to the
Time
submenu.
�
Press buttonj ork repeatedly
until you see this message in the left
multifunction display:
Set Time
Minute(s)
.
The selection marker is on the minute
setting.
�
Press buttonæ orç to set the
minutes.Setting time (hours)
�
Move the selection marker with button
æ orç to the
Time
submenu.
�
Press buttonj ork repeatedly
until you see this message in the left
multifunction display:
Set Time Hour
.
The selection marker is on the hour
setting.
�
Press buttonæ orç to set the
hour.Lighting submenu
Access the
Lighting
submenu via the
Settings
menu. Use the
Lighting
sub-
menu to change the lamp and lighting
settings on your vehicle.
The following functions are available:
Function
Page
Setting daytime running lamp
mode (USA only)
135
Setting locator lighting
135
Setting night security illumina-
tion (Headlamps delayed
switch-off)
136
Setting interior lighting delayed
switch-off
137
Page 135 of 426
�
Move the selection marker with button
æ or ç to the
Lighting
sub-
menu.
�
Press button j or k repeatedly
unti")
135 Controls in detail
Control system
Setting daytime running lamp mode
(USA only)�
Move the selection marker with button
æ or ç to the
Lighting
sub-
menu.
�
Press button j or k repeatedly
until you see this message in the left
multifunction display:
Light Circuit
Headlamp Mode
.
The selection marker is on the current
setting.
�
Press buttonæ orç to select
manual operation (
Manual
) or daytime
running lamp mode (
Constant
)
activated.With daytime running lamp mode activated
and the exterior lamp switch in
positionM orU, the low-beam
headlamps are switched on when the
engine is running.
In low ambient light conditions the
following lamps will switch on additionally:
�
Parking lamps
�
Tail lamps
�
License plate lamps
�
Side marker lamps
For more information on the daytime
running lamp mode, see “Daytime running
lamp mode” (
�page 108).Setting locator lighting
With the locator lighting feature activated
and the exterior lamp switch in
positionU, the following lamps will
switch on during darkness when the
vehicle is unlocked with the SmartKey:
�
Parking lamps
�
Tail lamps
�
License plate lamps
�
Side marker lamps
�
Front fog lamps
The locator lighting switches off when the
driver’s door is opened.
If you do not open a door after unlocking
the vehicle with the SmartKey the lamps
will switch off automatically after approxi-
mately 40 seconds.
i
This function is not available in countries
where the daytime running lamp mode is manda-
tory and therefore in a constant mode.
i
For safety reasons, resetting the
Lighting
submenu to factory settings while driving
(
�page 129) will not deactivate the daytime
running lamp mode.
You see the following message in the right multi-
function display:
Cannot be fully reset to
factory settings while driving
.
Page 136 of 426

136 Controls in detailControl system�
Move the selection marker with button
æ or ç to the
Lighting
submenu.
�
Press button j or k repeatedly
until you see this message in the left
multifunction display: Locator Lighting
.
The selection marker is on the current
setting.
�
Press button æ or ç to switch
the locator lighting feature
On
or
Off
.
�
Turn the exterior lamp switch to
positionU when exiting the vehicle
(�page 106).
The locator lighting feature is
activated.Setting night security illumination
(Headlamps delayed switch-off)
Use this function to set whether you would
like the exterior lamps to remain on for
15 seconds during darkness after exiting
the vehicle and closing the doors.
With the delayed shut-off feature activated
and the exterior lamp switch in
positionU before the engine is turned
off, the following lamps will switch on
when the engine is turned off:
�
Parking lamps
�
Tail lamps
�
License plate lamps
�
Side marker lamps
�
Front fog lamps
If, after turning off the engine, you do not
open a door or do not close an opened
door, the lamps will automatically switch
off after 60 seconds.
�
Move the selection marker with button
æ or ç to the
Lighting
sub-
menu.
�
Press button j or k repeatedly
until you see this message in the left
multifunction display: Headlamps Delayed Switch-off
.
The selection marker is on the current
setting.
�
Press button æ or ç to switch
the headlamps delayed shut-off feature On or
Off
.
�
Turn the exterior lamp switch to
positionU before turning off the
engine (
�page 106).
The headlamps delayed switch-off
feature is activated.
Page 137 of 426
137 Controls in detail
Control system
You can temporarily deactivate the
headlamps delayed switch-off feature:�
Before leaving the vehicle turn the
SmartKey in the starter switch to
position0.
�
Then turn it to position2 and back
to0.
The delayed switch-off feature is deac-
tivated. It will reactivate as soon as you
reinsert the SmartKey in the starter
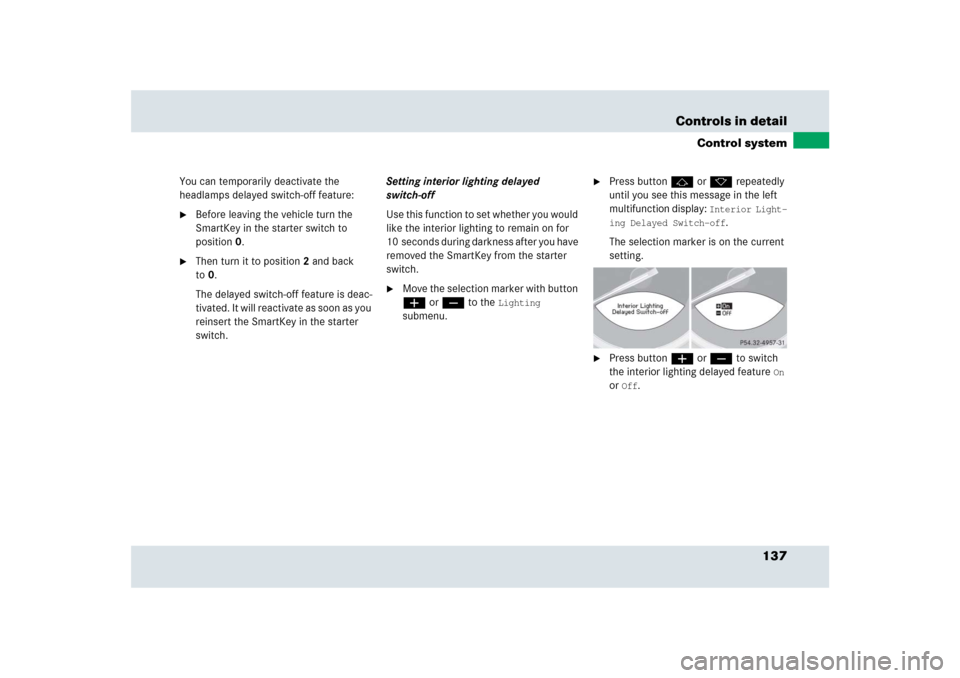
switch.Setting interior lighting delayed
switch-off
Use this function to set whether you would
like the interior lighting to remain on for
10 seconds during darkness after you have
removed the SmartKey from the starter
switch.
�
Move the selection marker with button
æ or ç to the
Lighting
submenu.
�
Press button j or k repeatedly
until you see this message in the left
multifunction display:
Interior Light-
ing Delayed Switch-off
.
The selection marker is on the current
setting.
�
Press button æ or ç to switch
the interior lighting delayed feature
On
or
Off
.
Page 181 of 426
.
Headlamp cleaning system
The button is located")
181 Controls in detail
Good visibility
�Good visibility
For information on the windshield wipers,
see “Switching on windshield wipers”
(�page 52).
Headlamp cleaning system
The button is located on the left side of the
dashboard.
1Headlamp washer button�
Switch on the ignition (
�page 40).
�
Press button 1.
The headlamps are cleaned with a
high-pressure water jet.For information on filling up the washer
reservoir, see “Windshield washer system
and headlamp cleaning system”
(
�page 257).
Rear view mirrors
For more information on setting the rear
view mirrors, see “Mirrors” (
�page 43).
Auto-dimming mirror
The reflection brightness of the interior
rear view mirror will respond automatically
to glare when
�
the ignition is switched on
and
�
incoming light from headlamps falls on
the sensor in the interior rear view
mirror
The rear view mirror will not react if
�
reverse gearR is engaged
�
the interior lighting is turned on
i
The headlamps will automatically be
cleaned when you have
�
switched on the headlamps
and
�
operated the windshield wipers with wind-
shield washer fluid fifteen times
When you switch off the ignition, the counter
resets.
Page 249 of 426
. For more information,
see “Coolant” (
�page 255) and see “Fu-
els, coolants, lubricants, e")
249 Operation
At the gas station
Coolant
For normal replenishing, use water (pota-
ble water quality). For more information,
see “Coolant” (
�page 255) and see “Fu-
els, coolants, lubricants, etc.”
(
�page 393).
Engine oil level
For more information on engine oil level,
see “Engine oil” (
�page 253).
Brake fluidWindshield washer and headlamp
cleaning system
For more information on filling up the
washer reservoir, see “Windshield washer
system and headlamp cleaning system”
(
�page 257).
Vehicle lighting
Check function and cleanliness. For more
information on replacing light bulbs, see
“Replacing bulbs” (
�page 361).
For more information on exterior lamps,
see “Exterior lamp switch” (
�page 106).Tire inflation pressure
For more information on tire inflation pres-
sure, see “Checking tire inflation pressure
manually” (
�page 271).
!
If you find that the brake fluid in the brake
fluid reservoir has fallen to the minimum mark or
below, have the brake system checked for brake
pad thickness and leaks immediately. Notify an
authorized Mercedes-Benz Center immediately.
Do not add brake fluid as this will not solve the
problem. For more information, see “Practical
hints” (�page 307).
Page 251 of 426
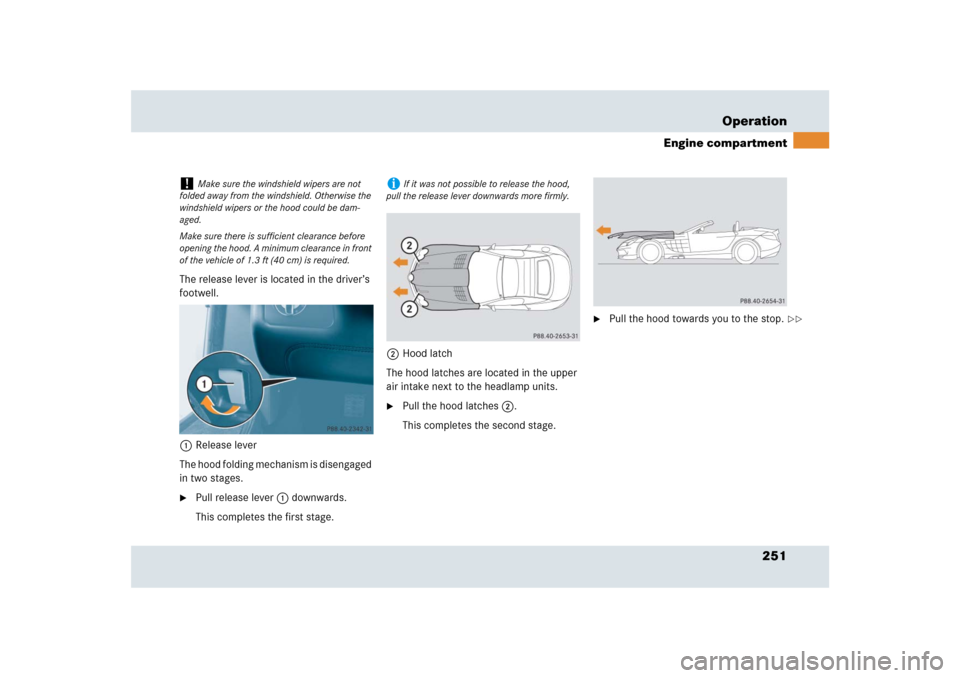
251 Operation
Engine compartment
The release lever is located in the driver’s
footwell.
1Release lever
The hood folding mechanism is disengaged
in two stages.�
Pull release lever1 downwards.
This completes the first stage.2Hood latch
The hood latches are located in the upper
air intake next to the headlamp units.
�
Pull the hood latches2.
This completes the second stage.
�
Pull the hood towards you to the stop.
!
Make sure the windshield wipers are not
folded away from the windshield. Otherwise the
windshield wipers or the hood could be dam-
aged.
Make sure there is sufficient clearance before
opening the hood. A minimum clearance in front
of the vehicle of 1.3 ft (40 cm) is required.
i
If it was not possible to release the hood,
pull the release lever downwards more firmly.
��
Page 257 of 426

257 OperationTrunk
Windshield washer system and head-lamp cleaning system
Fluid for the windshield washer system and
the headlamp cleaning system is supplied
from the windshield washer reservoir. It
has a capacity of approximately
7.4 US qt (7.0 l).
During all seasons, add MB Windshield
Washer Concentrate “MB SummerFit” to
water. Premix the windshield washer fluid
in a suitable container.�
Refill the reservoir with MB Windshield
Washer Concentrate and water (or
commercially available premixed
windshield washer solvent/antifreeze,
depending on ambient temperatures).The washer fluid reservoir is located in the
trunk underneath the interior floor on the
left-hand side.
1Interior floor
2Loop
3Removing interior floor
!
Always use washer solvent/antifreeze
where temperatures may fall below freezing
point. Failure to do so could result in damage to
the washer system/reservoir.
!
Only use washer fluid which is suitable for
plastic lenses. Improper washer fluid can
damage the plastic lenses of the headlamps.
Do not use distilled or deionized water in the
washer fluid reservoir. Otherwise, the washer
fluid level sensor could be damaged.
Warning!
G
Washer solvent/antifreeze is highly flamma-
ble. Do not spill washer solvent/antifreeze
on hot engine parts, because it may ignite
and burn. You could be seriously burned.
��