Page 118 of 426
118 Controls in detailControl systemMultifunction steering wheel
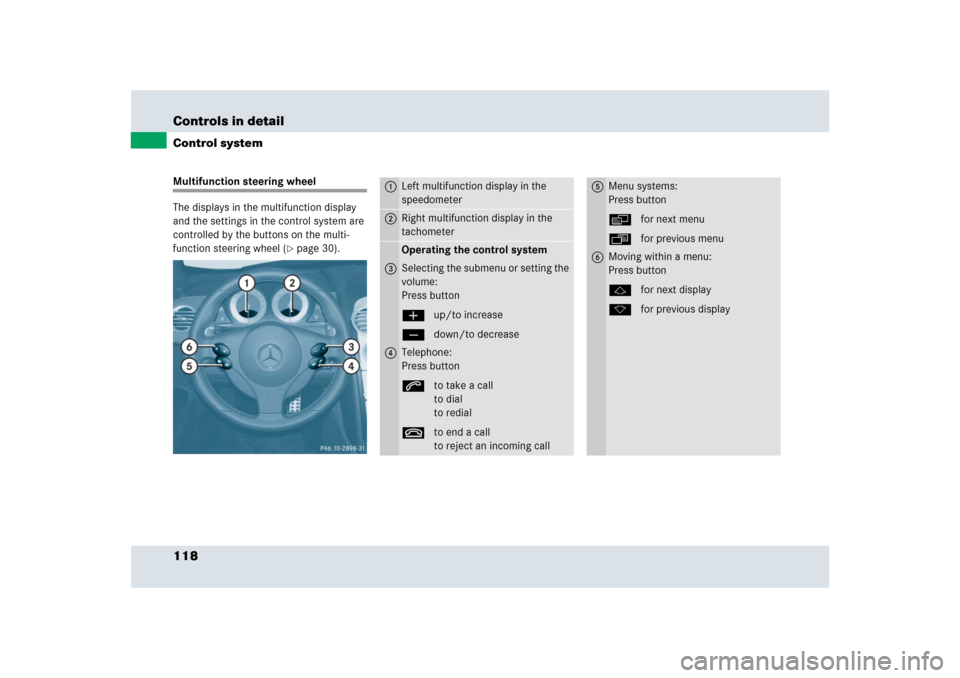
The displays in the multifunction display
and the settings in the control system are
controlled by the buttons on the multi-
function steering wheel (
�page 30).
1
Left multifunction display in the
speedometer
2
Right multifunction display in the
tachometerOperating the control system
3
Selecting the submenu or setting the
volume:
Press button
æup/to increase
çdown/to decrease
4
Telephone:
Press button
sto take a call
to dial
to redial
tto end a call
to reject an incoming call
5
Menu systems:
Press button
èfor next menu
ÿfor previous menu
6
Moving within a menu:
Press button
jfor next display
kfor previous display
Page 119 of 426
119 Controls in detail
Control system
Depending on the selected menu, pressing
the buttons on the multifunction steering
wheel will alter what appears in the
multifunction display.
The information available in the multifunc-
tion display are arranged in menus and
accompanying functions or submenus.
The individual functions are then found
within the relevant menu (radio or CD op-
erations under
AUDIO
, for example). These
functions serve to call up relevant informa-
tion or to customize the settings for your
vehicle.It is helpful to think of the menus, and the
functions within each menu, as being
arranged in a circular pattern.
�
If you press buttonè orÿ
repeatedly, you will pass through each
menu one after the other.
�
If you press buttonk orj
repeatedly, you will pass through each
function display, one after the other, in
the current menu.In the
Settings
menu, instead of functions
you will find a number of submenus for
calling up and changing settings. For
instructions on using these submenus, see
“Settings menu” (�page 129).
The number of menus available in the sys-
tem depends on which optional equipment
is installed in your vehicle.
The menus are described on the following
pages.
Page 121 of 426

121 Controls in detail
Control system
Menus, submenus and functions
Menu1
Menu2
Menu3
Menu4
Menu5
Menu6
Menu7
Standard display
722 S
1
1Only Mercedes-Benz SLR McLaren Roadster 722 S
AUDIO
Vehicle status
message memory
2
2The Vehicle status message memory menu is only displayed if there is a message stored.
Settings
Trip computer
Telephone
(�page 122)
(�page 123)
(�page 127)
(�page 128)
(�page 129)
(�page 139)
(�page 141)
Commands/submenusDigital speedome-
ter/Outside tem-
perature
Engine oil tem-
perature
Selecting
radio station
Calling up vehicle
malfunction, warn-
ing and system sta-
tus messages
stored in memory
Resetting to fac-
tory settings
Fuel consumption
statistics since start
Loading
phone book
Calling up mainte-
nance service
display
Vehicle supply
voltage
Operating the
CD player
Instrument clus-
ter submenu
Fuel consumption
statistics since the
last reset
Searching for
name in
phone book
Checking tire
inflation pressure
RACETIMER
Time submenu
Resetting fuel con-
sumption statistics
Overall analysis
Lighting submenu
Distance to empty
Lap analysis
Vehicle submenu
i
The headings used in the menus table are
designed to facilitate navigation within the sys-
tem and are not necessarily identical to those shown in the control system displays.
The first function displayed in each menu will automatically show you which part of the system
you are in.
Page 122 of 426
122 Controls in detailControl systemStandard display menu
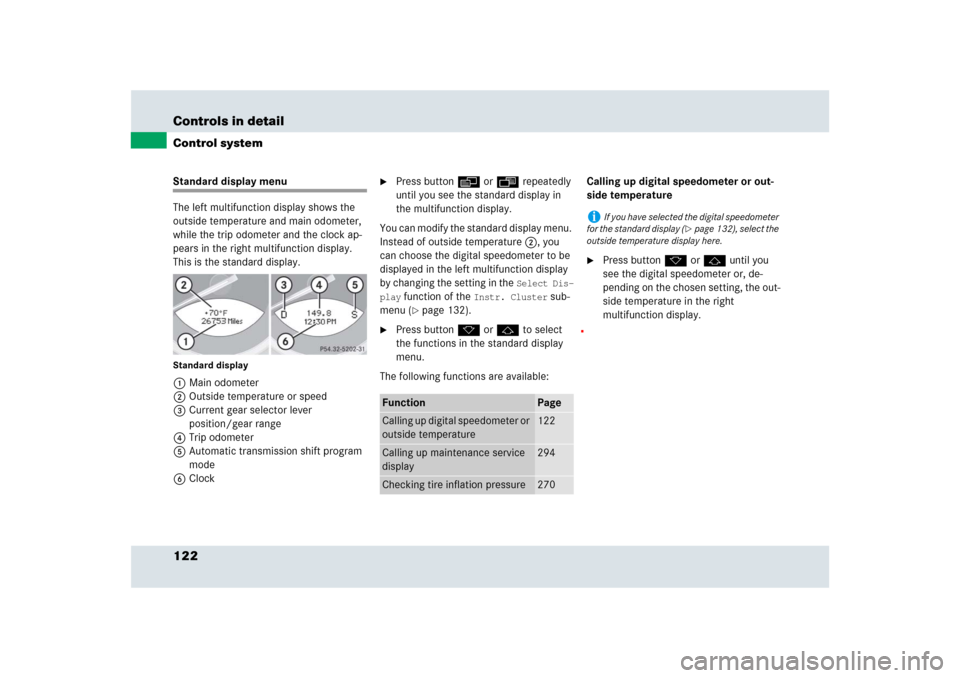
The left multifunction display shows the
outside temperature and main odometer,
while the trip odometer and the clock ap-
pears in the right multifunction display.
This is the standard display.Standard display1Main odometer
2Outside temperature or speed
3Current gear selector lever
position/gear range
4Trip odometer
5Automatic transmission shift program
mode
6Clock
�
Press buttonè orÿ repeatedly
until you see the standard display in
the multifunction display.
You can modify the standard display menu.
Instead of outside temperature 2, you
can choose the digital speedometer to be
displayed in the left multifunction display
by changing the setting in the
Select Dis-
play
function of the
Instr. Cluster
sub-
menu (
�page 132).
�
Press buttonk orj to select
the functions in the standard display
menu.
The following functions are available:Calling up digital speedometer or out-
side temperature
�
Press button k or j until you
see the digital speedometer or, de-
pending on the chosen setting, the out-
side temperature in the right
multifunction display.
Function
Page
Calling up digital speedometer or
outside temperature
122
Calling up maintenance service
display
294
Checking tire inflation pressure
270
i
If you have selected the digital speedometer
for the standard display (
�page 132), select the
outside temperature display here.
Page 124 of 426
124 Controls in detailControl systemRACETIMER
The RACETIMER allows you to time and
save driving stretches in hours, minutes
and seconds.�
Press button è or ÿ repeatedly
until you see the 722S menu.
�
Press button j repeatedly until you
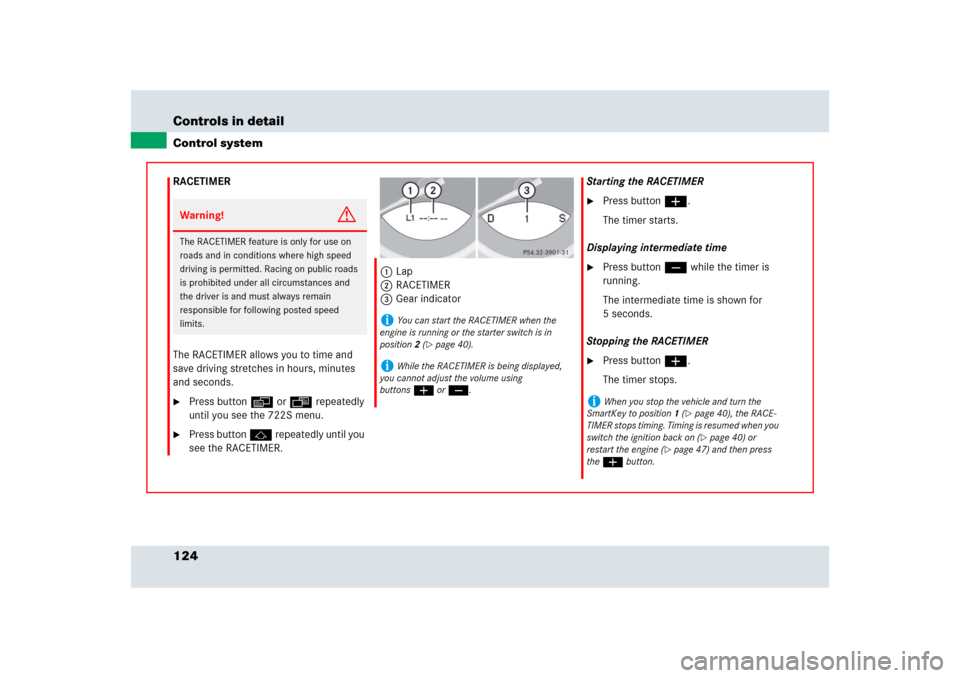
see the RACETIMER.1Lap
2RACETIMER
3Gear indicatorStarting the RACETIMER
�
Press button æ.
The timer starts.
Displaying intermediate time
�
Press button ç while the timer is
running.
The intermediate time is shown for
5 seconds.
Stopping the RACETIMER
�
Press button æ.
The timer stops.
Warning!
G
The RACETIMER feature is only for use on
roads and in conditions where high speed
driving is permitted. Racing on public roads
is prohibited under all circumstances and
the driver is and must always remain
responsible for following posted speed
limits.
i
You can start the RACETIMER when the
engine is running or the starter switch is in
position2 (
�page 40).
i
While the RACETIMER is being displayed,
you cannot adjust the volume using
buttonsæ or ç.
i
When you stop the vehicle and turn the
SmartKey to position 1 (
�page 40), the RACE-
TIMER stops timing. Timing is resumed when you
switch the ignition back on (�page 40) or
restart the engine (
�page 47) and then press
the æbutton.
Page 127 of 426

127 Controls in detail
Control system
AUDIO menu
The functions in the
AUDIO
menu operate
the audio equipment which you currently
have turned on.
If no audio equipment is currently turned
on, the message
AUDIO OFF
appears in the
multifunction display.
The following functions are available:
Selecting radio station
�
Turn on the radio (
�page 148).
�
Press button è or ÿ repeatedly
until you see the currently tuned sta-
tion in the right multifunction display.1Station frequency
2Wave band setting
3Setting for station selection using
memory
�
Press buttonk orj repeatedly
until the desired station is found.
The type of search depends on the
setting for the station tuning
(�page 138):
�
Memory: the next stored station is
selected (SP)
�
Station searchOperating the CD player
�
Turn on the radio and select the
CD player (
�page 158).
�
Press button è or ÿ repeatedly
until the settings for the CD currently
being played are shown in the right
multifunction display.
1Current track
2Current CD (with additional number
from 1 to 6 when running from CD
changer)
�
Press button k or j repeatedly
until the desired track is selected.
Function
Page
Selecting radio station
127
Operating CD player
127
i
You can only store new stations using the
corresponding feature on the radio
(
�page 153).
Page 128 of 426
128 Controls in detailControl systemVehicle status message memory menu
Use the vehicle status message memory
menu to scan malfunction and warning
messages that may be stored in the
system. Such messages appear in the
multifunction display and are based on
conditions or system status the vehicle’s
system has recorded.
The vehicle status message memory menu
only appears, if messages have been
stored.
�
Press buttonè orÿ repeatedly
until you see the vehicle status mes-
sage memory in the right multifunction
display.
If the vehicle status message memory
menu does not appear, no messages
have been stored.
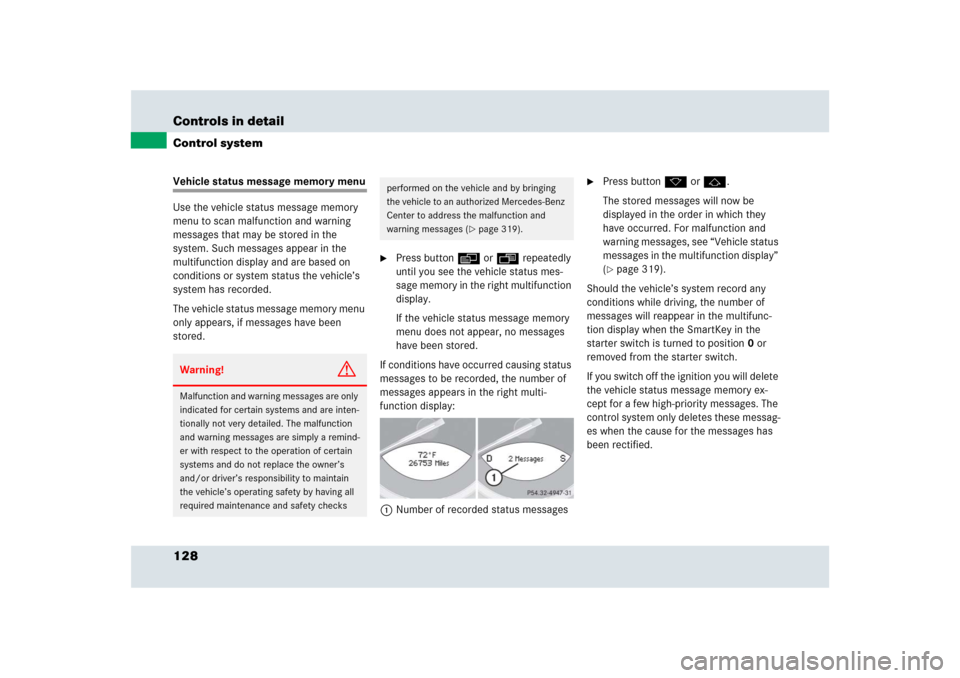
If conditions have occurred causing status
messages to be recorded, the number of
messages appears in the right multi-
function display:
1Number of recorded status messages
�
Press button k or j.
The stored messages will now be
displayed in the order in which they
have occurred. For malfunction and
warning messages, see “Vehicle status
messages in the multifunction display”
(�page 319).
Should the vehicle’s system record any
conditions while driving, the number of
messages will reappear in the multifunc-
tion display when the SmartKey in the
starter switch is turned to position0 or
removed from the starter switch.
If you switch off the ignition you will delete
the vehicle status message memory ex-
cept for a few high-priority messages. The
control system only deletes these messag-
es when the cause for the messages has
been rectified.
Warning!
G
Malfunction and warning messages are only
indicated for certain systems and are inten-
tionally not very detailed. The malfunction
and warning messages are simply a remind-
er with respect to the operation of certain
systems and do not replace the owner’s
and/or driver’s responsibility to maintain
the vehicle’s operating safety by having all
required maintenance and safety checks
performed on the vehicle and by bringing
the vehicle to an authorized Mercedes-Benz
Center to address the malfunction and
warning messages (
�page 319).
Page 129 of 426
129 Controls in detail
Control system
Settings menu
In the
Settings
menu there are two
functions:
�
The function
To reset, press reset
button for 3 seconds
with which you
can reset most the settings to those
set at the factory.
�
A collection of submenus with which
you can make individual settings for
your vehicle.
The following settings and submenus are
available:Resetting to factory settings
You can reset the functions of most of the
submenus to the factory settings.
For safety, the
Light Circuit Headlamp
Mode
submenu in the
Lighting
menu can
be reset with the vehicle at standstill only.
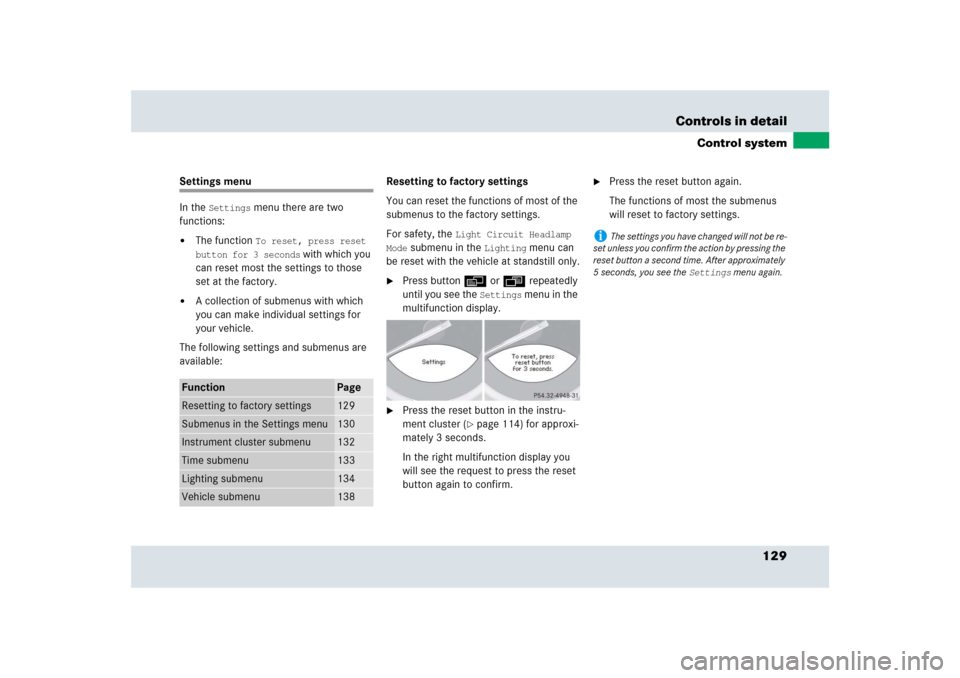
�
Press button è or ÿ repeatedly
until you see the
Settings
menu in the
multifunction display.
�
Press the reset button in the instru-
ment cluster (
�page 114) for approxi-
mately 3 seconds.
In the right multifunction display you
will see the request to press the reset
button again to confirm.
�
Press the reset button again.
The functions of most the submenus
will reset to factory settings.
Function
Page
Resetting to factory settings
129
Submenus in the Settings menu
130
Instrument cluster submenu
132
Time submenu
133
Lighting submenu
134
Vehicle submenu
138
i
The settings you have changed will not be re-
set unless you confirm the action by pressing the
reset button a second time. After approximately
5 seconds, you see the
Settings
menu again.