Page 113 of 426

113 Controls in detail
Lighting
Manual control
Switching interior lighting on�
Press switch3.
The interior lighting switches on.
Switching interior lighting off
�
Press switch3 again.
The interior lighting switches off.
Reading lamps
The reading lamps are integrated into the
interior rear view mirror.
�
Press reading lamp switch1or2 to
switch on the desired reading lamp.
�
Press reading lamp switch1or2
again to switch off the respective
reading lamp.
Courtesy lighting
For better orientation in the dark, courtesy
lamps will illuminate the interior of your
vehicle in the following ways:�
When you open a door, the driver’s and
passenger’s footwell are illuminated.
�
If the SmartKey is in starter switch
position1, the center console will be il-
luminated.
Trunk lamp
The trunk lamp switches on if the trunk is
opened.
If you leave the trunk open for an extended
period of time, the trunk lamp will switch
off automatically after approximately
10 minutes.
i
The center console is illuminated from the
interior rear view mirror.
i
The setting selected for the interior lighting
is used for the trunk lighting as well.
Page 181 of 426
181 Controls in detail
Good visibility
�Good visibility
For information on the windshield wipers,
see “Switching on windshield wipers”
(�page 52).
Headlamp cleaning system
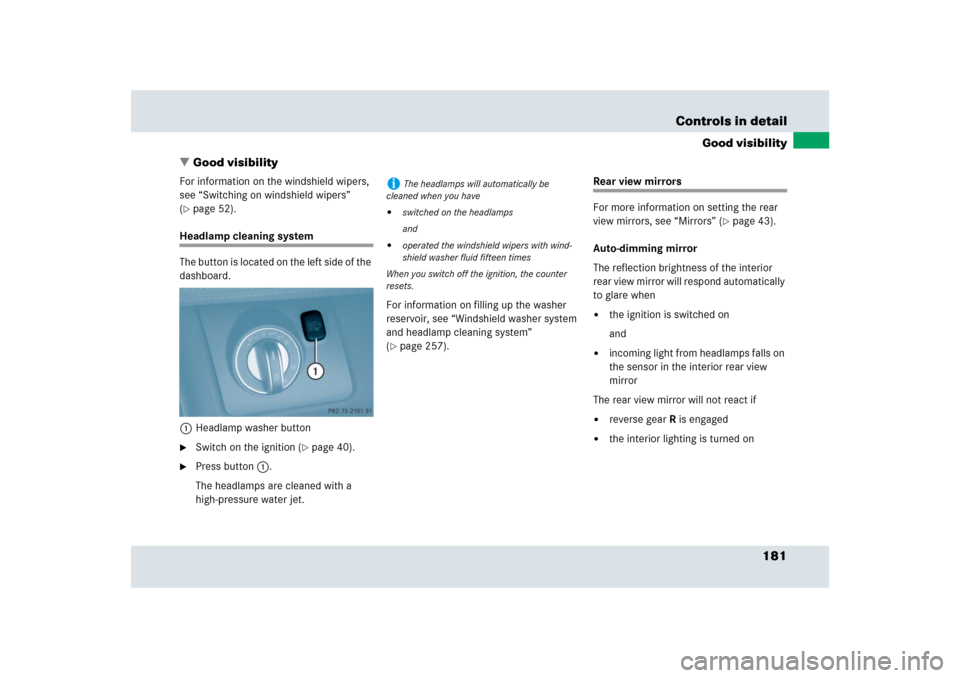
The button is located on the left side of the
dashboard.
1Headlamp washer button�
Switch on the ignition (
�page 40).
�
Press button 1.
The headlamps are cleaned with a
high-pressure water jet.For information on filling up the washer
reservoir, see “Windshield washer system
and headlamp cleaning system”
(
�page 257).
Rear view mirrors
For more information on setting the rear
view mirrors, see “Mirrors” (
�page 43).
Auto-dimming mirror
The reflection brightness of the interior
rear view mirror will respond automatically
to glare when
�
the ignition is switched on
and
�
incoming light from headlamps falls on
the sensor in the interior rear view
mirror
The rear view mirror will not react if
�
reverse gearR is engaged
�
the interior lighting is turned on
i
The headlamps will automatically be
cleaned when you have
�
switched on the headlamps
and
�
operated the windshield wipers with wind-
shield washer fluid fifteen times
When you switch off the ignition, the counter
resets.
Page 182 of 426
182 Controls in detailGood visibility
Sun visors
The sun visors protect you from sun glare
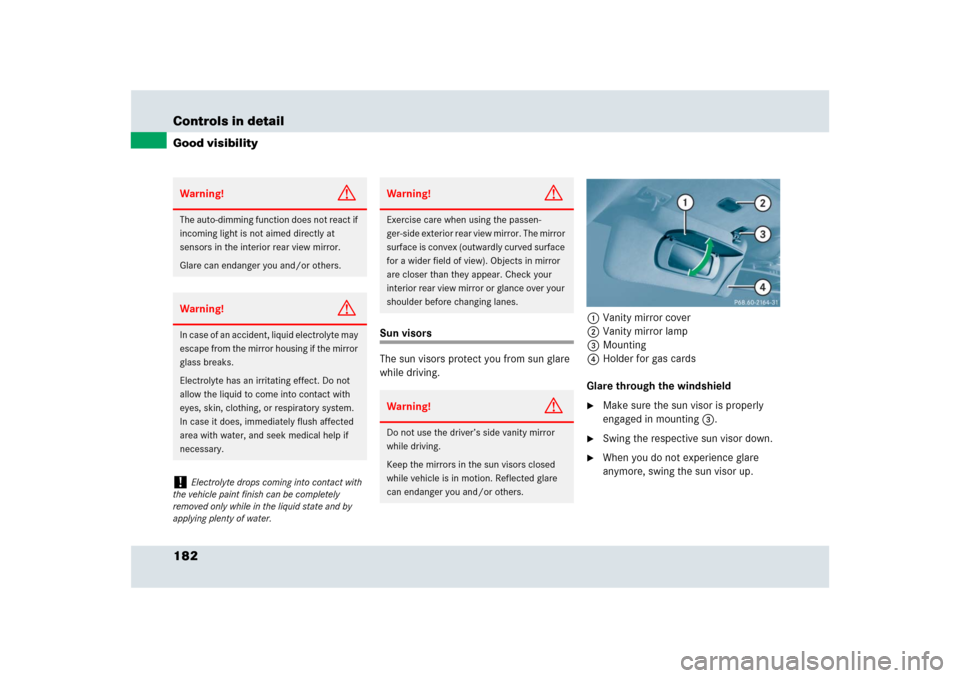
while driving. 1Vanity mirror cover
2Vanity mirror lamp
3Mounting
4Holder for gas cards
Glare through the windshield
�
Make sure the sun visor is properly
engaged in mounting 3.
�
Swing the respective sun visor down.
�
When you do not experience glare
anymore, swing the sun visor up.
Warning!
G
The auto-dimming function does not react if
incoming light is not aimed directly at
sensors in the interior rear view mirror.
Glare can endanger you and/or others.Warning!
G
In case of an accident, liquid electrolyte may
escape from the mirror housing if the mirror
glass breaks.
Electrolyte has an irritating effect. Do not
allow the liquid to come into contact with
eyes, skin, clothing, or respiratory system.
In case it does, immediately flush affected
area with water, and seek medical help if
necessary.!
Electrolyte drops coming into contact with
the vehicle paint finish can be completely
removed only while in the liquid state and by
applying plenty of water.
Warning!
G
Exercise care when using the passen-
ger-side exterior rear view mirror. The mirror
surface is convex (outwardly curved surface
for a wider field of view). Objects in mirror
are closer than they appear. Check your
interior rear view mirror or glance over your
shoulder before changing lanes.Warning!
G
Do not use the driver’s side vanity mirror
while driving.
Keep the mirrors in the sun visors closed
while vehicle is in motion. Reflected glare
can endanger you and/or others.
Page 183 of 426
183 Controls in detail
Good visibility
Glare through a door window�
Swing respective sun visor down.
�
Disengage the sun visor from
mounting3.
�
Pivot the sun visor to the side.
Vanity mirror
�
Swing respective sun visor down.
�
Flip up vanity mirror cover1 to access
the vanity mirror.
Vanity mirror lamp 2 comes on.
�
After using the vanity mirror, flip down
vanity mirror cover 1.
�
Swing the sun visor up.
Rear window defroster
The rear window defroster uses a large
amount of power. To keep the battery
drain to a minimum, switch off the
defroster as soon as the rear window is
clear. The defroster is automatically
deactivated after approximately
6 to 17 minutes of operation depending on
the outside temperature.
Activating�
Press buttonF on the automatic
climate control panel (
�page 186).
The indicator lamp on the button
comes on.Deactivating
�
Press buttonF again.
The indicator lamp on the button goes
out.
i
When the sun visor is disengaged from
mounting3, vanity mirror lamp2 switches
off.
!
To avoid damage to vanity mirror cover 1,
make sure it is closed before pivoting the sun
visor to the side.
Warning!
G
Any accumulation of snow and ice should be
removed from the rear window before
driving. Visibility could otherwise be
impaired, endangering you and/or others.
!
If the rear window defroster switches off too
soon and the indicator lamp starts flashing, this
means that too many electrical consumers are
operating simultaneously and there is insuffi-
cient voltage in the battery. The system re-
sponds automatically by deactivating the rear
window defroster.
As soon as the battery has sufficient voltage, the
rear window defroster automatically switches
back on automatically.
Page 203 of 426
203 Controls in detail
Open air
Installing
The following describes the installation of
the driver’s side cover. The installation of
the passenger-side cover is identical but
mirror-inverted.
1Cover
2Tab
3Bodywork
4Sealing
�
Open the trunk lid.
�
Fit tabs2 of cover1 between
sealing4 and bodywork3.5Lock
6Holder
7Slot
�
Press down on lock5 and turn it
clockwise by 90°.
�
Hold the lock in this position and insert
holder6 into slot7.
�
Press down on the cover and turn the
lock counter-clockwise by 90°.
Warning!
G
Do not use damaged covers. Damaged
covers could come loose while driving and
hit other road users.!
Do not use damaged covers. Damaged
covers could come loose while driving and
damage the vehicle.
��
Page 222 of 426
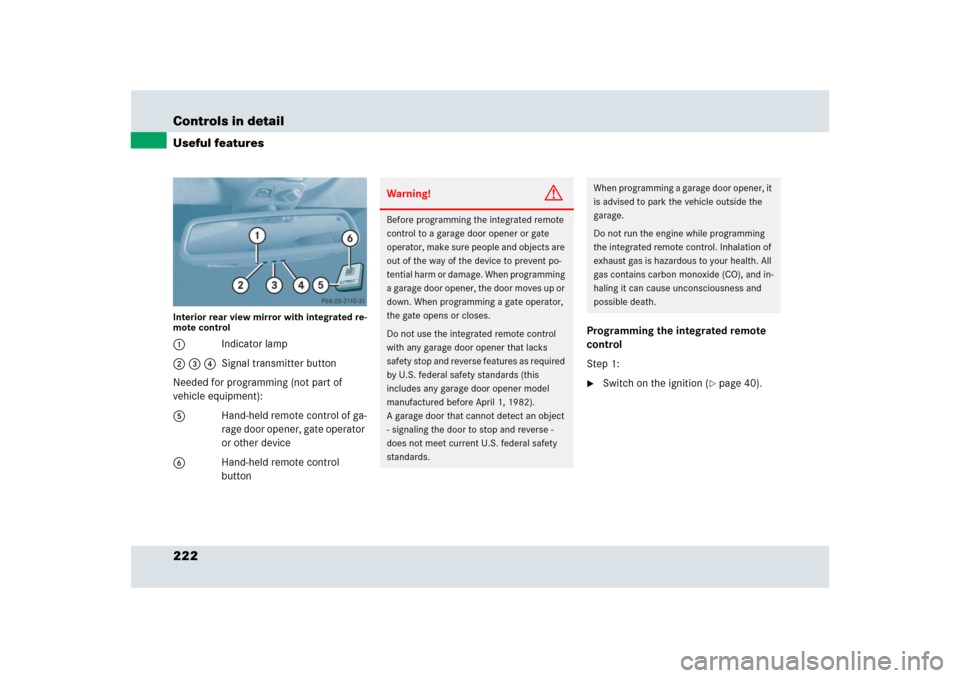
222 Controls in detailUseful featuresInterior rear view mirror with integrated re-
mote control1Indicator lamp
2 3 4Signal transmitter button
Needed for programming (not part of
vehicle equipment):
5Hand-held remote control of ga-
rage door opener, gate operator
or other device
6Hand-held remote control
buttonProgramming the integrated remote
control
Step 1:
�
Switch on the ignition (
�page 40).
Warning!
G
Before programming the integrated remote
control to a garage door opener or gate
operator, make sure people and objects are
out of the way of the device to prevent po-
tential harm or damage. When programming
a garage door opener, the door moves up or
down. When programming a gate operator,
the gate opens or closes.
Do not use the integrated remote control
with any garage door opener that lacks
safety stop and reverse features as required
by U.S. federal safety standards (this
includes any garage door opener model
manufactured before April 1, 1982).
A garage door that cannot detect an object
- signaling the door to stop and reverse -
does not meet current U.S. federal safety
standards.
When programming a garage door opener, it
is advised to park the vehicle outside the
garage.
Do not run the engine while programming
the integrated remote control. Inhalation of
exhaust gas is hazardous to your health. All
gas contains carbon monoxide (CO), and in-
haling it can cause unconsciousness and
possible death.
Page 299 of 426

299 Operation
Vehicle care
Power washer
Cleaning the windows and wiper blades
�
Remove the SmartKey from the starter
switch.
�
Fold the wiper arm away from the
windshield (
�page 363).
You must feel the wiper arm engage in
position.
�
Clean the wiper blade inserts with a
clean cloth and detergent solution.
�
Use a soft, clean cloth and a mild win-
dow cleaning solution on all outside
and inside glass surfaces.
An automotive glass cleaner is
recommended.
!
Make sure that the windshield wiper switch
is set to0 (
�page 52). Otherwise, the rain
sensor could activate and cause the wipers to
move unintentionally. This may lead to vehicle
damage.
Due to the width of the vehicle, fold in exterior
rear view mirrors prior to running the vehicle
through an automatic car wash to prevent
damage to the mirrors.
i
After running the vehicle through an auto-
matic car wash, wipe any wax off of the wind-
shield (
�page 299). This will prevent smears
and reduce wiping noise which can be caused by
residual wax on the windshield.
!
Do not use power washer to clean your
vehicle or the engine.
!
The hood must be opened (
�page 250) be-
fore folding the wiper arm away from the wind-
shield. You could otherwise damage the hood
and/or the wiper arms.
!
Never open or close the hood when the wip-
er arms are folded away from the windshield.
You could otherwise damage the hood and/or
the wiper arm.
Warning!
G
For safety reasons, switch off wipers and
remove SmartKey from starter switch
before cleaning the wiper blades. Otherwise
the wiper motor could suddenly turn on and
cause injury.
!
Do not pull on the wiper blade inserts. They
could tear.
!
To clean the window interior, do not use a
dry cloth, abrasives, solvents or cleaners con-
taining solvents. Do not touch the inside of the
front, rear or door windows with hard objects
such as an ice scraper or ring. Doing so may
damage the windows.
��
Page 347 of 426
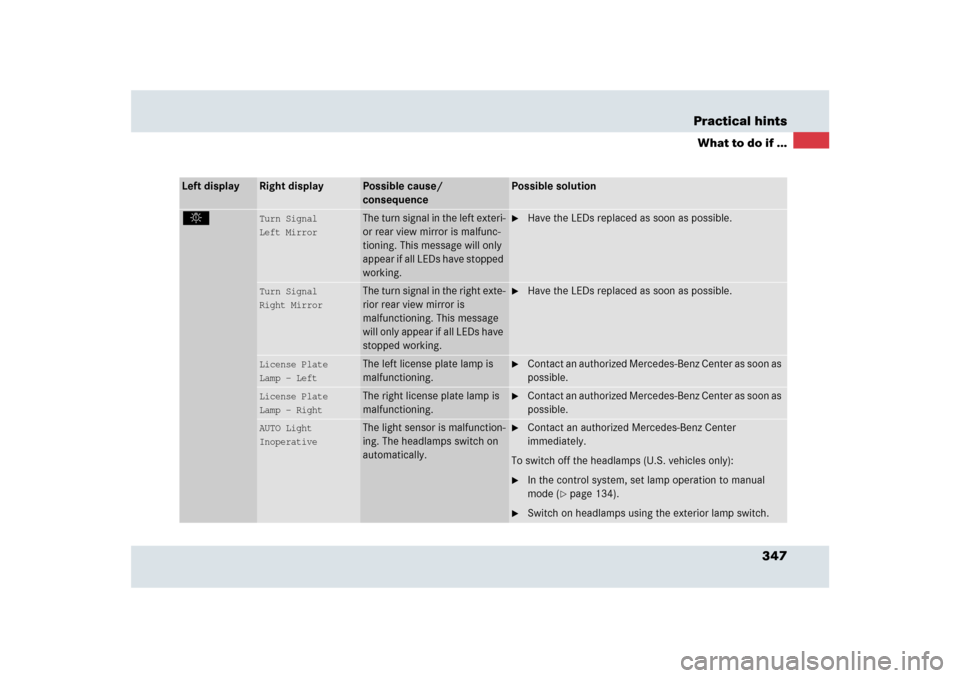
347 Practical hints
What to do if ...
Left display
Right display
Possible cause/
consequence
Possible solution
.
Turn Signal
Left Mirror
The turn signal in the left exteri-
or rear view mirror is malfunc-
tioning. This message will only
appear if all LEDs have stopped
working.
�
Have the LEDs replaced as soon as possible.
Turn Signal
Right Mirror
The turn signal in the right exte-
rior rear view mirror is
malfunctioning. This message
will only appear if all LEDs have
stopped working.
�
Have the LEDs replaced as soon as possible.
License Plate
Lamp - Left
The left license plate lamp is
malfunctioning.
�
Contact an authorized Mercedes-Benz Center as soon as
possible.
License Plate
Lamp - Right
The right license plate lamp is
malfunctioning.
�
Contact an authorized Mercedes-Benz Center as soon as
possible.
AUTO Light
Inoperative
The light sensor is malfunction-
ing. The headlamps switch on
automatically.
�
Contact an authorized Mercedes-Benz Center
immediately.
To switch off the headlamps (U.S. vehicles only):
�
In the control system, set lamp operation to manual
mode (
�page 134).
�
Switch on headlamps using the exterior lamp switch.