Page 360 of 426
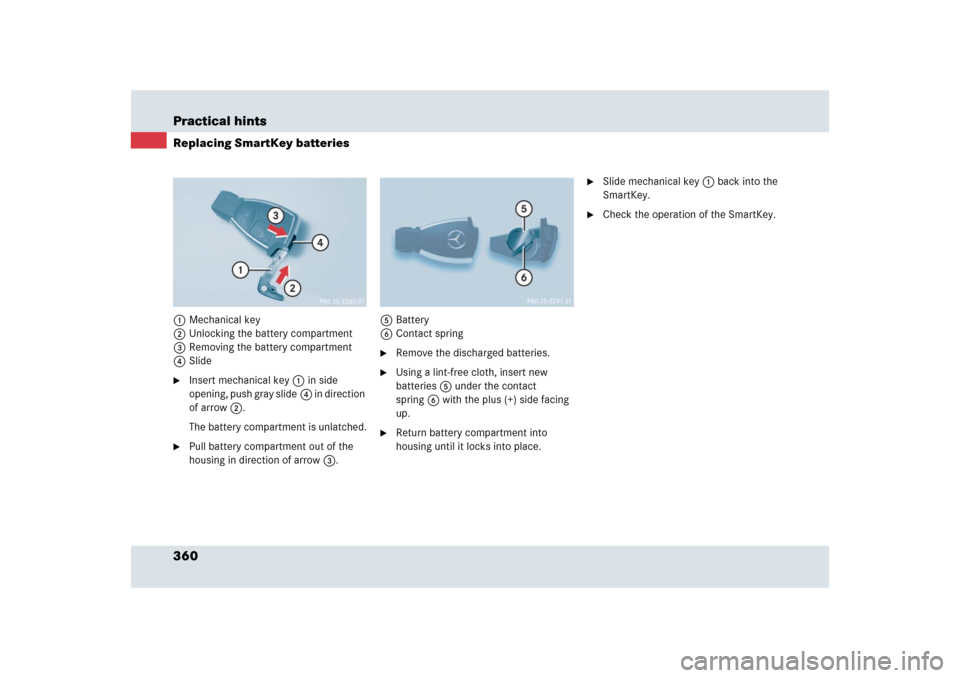
360 Practical hintsReplacing SmartKey batteries1Mechanical key
2Unlocking the battery compartment
3Removing the battery compartment
4Slide�
Insert mechanical key1in side
opening, push gray slide4 in direction
of arrow2.
The battery compartment is unlatched.
�
Pull battery compartment out of the
housing in direction of arrow3.5Battery
6Contact spring
�
Remove the discharged batteries.
�
Using a lint-free cloth, insert new
batteries5 under the contact
spring6 with the plus (+) side facing
up.
�
Return battery compartment into
housing until it locks into place.
�
Slide mechanical key1 back into the
SmartKey.
�
Check the operation of the SmartKey.
Page 363 of 426
363 Practical hints
Replacing wiper blades
�Replacing wiper blades
Removing wiper blades
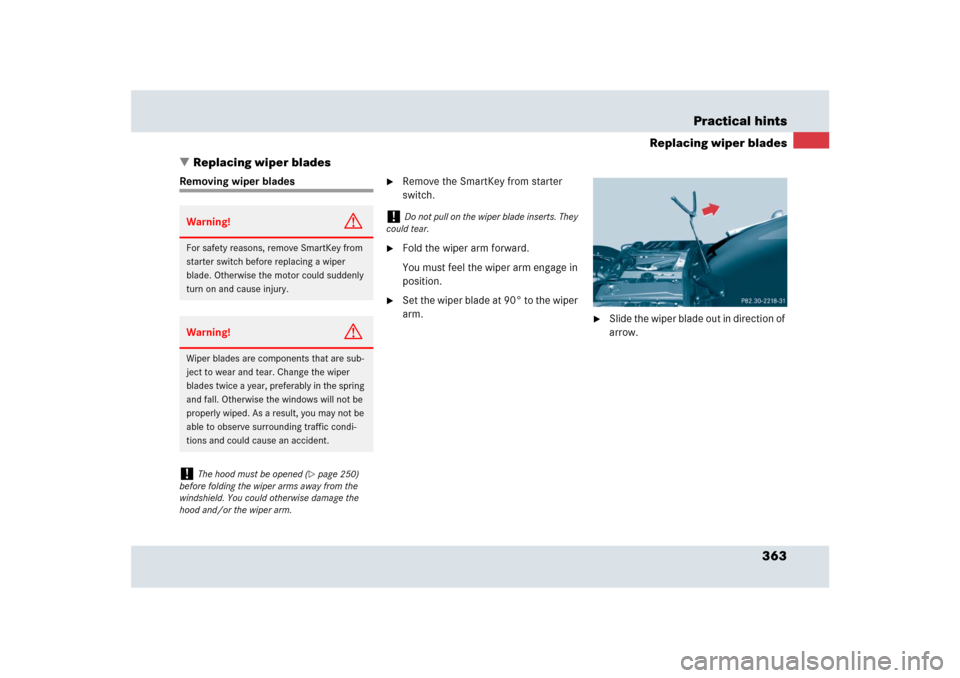
�
Remove the SmartKey from starter
switch.
�
Fold the wiper arm forward.
You must feel the wiper arm engage in
position.
�
Set the wiper blade at 90° to the wiper
arm.
�
Slide the wiper blade out in direction of
arrow.
Warning!
G
For safety reasons, remove SmartKey from
starter switch before replacing a wiper
blade. Otherwise the motor could suddenly
turn on and cause injury. Warning!
G
Wiper blades are components that are sub-
ject to wear and tear. Change the wiper
blades twice a year, preferably in the spring
and fall. Otherwise the windows will not be
properly wiped. As a result, you may not be
able to observe surrounding traffic condi-
tions and could cause an accident.!
The hood must be opened (
�page 250)
before folding the wiper arms away from the
windshield. You could otherwise damage the
hood and/or the wiper arm.
!
Do not pull on the wiper blade inserts. They
could tear.
Page 365 of 426

365 Practical hints
Flat tire
�Flat tire
The vehicle is equipped with the TIREFIT
kit.Preparing the vehicle�
Park the vehicle in a safe distance from
moving traffic on a hard, flat surface
when possible.
�
Turn on the hazard warning flashers.
�
Turn the steering wheel so that the
front wheels are in a straight ahead
position.
�
Set the parking brake.
�
Move the gear selector lever to park
positionP.
�
Turn off the engine (
�page 56).
�
Remove the SmartKey from the starter
switch.
�
Have any passenger exit the vehicle at
a safe distance from the roadway.
Sealing tires with TIREFIT
Small tire punctures, particularly those in
the tread, can be sealed with TIREFIT.
TIREFIT can be used in ambient tempera-
tures down to -4°F (-20°C).
�
Foreign objects (e.g. screws or nails)
should not be removed from the tire.
�
Take TIREFIT, the sticker, and the
electric air pump out of the trunk.
!
A wheel change should only be carried out
at an authorized Mercedes-Benz Center. Other-
wise there is a danger of damaging the vehicle by
jacking it up incorrectly.
i
Open door only when conditions are safe to
do so.
Warning!
G
TIREFIT is a limited repair device. TIREFIT
cannot be used for cuts or punctures larger
than approximately 0.16 in (4 mm) and tire
damage caused by driving with extremely
low tire inflation pressure, or on a flat tire, or
a damaged wheel.
Do not drive the vehicle under such
circumstances.
Contact your nearest Mercedes-Benz
Center for assistance or call Roadside
Assistance. !
After using TIREFIT, the tire inflation
pressure sensor may have to be replaced.
��
Page 367 of 426

367 Practical hints
Flat tire
�
Screw the air pump’s air hose5 onto
flange6 of the TIREFIT container.
�
Stick TIREFIT container1 upside
down into notch3 of the electric air
pump.
7Tire valve
8Electric air pump switch
9Pressure gauge and vent screw
aFiller hose
�
Unscrew the valve cap from tire
valve7.
�
Screw filler hosea onto tire valve7.
�
Close vent screw9 on pressure
gauge.
�
Insert electrical plug4 into vehicle
cigarette lighter socket.
�
Turn the SmartKey in the starter switch
to position1 (
�page 40).
�
PressI on electric air pump switch8.
The electric air pump should now
switch on and inflate the tire.After 5 minutes, the pressure gauge must
display at least 26 psi (1.8 bar). The air
hose can become hot during inflation.
Please exercise appropriate caution.
�
If this tire inflation pressure is not at-
tained, turn off the electric air pump,
detach the filler hose from the tire
valve, and drive vehicle back and forth
very slowly approximately 30 ft (10 m).
This serves to better distribute the
TIREFIT sealant material inside the tire.
�
Unscrew the air pump’s air hose5
from flange6 of the TIREFIT
container.
�
Screw air hose5onto tire valve7.
�
Inflate the tire again.
Warning!
G
Observe safety instructions on air pump
label.
!
Do not operate the electric air pump longer
than 8 minutes without interruption. Otherwise it
may overheat.
You may operate the air pump again after it has
cooled off.
��
Page 368 of 426
, press0 on electric
air pump switch8.
The electric air pump should now be
switched off.
�
Turn the SmartK")
368 Practical hintsFlat tire�
After attaining a tire inflation pressure
of 26 psi (1.8 bar), press0 on electric
air pump switch8.
The electric air pump should now be
switched off.
�
Turn the SmartKey in the starter switch
to position0 (
�page 40).
�
Detach the electric air pump.
The air hose may still be hot. Please
exercise appropriate caution.
�
Store the electrical plug and the air
hose behind the flap and place the
electrical air pump back in the trunk.
�
Close the trunk lid.
�
Drive off immediately.
The TIREFIT sealant will distribute itself
evenly inside the tire.
�
After driving vehicle for an initial
10 minutes, check tire inflation pres-
sure using the pressure gauge on the
air pump.
�
If tire inflation pressure is at least
20 psi (1.3 bar), inflate tire to correct
pressure (see placard on driver’s door
B-pillar) and contact a nearest qualified
workshop, e.g. an authorized
Mercedes-Benz Center, to have the
damaged tire replaced.
Recommended duration of use:
A maximum of 300 miles (500 km) at
or below 50 mph (80 km/h) with the
recommended tire inflation pressure.
Warning!
G
If a tire inflation pressure of 26 psi (1.8 bar)
is not attained, the tire is too severely
damaged for TIREFIT to provide a reliable
tire repair.
In this case, TIREFIT cannot properly seal
the tire.
Do not drive the vehicle.
Contact the nearest Mercedes-Benz Center
or call Roadside Assistance.
Warning!
G
Do not exceed vehicle speed of
50 mph (80 km/h). A TIREFIT repair is not
designed to operate at higher speeds.
The sticker must be attached on the instru-
ment cluster where it will be easily seen by
the driver.
Vehicle handling characteristics may
change. Adapt your driving accordingly.
Warning!
G
If tire inflation pressure has fallen below
20 psi (1.3 bar), do not continue to drive the
vehicle.
Park your vehicle safely away from the road-
way and contact the nearest authorized
Mercedes-Benz Center or Roadside
Assistance.
Have the damaged tire replaced.
��
Page 371 of 426

371 Practical hints
Batteries
Charging the batteries
You can obtain detailed information on
charging the battery from your authorized
Mercedes-Benz Center.
Warning!
G
The brake system requires electrical power
to operate.
A malfunction in the vehicle’s power supply
or electrical system may impair brake sys-
tem operation and switch it into its emer-
gency operation mode. The same applies if
battery is disconnected. To brake, the driver
must then apply significantly greater brake
pedal pressure and depress the pedal much
further to obtain the expected braking ef-
fect. If necessary, apply full pressure to the
brake pedal. Brakes are only applied to the
front wheels. Stopping distance is
increased! Adjust your driving style
accordingly. For more information, see
“Electro-hydraulic brake system”
(�page 87).
Warning!
G
With a disconnected battery�
you will no longer be able to turn the
SmartKey in the starter switch
�
the gear selector lever will remain
locked in park positionP
Warning!
G
Never charge a battery while still installed in
the vehicle unless the battery charge unit
approved by Mercedes-Benz (supplied with
your vehicle) is being used. Gases may es-
cape during charging and cause explosions
that may result in paint damage, corrosion
or personal injury.
A battery charge unit specially adapted for
Mercedes-Benz vehicles and tested and
approved by Mercedes-Benz is available,
permitting the charging of the battery in its
installed position. Contact an authorized
Mercedes-Benz Center for information and
availability. Charge battery in accordance
with the separate operating instructions for
the battery charger.
Page 372 of 426

372 Practical hintsBatteriesCharging with the battery charger
Only use the battery charge unit approved
by Mercedes-Benz and supplied with your
vehicle. This charger is designed to auto-
matically control the charge rate, and
charge the battery or maintain the existing
charge in the battery while the vehicle is
parked and not being driven for long
periods of time (on average approximately
3 weeks or more). Not driving the vehicle
for such extended periods may cause the
charge in the vehicle battery to drop. Using the charging point
The charging point for the battery charger
is located next to the CD-changer on the
left-hand side in the trunk.
1Charging point
�
Remove the SmartKey from the starter
switch.
�
Open the cover of the charging
point1.
�
Connect the battery charger with the
charging point 1.
�
Observe and follow the separate
operating instructions for the battery
charger.
�
Charge up the battery.
The battery charger switches off
automatically when the battery is
sufficiently charged.
Page 373 of 426

373 Practical hints
Towing the vehicle
�Towing the vehicle
Mercedes-Benz recommends that the
vehicle be transported with all wheels off
the ground using flatbed or appropriate
wheel lift/dolly equipment.
When circumstances do not permit the
recommended towing methods, the vehi-
cle may be towed with all wheels on the
ground only so far as necessary to have the
vehicle moved to a safe location where the
recommended towing methods can be em-
ployed.!
Use flatbed or wheel lift/dolly equipment
with SmartKey in starter switch turned to
position0.
Do not tow with sling-type equipment. Towing
with sling-type equipment over bumpy roads will
damage radiator and supports.
To prevent damage during transport, do not tie
down vehicle by its chassis or suspension parts.
!
Do not tow-start the vehicle.
!
When towing the vehicle with all wheels on
the ground, the gear selector lever must be in
neutral positionN and the SmartKey must be in
starter switch position2.
When towing the vehicle with all wheels on the
ground, the vehicle may be towed only for dis-
tances up to 30 miles (50 km) and at a speed not
to exceed 30 mph (50 km/h).
!
To be certain to avoid a possibility of dam-
age to the transmission, however, we recom-
mend the drive shaft be disconnected at the rear
axle drive flange for any towing beyond a short
tow to a nearby garage.
Warning!
G
If circumstances require towing the vehicle
with all wheels on the ground, always tow
with a tow bar if:�
the engine will not run
�
there is a malfunction in the electro-hy-
draulic brake system
�
there is a malfunction in the power
supply or in the vehicle’s electrical
system
This is necessary to adequately control the
towed vehicle.
Prior to towing the vehicle with all wheels on
the ground, make certain that the SmartKey
is in starter switch position2.