2009 MERCEDES-BENZ GL SUV trailer
[x] Cancel search: trailerPage 202 of 309

G
Risk of accident
Do not carry the ball coupling in the vehicle
interior if it is not secured.
Otherwise, you and others could be injured by
the ball coupling being thrown around if you:
R brake sharply
R change direction suddenly
R are involved in an accident
Information on cleaning and care of the trailer
coupling can be found at (Y page 203).Trailer power supply
When it leaves the factory, your vehicle's
trailer socket outlet is equipped with a per-
manent power supply and a power supply that
is switched on via the ignition lock.
The permanent power supply is supplied via
trailer socket pin 9.
The power supply that is switched on via the
ignition lock is supplied via trailer socket
pin 10.
! You can connect consumers with a power
rating of up to 240 W to the permanent
power supply and up to 180 W to the power
supply that is switched on via the ignition
lock.
You must not charge a trailer battery using
the power supply.
The trailer's turn signal lamps are only guar-
anteed to function when bulbs are used.
You can obtain further information about
installing the trailer electrics from a qualified
specialist workshop, e.g. a Mercedes-Benz
Service Centre.
X To switch the connected power supply
on or off: turn the key in the ignition lock
to position 2or 0, respectively. Trailer with 7-pin connector
If your trailer has a 7-pin connector, you can
connect it to the 13-pin socket on the ball
coupling using an adapter or, if necessary, an
adapter cable. Both of these can be obtained
at a qualified specialist workshop, e.g. at a
Mercedes-Benz Service Centre.
Fitting the adapter X
Open the socket cover.
X Insert connector with lug :into
groove ;on the socket and turn the con-
nector clockwise to the stop.
X Make the cover engage.
X If you are using an adapter cable, secure
the cable to the trailer with cable ties.
! Make sure that there is sufficient cable
play so that the cable cannot become
detached when cornering. Service
ASSYST PLUS service interval display
The ASSYST PLUS service interval display
informs you of the next service due date.
The service due date is shown in the multi-
function display, for example:
Service A in .. days
Service A in .. km
Service A due now
The letter indicates how much time the work-
shop will require to carry out the service work. Service
199Operation
X164_AKB; 2; 3, en-GB
wobuchh, Version: 2.11.8.1 2009-03-31T14:14:58+02:00 - Seite 199 Z
Dateiname: 6515431202_buchblock.pdf; erzeugt am 01. Apr 2009 00:17:52; WK
Page 206 of 309

!
Do not clean the wiper blades too often,
and avoid rubbing too hard, as this could
result in damage to the graphite coating.
This could cause wiper noise.
X Fold the wiper arms away from the wind-
screen.
X Clean the wiper blades carefully with a
damp cloth.
X Fold the wiper arms back again before
switching on the ignition.
Cleaning the headlamps X
Clean the plastic lenses of the headlamps
with a wet sponge and windscreen washer
fluid or cleaning cloths.
! Only use washer fluid or cleaning cloths
suitable for plastic lenses. Unsuitable
washer fluid or cleaning cloths could
scratch or damage the plastic lenses of the
headlamps.
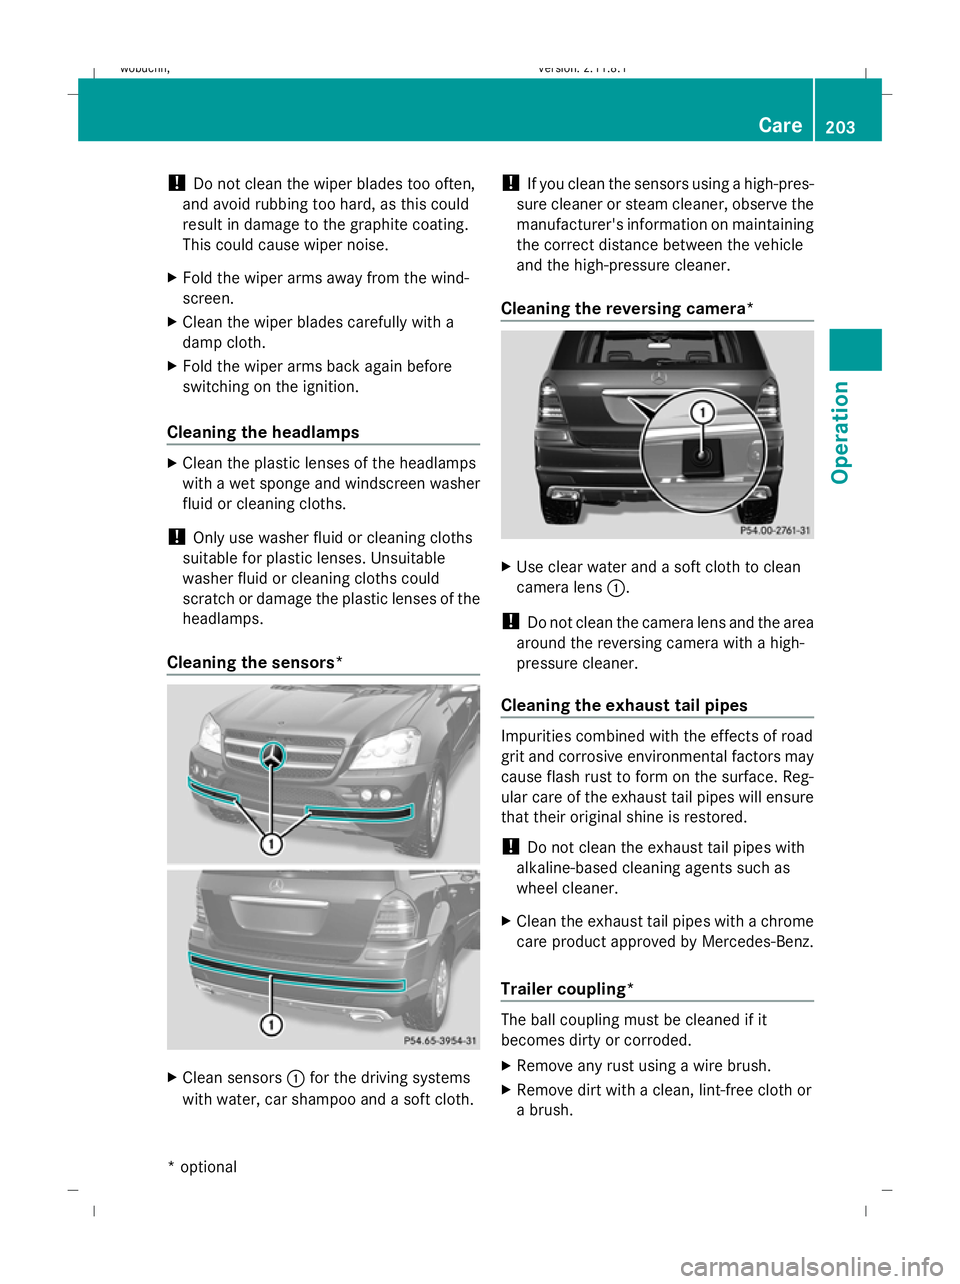
Cleaning the sensors* X
Clean sensors :for the driving systems
with water, car shampoo and a soft cloth. !
If you clean the sensors using a high-pres-
sure cleaner or steam cleaner, observe the
manufacturer's information on maintaining
the correct distance between the vehicle
and the high-pressure cleaner.
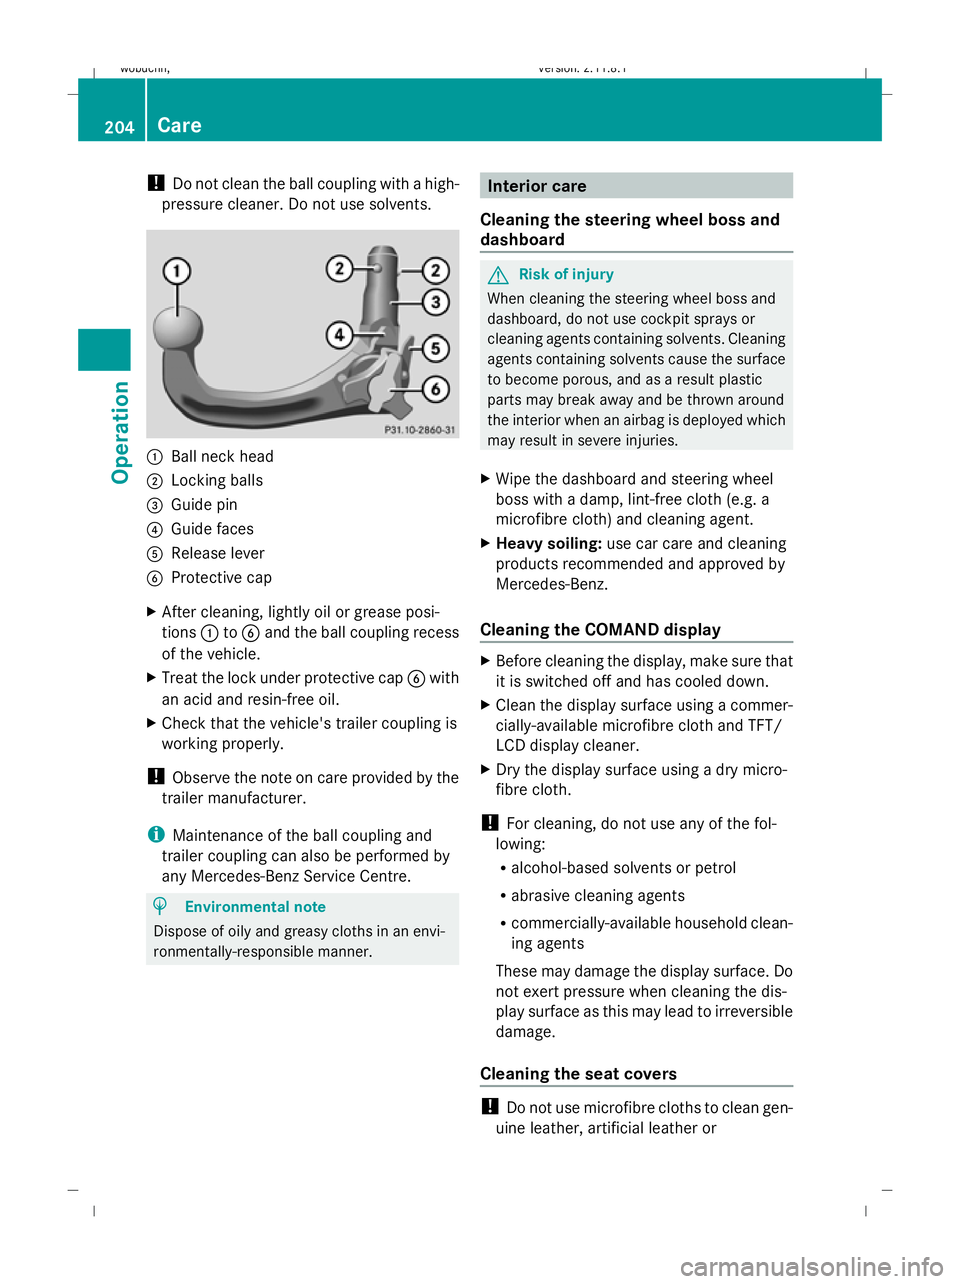
Cleaning the reversing camera* X
Use clear water and a soft cloth to clean
camera lens :.
! Do not clean the camera lens and the area
around the reversing camera with a high-
pressure cleaner.
Cleaning the exhaust tail pipes Impurities combined with the effects of road
grit and corrosive environmental factors may
cause flash rust to form on the surface. Reg-
ular care of the exhaust tail pipes will ensure
that their original shine is restored.
!
Do not clean the exhaust tail pipes with
alkaline-based cleaning agents such as
wheel cleaner.
X Clean the exhaust tail pipes with a chrome
care product approved by Mercedes-Benz.
Trailer coupling* The ball coupling must be cleaned if it
becomes dirty or corroded.
X
Remove any rust using a wire brush.
X Remove dirt with a clean, lint-free cloth or
a brush. Care
203Operation
* optional
X164_AKB; 2; 3, en-GB
wobuchh,
Version: 2.11.8.1 2009-03-31T14:14:58+02:00 - Seite 203 Z
Dateiname: 6515431202_buchblock.pdf; erzeugt am 01. Apr 2009 00:17:53; WK
Page 207 of 309

!
Do not clean the ball coupling with a high-
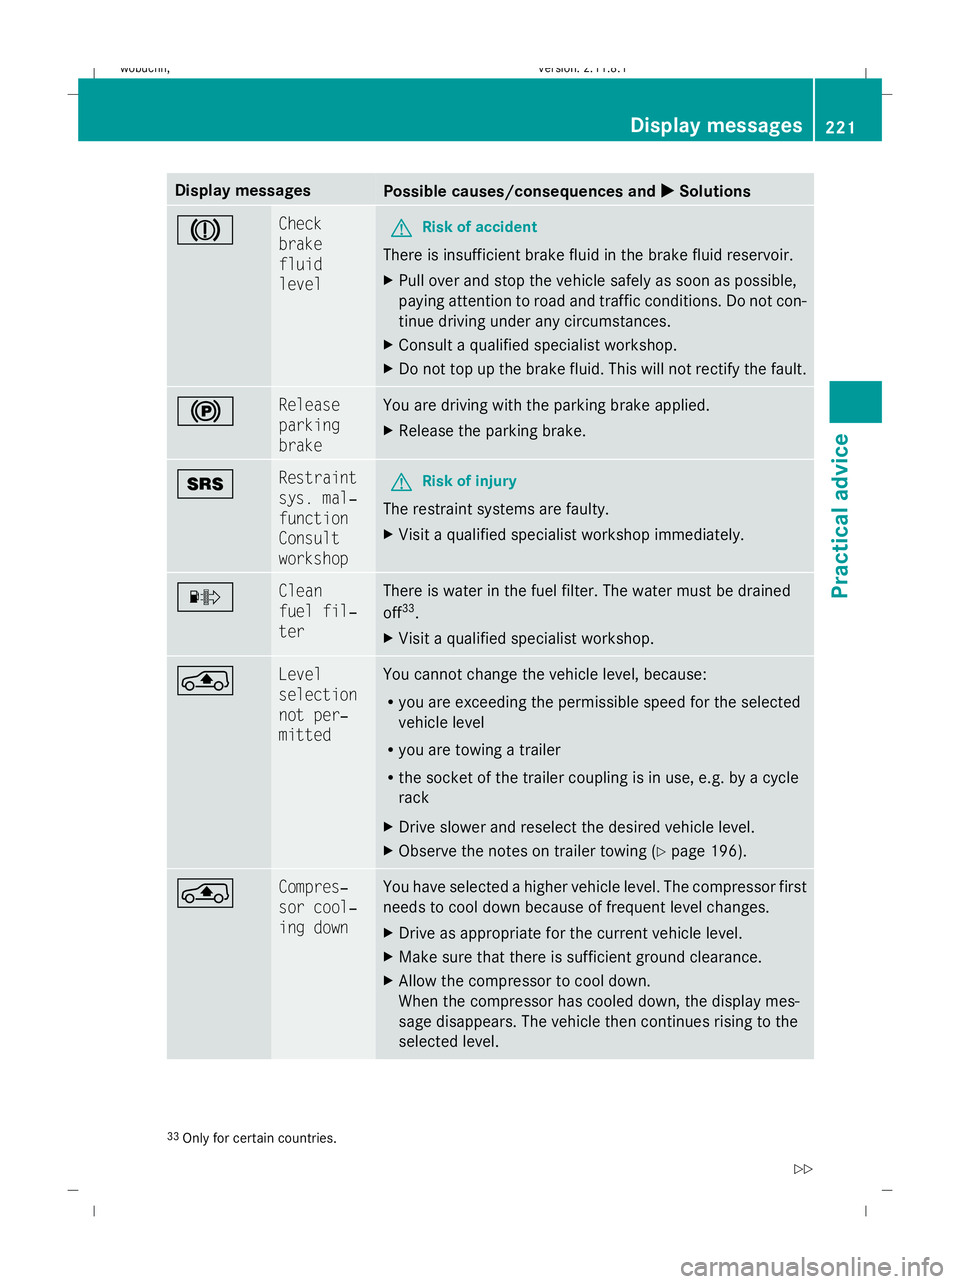
pressure cleaner. Do not use solvents. :
Ball neck head
; Locking balls
= Guide pin
? Guide faces
A Release lever
B Protective cap
X After cleaning, lightly oil or grease posi-
tions :toB and the ball coupling recess
of the vehicle.
X Treat the lock under protective cap Bwith
an acid and resin-free oil.
X Check that the vehicle's trailer coupling is
working properly.
! Observe the note on care provided by the
trailer manufacturer.
i Maintenance of the ball coupling and
trailer coupling can also be performed by
any Mercedes-Benz Service Centre. H
Environmental note
Dispose of oily and greasy cloths in an envi-
ronmentally-responsible manner. Interior care
Cleaning the steering wheel boss and
dashboard G
Risk of injury
When cleaning the steering wheel boss and
dashboard, do not use cockpit sprays or
cleaning agents containing solvents. Cleaning
agents containing solvents cause the surface
to become porous, and as a result plastic
parts may break away and be thrown around
the interior when an airbag is deployed which
may result in severe injuries.
X Wipe the dashboard and steering wheel
boss with a damp, lint-free cloth (e.g. a
microfibre cloth) and cleaning agent.
X Heavy soiling: use car care and cleaning
products recommended and approved by
Mercedes-Benz.
Cleaning the COMAND display X
Before cleaning the display, make sure that
it is switched off and has cooled down.
X Clean the display surface using a commer-
cially-available microfibre cloth and TFT/
LCD display cleaner.
X Dry the display surface using a dry micro-
fibre cloth.
! For cleaning, do not use any of the fol-
lowing:
R alcohol-based solvents or petrol
R abrasive cleaning agents
R commercially-available household clean-
ing agents
These may damage the display surface. Do
not exert pressure when cleaning the dis-
play surface as this may lead to irreversible
damage.
Cleaning the seat covers !
Do not use microfibre cloths to clean gen-
uine leather, artificial leather or 204
CareOperation
X164_AKB; 2; 3, en-GB
wobuchh,
Version: 2.11.8.1 2009-03-31T14:14:58+02:00 - Seite 204
Dateiname: 6515431202_buchblock.pdf; erzeugt am 01. Apr 2009 00:17:54; WK
Page 224 of 309

Display messages
Possible causes/consequences and
X
X Solutions J Check
brake
fluid
level
G
Risk of accident
There is insufficient brake fluid in the brake fluid reservoir.
X Pull over and stop the vehicle safely as soon as possible,
paying attention to road and traffic conditions. Do not con-
tinue driving under any circumstances.
X Consult a qualified specialist workshop.
X Do not top up the brake fluid. This will not rectify the fault. ! Release
parking
brake You are driving with the parking brake applied.
X
Release the parking brake. + Restraint
sys. mal‐
function
Consult
workshop
G
Risk of injury
The restraint systems are faulty.
X Visit a qualified specialist workshop immediately. · Clean
fuel fil‐
ter There is water in the fuel filter. The water must be drained
off
33
.
X Visit a qualified specialist workshop. ° Level
selection
not per‐
mitted You cannot change the vehicle level, because:
R
you are exceeding the permissible speed for the selected
vehicle level
R you are towing a trailer
R the socket of the trailer coupling is in use, e.g. by a cycle
rack
X Drive slower and reselect the desired vehicle level.
X Observe the notes on trailer towing (Y page 196).° Compres‐
sor cool‐
ing down You have selected a higher vehicle level. The compressor first
needs to cool down because of frequent level changes.
X
Drive as appropriate for the current vehicle level.
X Make sure that there is sufficient ground clearance.
X Allow the compressor to cool down.
When the compressor has cooled down, the display mes-
sage disappears. The vehicle then continues rising to the
selected level. 33
Only for certain countries. Display
messages
221Practical advice
X164_AKB; 2; 3, en-GB
wobuchh,V ersion: 2.11.8.1
2009-03-31T14:14:58+02:00 - Seite 221 Z
Dateiname: 6515431202_buchblock.pdf; erzeugt am 01. Apr 2009 00:17:59; WK
Page 228 of 309

Display messages
Possible causes/consequences and
X
X Solutions D Power
steering
malfunc‐
tion See
Owner's
Manual
G
Risk of accident
There is no power assistance for the steering. You will need
to use more force to steer.
X Check whether you are able to apply the extra force
required.
X If you are able to steer safely: carefully drive on to a
qualified specialist workshop.
X If you are unable to steer safely: do not drive on. Contact
the nearest qualified specialist workshop. b Left-hand
Cornering
light
or
Right-
hand Cor‐
nering
light
The left-hand or right-hand cornering lamp* is faulty.
X
Change the bulb ( Ypage 254). b Left-hand
dipped
beam
or
Right-
hand
dipped
beam The left-hand or right-hand dipped-beam headlamp is faulty.
X
Halogen headlamp: replace the bulb (Ypage 254).
X Bi-xenon headlamp*: visit a qualified specialist workshop. b AUTO
lights
inopera‐
tive The light sensor is faulty.
X
Visit a qualified specialist workshop. b Trailer
Left-hand
turn sig‐
nal
or
Trailer
Right-
hand turn
signal The left-hand or right-hand trailer turn signal lamp is faulty.
X
Change the bulb. b Trailer
brake lamp The trailer brake lamp is faulty.
X
Change the bulb. Display
messages
225Practical advice
* optional
X164_AKB; 2; 3, en-GB
wobuchh
,V ersion: 2.11.8.1
2009-03-31T14:14:58+02:00 - Seite 225 Z
Dateiname: 6515431202_buchblock.pdf; erzeugt am 01. Apr 2009 00:18:00; WK
Page 229 of 309

Display messages
Possible causes/consequences and
X
X Solutions b Trailer
Left-hand
tail lamp
or
Trailer
Right-
hand tail
lamp The left-hand or right-hand trailer tail lamp is faulty.
X
Change the bulb. b Turn sig‐
nal, rear
left
or
Turn sig‐
nal, rear
right The rear left-hand or right-hand turn signal is faulty.
X
Change the bulb ( Ypage 254). b Turn sig‐
nal in
mirror,
left
or
Turn sig‐
nal in
mirror,
right The turn signal in the left-hand or right-hand exterior mirror
is faulty. The display message will only appear if all LEDs have
failed.
X
Visit a qualified specialist workshop. b Turn sig‐
nal,
front left
or
Turn sig‐
nal,
front
right The front left-hand or right-hand turn signal is faulty.
X
Change the bulb ( Ypage 254). b Left-hand
brake lamp
or
Right-
hand
brake lamp The left-hand or right-hand brake lamp is faulty.
X
Change the bulb ( Ypage 254). b 3rd brake
lamp The third brake lamp is faulty. The display message will only
appear if all LEDs have failed.
X
Visit a qualified specialist workshop. 226
Display
messagesPractical advice
X164_AKB; 2; 3, en-GB
wobuchh,V ersion: 2.11.8.1
2009-03-31T14:14:58+02:00 - Seite 226
Dateiname: 6515431202_buchblock.pdf; erzeugt am 01. Apr 2009 00:18:00; WK
Page 251 of 309

Problem
Possible causes/consequences and
X XSolutions The engine cannot be
started using the key. The on-board voltage is too low.
X
Switch off non-essential consumers, e.g. seat heating* or inte-
rior lighting, and try to start the engine again.
If this does not work:
X Check the starter battery and charge it if necessary
(Y page 272).
or
X Jump-start the vehicle (Y page 276).
or
X Consult a qualified specialist workshop. The engine cannot be
started using KEYLESS
GO*. The key is in the
vehicle. A door is open. Therefore, the key cannot be detected as easily.
X
Close the door and try to start the vehicle again. There is interference from a powerful source of radio waves.
X
Start your vehicle using the key in the ignition lock. Trailer towing*
Problem
Possible causes/consequences and
X XSolutions The ball coupling can-
not be locked.
The key cannot be
removed from the ball
coupling.
G
Risk of accident
The ball coupling is dirty.
The trailer coupling is damaged.
X Remove the ball coupling and clean it (Y page 203). If the ball
coupling still cannot be locked, remove the ball coupling. It must
no longer be used to tow a trailer, as safe operation is not guar-
anteed.
X Have the entire trailer coupling checked at a qualified specialist
workshop. 248
TroubleshootingPractical advice
* optional
X164_AKB; 2; 3, en-GB
wobuchh,
Version: 2.11.8.1 2009-03-31T14:14:58+02:00 - Seite 248
Dateiname: 6515431202_buchblock.pdf; erzeugt am 01. Apr 2009 00:18:03; WK
Page 271 of 309

Changing a wheel and fitting the
spare wheel G
Risk of accident
The wheel dimensions and tyre size of the
"Minispare" emergency spare wheel *may dif-
fer from those of the damaged wheel.
Your vehicle's handling characteristics will
change when a "Minispare" emergency spare
wheel* is fitted. Adapt your style of driving
accordingly.
The "Minispare" emergency spare wheel*
may only be used for a short time. Do not
exceed the maximum speed of 80 km/h and
do not deactivate ESP ®
.
Never drive the vehicle with more than one
"Minispare" emergency spare wheel* fitted. G
Risk of accident
Have the "Minispare" emergency spare
wheel* or the spare wheel* replaced with a
new wheel as soon as possible at a qualified
specialist workshop which has the necessary
specialist knowledge and tools to carry out
the work required. Mercedes-Benz recom-
mends that you use a Mercedes-Benz Service
Centre for this purpose. In particular, work
relevant to safety or on safety-related sys-
tems must be carried out at a qualified spe-
cialist workshop.
Preparing the vehicle X
Prepare the vehicle as described
(Y page 262).
X If a trailer is coupled, uncouple it.
X Place the wheels in the straight-ahead posi-
tion.
X Remove the following items from the stow-
age well under the luggage compartment
floor:
R the wheel wrench
R the folding wheel chock
R the jack Use the folding wheel chock to prevent the
vehicle from rolling away.
X
Fold both plates :upwards.
X Fold out lower plate ;.
X Guide the lugs on the lower plate fully into
openings in base plate =. Securing the vehicle on level ground
X
On level ground: place the folding wheel
chock or similar under the wheel that is
diagonally opposite to the wheel you wish
to change. Securing the vehicle on slight downhill gradients268
Flat tyrePractical advice
* optional
X164_AKB; 2; 3, en-GB
wobuchh,
Version: 2.11.8.1 2009-03-31T14:14:58+02:00 - Seite 268
Dateiname: 6515431202_buchblock.pdf; erzeugt am 01. Apr 2009 00:18:11; WK