2009 MERCEDES-BENZ GL SUV spare wheel
[x] Cancel search: spare wheelPage 273 of 309

X
Make sure that the base of the jack is posi-
tioned directly under jacking point :.
X Take the socket wrench and ratchet ring
spanner =out of the vehicle tool kit.
X Insert the socket into ratchet ring spanner
= and place it on the jack so that the let-
tering AUFis visible.
X Raise the vehicle with ratchet ring spanner
= until the tyre is at most three centime-
tres off the ground. X
Unscrew the uppermost wheel bolt com-
pletely.
X In place of the wheel bolt, screw centring
pin ?from the vehicle tool kit into the
thread.
X Unscrew the remaining wheel bolts fully.
! Do not place wheel bolts in sand or on a
dirty surface. The bolt and wheel hub
threads could otherwise be damaged when
you screw them in.
X Remove the wheel. Fitting a new wheel G
Risk of accident
Replace damaged or corroded wheel bolts.
Never oil or grease wheel bolts. This could
cause the bolts to loosen in the wheel hub. G
Risk of accident
If a wheel hub thread is damaged, do not drive
the vehicle any further. Consult a qualified
specialist workshop which has the necessary
specialist knowledge and tools to carry out
the work required. Mercedes-Benz recom-
mends that you use a Mercedes-Benz Service
Centre or "Service 24". In particular, work rel-
evant to safety or on safety-related systems
must be carried out at a qualified specialist
workshop. G
Risk of accident
Only use wheel bolts that have been designed
for the wheel and the vehicle. For safety rea-
sons, Mercedes-Benz recommends that you
only use wheel bolts which have been
approved for Mercedes-Benz and the respec-
tive wheel. Other bolts may work loose or
damage the brake system.
Do not tighten the wheel bolts completely
while the vehicle is still jacked up. The vehicle
could topple off the jack. 1
Wheel bolts for 18", 19" and 20" wheels
2 Wheel bolts for the "Minispare" emer-
gency spare wheel* 270
Flat tyrePractical advice
* optional
X164_AKB; 2; 3, en-GB
wobuchh,
Version: 2.11.8.1 2009-03-31T14:14:58+02:00 - Seite 270
Dateiname: 6515431202_buchblock.pdf; erzeugt am 01. Apr 2009 00:18:13; WK
Page 274 of 309
!
Always use wheel bolts ;to fit the
"Minispare" emergency spare wheel*.
Using other wheel bolts to fit the
"Minispare" emergency spare wheel* could
damage the brake system.
i Wheel bolts 2can be found with the
"Minispare" emergency spare wheel*.
X Clean the wheel and wheel hub contact
surfaces. X
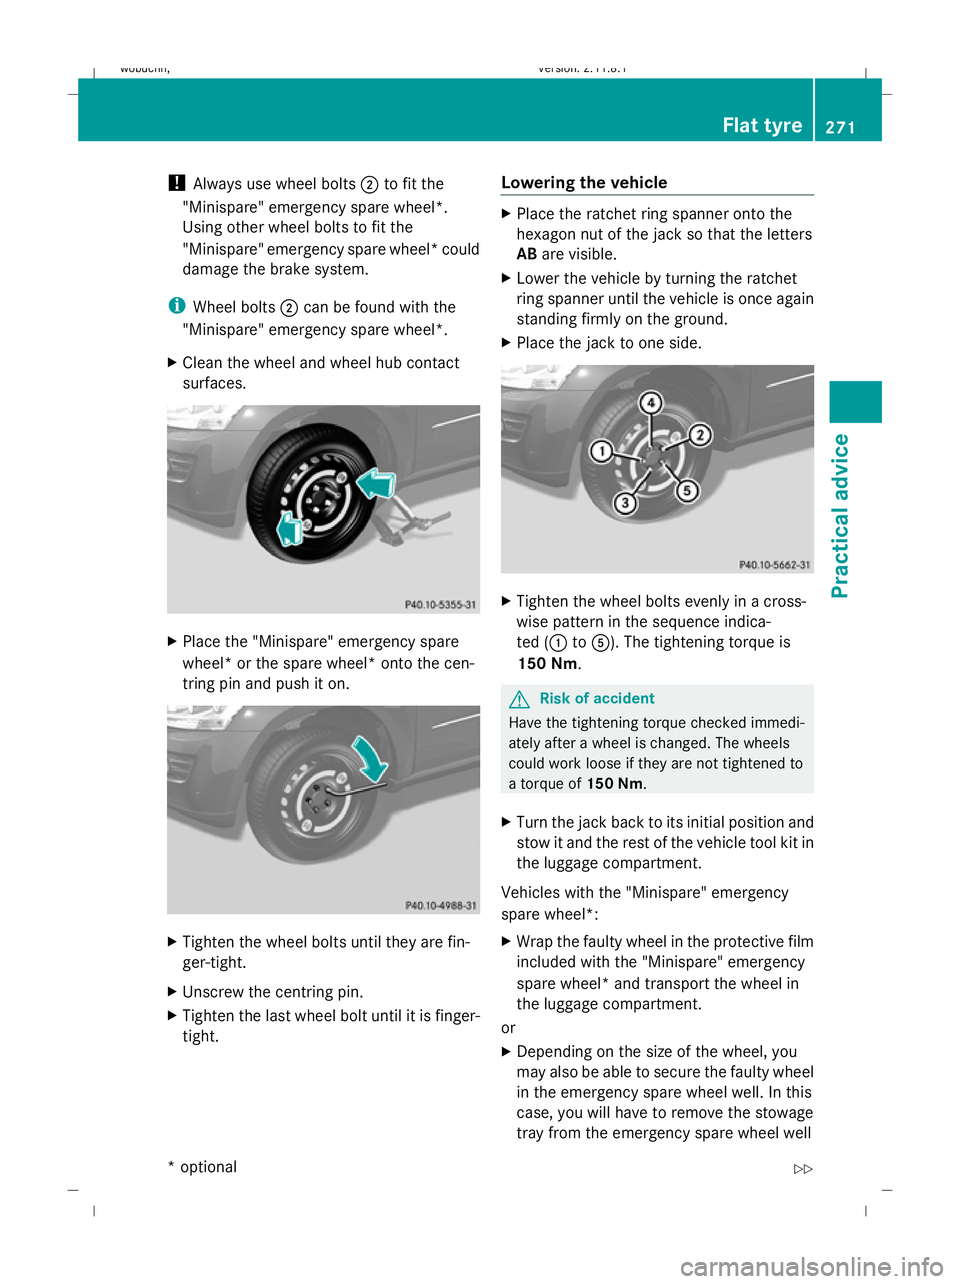
Place the "Minispare" emergency spare
wheel* or the spare wheel* onto the cen-
tring pin and push it on. X
Tighten the wheel bolts until they are fin-
ger-tight.
X Unscrew the centring pin.
X Tighten the last wheel bolt until it is finger-
tight. Lowering the vehicle X
Place the ratchet ring spanner onto the
hexagon nut of the jack so that the letters
AB are visible.
X Lower the vehicle by turning the ratchet
ring spanner until the vehicle is once again
standing firmly on the ground.
X Place the jack to one side. X
Tighten the wheel bolts evenly in a cross-
wise pattern in the sequence indica-
ted (: toA). The tightening torque is
150 Nm. G
Risk of accident
Have the tightening torque checked immedi-
ately after a wheel is changed. The wheels
could work loose if they are not tightened to
a torque of 150 Nm.
X Turn the jack back to its initial position and
stow it and the rest of the vehicle tool kit in
the luggage compartment.
Vehicles with the "Minispare" emergency
spare wheel*:
X Wrap the faulty wheel in the protective film
included with the "Minispare" emergency
spare wheel* and transport the wheel in
the luggage compartment.
or
X Depending on the size of the wheel, you
may also be able to secure the faulty wheel
in the emergency spare wheel well. In this
case, you will have to remove the stowage
tray from the emergency spare wheel well Flat tyre
271Practical advice
* optional
X164_AKB; 2; 3, en-GB
wobuchh,
Version: 2.11.8.1 2009-03-31T14:14:58+02:00 - Seite 271 Z
Dateiname: 6515431202_buchblock.pdf; erzeugt am 01. Apr 2009 00:18:13; WK
Page 275 of 309
and stow it securely in the luggage com-
partment.
Vehicles with a spare wheel*:
X Use the bolts to secure the faulty wheel to
the exterior spare wheel bracket*.
i Do not activate the tyre pressure moni-
tor* until the defective tyre has been
removed from the vehicle. Battery
Notes on the vehicle battery
In order for the battery to achieve the maxi-
mum possible service life, it must always be
sufficiently charged.
Have the battery charge checked more fre-
quently if you use the vehicle mainly for short
trips or if you leave it standing idle for a
lengthy period.
To prevent damage from corrosion, only
replace the battery with one that has a central
ventilation cover.
Consult a Mercedes-Benz Service Centre if
you wish to leave your vehicle parked up for
a long period of time. G
Risk of injury
Comply with safety precautions and take pro-
tective measures when handling batteries. Risk of explosion
Fire, naked flames and
smoking are prohibited
when handling the battery.
Avoid creating sparks. Battery acid is caustic.
Avoid contact with the skin,
eyes or clothing.
Wear suitable protective
clothing, in particular
gloves, an apron and a face
mask. Immediately rinse acid
splashes off with clean
water. Consult a doctor if
necessary.
Wear eye protection.
Keep children away.
Observe this Owner's Man-
ual.
H
Environmental note
Do not dispose of batteries in the household
rubbish. Dispose of defective batteries in an
environmentally responsible manner. Take
them to a Mercedes-Benz Service Centre or
to a special collection point for old batteries. G
Risk of injury
For safety reasons, Mercedes-Benz recom-
mends that you only use batteries which have
been tested and approved for your vehicle by
Mercedes-Benz. These batteries provide
increased impact protection to prevent vehi-
cle occupants from suffering acid burns
should the battery be damaged in the event
of an accident.
To prevent acid burns, observe the following
safety notes when handling batteries:
R do not lean over the battery.
R do not place any metal objects on a battery.
Otherwise, you could cause a short circuit
and the battery's gas mixture could ignite.
R make sure that you do not create an elec-
trostatic charge, e.g. by wearing synthetic
clothing or as a result of friction on fabrics.
Therefore, you should not pull or slide the
battery over carpets or other synthetic
materials. 272
BatteryPractical advice
* optional
X164_AKB; 2; 3, en-GB
wobuchh,
Version: 2.11.8.1 2009-03-31T14:14:58+02:00 - Seite 272
Dateiname: 6515431202_buchblock.pdf; erzeugt am 01. Apr 2009 00:18:14; WK
Page 300 of 309
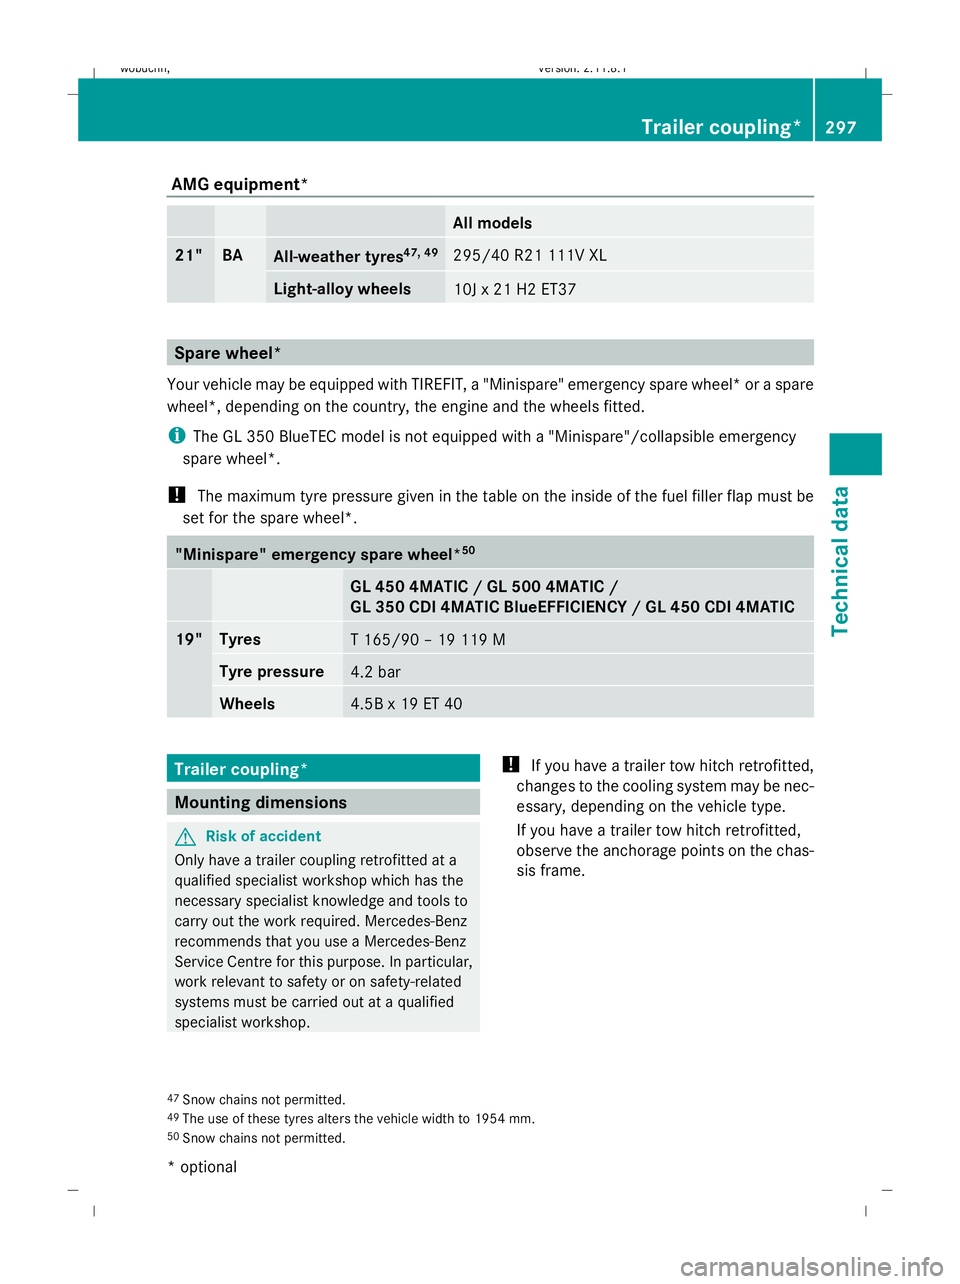
AMG equipment*
All models
21" BA
All-weather tyres
47, 49 295/40 R21 111V XL
Light-alloy wheels
10J x 21 H2 ET37
Spare wheel*
Your vehicle may be equipped with TIREFIT, a "Minispare" emergency spare wheel* or a spare
wheel*, depending on the country, the engine and the wheels fitted.
i The GL 350 BlueTEC model is not equipped with a "Minispare"/collapsible emergency
spare wheel*.
! The maximum tyre pressure given in the table on the inside of the fuel filler flap must be
set for the spare wheel*. "Minispare" emergency spare wheel*
50 GL 450 4MATIC / GL 500 4MATIC /
GL 350 CDI 4MATIC BlueEFFICIENCY / GL 450 CDI 4MATIC
19" Tyres
T 165/90 – 19 119 M
Tyre pressure
4.2 bar
Wheels
4.5B x 19 ET 40
Trailer coupling*
Mounting dimensions
G
Risk of accident
Only have a trailer coupling retrofitted at a
qualified specialist workshop which has the
necessary specialist knowledge and tools to
carry out the work required. Mercedes-Benz
recommends that you use a Mercedes-Benz
Service Centre for this purpose. In particular,
work relevant to safety or on safety-related
systems must be carried out at a qualified
specialist workshop. !
If you have a trailer tow hitch retrofitted,
changes to the cooling system may be nec-
essary, depending on the vehicle type.
If you have a trailer tow hitch retrofitted,
observe the anchorage points on the chas-
sis frame.
47 Snow chains not permitted.
49 The use of these tyres alters the vehicle width to 1954 mm.
50 Snow chains not permitted. Trailer coupling*
297Technical data
* optional
X164_AKB; 2; 3, en-GB
wobuchh,
Version: 2.11.8.1 2009-03-31T14:14:58+02:00 - Seite 297 Z
Dateiname: 6515431202_buchblock.pdf; erzeugt am 01. Apr 2009 00:18:26; WK