2009 MERCEDES-BENZ GL SUV light
[x] Cancel search: lightPage 190 of 309
You will require considerably more effort to
steer and brake and you could therefore lose
control of the vehicle and cause an accident.
Brakes
G
Risk of accident
Do not change down for additional engine
braking on a slippery road surface. This could
cause the drive wheels to lose their grip and
the vehicle could skid. G
Risk of accident
Make sure that other road users are not
endangered by your braking.
Downhill gradients On long and steep downhill gradients, espe-
cially if the vehicle is laden or towing a trailer,
you must select shift range 1,2or 3in good
time.
i This also applies if you have activated
cruise control, Speedtronic or Distronic*.
This will use the braking effect of the engine,
so less braking will be required to maintain
the speed. This relieves the load on the brake
system and prevents the brakes from over-
heating and wearing too quickly. If you need
additional braking, depress the brake pedal
repeatedly rather than continuously.
Heavy and light loads If the brakes have been subjected to a heavy
load, do not stop the vehicle immediately, but
drive on for a short while. This allows the air-
flow to cool the brakes more quickly. G
Risk of accident
Never depress the brake pedal continuously
while the vehicle is in motion, e.g. never cause
the brakes to rub by applying constant slight
pedal pressure. This causes the brake system
to overheat, increases the braking distance
and can lead to the brakes failing completely. If the brakes have been used only moderately,
you should occasionally test their effective-
ness. To do this, brake more firmly from a
higher speed. This improves the grip of the
brakes.
Wet roads If driving in heavy rain for a prolonged period
of time without braking, there may be a
delayed reaction from the brakes when brak-
ing for the first time. You must brake harder.
You must therefore maintain a greater dis-
tance from the vehicle in front.
After driving on a wet surface, brake firmly
while paying attention to the traffic condi-
tions. This way the brake discs will become
warm, drying more quickly, which will protect
them against corrosion.
Limited braking performance on salted
roads
G
Risk of accident
The layer of salt on the brake discs and the
brake pads/linings may cause a delay in the
braking effect, resulting in a significantly lon-
ger braking distance, which could lead to an
accident.
To avoid this danger, you should:
R occasionally brake carefully, without put-
ting other road users at risk, when you are
driving on salted roads. This helps to
remove any salt that may have started to
build up on the brake discs and the brake
pads/linings.
R maintain a greater distance to the vehicle
ahead and drive with particular care.
R carefully apply the brakes at the end of a
trip and immediately after commencing a
new trip, so that salt residues are removed
from the brake disc. Driving tips
187Operation
* optional
X164_AKB; 2; 3, en-GB
wobuchh
,V ersion: 2.11.8.1
2009-03-31T14:14:58+02:00 - Seite 187 Z
Dateiname: 6515431202_buchblock.pdf; erzeugt am 01. Apr 2009 00:17:49; WK
Page 193 of 309
X
Wheels and tyres: check the tyre tread
depth and tyre pressure.
X Check for damage and remove foreign
objects, e.g. small stones, from the
wheels/tyres.
X Replace any missing valve caps.
X Replace dented or damaged wheels.
Checklist after driving off-road Driving over rough terrain places greater
demands on your vehicle than driving on nor-
mal roads. After driving off-road, check the
vehicle. This allows you to detect damage
promptly and reduce the risk of an accident
to yourself and other road users.
X Deactivate the LOW RANGE off-road gear
(Y page 114).
X Deactivate DSR (Y page 113).
X Set the differential lock setting to AUTO on
the selector wheel (Y page 116).
X Lower the vehicle level again to a level suit-
able to the road conditions, e.g. to the high-
way/high-speed level.
X Clean the headlamps and rear lights and
check for damage.
X Clean the front and rear licence plates.
X Clean the wheels/tyres with a water jet and
remove any foreign objects.
X Clean the wheels, wheel arches and the
vehicle underside with a water jet; check
for foreign objects and damage.
X Check whether twigs or other parts of
plants have become trapped. These
increase the risk of fire and can damage
fuel pipes, brake hoses or the rubber bel-
lows of the axle joints and propeller shafts.
X After the trip, examine without fail the
entire undercarriage, wheels, tyres, brakes,
bodywork structure, steering, chassis and
exhaust system for damage.
X After driving for extended periods across
sand, mud, gravel, water or in similarly dirty
conditions, have the brake discs, wheels, brake pads/l
inings and axle joints checked
and cleaned.
X If you detect strong vibrations after off-road
travel, check for foreign objects in the
wheels and drive train and remove them if
necessary. Foreign objects can disturb the
balance and cause vibrations. Travelling uphill
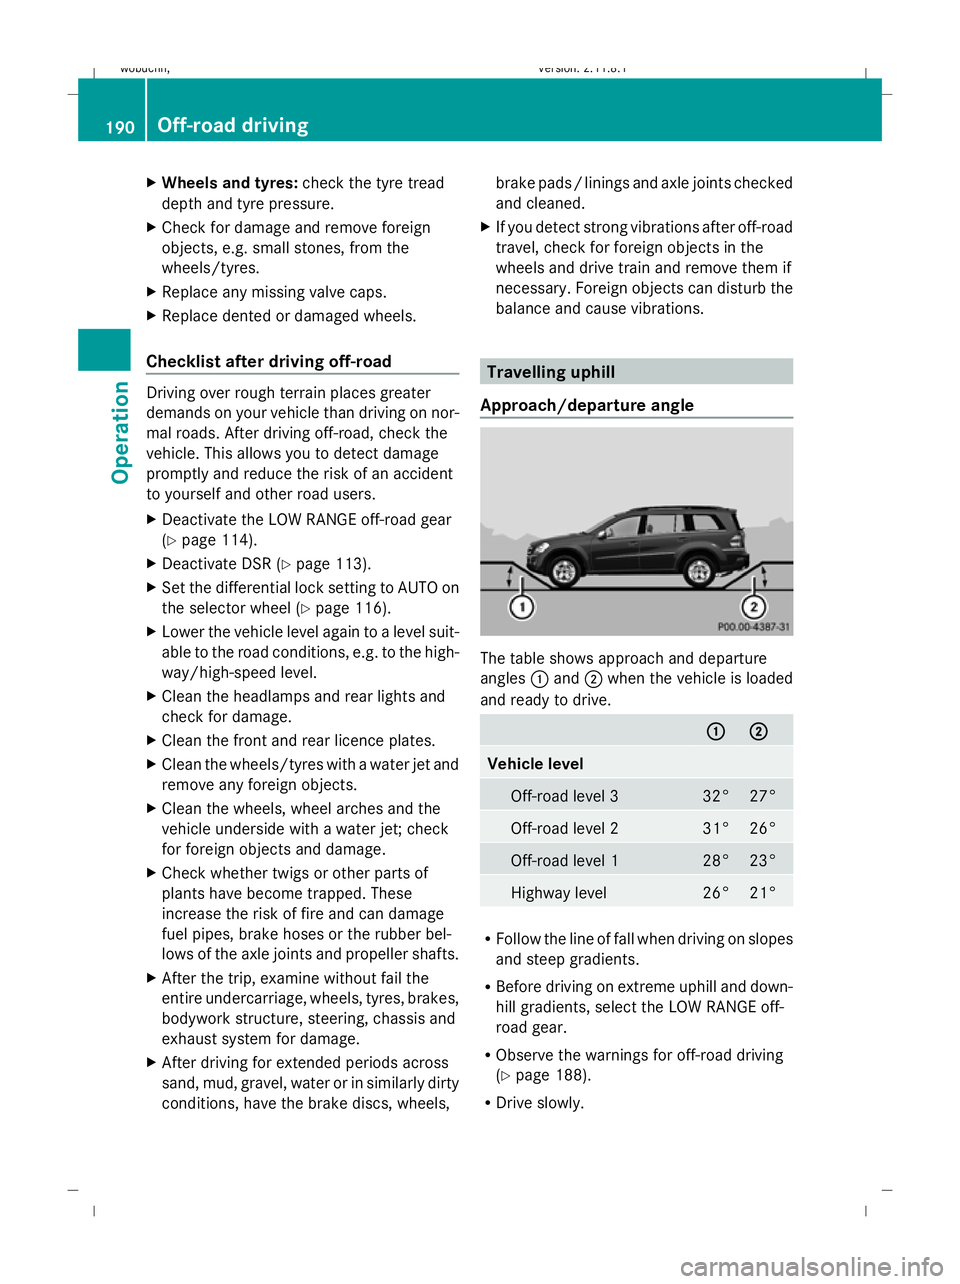
Approach/departure angle The table shows approach and departure
angles
:and ;when the vehicle is loaded
and ready to drive. :
: ;
; Vehicle level
Off-road level 3 32° 27°
Off-road level 2 31° 26°
Off-road level 1 28° 23°
Highway level 26° 21°
R
Follow the line of fall when driving on slopes
and steep gradients.
R Before driving on extreme uphill and down-
hill gradients, select the LOW RANGE off-
road gear.
R Observe the warnings for off-road driving
(Y page 188).
R Drive slowly. 190
Off-road drivingOperation
X164_AKB; 2; 3, en-GB
wobuchh,
Version: 2.11.8.1 2009-03-31T14:14:58+02:00 - Seite 190
Dateiname: 6515431202_buchblock.pdf; erzeugt am 01. Apr 2009 00:17:49; WK
Page 194 of 309
R
Accelerate gently and make sure that the
wheels are gripping.
R Avoid high engine speeds, except when
driving on sandy and muddy routes with
high driving resistance.
R Select a shift range appropriate to the gra-
dient.
R Before tackling steep downhill gradients,
select shift range 1.
i The vehicle will not roll backwards when
stopping on an uphill gradient if:
R the automatic transmission is in position
D.
R you have selected the LOW RANGE off-
road gear.
Depress the brake pedal when stopping on
steep uphill gradients. Hill start assist will
aid you when you pull away again
(Y page 90).
Maximum gradient-climbing capability On good road surfaces and with the LOW
RANGE off-road gear selected, the full gradi-
ent-climbing capability is available.
i
If the load on the front axle is reduced
when pulling away on a steep uphill slope,
the front wheels have a tendency to spin.
4ETS recognises this and brakes the
wheels accordingly. The rear wheel torque
is increased and it is easier to pull away.
Brow of hill When driving up an uphill gradient, slightly
reduce pressure on the accelerator immedi-
ately before reaching the brow of the hill.
Make use of the vehicle’s own impetus to
travel over the brow.
This style of driving prevents: R
the vehicle from lifting off the ground on the
brow of a hill
R loss of traction
R the vehicle from travelling too quickly down
the other side
Driving downhill R
Drive slowly.
R Do not drive at an angle down steep
inclines. Steer into the line of fall and drive
with the front wheels aligned straight. Oth-
erwise, the vehicle could slip sideways, tip
and overturn.
R Before tackling steep downhill gradients,
select shift range 1.
R Activate DSR. If this is not sufficient, brake
gently. When doing so, make sure that the
vehicle is facing in the direction of the line
of fall.
R Check that the brakes are working normally
after a long downhill stretch.
i Off-road ABS is activated when the
LOW RANGE off-road gear is selected.
At speeds below 30 km/h, the front wheels
lock cyclically during braking. The digging-
in effect achieved in the process reduces
the stopping distance when driving off-
road. The steerability of the vehicle is con-
siderably reduced when the wheels lock. Driving over obstacles
Observe the following rules when driving over
tree stumps, large stones and other obsta-
cles:
R Select the LOW RANGE off-road gear
(Y page 114).
R Avoid high engine speeds.
R Select shift range 1. Off-road driving
191Operation
X164_AKB; 2; 3, en-GB
wobuchh,V ersion: 2.11.8.1
2009-03-31T14:14:58+02:00 - Seite 191 Z
Dateiname: 6515431202_buchblock.pdf; erzeugt am 01. Apr 2009 00:17:49; WK
Page 199 of 309
Never press the ADS button* or operate the
level control* while you are coupling up or
decoupling a trailer.
X Make sure the DIRECT SELECT selector
lever is set to P.
X Depress the parking brake.
X Start the engine.
X Set the vehicle to highway level
(Y page 132).
X Set the adaptive damping system (ADS)
setting to AUTOorCOMF (Ypage 129).
X Switch off the engine.
X Close the doors and tailgate.
X Position the trailer level behind the vehicle.
X Couple up the trailer.
X Establish the electrical connection
between the vehicle and the trailer.
i If you have coupled a trailer, the vehicle
will remain at highway level.
The vehicle automatically lowers to high-
way level if you drive faster than 8 km/h
with a trailer. The vehicle is not lowered to
the high-speed level even if you are travel-
ling at higher speeds.
This also applies when using accessories
that are plugged into the socket of the
trailer coupling (e.g. a bicycle rack).
Decoupling a trailer G
Risk of injury
Do not disconnect a trailer with an engaged
overrun brake. Otherwise, your hand could
become trapped between the bumper and
drawbar.
! Do not uncouple a trailer with overrun
brake between the bumper and drawbar,
otherwise your vehicle could be damaged
by the spring action of the overrun brake. X
Make sure the DIRECT SELECT selector
lever is set to P.
X Depress the parking brake.
X Start the engine.
X Close the doors and tailgate.
X Secure the trailer against rolling away. G
Risk of injury
The vehicle is lowered as soon as you discon-
nect the trailer cable. Make sure that nobody
is in the vicinity of the wheel arch or the
underbody. You could otherwise trap yourself
or others.
As soon as you decouple the trailer, the unla-
den vehicle rises slightly. Make sure that you
or others are not injured in the process.
X Remove the trailer cable and decouple the
trailer.
X Switch off the engine. Notes on towing a trailer
G
Risk of accident
When reversing the vehicle towards the
trailer, make sure there is nobody between
the trailer and the vehicle.
Couple and uncouple the trailer carefully. If
you do not couple the trailer to the towing
vehicle correctly, the trailer could become
detached.
Make sure that the following values are not
exceeded:
R the permissible trailer drawbar noseweight
R the permissible trailer load
R the permissible rear axle load of the towing
vehicle
R the maximum permissible gross vehicle
weight of both the towing vehicle and the
trailer
You will find the applicable permissible val-
ues, which must not be exceeded, in the vehi-
cle documents. 196
Trailer towing*Operation
* optional
X164_AKB; 2; 3, en-GB
wobuchh
,V ersion: 2.11.8.1
2009-03-31T14:14:58+02:00 - Seite 196
Dateiname: 6515431202_buchblock.pdf; erzeugt am 01. Apr 2009 00:17:51; WK
Page 200 of 309

You will find the values approved by the man-
ufacturer on the vehicle identification plates
and those for the towing vehicle in the "Tech-
nical data" section.
You will find installation dimensions and loads
in the "Technical data" section
(Y page 297).
The maximum drawbar load of the trailer
drawbar on the ball coupling is 140 kg. How-
ever, the actual noseweight must not exceed
the value given on the trailer coupling or
trailer identification plates. The lowest weight
applies.
! Use a noseweight as close as possible to
the maximum permissible noseweight. Do
not use a noseweight of less than 50 kg,
otherwise the trailer may come loose.
Bear in mind that the payload and the rear
axle load are reduced by the actual nose-
weight.
When towing a trailer, where possible set the
tyre pressures for the permissible gross
weight which you find in the table on the
inside of your vehicle's fuel filler flap (higher
values).
Driving tips i
Observe the notes on ESP ®
trailer stabi-
lisation (Y page 51).
In Germany, the maximum permissible speed
for vehicle/trailer combinations depends on
the type of trailer and is either 80 km/h or
100 km/h. Before beginning the journey,
check the trailer's documents to see what the
maximum permitted speed is. G
Risk of accident
Always observe the maximum speed permit-
ted in Germany for vehicle/trailer combina-
tions, even in countries where higher speeds
are permitted. This lowers the risk of an acci-
dent. When towing a trailer, your vehicle's handling
characteristics will be different in comparison
to when driving without a trailer.
The vehicle/trailer combination:
R is heavier
R is restricted in its acceleration and gradi-
ent-climbing capability
R has an increased braking distance
R is affected more by strong crosswinds
R demands more sensitive steering
R consumes more fuel
On long and steep downhill gradients, you
must select shift range 1,2or 3in good time.
i This also applies if you have activated
cruise control, Distronic* or Speedtronic.
This will use the braking effect of the engine,
so less braking will be required to maintain
the speed. This relieves the load on the brake
system and prevents the brakes from over-
heating and wearing too quickly. If you need
additional braking, depress the brake pedal
repeatedly rather than continuously. G
Risk of accident
Never depress the brake pedal continuously
while the vehicle is in motion, e.g. never cause
the brakes to rub by applying constant slight
pedal pressure. This causes the brake system
to overheat, increases the braking distance
and can lead to the brakes failing completely.
Driving tips
R Maintain a greater distance from the vehi-
cle in front than when driving without a
trailer.
R Avoid braking abruptly. If possible, brake
gently at first to allow the trailer to run on.
Then, increase the braking force rapidly.
R The values given for gradient-climbing
capabilities from a standstill refer to sea
level. When driving in mountainous areas,
note that the power output of the engine,
and consequently the vehicle's gradient- Trailer towing*
197Operation
* optional
X164_AKB; 2; 3, en-GB
wobuchh
,V ersion: 2.11.8.1
2009-03-31T14:14:58+02:00 - Seite 197 Z
Dateiname: 6515431202_buchblock.pdf; erzeugt am 01. Apr 2009 00:17:52; WK
Page 204 of 309
Care
Care and cleaning products
Regular care of your vehicle is a condition for
retaining the quality in the long term.
Use only care products and cleaning agents
recommended and approved by Mercedes-
Benz.
! For cleaning your vehicle, do not use any
of the following:
R dry, rough or hard cloths
R abrasive cleaning agents
R solvents
R cleaning agents containing solvents
and do not scrub.
Do not touch the surfaces and protective
films with hard objects, e.g. rings or ice
scrapers. You could otherwise scratch or
damage the surfaces and protective film. H
Environmental note
Dispose of empty packaging, cleaning cloths
and polishing wads in an environmentally
responsible manner.
! Do not park the vehicle for a long period
of time directly after cleaning, especially if
the wheels have just been cleaned with a
wheel cleaner. Wheel cleaners could cause
rapid corrosion of the brake discs and
brake pads/linings. After cleaning, park
the vehicle when it is at normal operating
temperature. Exterior care
Automatic car wash G
Risk of accident
The efficiency of the brakes is reduced after
using an automatic car wash. This could cause
an accident. For this reason, following a car
wash, drive with particular care until the
brakes are dry. You can wash the vehicle in an automatic car
wash from the beginning.
!
Do not wash vehicles with an exterior
spare wheel bracket* in an automatic car
wash.
If the vehicle is very dirty, pre-wash it before
cleaning it in an automatic car wash.
! Make sure that the automatic car wash is
suitable for the size of the vehicle. Fold in
the exterior mirrors before the vehicle is
washed. There is otherwise a risk of dam-
age to the exterior mirrors.
! When washing your vehicle in a tow-
through car wash, make sure that the auto-
matic transmission is in position N, other-
wise the vehicle could be damaged.
R Vehicles with a key:
Do not remove the key from the ignition
lock. Do not open the driver's or front-
passenger door when the engine is
switched off, as this automatically shifts
the automatic transmission to park posi-
tion Pand locks the wheels, unless you
have previously shifted the automatic
transmission to N.
R Vehicles with KEYLESS GO*:
Do not open the driver's or front-
passenger door when the engine is
switched off, as this shifts the automatic
transmission to park position Pand locks
the wheels.
! Make sure that the side windows are com-
pletely closed, that the ventilation/heater
blower is fully turned off and that the wind-
screen wiper switch is set to 0. Otherwise,
the rain/light sensor may be activated, trig-
gering unintended wiper movements. This
could cause damage to the vehicle.
After using an automatic car wash, wipe off
wax and drying agents from the windscreen
and the wiper blades. This will prevent smears
and reduce wiping noises caused by residue
on the windscreen. Care
201Operation
* optional
X164_AKB; 2; 3, en-GB
wobuchh,
Version: 2.11.8.1 2009-03-31T14:14:58+02:00 - Seite 201 Z
Dateiname: 6515431202_buchblock.pdf; erzeugt am 01. Apr 2009 00:17:53; WK
Page 205 of 309
High-pressure cleaners
G
Risk of accident
Do not use high-pressure cleaners with circu-
lar-jet nozzles (dirt grinders) to clean your
vehicle, in particular the tyres. You could oth-
erwise damage the tyres and cause an acci-
dent.
! Observe the instructions issued by the
equipment manufacturer concerning the
distance to be maintained between the
nozzle of the high-pressure cleaner and the
vehicle (at least 30 cm).
Move the high-pressure cleaner nozzle
around when cleaning your vehicle.
Do not aim directly at any of the following:
R tyres
R door joint
R electrical components
R battery
R connectors
R lights
R seals
R trim elements
R ventilation slots
Damaged seals or electrical components
can lead to failures or leaks.
Cleaning the paintwork Scratches, corrosive deposits, areas affected
by corrosion and damage caused by inade-
quate care cannot always be completely
repaired. In such cases, visit a qualified spe-
cialist workshop immediately, e.g. a
Mercedes-Benz Service Centre.
X Remove the following types of dirt immedi-
ately, whilst avoiding rubbing too hard.
Soak:
R insect remains with insect remover
R bird droppings with water and rinse off the treated surface after-
wards.
Remove:
R
tree resin, oils, fuels and greases by rub-
bing gently with a cloth soaked in petro-
leum ether or lighter fluid.
R tar stain with tar remover
R wax with silicone remover
! Do not affix:
R stickers
R films
R magnetic plates or similar items
to painted surfaces. Otherwise, you could
damage the paintwork.
Cleaning the wheels !
Do not use acidic wheel cleaners to
remove brake dust. This could damage
wheel bolts and brake components.
Cleaning the windows X
Clean the inside and outside of the win-
dows with a damp cloth and a cleaning
product approved and recommended by
Mercedes-Benz.
! Clean the water drainage channels of the
windscreen and the rear window at regular
intervals. Under certain circumstances,
deposits such as leaves, petals and pollen
may prevent water from draining away
leading to corrosion damage.
Cleaning the wiper blades G
Risk of injury
Before cleaning the windscreen or wiper
blades, turn the key to position 0in the igni-
tion lock or press the Start/Stop button* until
all indicator lamps have gone out in the instru-
ment cluster. The windscreen wipers could
otherwise move and cause injury. 202
CareOperation
* optional
X164_AKB; 2; 3, en-GB
wobuchh,
Version: 2.11.8.1 2009-03-31T14:14:58+02:00 - Seite 202
Dateiname: 6515431202_buchblock.pdf; erzeugt am 01. Apr 2009 00:17:53; WK
Page 207 of 309
!
Do not clean the ball coupling with a high-
pressure cleaner. Do not use solvents. :
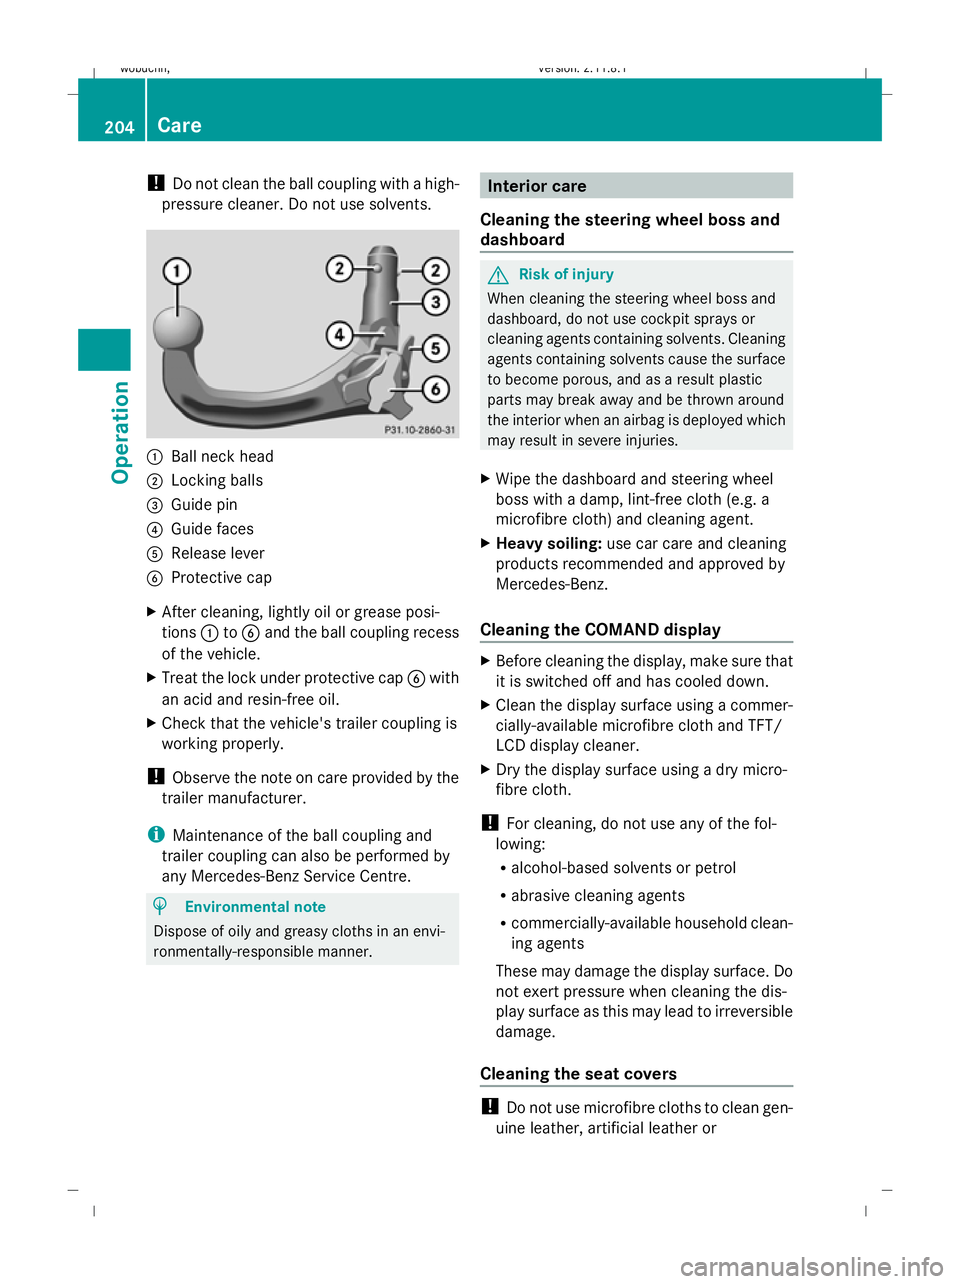
Ball neck head
; Locking balls
= Guide pin
? Guide faces
A Release lever
B Protective cap
X After cleaning, lightly oil or grease posi-
tions :toB and the ball coupling recess
of the vehicle.
X Treat the lock under protective cap Bwith
an acid and resin-free oil.
X Check that the vehicle's trailer coupling is
working properly.
! Observe the note on care provided by the
trailer manufacturer.
i Maintenance of the ball coupling and
trailer coupling can also be performed by
any Mercedes-Benz Service Centre. H
Environmental note
Dispose of oily and greasy cloths in an envi-
ronmentally-responsible manner. Interior care
Cleaning the steering wheel boss and
dashboard G
Risk of injury
When cleaning the steering wheel boss and
dashboard, do not use cockpit sprays or
cleaning agents containing solvents. Cleaning
agents containing solvents cause the surface
to become porous, and as a result plastic
parts may break away and be thrown around
the interior when an airbag is deployed which
may result in severe injuries.
X Wipe the dashboard and steering wheel
boss with a damp, lint-free cloth (e.g. a
microfibre cloth) and cleaning agent.
X Heavy soiling: use car care and cleaning
products recommended and approved by
Mercedes-Benz.
Cleaning the COMAND display X
Before cleaning the display, make sure that
it is switched off and has cooled down.
X Clean the display surface using a commer-
cially-available microfibre cloth and TFT/
LCD display cleaner.
X Dry the display surface using a dry micro-
fibre cloth.
! For cleaning, do not use any of the fol-
lowing:
R alcohol-based solvents or petrol
R abrasive cleaning agents
R commercially-available household clean-
ing agents
These may damage the display surface. Do
not exert pressure when cleaning the dis-
play surface as this may lead to irreversible
damage.
Cleaning the seat covers !
Do not use microfibre cloths to clean gen-
uine leather, artificial leather or 204
CareOperation
X164_AKB; 2; 3, en-GB
wobuchh,
Version: 2.11.8.1 2009-03-31T14:14:58+02:00 - Seite 204
Dateiname: 6515431202_buchblock.pdf; erzeugt am 01. Apr 2009 00:17:54; WK