2009 MERCEDES-BENZ E-CLASS SALOON brake light
[x] Cancel search: brake lightPage 149 of 373
:
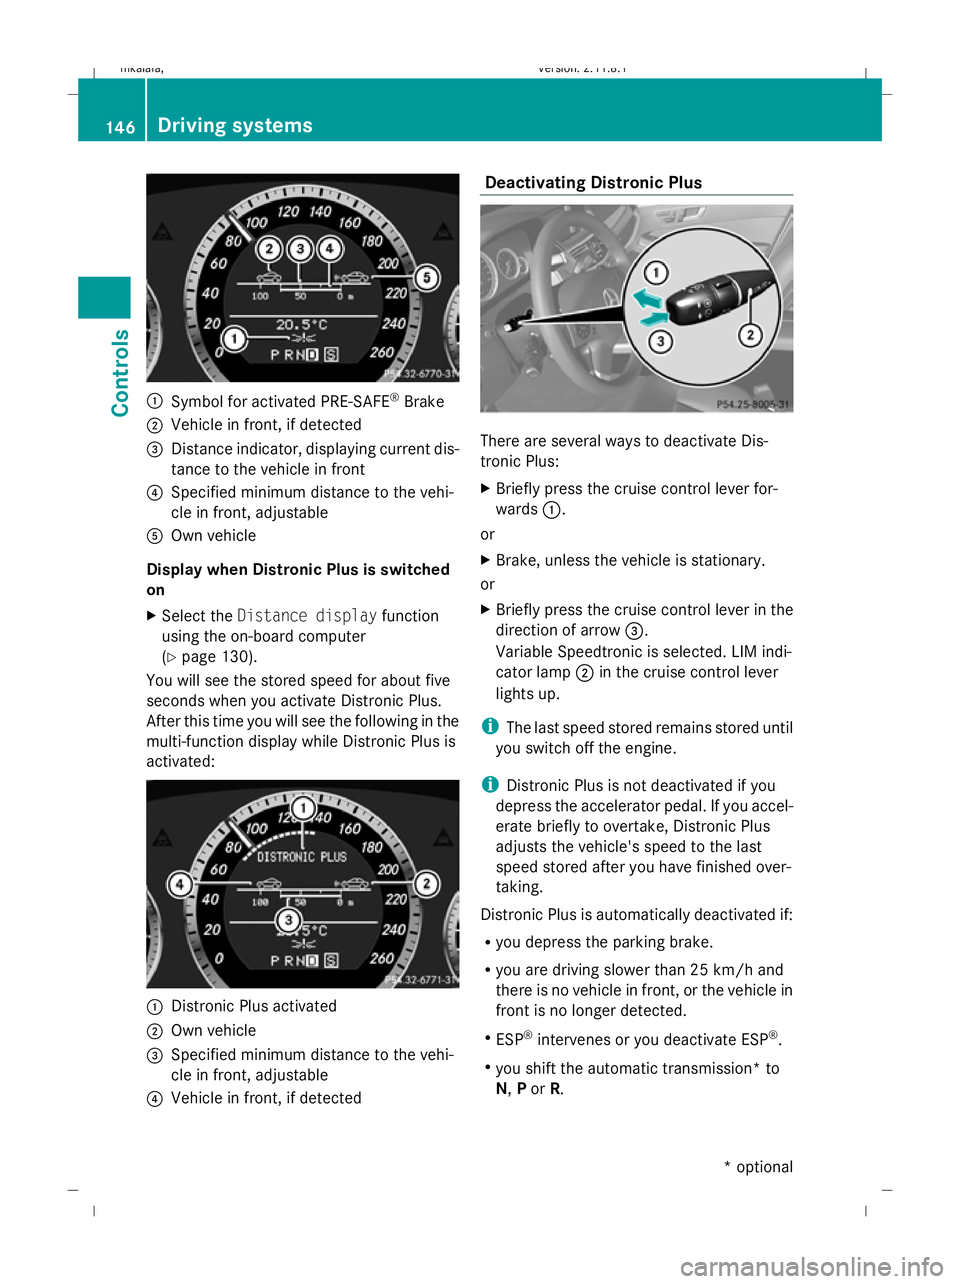
Symbol for activated PRE-SAFE ®
Brake
; Vehicle in front, if detected
= Distance indicator, displaying current dis-
tance to the vehicle in front
? Specified minimum distance to the vehi-
cle in front, adjustable
A Own vehicle
Display when Distronic Plus is switched
on
X Select the Distance display function
using the on-board computer
(Y page 130).
You will see the stored speed for about five
seconds when you activate Distronic Plus.
After this time you will see the following in the
multi-function display while Distronic Plus is
activated: :
Distronic Plus activated
; Own vehicle
= Specified minimum distance to the vehi-
cle in front, adjustable
? Vehicle in front, if detected Deactivating Distronic Plus
There are several ways to deactivate Dis-
tronic Plus:
X
Briefly press the cruise control lever for-
wards :.
or
X Brake, unless the vehicle is stationary.
or
X Briefly press the cruise control lever in the
direction of arrow =.
Variable Speedtronic is selected. LIM indi-
cator lamp ;in the cruise control lever
lights up.
i The last speed stored remains stored until
you switch off the engine.
i Distronic Plus is not deactivated if you
depress the accelerator pedal. If you accel-
erate briefly to overtake, Distronic Plus
adjusts the vehicle's speed to the last
speed stored after you have finished over-
taking.
Distronic Plus is automatically deactivated if:
R you depress the parking brake.
R you are driving slower than 25 km/h and
there is no vehicle in front, or the vehicle in
front is no longer detected.
R ESP ®
intervenes or you deactivate ESP ®
.
R you shift the automatic transmission* to
N, Por R. 146
Driving systemsControls
* optional
212_AKB; 2; 4, en-GB
mkalafa
,V ersion: 2.11.8.1
2009-05-05T14:17:16+02:00 - Seite 146
Dateiname: 6515346702_buchblock.pdf; erzeugt am 07. May 2009 14:16:19; WK
Page 151 of 373
of its narrow width. The distance to the vehi-
cle in front will be too short.
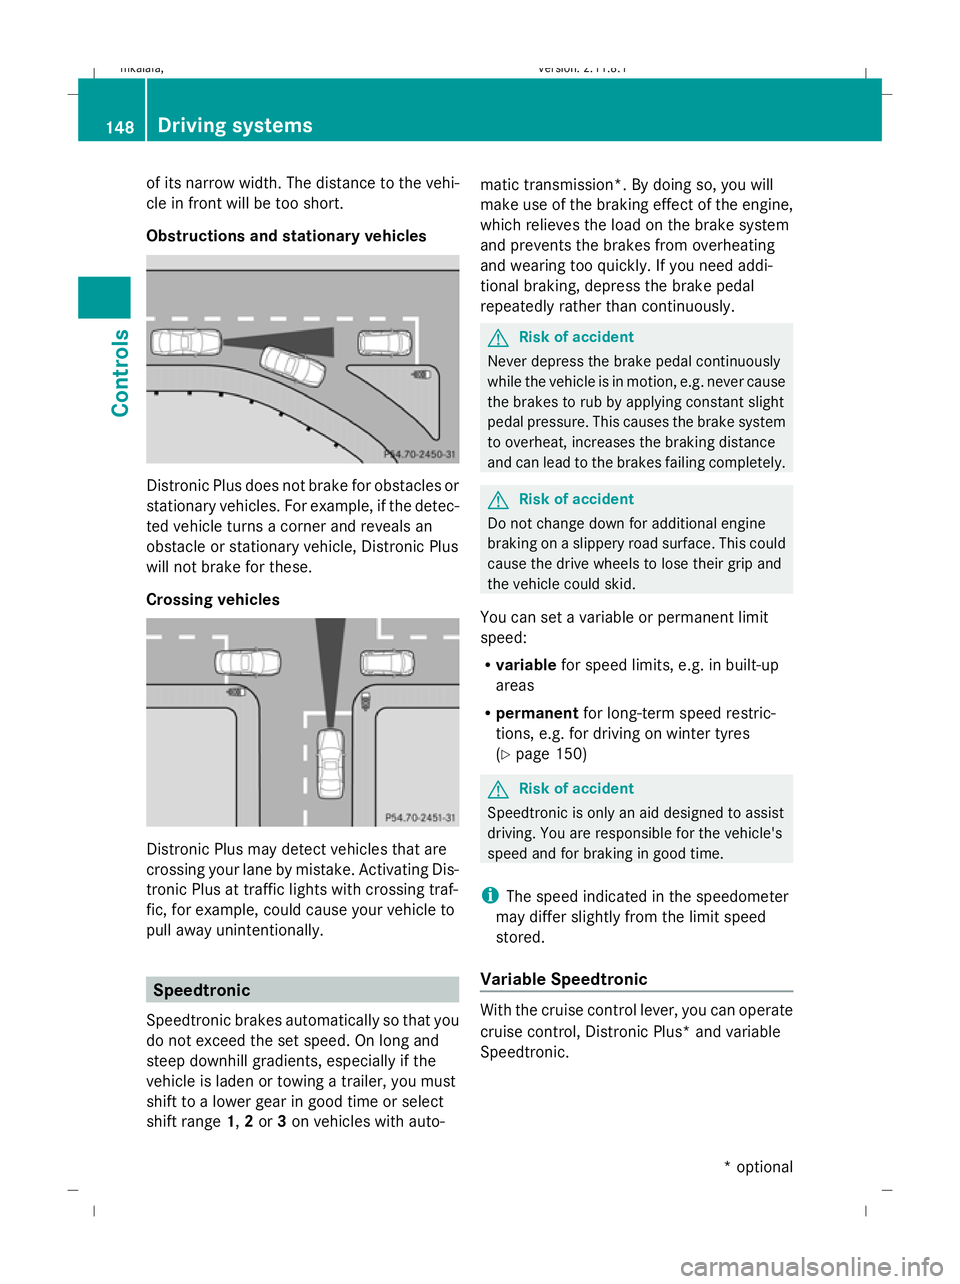
Obstructions and stationary vehicles Distronic Plus does not brake for obstacles or
stationary vehicles. For example, if the detec-
ted vehicle turns a corner and reveals an
obstacle or stationary vehicle, Distronic Plus
will not brake for these.
Crossing vehicles Distronic Plus may detect vehicles that are
crossing your lane by mistake. Activating Dis-
tronic Plus at traffic lights with crossing traf-
fic, for example, could cause your vehicle to
pull away unintentionally. Speedtronic
Speedtronic brakes automatically so that you
do not exceed the set speed. On long and
steep downhill gradients, especially if the
vehicle is laden or towing a trailer, you must
shift to a lower gear in good time or select
shift range 1,2or 3on vehicles with auto- matic transmission*. By doing so, you will
make use of the braking effect of the engine,
which relieves the load on the brake system
and prevents the brakes from overheating
and wearing too quickly. If you need addi-
tional braking, depress the brake pedal
repeatedly rather than continuously. G
Risk of accident
Never depress the brake pedal continuously
while the vehicle is in motion, e.g. never cause
the brakes to rub by applying constant slight
pedal pressure. This causes the brake system
to overheat, increases the braking distance
and can lead to the brakes failing completely. G
Risk of accident
Do not change down for additional engine
braking on a slippery road surface. This could
cause the drive wheels to lose their grip and
the vehicle could skid.
You can set a variable or permanent limit
speed:
R variable for speed limits, e.g. in built-up
areas
R permanent for long-term speed restric-
tions, e.g. for driving on winter tyres
(Y page 150) G
Risk of accident
Speedtronic is only an aid designed to assist
driving. You are responsible for the vehicle's
speed and for braking in good time.
i The speed indicated in the speedometer
may differ slightly from the limit speed
stored.
Variable Speedtronic With the cruise control lever, you can operate
cruise control, Distronic Plus* and variable
Speedtronic.148
Driving systemsControls
* optional
212_AKB; 2; 4, en-GB
mkalafa,
Version: 2.11.8.1 2009-05-05T14:17:16+02:00 - Seite 148
Dateiname: 6515346702_buchblock.pdf; erzeugt am 07. May 2009 14:16:20; WK
Page 156 of 373
message in the multi-function display goes
out. On vehicles with automatic transmis-
sion*, you can also select
P. This deactivates
the HOLD function. RACE START (E 63 AMG)
RACE START enables optimal acceleration
from a standing start with suitable high-grip
road surface conditions. G
Risk of accident
RACE START is only available when ESP ®
Sports mode is activated. ESP ®
Sport stabil-
ises the vehicle in a limited manner if the vehi-
cle starts to skid or when a wheel is spinning.
RACE START should only be used on closed
off circuits. Always adapt your driving style to
suit the prevailing road and weather condi-
tions.
Conditions for activation RACE START can be activated when:
R
the doors are closed
R the engine is running and it has reached an
operating temperature of approximately
80 †. This is the case when the engine oil
temperature lamp in the multi-function dis-
play stops flashing.
R ESP ®
Sport is activated (Y page 62)
R the steering wheel is in the straight-ahead
position
R the vehicle is at rest and the brake pedal is
depressed (left foot)
R the transmission is in position DActivating RACE START X
Depress the brake pedal with your left foot,
and keep it depressed.
X Turn the program selector switch clock-
wise (Y page 116), until the RSlamp lights
up.
The multi-function display shows the RACE
START Confirm: Paddle UP Cancel:
Paddle DOWN message.
i If the conditions for activation are no lon-
ger fulfilled, RACE START is cancelled. The
multi-function display shows the RACE
START cancelled message.
X To cancel: pull the left paddle
(Y page 114).
or
X To confirm: pull the right paddle
(Y page 114).
The multi-function display shows the RACE
START available Depress accelera‐
tor message.
i If you do not depress the accelerator
pedal fully within two seconds, RACE
START is cancelled. The multi-function dis-
play shows the RACE START not possi‐
ble See Owner's Manual message.
X Depress the accelerator pedal fully.
The engine speed rises to approximately
4,000 rpm.
The multi-function display shows the RACE
START Release brake to start mes-
sage.
i If you do not release the brake pedal
within seven seconds, RACE START is can-
celled. The multi-function display shows
the RACE START cancelled message.
X Take your foot off the brake, but keep the
accelerator pedal depressed.
The vehicle pulls away at maximum accel-
eration.
The multi-function display shows the RACE
START active message. Driving systems
153Controls
* optional
212_AKB; 2; 4, en-GB
mkalafa,
Version: 2.11.8.1 2009-05-05T14:17:16+02:00 - Seite 153 Z
Dateiname: 6515346702_buchblock.pdf; erzeugt am 07. May 2009 14:16:21; WK
Page 161 of 373

Front sensors
Centre Approximately 100 cm
Corners Approximately 60 cm
Rear sensors
Centre Approximately 120 cm
Corners Approximately 80 cm
!
When parking, pay particular attention to
objects above or below the sensors, such
as flower pots or trailer towbars. PARK-
TRONIC does not detect such objects when
they are in the immediate vicinity of the
vehicle. You could damage the vehicle or
the objects.
Ultrasonic sources such as an automatic
car wash, a lorry's compressed-air brakes
or a pneumatic drill could cause PARK-
TRONIC to malfunction.
Minimum distance Centre Approximately 20 cm
Corners Approximately 15 cm
If there is an obstacle within this range, all
warning displays light up and a tone sounds.
If the distance falls below the minimum clear-
ance, it may no longer be shown.
Warning displays
The warning displays show the distance
between the sensors and the obstacle. The
warning display for the front area is located
on the dashboard above the centre air vents.
The warning display for the rear area is loca-
ted on the roof lining in the rear compart-
ment. Warning display for front area
:
Left-hand side of the vehicle
; Right-hand side of the vehicle
= Indicator segments
The warning display for each side of the vehi-
cle is divided into five yellow and two red seg-
ments. PARKTRONIC is operational if yellow
indicator segments =light up.
The gear lever position or, in the case of auto-
matic transmission*, the selector lever posi-
tion determines which warning display is
active when the engine is running:
Manual transmission: Selector lever
position Warning display
Forwards gear
or
Neutral
Front area activated
Reverse gear
Rear and front areas
activated
Automatic transmission*:
Selector lever
position Warning display
D
Front area activated
R
or N Rear and front areas
activated
P
No areas activated158
Driving systemsControls
* optional
212_AKB; 2; 4, en-GB
mkalafa
,V ersion: 2.11.8.1
2009-05-05T14:17:16+02:00 - Seite 158
Dateiname: 6515346702_buchblock.pdf; erzeugt am 07. May 2009 14:16:23; WK
Page 199 of 373
Folding the rear seat backrest back
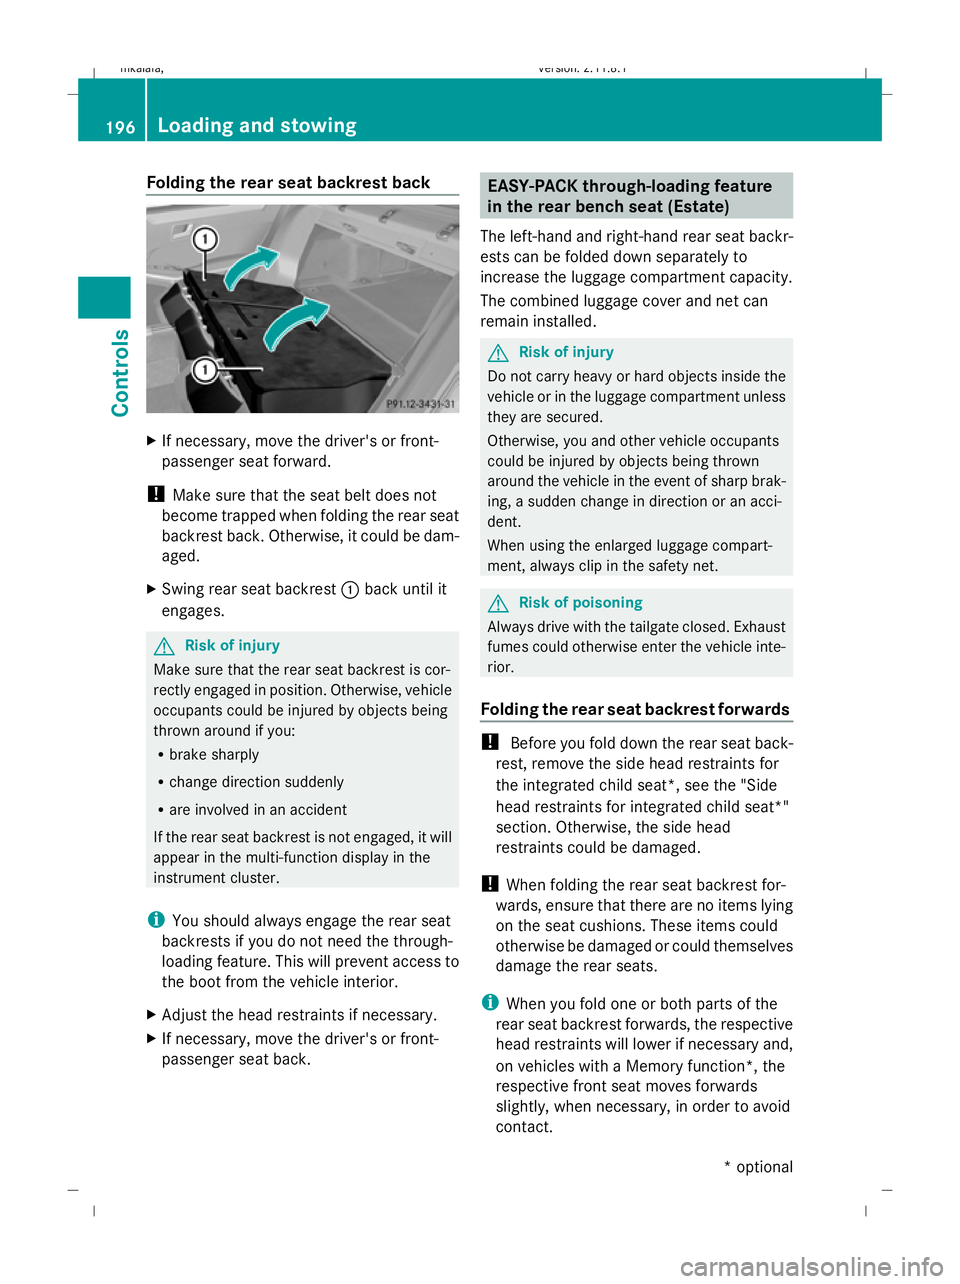
X
If necessary, move the driver's or front-
passenger seat forward.
! Make sure that the seat belt does not
become trapped when folding the rear seat
backrest back. Otherwise, it could be dam-
aged.
X Swing rear seat backrest :back until it
engages. G
Risk of injury
Make sure that the rear seat backrest is cor-
rectly engaged in position. Otherwise, vehicle
occupants could be injured by objects being
thrown around if you:
R brake sharply
R change direction suddenly
R are involved in an accident
If the rear seat backrest is not engaged, it will
appear in the multi-function display in the
instrument cluster.
i You should always engage the rear seat
backrests if you do not need the through-
loading feature. This will prevent access to
the boot from the vehicle interior.
X Adjust the head restraints if necessary.
X If necessary, move the driver's or front-
passenger seat back. EASY-PACK through-loading feature
in the rear bench seat (Estate)
The left-hand and right-hand rear seat backr-
ests can be folded down separately to
increase the luggage compartment capacity.
The combined luggage cover and net can
remain installed. G
Risk of injury
Do not carry heavy or hard objects inside the
vehicle or in the luggage compartment unless
they are secured.
Otherwise, you and other vehicle occupants
could be injured by objects being thrown
around the vehicle in the event of sharp brak-
ing, a sudden change in direction or an acci-
dent.
When using the enlarged luggage compart-
ment, always clip in the safety net. G
Risk of poisoning
Always drive with the tailgate closed. Exhaust
fumes could otherwise enter the vehicle inte-
rior.
Folding the rear seat backrest forwards !
Before you fold down the rear seat back-
rest, remove the side head restraints for
the integrated child seat*, see the "Side
head restraints for integrated child seat*"
section. Otherwise, the side head
restraints could be damaged.
! When folding the rear seat backrest for-
wards, ensure that there are no items lying
on the seat cushions. These items could
otherwise be damaged or could themselves
damage the rear seats.
i When you fold one or both parts of the
rear seat backrest forwards, the respective
head restraints will lower if necessary and,
on vehicles with a Memory function*, the
respective front seat moves forwards
slightly, when necessary, in order to avoid
contact. 196
Loading and stowingCont
rols
* optional
212_AKB; 2; 4, en-GB
mkalafa
,V ersion: 2.11.8.1
2009-05-05T14:17:16+02:00 - Seite 196
Dateiname: 6515346702_buchblock.pdf; erzeugt am 07. May 2009 14:16:40; WK
Page 201 of 373
Otherwise, vehicle occupants could be
injured by objects being thrown around if you:
R brake sharply
R change direction suddenly
R are involved in an accident
Please observe the loading guidelines.
Observe the following points or guidelines
when securing loads:
R secure the load using the lashing eyelets.
R do not use elastic straps or nets to secure
a load, as these are only intended as an
anti-slip protection for light loads.
R do not route lashing materials across sharp
edges or corners.
R pad sharp edges for protection.
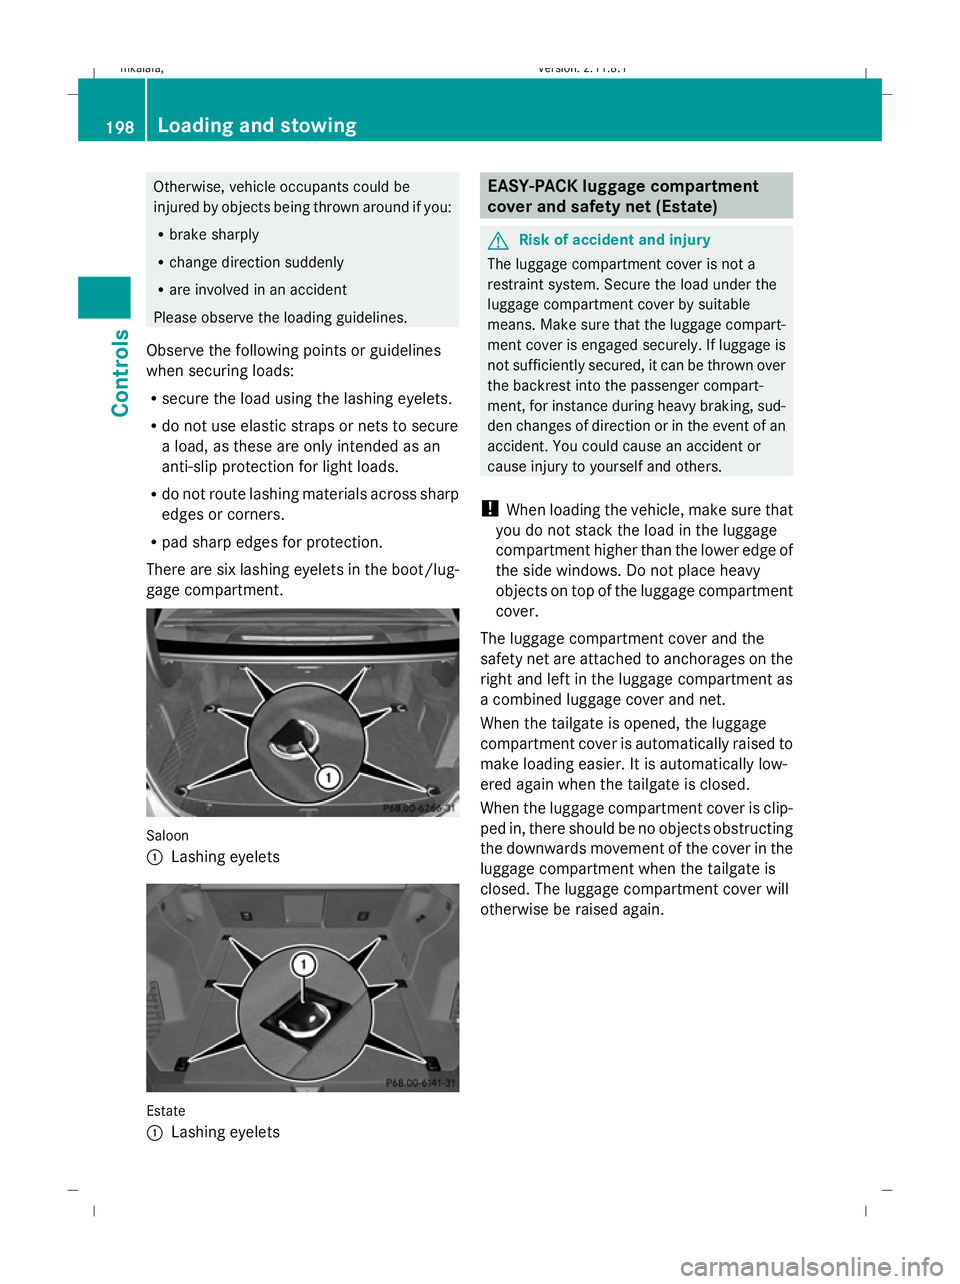
There are six lashing eyelets in the boot/lug-
gage compartment. Saloon
:
Lashing eyelets Estate
:
Lashing eyelets EASY-PACK luggage compartment
cover and safety net (Estate)
G
Risk of accident and injury
The luggage compartment cover is not a
restraint system. Secure the load under the
luggage compartment cover by suitable
means. Make sure that the luggage compart-
ment cover is engaged securely. If luggage is
not sufficiently secured, it can be thrown over
the backrest into the passenger compart-
ment, for instance during heavy braking, sud-
den changes of direction or in the event of an
accident. You could cause an accident or
cause injury to yourself and others.
! When loading the vehicle, make sure that
you do not stack the load in the luggage
compartment higher than the lower edge of
the side windows. Do not place heavy
objects on top of the luggage compartment
cover.
The luggage compartment cover and the
safety net are attached to anchorages on the
right and left in the luggage compartment as
a combined luggage cover and net.
When the tailgate is opened, the luggage
compartment cover is automatically raised to
make loading easier. It is automatically low-
ered again when the tailgate is closed.
When the luggage compartment cover is clip-
ped in, there should be no objects obstructing
the downwards movement of the cover in the
luggage compartment when the tailgate is
closed. The luggage compartment cover will
otherwise be raised again. 198
Loading and stowingControls
212_AKB; 2; 4, en-GB
mkalafa,
Version: 2.11.8.1 2009-05-05T14:17:16+02:00 - Seite 198
Dateiname: 6515346702_buchblock.pdf; erzeugt am 07. May 2009 14:16:42; WK
Page 206 of 373
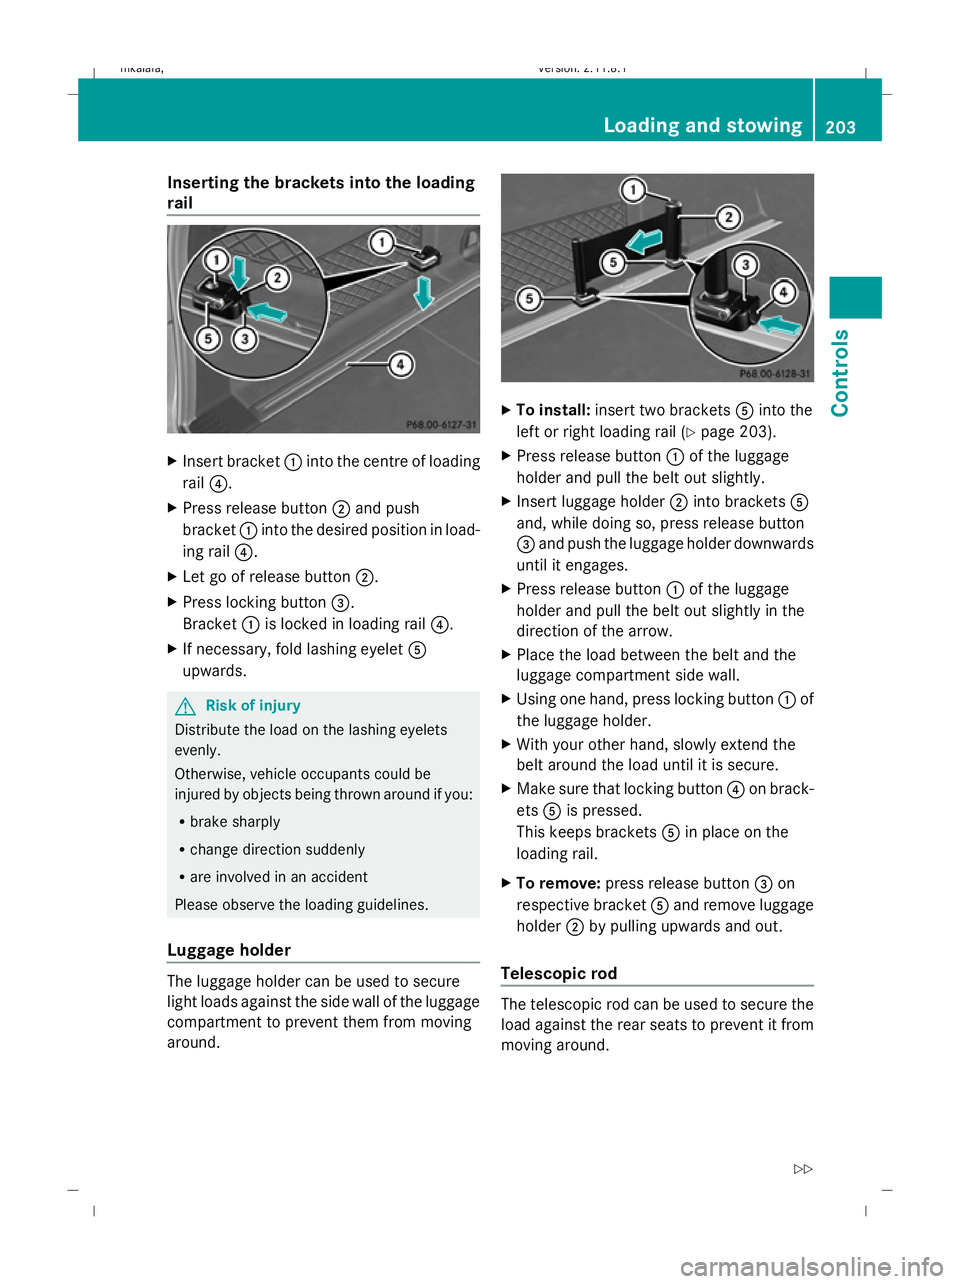
Inserting the brackets into the loading
rail X
Insert bracket :into the centre of loading
rail ?.
X Press release button ;and push
bracket :into the desired position in load-
ing rail ?.
X Let go of release button ;.
X Press locking button =.
Bracket :is locked in loading rail ?.
X If necessary, fold lashing eyelet A
upwards. G
Risk of injury
Distribute the load on the lashing eyelets
evenly.
Otherwise, vehicle occupants could be
injured by objects being thrown around if you:
R brake sharply
R change direction suddenly
R are involved in an accident
Please observe the loading guidelines.
Luggage holder The luggage holder can be used to secure
light loads against the side wall of the luggage
compartment to prevent them from moving
around. X
To install: insert two brackets Ainto the
left or right loading rail (Y page 203).
X Press release button :of the luggage
holder and pull the belt out slightly.
X Insert luggage holder ;into brackets A
and, while doing so, press release button
= and push the luggage holder downwards
until it engages.
X Press release button :of the luggage
holder and pull the belt out slightly in the
direction of the arrow.
X Place the load between the belt and the
luggage compartment side wall.
X Using one hand, press locking button :of
the luggage holder.
X With your other hand, slowly extend the
belt around the load until it is secure.
X Make sure that locking button ?on brack-
ets Ais pressed.
This keeps brackets Ain place on the
loading rail.
X To remove: press release button =on
respective bracket Aand remove luggage
holder ;by pulling upwards and out.
Telescopic rod The telescopic rod can be used to secure the
load against the rear seats to prevent it from
moving around. Loading and stowing
203Controls
212_AKB; 2; 4, en-GB
mkalafa,V ersion: 2.11.8.1
2009-05-05T14:17:16+02:00 - Seite 203 Z
Dateiname: 6515346702_buchblock.pdf; erzeugt am 07. May 2009 14:16:46; WK
Page 235 of 373
Heavy and light loads
If the brakes have been subjected to a heavy
load, do not stop the vehicle immediately, but
drive on for a short while. This allows the air-
flow to cool the brakes more quickly. G
Risk of accident
Never depress the brake pedal continuously
while the vehicle is in motion, e.g. never cause
the brakes to rub by applying constant slight
pedal pressure. This causes the brake system
to overheat, increases the braking distance
and can lead to the brakes failing completely.
If the brakes have been used only moderately,
you should occasionally test their effective-
ness. To do this, brake more firmly from a
higher speed. This improves the grip of the
brakes.
Wet roads If driving in heavy rain for a prolonged period
of time without braking, there may be a
delayed reaction from the brakes when brak-
ing for the first time. You must brake harder.
You must therefore maintain a greater dis-
tance from the vehicle in front.
After driving on a wet surface, brake firmly
while paying attention to the traffic condi-
tions. This way the brake discs will become
warm, drying more quickly, which will protect
them against corrosion.
Limited braking performance on salt
treated roads G
Risk of accident
The layer of salt on the brake discs and the
brake pads/linings may cause a delay in the
braking effect, resulting in a significantly lon-
ger braking distance, which could lead to an
accident.
To avoid this danger, you should:
R occasionally brake carefully, without put-
ting other road users at risk, when you are
driving on salted roads. This helps to remove any salt that may have started to
build up on the brake discs and the brake
pads/linings.
R maintain a greater distance to the vehicle
ahead and drive with particular care.
R carefully apply the brakes at the end of a
trip and immediately after commencing a
new trip, so that salt residues are removed
from the brake disc.
New brake pads/linings For safety reasons, Mercedes-Benz recom-
mends that you only have brake pads/linings
fitted to your vehicle which have been
approved for Mercedes-Benz vehicles or
which correspond to an equivalent quality
standard. Brake pads/linings which have not
been approved for Mercedes-Benz vehicles or
which are not of an equivalent quality could
affect your vehicle's operating safety.
G
Risk of accident
New brake pads/linings only reach their opti-
mum braking effect after several hundred kil-
ometres of driving. Before this optimum brak-
ing effect is reached, you should compensate
for the reduced braking effect by applying
greater pressure when braking. This also
applies after the brake discs or the brake
pads/linings have been replaced.
High-performance brake system for
AMG vehicles The high-performance brake system is
designed for heavy loads. Braking can there-
fore cause noises. This will depend on:
R
speed
R braking force
R environmental conditions, such as temper-
ature and humidity
The wear of individual components of the
brake system, such as the brake pads/linings
or brake discs, depends on the individual driv-
ing style and operating conditions. 232
Driving tipsOperation
212_AKB; 2; 4, en-GB
mkalafa,
Version: 2.11.8.1 2009-05-05T14:17:16+02:00 - Seite 232
Dateiname: 6515346702_buchblock.pdf; erzeugt am 07. May 2009 14:16:58; WK