2009 MERCEDES-BENZ E-CLASS SALOON heating
[x] Cancel search: heatingPage 139 of 373
X
Press the :or9 button to select
one of the three departure times or Timer
off (no timer active).
X Press the abutton to confirm.
When a departure time is selected, the yel-
low indicator lamp lights up on the auxiliary
heating button.
Changing the departure time
X Press the =or; button to select the
Settings menu.
X Press the :or9 button to select the
Heating submenu.
X Press the abutton to confirm.
You will see the selected setting.
X Press the abutton to confirm.
X Press the :or9 button to select
Change A, Bor C.
X Press the abutton to confirm.
You can now change the departure time.
X Press the =or; button to select the
display to be changed: hours, minutes.
X Press the :or9 button to set the
selected display.
X Press the abutton to store the entry.
The yellow indicator lamp on the auxiliary
heating button lights up.
Convenience Activating/deactivating the EASY-
ENTRY/EXIT feature*
You can use the
Easy Entry/Exit: function
to activate or deactivate the easy-entry/exit
feature (Y page 85). G
Risk of injury
The steering wheel moves when the EASY-
ENTRY/EXIT feature is active. There is a risk
of occupants becoming trapped. Before acti-
vating the EASY-ENTRY/EXIT feature, make
sure that nobody can become trapped.
Do not leave children unsupervised in the
vehicle, even if they are secured in a child restraint system. The children could open the
driver's door and thereby unintentionally acti-
vate the EASY-ENTRY/EXIT feature and
become trapped.
X Press the =or; button on the steer-
ing wheel to select the Settingsmenu.
X Press the :or9 button to select the
Convenience submenu.
X Press the abutton to confirm.
X Press the :or9 button to select the
Easy Entry/Exit: function.
You will see the selected setting: onor
off.
X Press the abutton to save the setting.
Switching the belt adjustment on/off
X Press the =or; button on the steer-
ing wheel to select the Settingsmenu.
X Press the :or9 button to select the
Convenience submenu.
X Press the abutton to confirm.
X Press the :or9 button to select the
Belt adjustment: function.
You will see the selected setting: onor
off.
X Press the abutton to save the setting.
Switching the fold in mirrors when lock-
ing* function on/off
If you switch on the Fold mirrors in when
locking: function, the exterior mirrors fold
in when you lock the vehicle. When you
unlock the vehicle and then open the driver's
or front-passenger door, the exterior mirrors
fold out again.
If you have switched the function on and you
fold the exterior mirrors in using the button
on the door (Y page 86), they will not fold out
automatically. The exterior mirrors can then
only be folded out using the button on the
door. 136
On-board computerControls
* optional
212_AKB; 2; 4, en-GB
mkalafa,
Version: 2.11.8.1 2009-05-05T14:17:16+02:00 - Seite 136
Dateiname: 6515346702_buchblock.pdf; erzeugt am 07. May 2009 14:16:16; WK
Page 141 of 373
Brake* are described in the "Driving safety
systems" section (Y page 58). Cruise control
Cruise control maintains a constant road
speed for you. It brakes automatically in order
to avoid exceeding the set speed. On long and
steep downhill gradients, especially if the
vehicle is laden or towing a trailer, you must
shift to a lower gear in good time or select
shift range 1,2or 3on vehicles with auto-
matic transmission*. By doing so, you will
make use of the braking effect of the engine,
which relieves the load on the brake system
and prevents the brakes from overheating
and wearing too quickly. G
Risk of accident
Do not change down for additional engine
braking on a slippery road surface. This could
cause the drive wheels to lose their grip and
the vehicle could skid.
Use cruise control only if road and traffic con-
ditions make it appropriate to maintain a
steady speed for a prolonged period. You can
store any road speed above 30 km/h. G
Risk of accident
Cruise control cannot take account of road
and traffic conditions.
Always pay attention to traffic conditions
even when cruise control is activated.
Cruise control is only an aid designed to assist
driving. You are responsible for the vehicle's
speed and for braking in good time. G
Risk of accident
Do not use cruise control:
R in road and traffic conditions which do not
allow you to maintain a constant speed (e.g. heavy traffic or winding roads). You could
otherwise cause an accident.
R on slippery roads. Braking or accelerating
could cause the drive wheels to lose trac-
tion and the vehicle could then skid.
R when there is poor visibility, e.g. due to fog,
heavy rain or snow
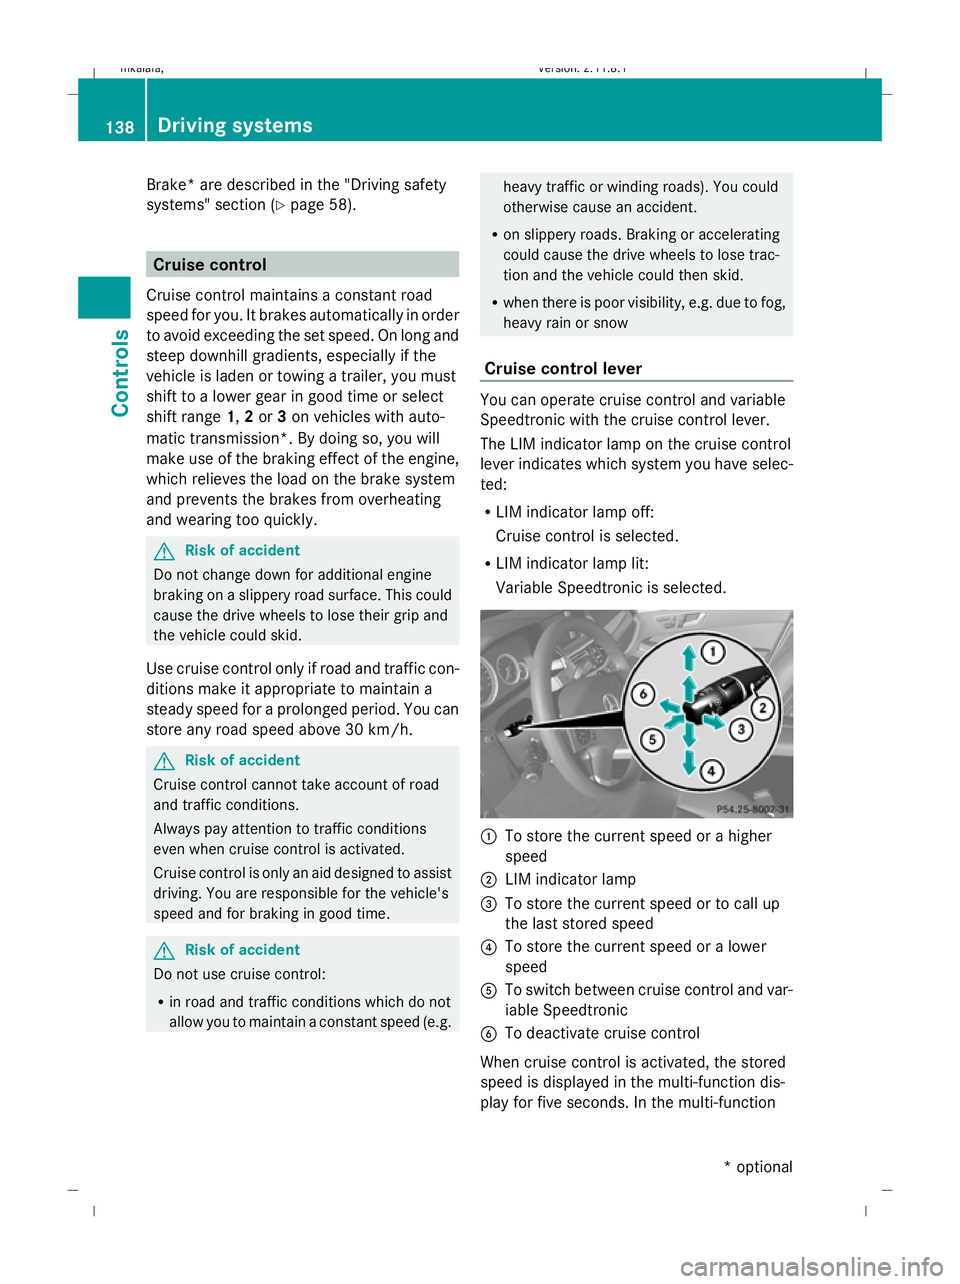
Cruise control lever You can operate cruise control and variable
Speedtronic with the cruise control lever.
The LIM indicator lamp on the cruise control
lever indicates which system you have selec-
ted:
R LIM indicator lamp off:
Cruise control is selected.
R LIM indicator lamp lit:
Variable Speedtronic is selected. :
To store the current speed or a higher
speed
; LIM indicator lamp
= To store the current speed or to call up
the last stored speed
? To store the current speed or a lower
speed
A To switch between cruise control and var-
iable Speedtronic
B To deactivate cruise control
When cruise control is activated, the stored
speed is displayed in the multi-function dis-
play for five seconds. In the multi-function 138
Driving systemsControls
* optional
212_AKB; 2; 4, en-GB
mkalafa
,V ersion: 2.11.8.1
2009-05-05T14:17:16+02:00 - Seite 138
Dateiname: 6515346702_buchblock.pdf; erzeugt am 07. May 2009 14:16:17; WK
Page 143 of 373
Adjustment in 10 km/h increments
X
Briefly press the cruise control lever
beyond the pressure point, up :for a
higher speed or down ?for a lower speed.
The last speed stored is increased or
reduced.
Deactivating cruise control There are several ways to deactivate cruise
control:
X
Briefly press the cruise control lever for-
wards B.
or
X Brake.
or
X Briefly press the cruise control lever in the
direction of arrow A.
Variable Speedtronic is selected. LIM indi-
cator lamp ;in the cruise control lever
lights up.
Cruise control is automatically deactivated if:
R you depress the parking brake.
R you drive at less than 30 km/h
R ESP ®
intervenes or you deactivate ESP ®
R you change into neutral in a vehicle with
manual transmission while driving or if the
clutch is depressed for longer than 6 sec-
onds
R on vehicles with manual transmission, you
shift to a higher gear and as a result the
engine speed is too low
R you move the selector lever to Non vehi-
cles with automatic transmission* while
driving
If cruise control is deactivated, you will hear
a warning tone. You see the Cruise con‐
trol off message in the multi-function dis-
play for approximately five seconds.
i The last speed stored is cleared when you
switch off the engine. Distronic Plus*
i Distronic Plus is not available in all coun-
tries.
Distronic Plus regulates the speed and auto-
matically maintains the distance to the vehi-
cle in front. It brakes automatically in order
to avoid exceeding the set speed. On long and
steep downhill gradients, especially if the
vehicle is laden or towing a trailer, you must
select shift range 1,2or 3in good time. By
doing so, you will make use of the braking
effect of the engine, which relieves the load
on the brake system and prevents the brakes
from overheating and wearing too quickly. G
Risk of accident
Do not change down for additional engine
braking on a slippery road surface. This could
cause the drive wheels to lose their grip and
the vehicle could skid. G
Risk of accident
Distronic Plus is only an aid designed to assist
driving. The driver is fully responsible for the
vehicle's distance from other vehicles, the
vehicle's speed and for braking in good time.
Distronic Plus does not react to:
R pedestrians
R stationary obstacles on the road, e.g. stop-
ped or parked vehicles
R oncoming and crossing traffic
Distronic Plus may not detect narrow vehicles
driving in front, e.g. motorcycles, or vehicles
driving on a different line. Therefore, always
pay attention to traffic conditions even when
Distronic Plus is activated. Otherwise, you
may fail to recognise dangers in time, cause
an accident and injure yourself and others.
If a slower-moving vehicle is detected in front,
Distronic Plus causes your vehicle to brake
and maintain a preset distance to the vehicle
in front. 140
Driving systemsCont
rols
* optional
212_AKB; 2; 4, en-GB
mkalafa
,V ersion: 2.11.8.1
2009-05-05T14:17:16+02:00 - Seite 140
Dateiname: 6515346702_buchblock.pdf; erzeugt am 07. May 2009 14:16:17; WK
Page 151 of 373
of its narrow width. The distance to the vehi-
cle in front will be too short.
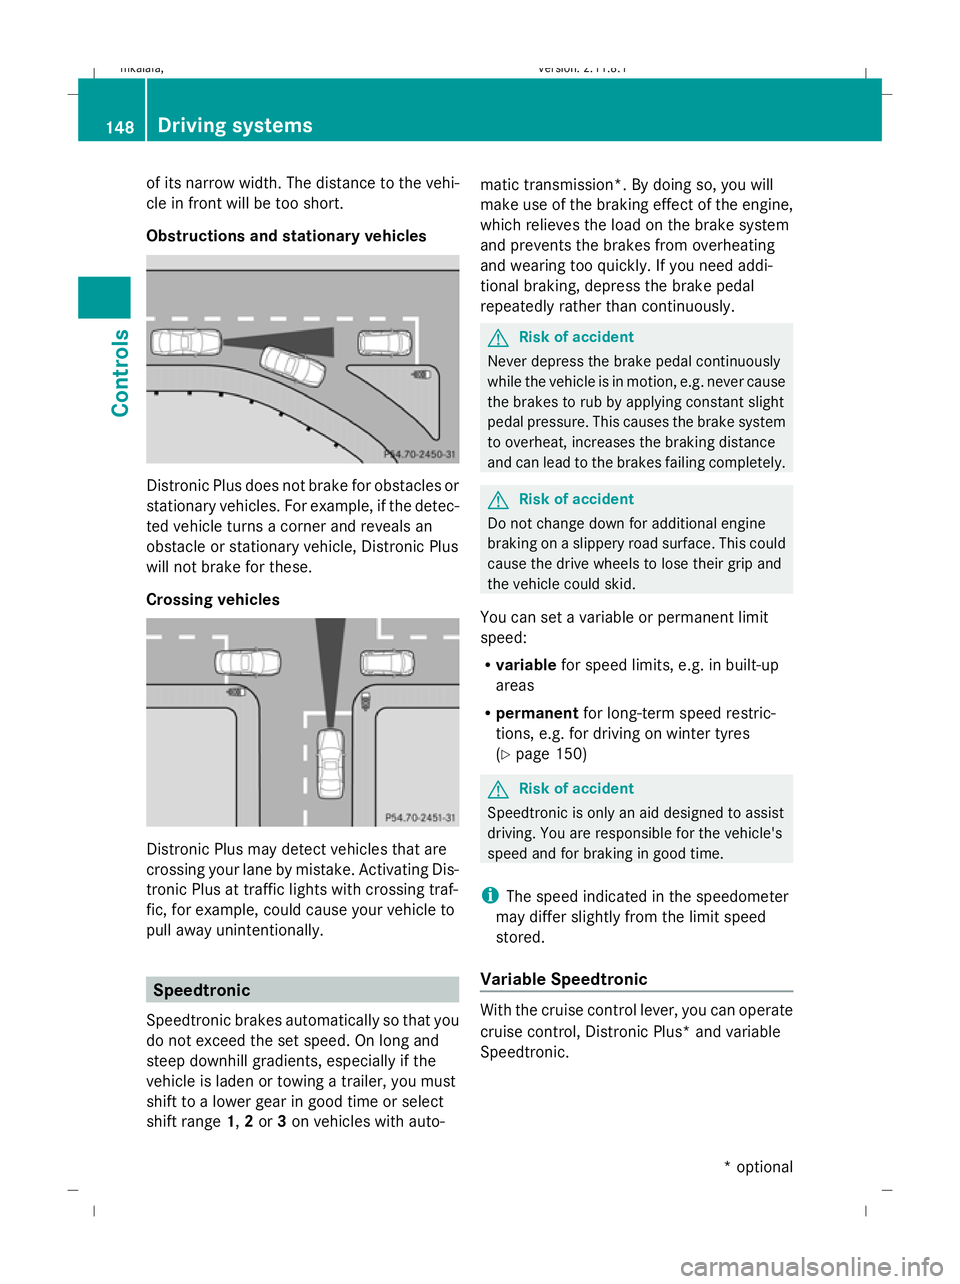
Obstructions and stationary vehicles Distronic Plus does not brake for obstacles or
stationary vehicles. For example, if the detec-
ted vehicle turns a corner and reveals an
obstacle or stationary vehicle, Distronic Plus
will not brake for these.
Crossing vehicles Distronic Plus may detect vehicles that are
crossing your lane by mistake. Activating Dis-
tronic Plus at traffic lights with crossing traf-
fic, for example, could cause your vehicle to
pull away unintentionally. Speedtronic
Speedtronic brakes automatically so that you
do not exceed the set speed. On long and
steep downhill gradients, especially if the
vehicle is laden or towing a trailer, you must
shift to a lower gear in good time or select
shift range 1,2or 3on vehicles with auto- matic transmission*. By doing so, you will
make use of the braking effect of the engine,
which relieves the load on the brake system
and prevents the brakes from overheating
and wearing too quickly. If you need addi-
tional braking, depress the brake pedal
repeatedly rather than continuously. G
Risk of accident
Never depress the brake pedal continuously
while the vehicle is in motion, e.g. never cause
the brakes to rub by applying constant slight
pedal pressure. This causes the brake system
to overheat, increases the braking distance
and can lead to the brakes failing completely. G
Risk of accident
Do not change down for additional engine
braking on a slippery road surface. This could
cause the drive wheels to lose their grip and
the vehicle could skid.
You can set a variable or permanent limit
speed:
R variable for speed limits, e.g. in built-up
areas
R permanent for long-term speed restric-
tions, e.g. for driving on winter tyres
(Y page 150) G
Risk of accident
Speedtronic is only an aid designed to assist
driving. You are responsible for the vehicle's
speed and for braking in good time.
i The speed indicated in the speedometer
may differ slightly from the limit speed
stored.
Variable Speedtronic With the cruise control lever, you can operate
cruise control, Distronic Plus* and variable
Speedtronic.148
Driving systemsControls
* optional
212_AKB; 2; 4, en-GB
mkalafa,
Version: 2.11.8.1 2009-05-05T14:17:16+02:00 - Seite 148
Dateiname: 6515346702_buchblock.pdf; erzeugt am 07. May 2009 14:16:20; WK
Page 174 of 373
X
Activate Lane Keeping Assist using the on-
board computer (Y page 130).
Symbol :appears. Air conditioning
Overview of air-conditioning systems
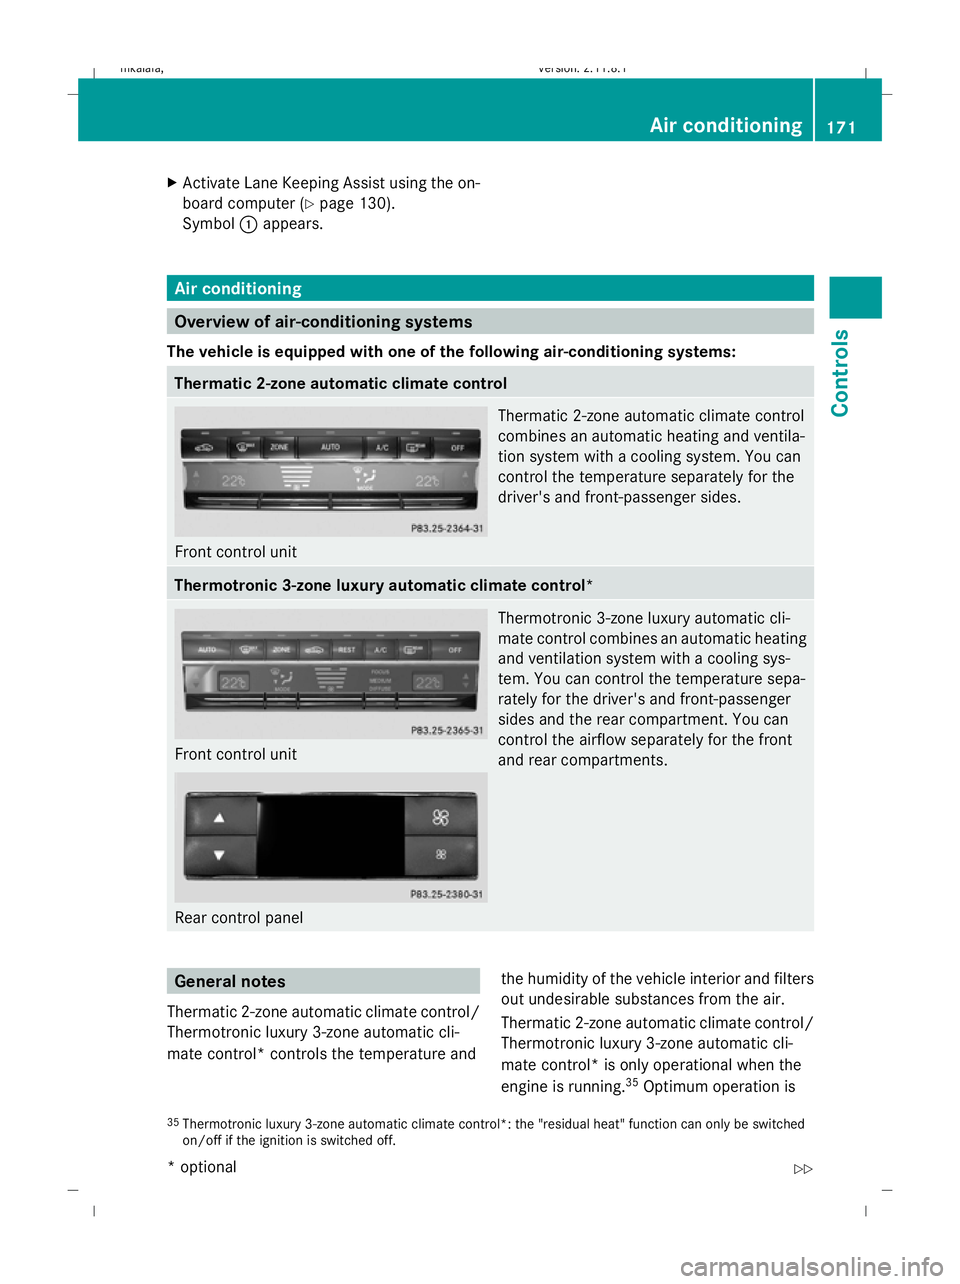
The vehicle is equipped with one of the following air-conditioning systems: Thermatic 2-zone automatic climate control
Front control unit Thermatic 2-zone automatic climate control
combines an automatic heating and ventila-
tion system with a cooling system. You can
control the temperature separately for the
driver's and front-passenger sides. Thermotronic 3-zone luxury automatic climate control*
Front control unit
Rear control panel Thermotronic 3-zone luxury automatic cli-
mate control combines an automatic heating
and ventilation system with a cooling sys-
tem. You can control the temperature sepa-
rately for the driver's and front-passenger
sides and the rear compartment. You can
control the airflow separately for the front
and rear compartments. General notes
Thermatic 2-zone automatic climate control/
Thermotronic luxury 3-zone automatic cli-
mate control* controls the temperature and the humidity of the vehicle interior and filters
out undesirable substances from the air.
Thermatic 2-zone automatic climate control/
Thermotronic luxury 3-zone automatic cli-
mate control* is only operational when the
engine is running. 35
Optimum operation is
35 Thermotronic luxury 3-zone automatic climate control*: the "residual heat" function can only be switched
on/off if the ignition is switched off. Air conditioning
171Controls
* optional
212_AKB; 2; 4, en-GB
mkalafa,
Version: 2.11.8.1 2009-05-05T14:17:16+02:00 - Seite 171 Z
Dateiname: 6515346702_buchblock.pdf; erzeugt am 07. May 2009 14:16:28; WK
Page 175 of 373
only achieved when you drive with the side
windows and sliding/tilting sunroof*/pano-
rama sliding sunroof* closed.
i Ventilate the vehicle for a brief period
during warm weather, e.g. using the con-
venience opening feature (Y page 102).
This will speed up the cooling process and
the desired vehicle interior temperature
will be reached more quickly.
i The integrated filter can filter out most
particles of dust and completely filters out
pollen. A clogged filter reduces the amount of air supplied to the vehicle interior. For
this reason, you should always observe the
interval for replacing the filter, which is
specified in the Service Booklet. As it
depends on environmental conditions, e.g.
heavy air pollution, the interval may be
shorter than stated in the Service Booklet. G
Risk of accident
Observe the recommended settings on the
following pages. Otherwise, the windows
could mist up. This may prevent you from
observing the traffic conditions, thereby caus-
ing an accident. Overview of air-conditioning system functions
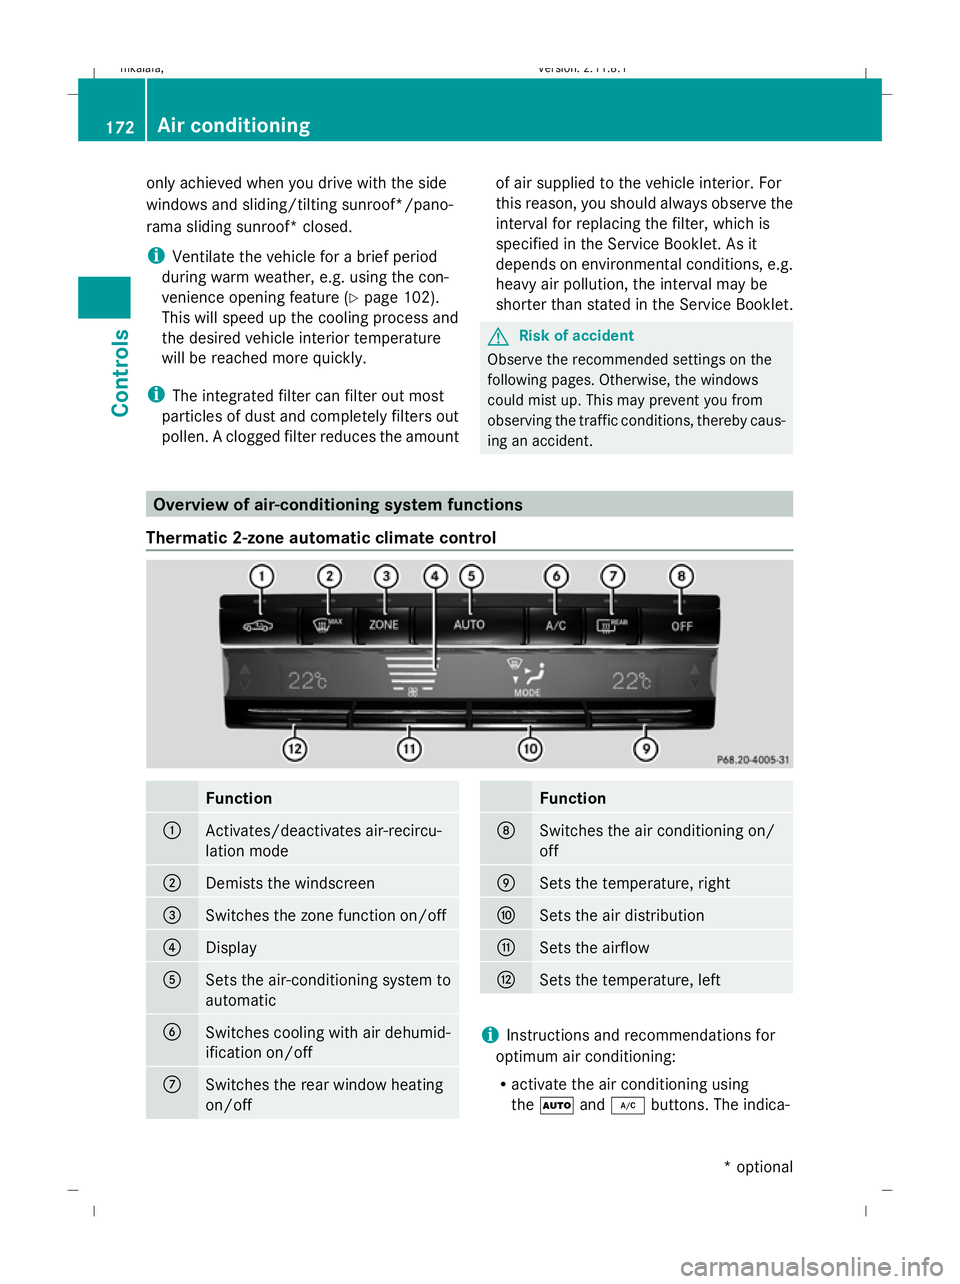
Thermatic 2-zone automatic climate control Function
:
Activates/deactivates air-recircu-
lation mode
;
Demists the windscreen
=
Switches the zone function on/off
?
Display
A
Sets the air-conditioning system to
automatic
B
Switches cooling with air dehumid-
ification on/off
C
Switches the rear window heating
on/off Function
D
Switches the air conditioning on/
off
E
Sets the temperature, right
F
Sets the air distribution
G
Sets the airflow
H
Sets the temperature, left
i
Instructions and recommendations for
optimum air conditioning:
R activate the air conditioning using
the à and¿ buttons. The indica- 172
Air conditioningControls
* optional
212_AKB; 2; 4, en-GB
mkalafa,
Version: 2.11.8.1 2009-05-05T14:17:16+02:00 - Seite 172
Dateiname: 6515346702_buchblock.pdf; erzeugt am 07. May 2009 14:16:28; WK
Page 176 of 373
tor lamps above the
Ãand¿ but-
tons come on.
R set the temperature to 22 †.
R only use the "demisting" function briefly,
until the windscreen is clear again.
R only use the "air-recirculation" mode
briefly, e.g. if there are unpleasant out-
side odours or when in a tunnel. Other- wise, the windows could mist up due to
a lack of fresh air.
R use the "ZONE" function to adopt the
temperature settings on the driver's side
for the front-passenger side as well. The
indicator lamp above the ábutton
goes out.
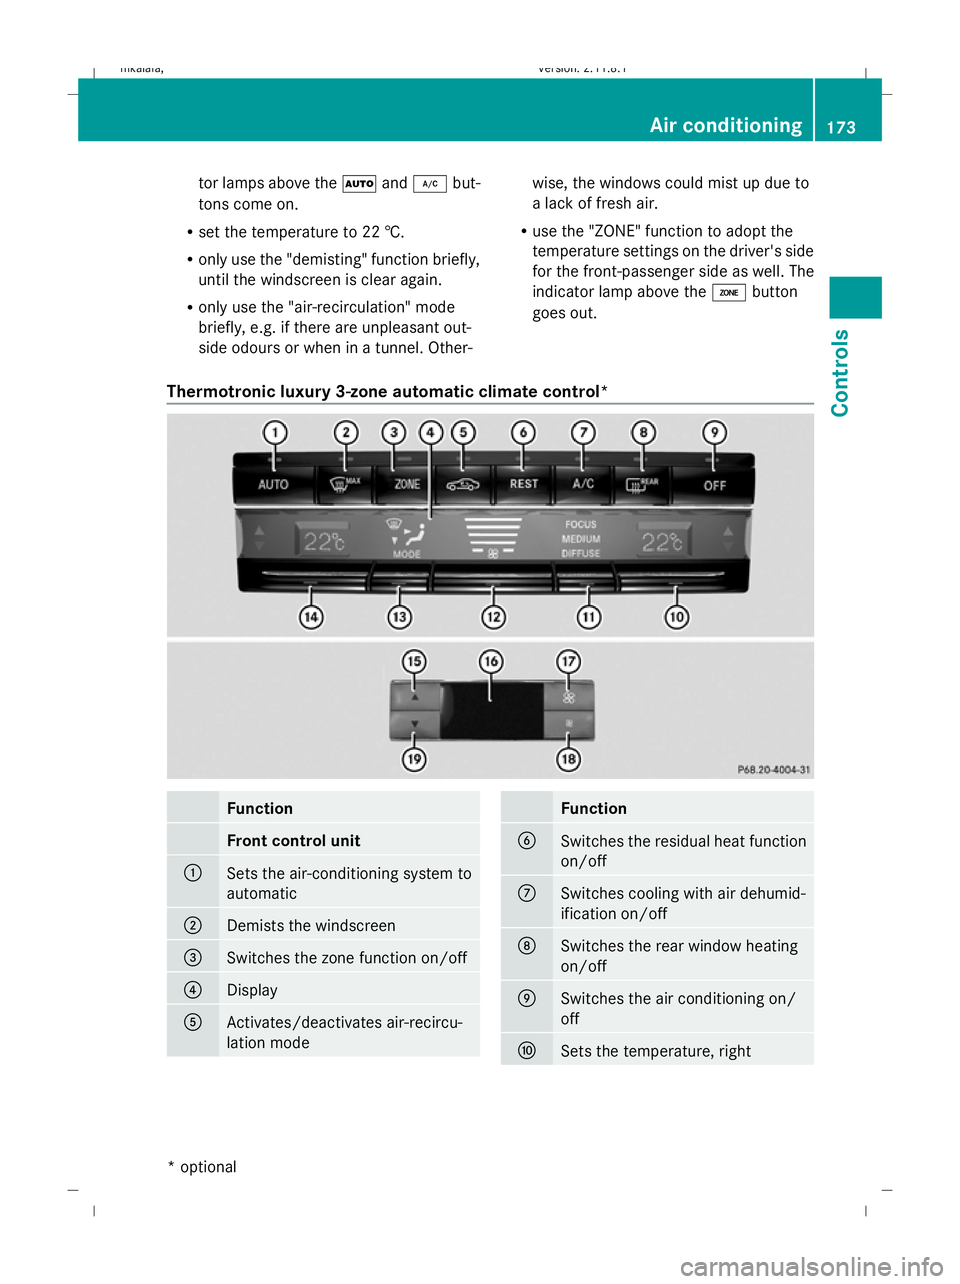
Thermotronic luxury 3-zone automatic climate control* Function
Front control unit
:
Sets the air-conditioning system to
automatic
;
Demists the windscreen
=
Switches the zone function on/off
?
Display
A
Activates/deactivates air-recircu-
lation mode Function
B
Switches the residual heat function
on/off
C
Switches cooling with air dehumid-
ification on/off
D
Switches the rear window heating
on/off
E
Switches the air conditioning on/
off
F
Sets the temperature, right Air conditioning
173Controls
* optional
212_AKB; 2; 4, en-GB
mkalafa
,V ersion: 2.11.8.1
2009-05-05T14:17:16+02:00 - Seite 173 Z
Dateiname: 6515346702_buchblock.pdf; erzeugt am 07. May 2009 14:16:29; WK
Page 182 of 373
Demisting the windscreen
i You should only select the "demisting"
function until the windscreen is clear again.
X Turn the key to position 2in the ignition
lock.
X To activate: press the¬button.
The indicator lamp above the ¬button
lights up.
The system automatically switches to the
following functions:
R cooling with air dehumidification on
R high airflow 37
R high temperature 37
R air distribution to the windscreen and
front side windows
R air-recirculation mode off
X To switch off: press the¬button.
The indicator lamp above the ¬button
goes out. The previously selected settings
come into effect again. The cooling with air
dehumidification function remains on. Air-
recirculation mode remains deactivated.
or
X Press the Ãbutton.
The indicator lamp above the ¬button
goes out. Airflow and air distribution are set
to automatic mode.
or
X Thermatic 2-zone automatic climate
control: press button EorH up or down
(Y page 172).
Thermotronic luxury 3-zone automatic
climate control*: press buttonForJ
up or down ( Ypage 173).
or
X Thermatic 2-zone automatic climate
control: press button Gup or down
(Y page 172). Thermotronic luxury 3-zone automatic
climate control*:
press buttonHup or
down (Y page 173). Demisting the windows
Windows misted up on the inside X
Activate the "cooling function with air dehu-
midification" function.
X Activate automatic mode.
X If the windows continue to mist up, activate
the demisting function.
i You should only select this setting until
the windscreen is clear again.
Windows misted up on the outside X
Activate the windscreen wipers.
X Thermatic 2-zone automatic climate
control: press button Fup or down
(Y page 172) until the PorO symbol
appears in the display.
X Thermotronic luxury 3-zone automatic
climate control*: press buttonIup or
down (Y page 173), until PorO
appears in the display.
i You should only select this setting until
the windscreen is clear again. Switching the rear window heating
on/off
G
Risk of accident
Make sure that all windows are clear of ice
and snow before starting a journey. This may
otherwise obstruct your view of the traffic
conditions, thereby causing an accident.
i The rear window heating has a high cur-
rent draw. You should therefore switch it
off as soon as the window is clear, as it only
37 Depending on the outside temperature. Air conditioning
179Controls
* optional
212_AKB; 2; 4, en-GB
mkalafa
,V ersion: 2.11.8.1
2009-05-05T14:17:16+02:00 - Seite 179 Z
Dateiname: 6515346702_buchblock.pdf; erzeugt am 07. May 2009 14:16:31; WK