2009 MERCEDES-BENZ E-CLASS SALOON lock
[x] Cancel search: lockPage 204 of 373
items sufficiently. This could result in injury to
yourself or others.
! The bag hook can bear a maximum load
of 3 kg. Do not use it to secure a load.
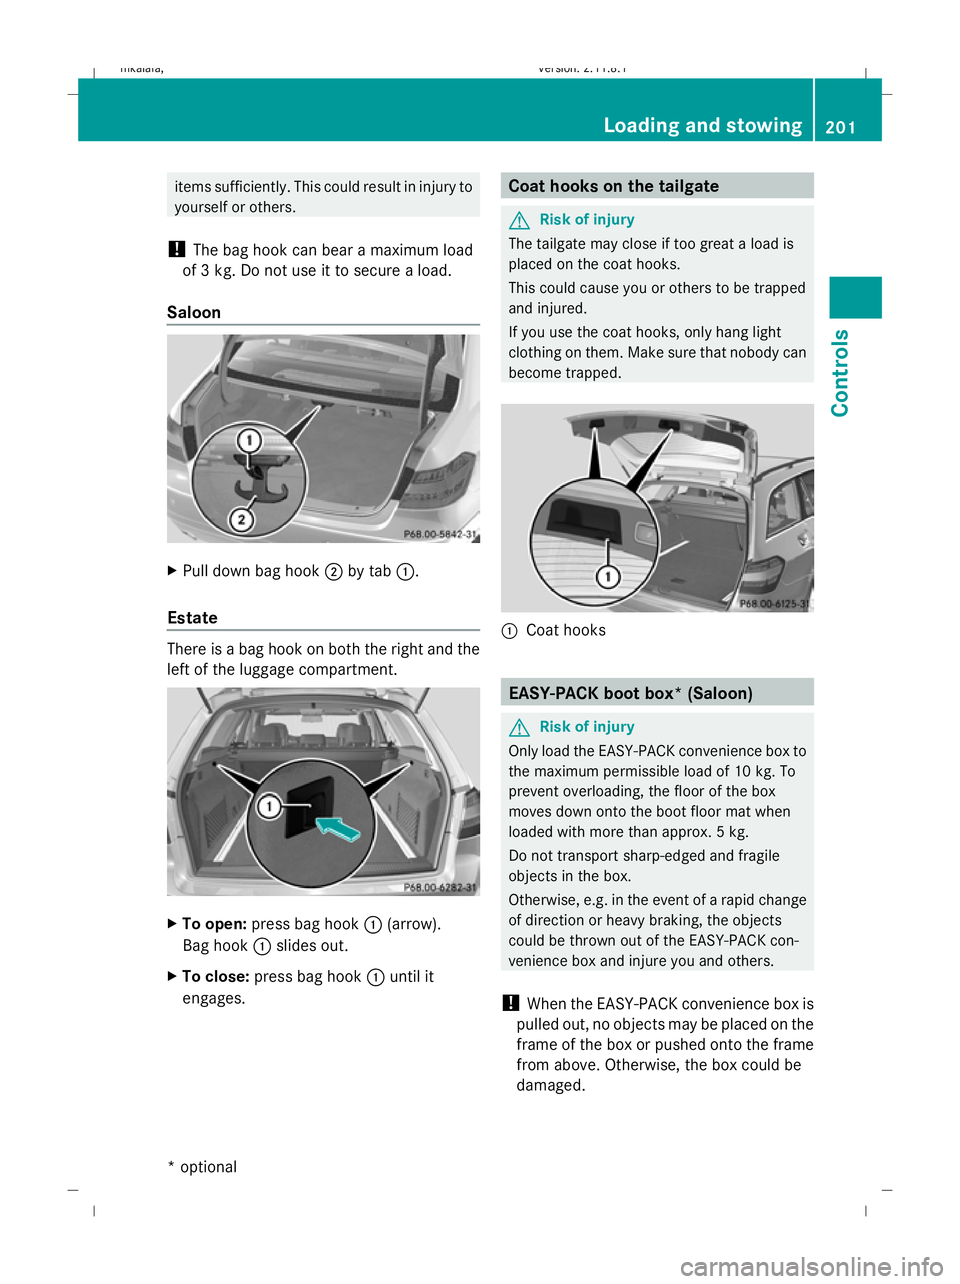
Saloon X
Pull down bag hook ;by tab :.
Estate There is a bag hook on both the right and the
left of the luggage compartment.
X
To open: press bag hook :(arrow).
Bag hook :slides out.
X To close: press bag hook :until it
engages. Coat hooks on the tailgate
G
Risk of injury
The tailgate may close if too great a load is
placed on the coat hooks.
This could cause you or others to be trapped
and injured.
If you use the coat hooks, only hang light
clothing on them. Make sure that nobody can
become trapped. :
Coat hooks EASY-PACK boot box* (Saloon)
G
Risk of injury
Only load the EASY-PACK convenience box to
the maximum permissible load of 10 kg. To
prevent overloading, the floor of the box
moves down onto the boot floor mat when
loaded with more than approx. 5 kg.
Do not transport sharp-edged and fragile
objects in the box.
Otherwise, e.g. in the event of a rapid change
of direction or heavy braking, the objects
could be thrown out of the EASY-PACK con-
venience box and injure you and others.
! When the EASY-PACK convenience box is
pulled out, no objects may be placed on the
frame of the box or pushed onto the frame
from above. Otherwise, the box could be
damaged. Loading and stowing
201Controls
* optional
212_AKB; 2; 4, en-GB
mkalafa,
Version: 2.11.8.1 2009-05-05T14:17:16+02:00 - Seite 201 Z
Dateiname: 6515346702_buchblock.pdf; erzeugt am 07. May 2009 14:16:45; WK
Page 205 of 373
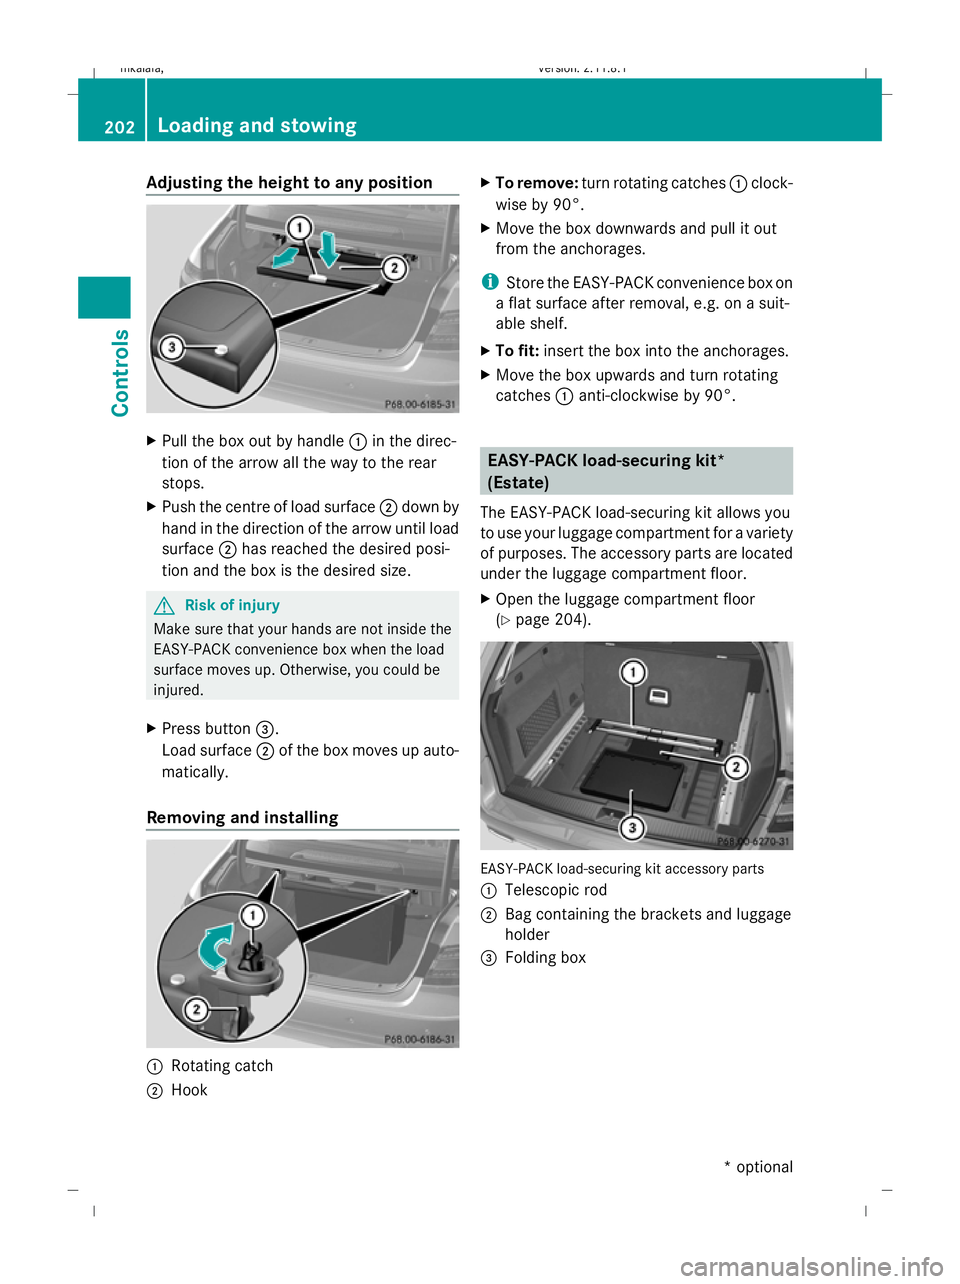
Adjusting the height to any position
X
Pull the box out by handle :in the direc-
tion of the arrow all the way to the rear
stops.
X Push the centre of load surface ;down by
hand in the direction of the arrow until load
surface ;has reached the desired posi-
tion and the box is the desired size. G
Risk of injury
Make sure that your hands are not inside the
EASY-PACK convenience box when the load
surface moves up. Otherwise, you could be
injured.
X Press button =.
Load surface ;of the box moves up auto-
matically.
Removing and installing :
Rotating catch
; Hook X
To remove: turn rotating catches :clock-
wise by 90°.
X Move the box downwards and pull it out
from the anchorages.
i Store the EASY-PACK convenience box on
a flat surface after removal, e.g. on a suit-
able shelf.
X To fit: insert the box into the anchorages.
X Move the box upwards and turn rotating
catches :anti-clockwise by 90°. EASY-PACK load-securing kit*
(Estate)
The EASY-PACK load-securing kit allows you
to use your luggage compartment for a variety
of purposes. The accessory parts are located
under the luggage compartment floor.
X Open the luggage compartment floor
(Y page 204). EASY-PACK load-securing kit accessory parts
:
Telescopic rod
; Bag containing the brackets and luggage
holder
= Folding box 202
Loading and stowingCont
rols
* optional
212_AKB; 2; 4, en-GB
mkalafa
,V ersion: 2.11.8.1
2009-05-05T14:17:16+02:00 - Seite 202
Dateiname: 6515346702_buchblock.pdf; erzeugt am 07. May 2009 14:16:45; WK
Page 206 of 373
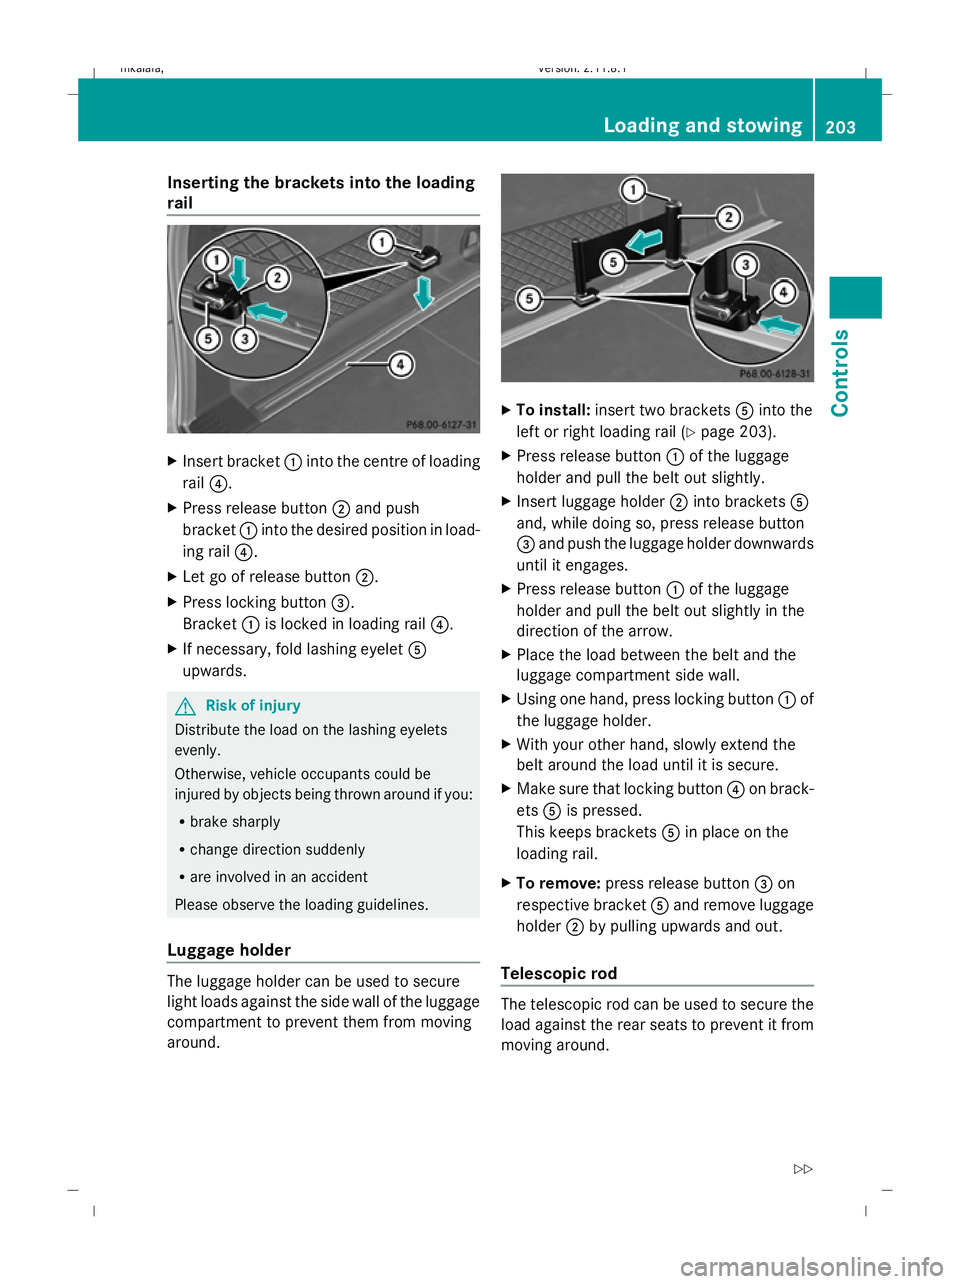
Inserting the brackets into the loading
rail X
Insert bracket :into the centre of loading
rail ?.
X Press release button ;and push
bracket :into the desired position in load-
ing rail ?.
X Let go of release button ;.
X Press locking button =.
Bracket :is locked in loading rail ?.
X If necessary, fold lashing eyelet A
upwards. G
Risk of injury
Distribute the load on the lashing eyelets
evenly.
Otherwise, vehicle occupants could be
injured by objects being thrown around if you:
R brake sharply
R change direction suddenly
R are involved in an accident
Please observe the loading guidelines.
Luggage holder The luggage holder can be used to secure
light loads against the side wall of the luggage
compartment to prevent them from moving
around. X
To install: insert two brackets Ainto the
left or right loading rail (Y page 203).
X Press release button :of the luggage
holder and pull the belt out slightly.
X Insert luggage holder ;into brackets A
and, while doing so, press release button
= and push the luggage holder downwards
until it engages.
X Press release button :of the luggage
holder and pull the belt out slightly in the
direction of the arrow.
X Place the load between the belt and the
luggage compartment side wall.
X Using one hand, press locking button :of
the luggage holder.
X With your other hand, slowly extend the
belt around the load until it is secure.
X Make sure that locking button ?on brack-
ets Ais pressed.
This keeps brackets Ain place on the
loading rail.
X To remove: press release button =on
respective bracket Aand remove luggage
holder ;by pulling upwards and out.
Telescopic rod The telescopic rod can be used to secure the
load against the rear seats to prevent it from
moving around. Loading and stowing
203Controls
212_AKB; 2; 4, en-GB
mkalafa,V ersion: 2.11.8.1
2009-05-05T14:17:16+02:00 - Seite 203 Z
Dateiname: 6515346702_buchblock.pdf; erzeugt am 07. May 2009 14:16:46; WK
Page 207 of 373
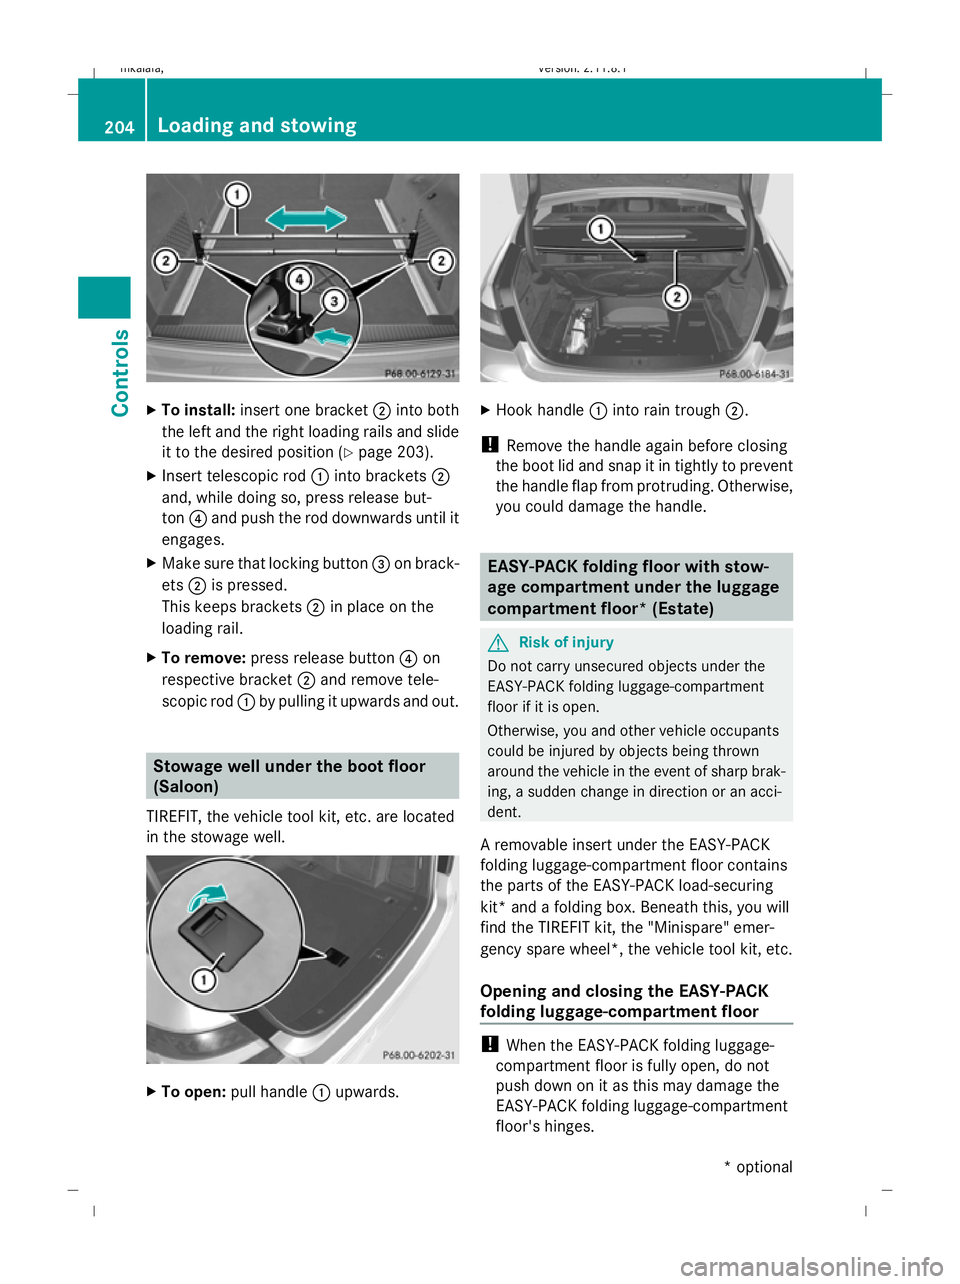
X
To install: insert one bracket ;into both
the left and the right loading rails and slide
it to the desired position (Y page 203).
X Insert telescopic rod :into brackets ;
and, while doing so, press release but-
ton ?and push the rod downwards until it
engages.
X Make sure that locking button =on brack-
ets ;is pressed.
This keeps brackets ;in place on the
loading rail.
X To remove: press release button ?on
respective bracket ;and remove tele-
scopic rod :by pulling it upwards and out. Stowage well under the boot floor
(Saloon)
TIREFIT, the vehicle tool kit, etc. are located
in the stowage well. X
To open: pull handle :upwards. X
Hook handle :into rain trough ;.
! Remove the handle again before closing
the boot lid and snap it in tightly to prevent
the handle flap from protruding. Otherwise,
you could damage the handle. EASY-PACK folding floor with stow-
age compartment under the luggage
compartment floor* (Estate)
G
Risk of injury
Do not carry unsecured objects under the
EASY-PACK folding luggage-compartment
floor if it is open.
Otherwise, you and other vehicle occupants
could be injured by objects being thrown
around the vehicle in the event of sharp brak-
ing, a sudden change in direction or an acci-
dent.
A removable insert under the EASY-PACK
folding luggage-compartment floor contains
the parts of the EASY-PACK load-securing
kit* and a folding box. Beneath this, you will
find the TIREFIT kit, the "Minispare" emer-
gency spare wheel*, the vehicle tool kit, etc.
Opening and closing the EASY-PACK
folding luggage-compartment floor !
When the EASY-PACK folding luggage-
compartment floor is fully open, do not
push down on it as this may damage the
EASY-PACK folding luggage-compartment
floor's hinges. 204
Loading and stowingControls
* optional
212_AKB; 2; 4, en-GB
mkalafa,
Version: 2.11.8.1 2009-05-05T14:17:16+02:00 - Seite 204
Dateiname: 6515346702_buchblock.pdf; erzeugt am 07. May 2009 14:16:47; WK
Page 208 of 373
X
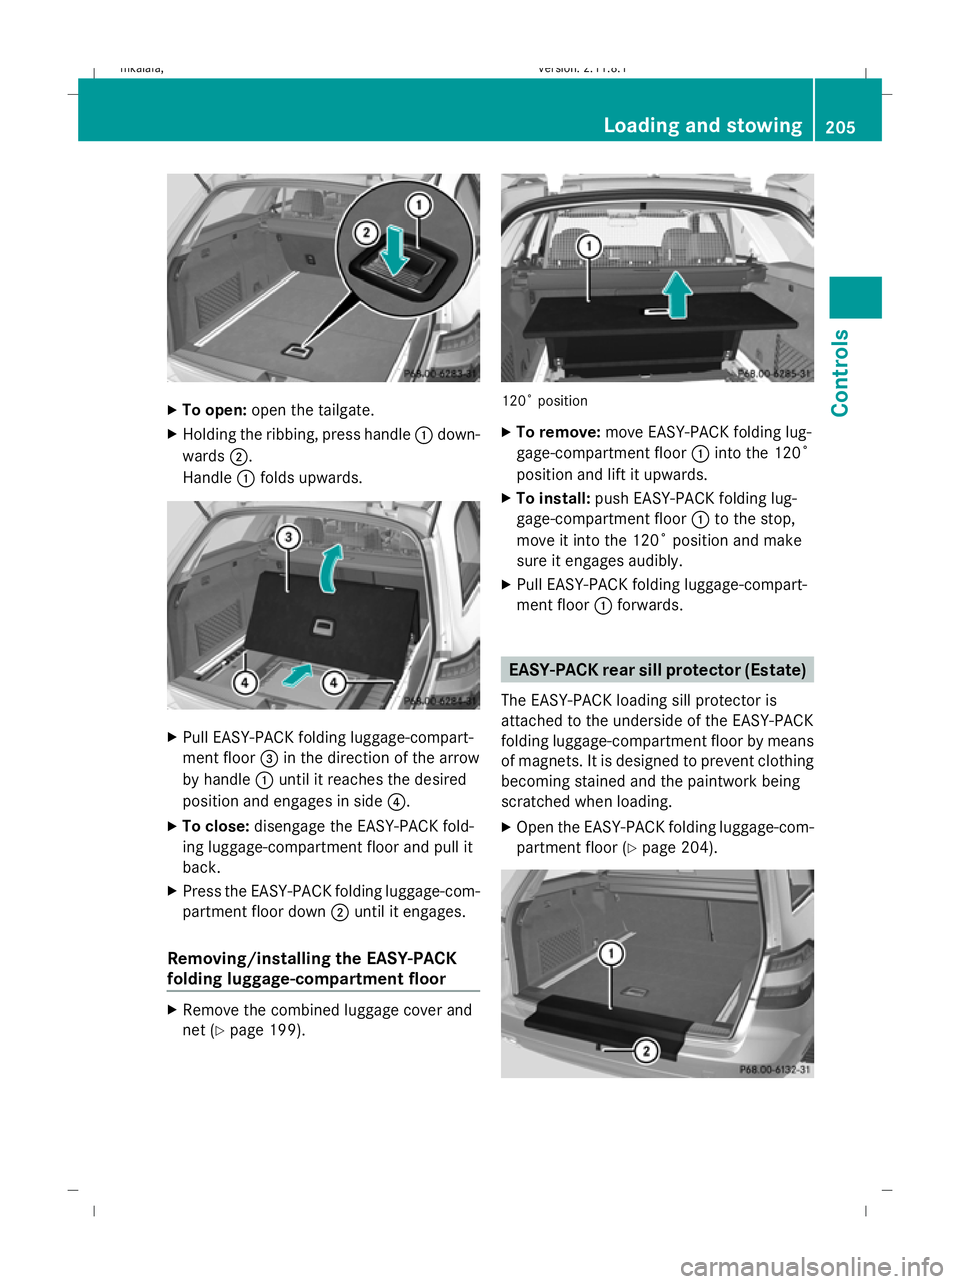
To open: open the tailgate.
X Holding the ribbing, press handle :down-
wards ;.
Handle :folds upwards. X
Pull EASY-PACK folding luggage-compart-
ment floor =in the direction of the arrow
by handle :until it reaches the desired
position and engages in side ?.
X To close: disengage the EASY-PACK fold-
ing luggage-compartment floor and pull it
back.
X Press the EASY-PACK folding luggage-com-
partment floor down ;until it engages.
Removing/installing the EASY-PACK
folding luggage-compartment floor X
Remove the combined luggage cover and
net ( Ypage 199). 120˚ position
X
To remove: move EASY-PACK folding lug-
gage-compartment floor :into the 120˚
position and lift it upwards.
X To install: push EASY-PACK folding lug-
gage-compartment floor :to the stop,
move it into the 120˚ position and make
sure it engages audibly.
X Pull EASY-PACK folding luggage-compart-
ment floor :forwards. EASY-PACK rear sill protector (Estate)
The EASY-PACK loading sill protector is
attached to the underside of the EASY-PACK
folding luggage-compartment floor by means
of magnets. It is designed to prevent clothing
becoming stained and the paintwork being
scratched when loading.
X Open the EASY-PACK folding luggage-com-
partment floor ( Ypage 204). Loading and stowing
205Controls
212_AKB; 2; 4, en-GB
mkalafa, Version: 2.11.8.1 2009-05-05T14:17:16+02:00 - Seite 205 Z
Dateiname: 6515346702_buchblock.pdf; erzeugt am 07. May 2009 14:16:48; WK
Page 209 of 373
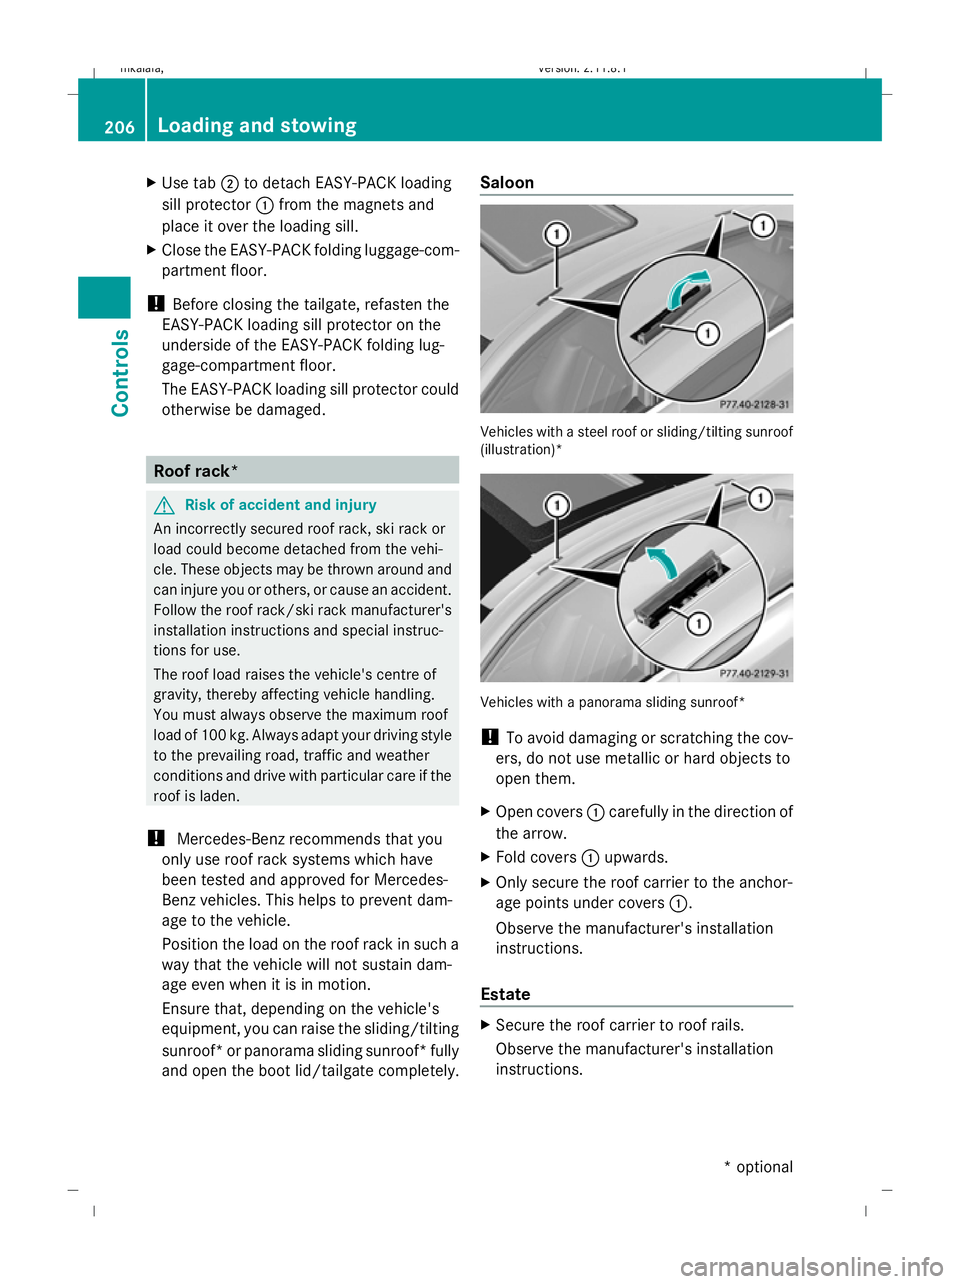
X
Use tab ;to detach EASY-PACK loading
sill protector :from the magnets and
place it over the loading sill.
X Close the EASY-PACK folding luggage-com-
partment floor.
! Before closing the tailgate, refasten the
EASY-PACK loading sill protector on the
underside of the EASY-PACK folding lug-
gage-compartment floor.
The EASY-PACK loading sill protector could
otherwise be damaged. Roof rack*
G
Risk of accident and injury
An incorrectly secured roof rack, ski rack or
load could become detached from the vehi-
cle. These objects may be thrown around and
can injure you or others, or cause an accident.
Follow the roof rack/ski rack manufacturer's
installation instructions and special instruc-
tions for use.
The roof load raises the vehicle's centre of
gravity, thereby affecting vehicle handling.
You must always observe the maximum roof
load of 100 kg. Always adapt your driving style
to the prevailing road, traffic and weather
conditions and drive with particular care if the
roof is laden.
! Mercedes-Benz recommends that you
only use roof rack systems which have
been tested and approved for Mercedes-
Benz vehicles. This helps to prevent dam-
age to the vehicle.
Position the load on the roof rack in such a
way that the vehicle will not sustain dam-
age even when it is in motion.
Ensure that, depending on the vehicle's
equipment, you can raise the sliding/tilting
sunroof* or panorama sliding sunroof* fully
and open the boot lid/tailgate completely. Saloon
Vehicles with a steel roof or sliding/tilting sunroof
(illustration)*
Vehicles with a panorama sliding sunroof*
! To avoid damaging or scratching the cov-
ers, do not use metallic or hard objects to
open them.
X Open covers :carefully in the direction of
the arrow.
X Fold covers :upwards.
X Only secure the roof carrier to the anchor-
age points under covers :.
Observe the manufacturer's installation
instructions.
Estate X
Secure the roof carrier to roof rails.
Observe the manufacturer's installation
instructions. 206
Loading and stowingControls
* optional
212_AKB; 2; 4, en-GB
mkalafa,
Version: 2.11.8.1 2009-05-05T14:17:16+02:00 - Seite 206
Dateiname: 6515346702_buchblock.pdf; erzeugt am 07. May 2009 14:16:48; WK
Page 210 of 373
Features
Sun visors
G
Risk of accident
Keep the mirrors in the sun visors covered
while driving. Otherwise, you could be daz-
zled, impairing your view of traffic conditions.
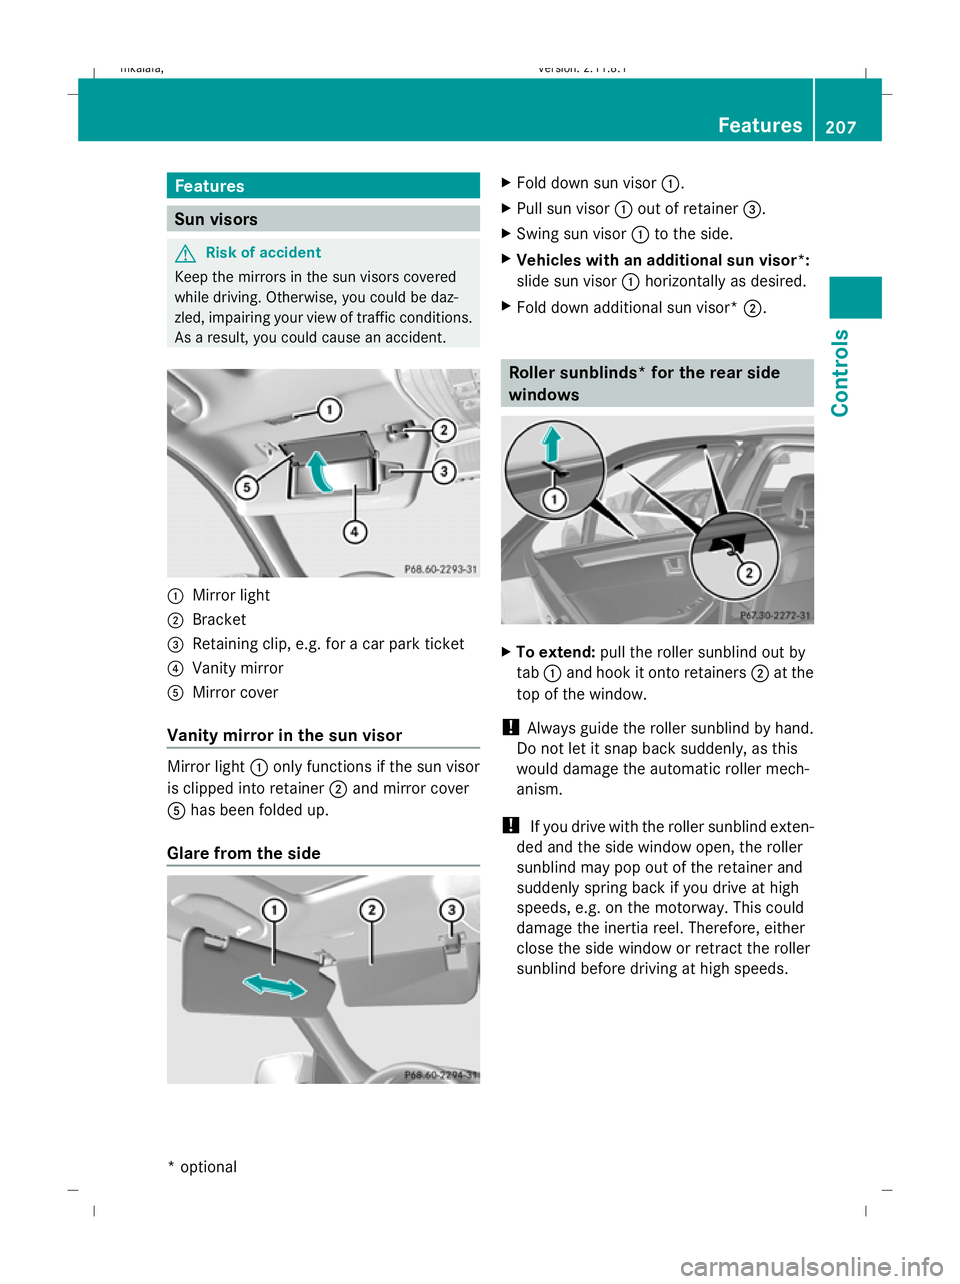
As a result, you could cause an accident. :
Mirror light
; Bracket
= Retaining clip, e.g. for a car park ticket
? Vanity mirror
A Mirror cover
Vanity mirror in the sun visor Mirror light
:only functions if the sun visor
is clipped into retainer ;and mirror cover
A has been folded up.
Glare from the side X
Fold down sun visor :.
X Pull sun visor :out of retainer =.
X Swing sun visor :to the side.
X Vehicles with an additional sun visor *:
sl ide sun visor :horizontally as desired.
X Fold down additional sun visor* ;. Roller sunblinds* for the rear side
windows
X
To extend: pull the roller sunblind out by
tab :and hook it onto retainers ;at the
top of the window.
! Always guide the roller sunblind by hand.
Do not let it snap back suddenly, as this
would damage the automatic roller mech-
anism.
! If you drive with the roller sunblind exten-
ded and the side window open, the roller
sunblind may pop out of the retainer and
suddenly spring back if you drive at high
speeds, e.g. on the motorway. This could
damage the inertia reel. Therefore, either
close the side window or retract the roller
sunblind before driving at high speeds. Features
207Controls
* optional
212_AKB; 2; 4, en-GB
mkalafa,
Version: 2.11.8.1 2009-05-05T14:17:16+02:00 - Seite 207 Z
Dateiname: 6515346702_buchblock.pdf; erzeugt am 07. May 2009 14:16:49; WK
Page 211 of 373
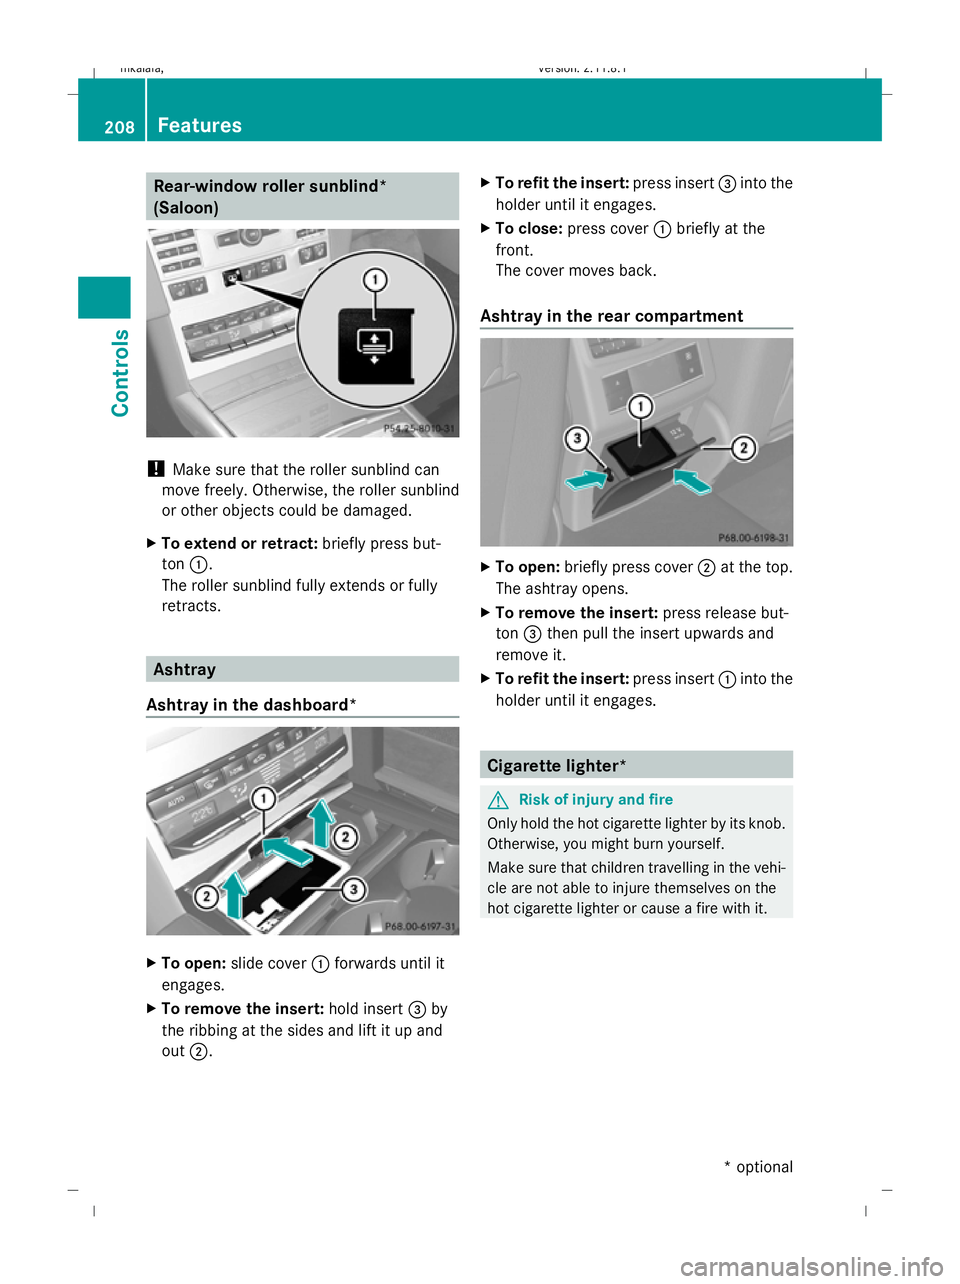
Rear-window roller sunblind*
(Saloon)
!
Make sure that the roller sunblind can
move freely. Otherwise, the roller sunblind
or other objects could be damaged.
X To extend or retract: briefly press but-
ton :.
The roller sunblind fully extends or fully
retracts. Ashtray
Ashtray in the dashboard* X
To open: slide cover :forwards until it
engages.
X To remove the insert: hold insert=by
the ribbing at the sides and lift it up and
out ;. X
To refit the insert: press insert=into the
holder until it engages.
X To close: press cover :briefly at the
front.
The cover moves back.
Ashtray in the rear compartment X
To open: briefly press cover ;at the top.
The ashtray opens.
X To remove the insert: press release but-
ton =then pull the insert upwards and
remove it.
X To refit the insert: press insert:into the
holder until it engages. Cigarette lighter*
G
Risk of injury and fire
Only hold the hot cigarette lighter by its knob.
Otherwise, you might burn yourself.
Make sure that children travelling in the vehi-
cle are not able to injure themselves on the
hot cigarette lighter or cause a fire with it. 208
FeaturesControls
* optional
212_AKB; 2; 4, en-GB
mkalafa
,V ersion: 2.11.8.1
2009-05-05T14:17:16+02:00 - Seite 208
Dateiname: 6515346702_buchblock.pdf; erzeugt am 07. May 2009 14:16:50; WK