2009 MERCEDES-BENZ E-CLASS SALOON weight
[x] Cancel search: weightPage 58 of 373

Folding in the child seat
X
Pull release handle :forwards.
X Push the middle of the integrated child seat
forwards and down ;until it engages.
Padded table* for the integrated child
seat* Use the padded table in accordance with the
instructions in table (Y
page 53).
Do not use the integrated child seat with pad-
ded table as a direct attachment to a baby car
seat for which a body weight of up to 10 kg is
permitted. G
Risk of injury
If the padded table is not installed correctly
on the integrated child seat, it cannot provide
the intended protection. It would then not be
possible to restrain the child in the event of
an accident, sudden braking or abrupt change
in direction and this could result in serious or
even fatal injury to the child. For this reason,
observe the following description when fitting
the padded table.
The padded table is only suitable for use
together with the folded-out integrated child
seat.
On the rear seats, only use the padded table
which is recommended for Mercedes-Benz
vehicles.
An incorrectly fitted padded table could come
loose and seriously or even fatally injure the
child or other vehicle occupants. Fit the pad- ded table and ensure that it is correctly
secured.
G
Risk of injury
Do not modify the padded table, integrated
child seat or seat belts. The padded table
must not be used without a cover. The cover
must not be removed from the padded table
or replaced with a cover from another manu-
facturer. Otherwise, the official approval
becomes invalid and its protective function
could be restricted.
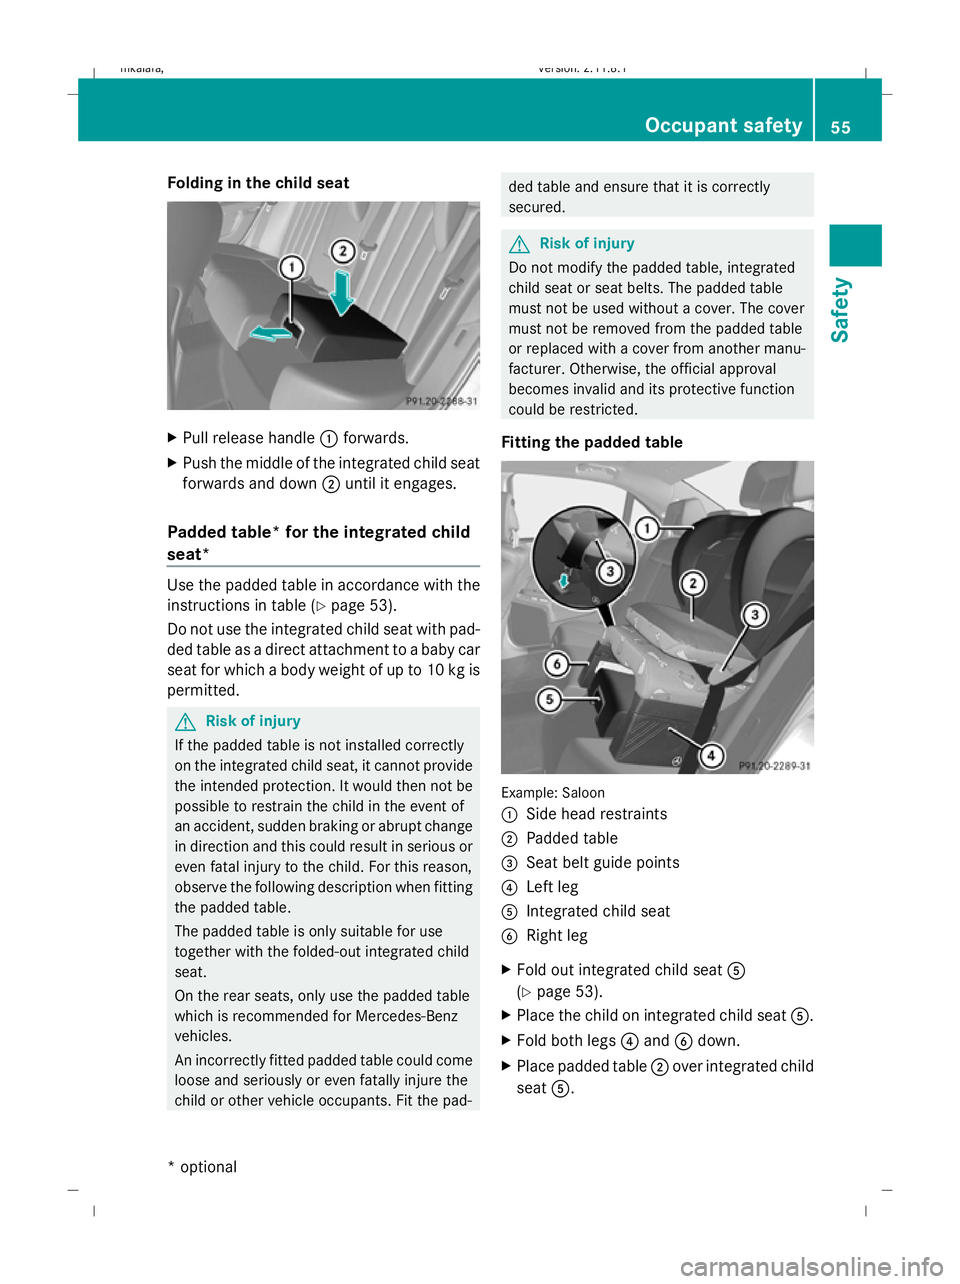
Fitting the padded table Example: Saloon
:
Side head restraints
; Padded table
= Seat belt guide points
? Left leg
A Integrated child seat
B Right leg
X Fold out integrated child seat A
(Y page 53).
X Place the child on integrated child seat A.
X Fold both legs ?and Bdown.
X Place padded table ;over integrated child
seat A. Occupant safety
55Safety
* optional
212_AKB; 2; 4, en-GB
mkalafa
,V ersion: 2.11.8.1
2009-05-05T14:17:16+02:00 - Seite 55 Z
Dateiname: 6515346702_buchblock.pdf; erzeugt am 07. May 2009 14:15:41; WK
Page 85 of 373

Rear-compartment seats
i
The system automatically switches down
from level 3to level 2after about eight
minutes (driver's seat and front-passenger
seat) or five minutes (rear seats).
The system automatically switches down
from level 2to level 1after approximately
ten minutes.
The system automatically switches off
approximately 20 minutes after it is set to
level 1.
X Make sure that the key is in position 1or
2 in the ignition lock.
X To switch on: press button:repeatedly
until the desired heating level is set.
X To switch off: press button:repeatedly
until all indicator lamps go out.
i If the battery voltage is too low, the seat
heating may switch off. Folding bench seat* in the luggage
compartment (Estate)
The folding bench seat in the luggage com-
partment is only suitable for persons no more
than 1.40 m tall and weighing a maximum of
50 kg.
The maximum permissible weight may be
reduced by extensive optional extras, vehicle
load and trailer towing. Observe the maxi-
mum gross vehicle weight and the permissi-
ble axle load, which can be found on the vehi-
cle identification plate (Y page 332).The combined luggage cover and net must be
fitted if you are using the folding bench seat. G
Risk of injury
The rear seat backrests must be locked in the
upright position if you are using the folding
bench seat in the luggage compartment.
Only drive when the head restraints in the
folding bench seat are adjusted to the correct
position. Make sure that the centre of the
head restraint supports the seat occupant's
head at about eye level. This can reduce the
risk of injury to a child in the event of an acci-
dent.
Ensure that the seat belt sits correctly on the
body and that it is engaged in the seat belt
buckle.
Never leave children unsupervised in the vehi-
cle. This applies even if they are secured in a
child restraint system.
Secure children as recommended; see "Chil-
dren in the vehicle" section. G
Risk of injury
Only replace damaged covers with genuine
covers.
Make sure that items of luggage and other
objects are sufficiently secured in the luggage
compartment.
Otherwise, the load could injure someone in
the event of sharp braking, a sudden change
in direction or an accident.
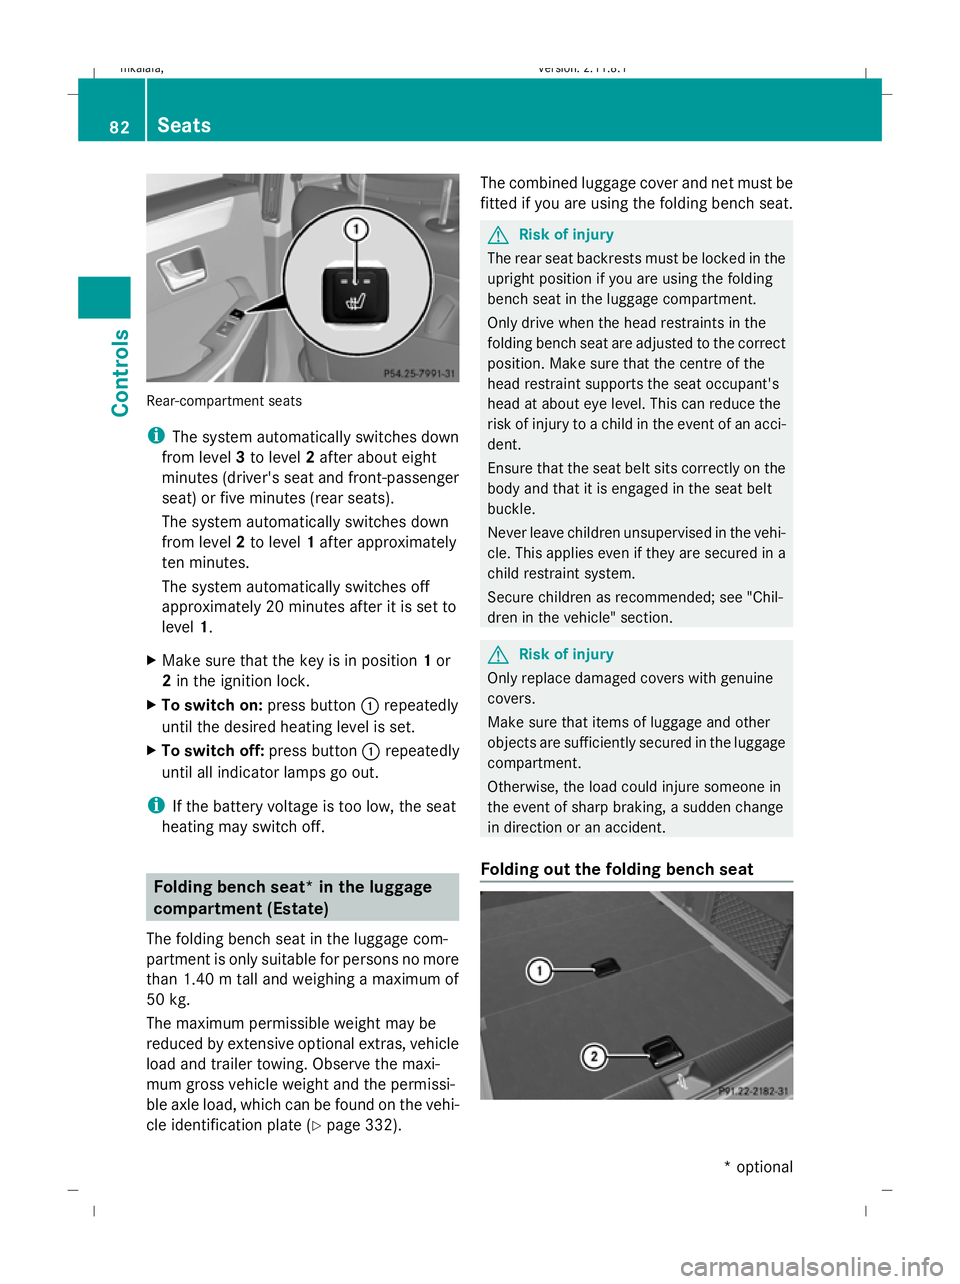
Folding out the folding bench seat 82
SeatsCont
rols
* optional
212_AKB; 2; 4, en-GB
mkalafa
,V ersion: 2.11.8.1
2009-05-05T14:17:16+02:00 - Seite 82
Dateiname: 6515346702_buchblock.pdf; erzeugt am 07. May 2009 14:15:53; WK
Page 191 of 373

Even if you follow all the loading guidelines,
the load will increase the risk of injury in the
event of an accident.
The handling characteristics of a laden vehi-
cle are dependent on the distribution of the
load within the vehicle. For this reason, you
should observe the following notes when
transporting a load:
R when transporting a load, never exceed the
maximum permissible gross vehicle weight
or the permissible axle loads for the vehicle
(including occupants).
R position heavy loads as far forwards and as
low in the boot or luggage compartment as
possible.
R the load must not protrude above the upper
edge of the seat backrests.
R always place the load against the rear or
front seat backrests. Make sure that the
seat backrests are securely locked into
place.
R always place the load behind unoccupied
seats if possible.
R secure the load with sufficiently strong and
wear-resistant load restraints. pad sharp
edges for protection.
i Load restraints are available at any quali-
fied specialist workshop, e.g. a Mercedes-
Benz Service Centre. Stowage compartments
G
Risk of injury
The stowage compartments must be closed
when items are stored in them. Luggage nets
are not designed to secure heavy items of
luggage.
You or other vehicle occupants could be
injured by objects being thrown around if you: R
brake sharply
R change direction suddenly
R are involved in an accident
Sharp-edged and fragile objects must not be
placed in the luggage net.
Do not place hard objects in the map pockets.
Objects must not protrude from the map
pockets.
Glove compartment i
Depending on the vehicle's equipment,
there is an AUX-IN connection installed in
the glove compartment, or a Media Inter-
face*, which is a universal interface for
portable audio equipment, e.g. for an iPod
or USB device; see the separate Audio or
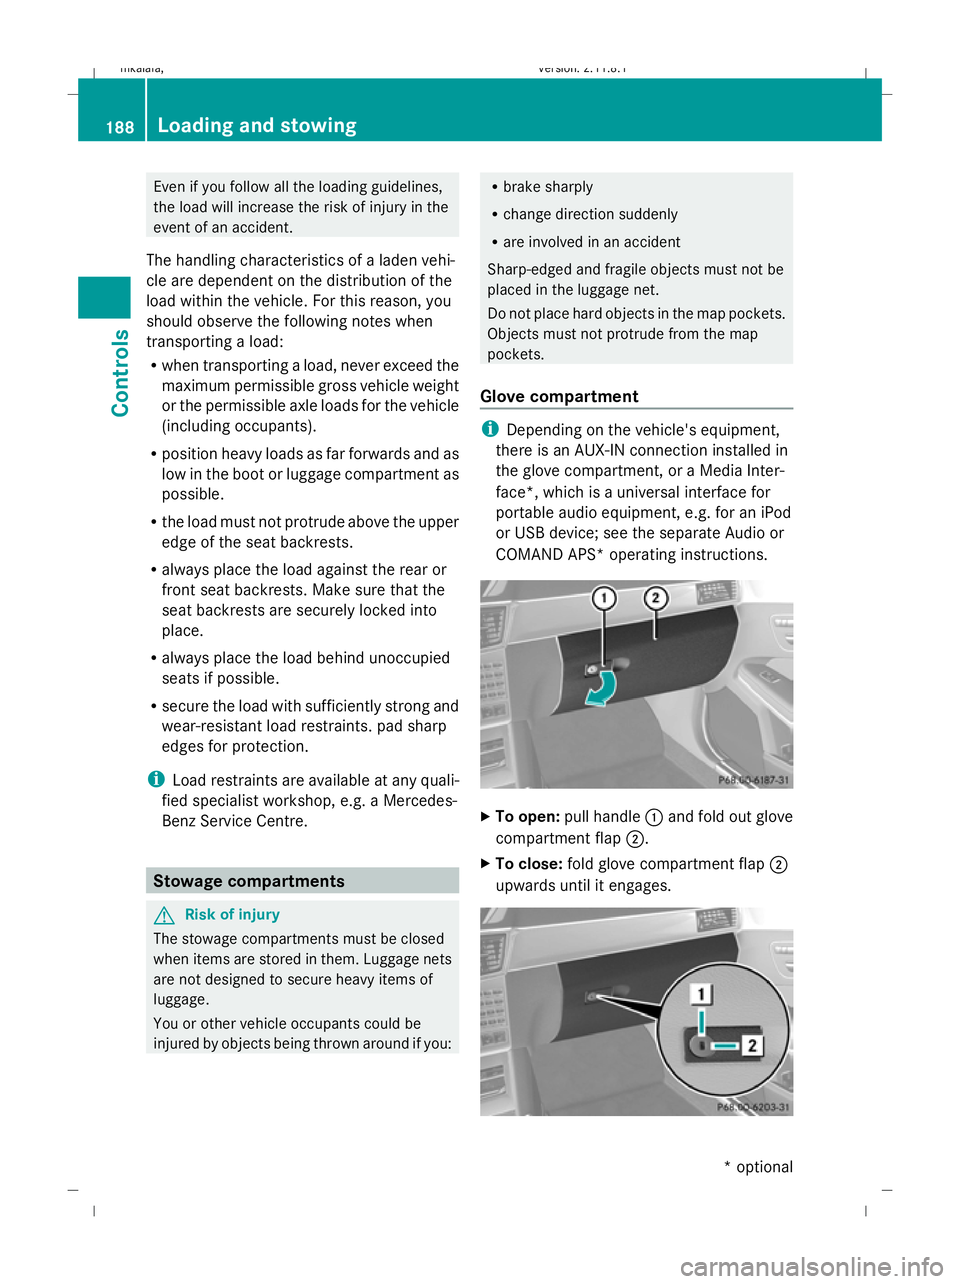
COMAND APS* operating instructions. X
To open: pull handle :and fold out glove
compartment flap ;.
X To close: fold glove compartment flap ;
upwards until it engages. 188
Loading and sto
wingControls
* optional
212_AKB; 2; 4, en-GB
mkalafa
,V ersion: 2.11.8.1
2009-05-05T14:17:16+02:00 - Seite 188
Dateiname: 6515346702_buchblock.pdf; erzeugt am 07. May 2009 14:16:34; WK
Page 196 of 373

Cup holder in the folding bench seat*
X
To open: press the front of cup holder :.
Cup holder :is released.
X Pull cup holder :out to the stop. Bottle holder
G
Risk of injury
Do not transport heavy, sharp-edged and frag-
ile bottles in the bottle holder. In the event of
an accident, the bottle holder can not secure
the bottles adequately.
The bottle holder is suitable for bottles from
0.7 l to 1.5 l in size. The bottle holder does
not keep the bottles in place, but only pre-
vents them from tipping over. X
Press the outside of button :and push in
the direction of the arrow until a size suit-
able for the bottle has been attained.
X Insert the bottle into the bottle holder. !
When placing bottles in the bottle holder,
make sure that bottles which are heavier
than 0.5 kg are positioned on the vehicle
floor. Otherwise, the bottle holder could be
damaged. Luggage net in the front-passenger
footwell
G
Risk of injury
Only place lightweight objects in the luggage
net. Do not use it to transport heavy, sharp-
edged or fragile objects. The luggage net can-
not secure the objects sufficiently in the event
of an accident. Skibag*
G
Risk of injury
The skibag is designed to carry up to four pairs
of skis. Do not use the skibag to carry any
other type of load.
The skibag must always be secured when
laden. Otherwise, injuries could be caused by
it in the event of an accident.
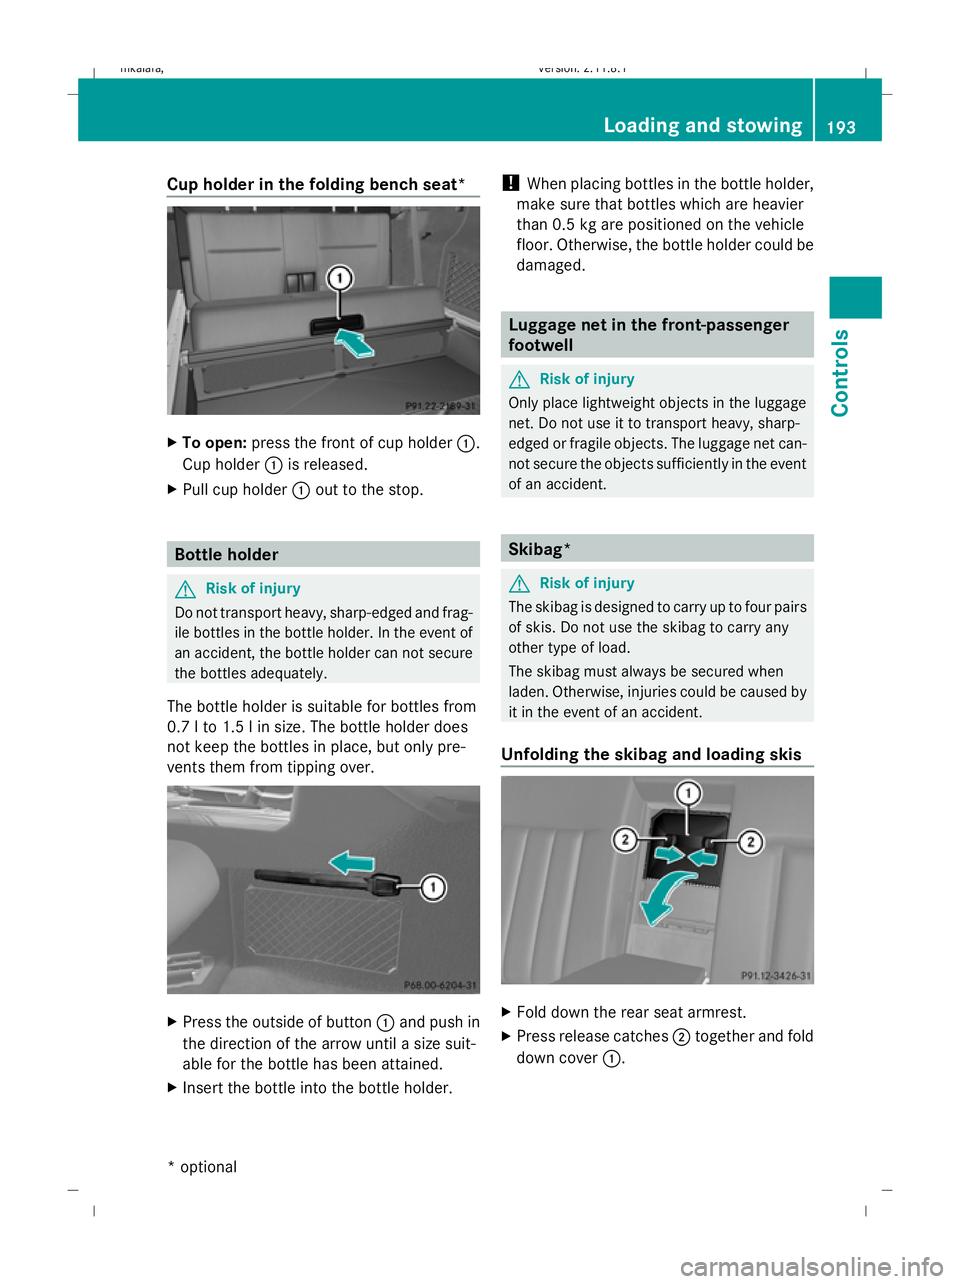
Unfolding the skibag and loading skis X
Fold down the rear seat armrest.
X Press release catches ;together and fold
down cover :. Loading and stowing
193Controls
* optional
212_AKB; 2; 4, en-GB
mkalafa
,V ersion: 2.11.8.1
2009-05-05T14:17:16+02:00 - Seite 193 Z
Dateiname: 6515346702_buchblock.pdf; erzeugt am 07. May 2009 14:16:38; WK
Page 221 of 373

soon as sulphur-free fuel (sulphur content
< 10 ppm) is used for refuelling, the odours
are reduced.
AMG vehicles !
Refuel using only unleaded super grade
petrol with a minimum octane number of
98 RON/88 MON conforming to European
standard EN 228.
Otherwise, you could impair engine output
or damage the engine.
i If the recommended fuel is not available
and only as a temporary measure, you may
also use premium unleaded petrol,
95 RON/85 MON. This may reduce engine
performance and increase fuel consump-
tion. You must avoid driving at full throttle.
! In emergencies, and only when the rec-
ommended fuel is not available, you may
also use standard unleaded petrol,
91 RON/82.5 MON.
However, using this fuel results in consid-
erably higher petrol consumption and sig-
nificantly reduced engine output. Avoid
driving at full throttle.
If no fuel other than regular petrol with
91 RON/82.5 MON or a lower grade is per-
manently available, you should have the
vehicle adapted to run on this fuel by the
local after-sales service. Diesel (EN 590, DIN 51628)
G
Risk of fire
Do not use petrol to refuel vehicles with a die-
sel engine. Never mix diesel with petrol. This
causes damage to the fuel system and engine
and could result in the vehicle catching fire.
! Refuel using only diesel which conforms
to European standard EN 590 or German
standard DIN 51628. Otherwise, you could
impair engine output or damage the engine. !
When refuelling vehicles with a diesel par-
ticulate filter in countries outside the EU,
only low-sulphur Euro diesel with less than
0.005 percent sulphur content by weight
(50 ppm) should be used.
! In countries in which diesel with a higher
sulphur content is available, the engine oil
should be renewed at more frequent inter-
vals. More information about intervals for
changing the engine oil can be obtained
from any Mercedes-Benz Service Centre.
! Using fuel that does not comply with the
European standard EN 590 or the German
standard DIN 51628 can lead to increased
wear, engine damage and damage to the
exhaust system.
Do not use the following:
R marine diesel
R heating oil
R bio-diesel
R vegetable oil
R petrol
R paraffin
R kerosene
Do not add such fuels to diesel fuel and do
not use any special additives (exception:
flow improvers – see "Low outside temper-
atures").
Damage caused by the use of unapproved
fuels or additives is not covered by the
implied warranty.
Further information on "Fuel" (Y page 334).
Low outside temperatures The flow properties of diesel may be inade-
quate at low ambient temperatures.
Diesel fuel with improved cold flow qualities
is available during the winter months. In
Europe, the different climate-dependant cold
categories are defined in standard EN 590.
Refuelling with diesel fuel which complies218
RefuellingOperation
212_AKB; 2; 4, en-GB
mkalafa,
Version: 2.11.8.1 2009-05-05T14:17:16+02:00 - Seite 218
Dateiname: 6515346702_buchblock.pdf; erzeugt am 07. May 2009 14:16:54; WK
Page 238 of 373

X
Grasp release wheel ;with your hand
such that the thumb is in the thumb rest
and turn it anti-clockwise.
The ball coupling disengages and folds out
from under the rear bumper. Indicator
lamp :flashes. X
Pull the ball coupling in the direction of the
arrow until it engages in a vertical position.
Indicator lamp :goes out.
The multi-function display shows the
Trailer hitch Check lock mech. mes-
sage until the ball coupling is engaged.
X Remove the protective cap from the ball
coupling and store it in a safe place.
X Make sure that the ball of the ball coupling
is clean and that, depending on the trailer
specification, it is greased or dry (without
grease) when used.
The power socket is integrated in the ball
coupling. Notes on towing a trailer
G
Risk of accident
When reversing the vehicle towards the
trailer, make sure there is nobody between
the trailer and the vehicle.
Couple and uncouple the trailer carefully. If
you do not couple the trailer to the towing
vehicle correctly, the trailer could become
detached. Make sure that the following values are not
exceeded:
R
the permissible trailer drawbar noseweight
R the permissible trailer load
R the permissible rear axle load of the towing
vehicle
R the maximum permissible gross vehicle
weight of both the towing vehicle and the
trailer
You will find the applicable permissible val-
ues, which must not be exceeded, in the vehi-
cle documents.
You will find the values approved by the man-
ufacturer on the vehicle identification plates
and those for the towing vehicle in the "Tech-
nical data" section.
i When towing a trailer, set the tyre pres-
sure on the rear axle of the towing vehicle
for a maximum load; see the tyre pressure
table in the fuel filler flap.
You will find installation dimensions and loads
in the "Technical data" section
(Y page 356).
The maximum drawbar load of the trailer
drawbar on the ball coupling is 84 kg. How-
ever, the actual noseweight must not exceed
the value given on the trailer coupling or
trailer identification plates. The lowest weight
applies.
! Use a noseweight as close as possible to
the maximum permissible noseweight. Do
not use a noseweight of less than 50 kg,
otherwise the trailer may come loose.
Bear in mind that the payload and the rear
axle load are reduced by the actual nose-
weight.
Please note that when towing a trailer, PARK-
TRONIC* ( Ypage 159), parking guid-
ance* (Y page 162) and Blind Spot
Assist* (Y page 261) are only available with
limitations, or not at all. Trailer towing
235Operation
* optional
212_AKB; 2; 4, en-GB
mkalafa
,V ersion: 2.11.8.1
2009-05-05T14:17:16+02:00 - Seite 235 Z
Dateiname: 6515346702_buchblock.pdf; erzeugt am 07. May 2009 14:16:59; WK
Page 327 of 373

X
Slide cover :of positive terminal ;in
the direction of the arrow .
X Connect positive terminal ;on your vehi-
cle to positive terminal =of donor battery
B using the jump lead, beginning with your
own battery.
X Start the engine of the donor vehicle and
run it at idling speed.
X Connect negative terminal ?of donor bat-
tery Bto earth point Aof your vehicle
using the jump lead, Connect donor bat-
tery Bfirst.
X Start the engine.
X First, remove the jump lead from earth
point Aand negative terminal ?, then
from positive terminal ;and positive ter-
minal =, each time disconnecting from the
battery on your own vehicle first.
X Have the battery checked at a qualified
specialist workshop, e.g. a Mercedes-Benz
Service Centre. Towing and tow-starting
Points to remember
G
Risk of accident
If you have the vehicle towed, you must use a
rigid towing bar if:
R the engine is not running.
R there is a brake system malfunction.
R there is a malfunction in the power supply
or the vehicle's electrical system.
The power steering and the brake force boos-
ter do not work when the engine is not run-
ning. Greater braking force will then be
required and brake pedal travel will be longer.
If necessary, depress the brake pedal with full
force.
Before towing away, make sure that the steer-
ing can be moved and is not locked.
If you tow or tow-start another vehicle, its
weight must not exceed the maximum per-
missible gross vehicle weight of your vehicle. G
Risk of accident
The vehicle is braked when the HOLD function
or Distronic Plus* is activated. Therefore, 324
Towing and tow-startingPractical advice
* optional
212_AKB; 2; 4, en-GB
mkalafa
,V ersion: 2.11.8.1
2009-05-05T14:17:16+02:00 - Seite 324
Dateiname: 6515346702_buchblock.pdf; erzeugt am 07. May 2009 14:17:27; WK
Page 336 of 373

Vehicle identification plate illustration
:
Vehicle identification plate
; Vehicle manufacturer
= EU type approval number
? Vehicle identification number (VIN)
A Maximum permissible gross vehicle
weight
B Maximum permissible towing weight
C Maximum permissible front axle load
D Maximum permissible rear axle load
E Paint code Vehicle identification number (VIN)
In addition to being stamped on the vehicle
identification plate, the vehicle identification
number (VIN) is also stamped onto the vehicle
body. It is located on the floor in front of the
right-hand front seat. X
Slide the right-hand front seat to its rear-
most position.
X Fold floor covering :upwards.
You will see vehicle identification number
(VIN) ;. Engine number
The engine number is stamped on the crank-
case. More information can be obtained from
any Mercedes-Benz Service Centre. Service products and capacities
Service products include the following:
R fuels (e.g. petrol, diesel)
R exhaust gas aftertreatment additive
(AdBlue ®
)
R lubricants (e.g. engine oil, transmission oil)
R coolant
R brake fluid
R windscreen washer concentrate
Mercedes-Benz recommends that you only
use products which have been tested and
specially approved by Mercedes-Benz for
your vehicle and which are listed in this
Mercedes-Benz Owner's Manual in the rele-
vant chapter since:
R parts and service products are matched.
R damage caused by the use of non-approved
service products is not covered by the
implied warranty.
You can recognise service products approved
by Mercedes-Benz by the following inscrip-
tion on the containers:
R MB-Freigabe (e.g. MB-Freigabe 229.51)
R MB Approval (e.g. MB Approval 229.51)
Other designations or recommendations that
relate to a level of quality or a specification in
accordance with an MB Sheet number (such Service products and capacities
333Technical data
212_AKB; 2; 4, en-GB
mkalafa, Version: 2.11.8.1 2009-05-05T14:17:16+02:00 - Seite 333 Z
Dateiname: 6515346702_buchblock.pdf; erzeugt am 07. May 2009 14:17:32; WK