2009 MERCEDES-BENZ E-CLASS SALOON roof
[x] Cancel search: roofPage 45 of 373

in the event of an accident. Appropriate seat
covers can be obtained from a Mercedes-
Benz Service Centre.
The purpose of pelvisbag deployment is to
enhance the level of protection of the vehicle
occupants on the side of the vehicle on which
the impact occurs. The pelvisbags
:deploy next to and below
the outer seat cushions. They are deployed:
R on the side on which an impact occurs
R at the start of an accident with a high rate
of lateral vehicle deceleration or accelera-
tion, e.g. in a side impact
R independently of the seat belt use
R independently of the front airbags
R independently of the belt tensioners
R if the vehicle overturns, but only if the sys-
tem detects high vehicle deceleration in a
lateral direction and determines that side-
bag deployment can offer additional pro-
tection to that provided by the seat belt
Windowbags
The purpose of the windowbags is to enhance
the level of protection for the head (but not
chest or arms) of the vehicle occupants on
the side of the vehicle on which the impact
occurs.
The windowbags are integrated into the side
of the roof frame and run from the front door
(A-pillar) to the rear door (C-pillar). Example: Saloon
Windowbags
:are deployed:
R at the start of an accident with a high rate
of vehicle acceleration or deceleration in a
lateral direction
R on the side on which an impact occurs
R independently of the front airbags
R regardless of whether the front-passenger
seat is occupied
R independently of the seat belt use
R if the vehicle overturns and the system
determines that windowbag deployment
can offer additional protection to that pro-
vided by the seat belt PRE-SAFE
®
system
PRE-SAFE ®
system takes pre-emptive meas-
ures to protect you in certain hazardous sit-
uations.
PRE-SAFE ®
intervenes in the event of:
R emergency braking situations, e.g. if Brake
Assist BAS is activated or Brake Assist BAS
PLUS* intervenes powerfully
R the radar sensor system detecting an
immediate danger of collision in certain sit-
uations (on vehicles with Distronic Plus*)
R critical situations involving driving dynam-
ics, e.g. if the vehicle oversteers or under-
steers significantly due to physical limits
being exceeded 42
Occupant safetySafety
* optional
212_AKB; 2; 4, en-GB
mkalafa,
Version: 2.11.8.1
2009-05-05T14:17:16+02:00 - Seite 42
Dateiname: 6515346702_buchblock.pdf; erzeugt am 07. May 2009 14:15:38; WK
Page 46 of 373
PRE-SAFE
®
may take the following measures
in these situations:
R it tensions the front seat belts.
R on vehicles with memory functions*: it
adjusts the front-passenger seat if this is in
an unfavourable position.
R on vehicles with multicontour seat* or
active multicontour seat*: it increases the
air pressure in the seat side cushions and
the backrest side cushions.
R if the vehicle skids, it closes the sliding/
tilting sunroof* or panorama sliding sun-
roof* and the side windows so that only a
small gap remains.
if the hazardous situation passes without
resulting in an accident, PRE-SAFE ®
slackens
the belt pretensioning. You can then reverse
all settings made by PRE-SAFE ®
. On vehicles
with a multi-contour seat* or an active multi-
contour seat*, the air pressure in the side
bolsters is then reduced again.
If the seat belts are not released:
X Move the backrest or the seat back slightly
until the belt tension is reduced.
The locking mechanism releases. G
Risk of injury
When adjusting the seat, make sure that
nobody can become trapped.
! Make sure that there are no objects in the
footwell or behind the seats when adjusting
the seats. You could otherwise damage the
seats and the objects. NECK-PRO head restraints
NECK-PRO head restraints are designed to
increase protection to the driver's and front-
passenger's head and neck. To this end, the
head restraints on the driver's and front-
passenger seats are moved forwards and
upwards in the event of a rear-end collision of
a certain severity when viewed in the direc- tion of travel. This provides better head sup-
port. G
Risk of injury
Head restraint covers prevent the NECK-PRO
head restraints from triggering correctly. Con-
sequently, the NECK-PRO head restraints
cannot provide the intended level of protec-
tion. Do not use head restraint covers.
If the NECK-PRO head restraints are triggered
in an accident, you must reset the head
restraints on the driver's and front-passenger
seats (Y page 303). Head restraints that have
been triggered are tilted forwards. Children in the vehicle
If a child is travelling in your vehicle, secure
the child using a child restraint system which
is appropriate to the size and age of the child
and is recommended for Mercedes-Benz
vehicles. You should fit the restraint system
to a suitable rear seat. You can also secure
the child on the integrated child seat*
(Y page 53). Ensure that the child is secured
throughout the trip.
You can obtain information about the correct
child restraint system from any Mercedes-
Benz Service Centre.
i It is advisable to use Mercedes-Benz care
products to clean child restraint systems.
Information about this can be obtained
from any Mercedes-Benz Service Centre. G
Risk of injury
Do not leave children unsupervised in the
vehicle, even if they are secured in a child
restraint system. Children could injure them-
selves on parts of the vehicle. They could also
be seriously or even fatally injured by pro-
longed exposure to extreme heat or cold.
Do not expose the child restraint system to
direct sunlight. Parts of the child restraint sys-
tem could heat up and the child could burn
herself/himself on them. Occupant safety
43Safety
* optional
212_AKB; 2; 4, en-GB
mkalafa,
Version: 2.11.8.1 2009-05-05T14:17:16+02:00 - Seite 43 Z
Dateiname: 6515346702_buchblock.pdf; erzeugt am 07. May 2009 14:15:38; WK
Page 60 of 373
X
Guide the seat belt through seat belt guide
A on the door side on side head restraint
B.
X Secure the child using the seat belt
(Y page 53).
Removing the side head restraints
X Take the seat belt out of seat belt guide
A.
X Move head restraint ;upwards.
X Press left or right release button ?and pull
side head restraint Bforward to remove
it.
Left-hand and right-hand lock verification
indicators :fold out briefly.
X Adjust head restraints ;(Ypage 79).
Storing the padded table and the side
head restraint G
Risk of injury
If the padded table and the side head
restraints are not secured in the vehicle as
specified, they may come loose. In the event
of an accident, sudden braking or abrupt
change in direction, they could injure vehicle
occupants or cause damage to the vehicle.
Secure the padded table in the vehicle as
specified.
On vehicles with TIREFIT kit, the side head
restraints can be stored in the stowage com-
partment under the boot/luggage compart-
ment floor (Y page 204)/(Y page 204).
Child-proof locks If children are travelling in the vehicle, you can
activate the child-proof locks for the rear
doors.
Child-proof locks for the rear doors
The child-proof locks on the rear doors enable
you to secure each door individually. A locked
door cannot be opened from the inside. The
door can be opened from the outside if the
vehicle is unlocked. G
Risk of accident and injury
Activate the child-proof locks for the rear
doors and the override switch for the rear
windows if children are travelling in the vehi-
cle. Otherwise, the children could open doors
or windows while the vehicle is in motion and
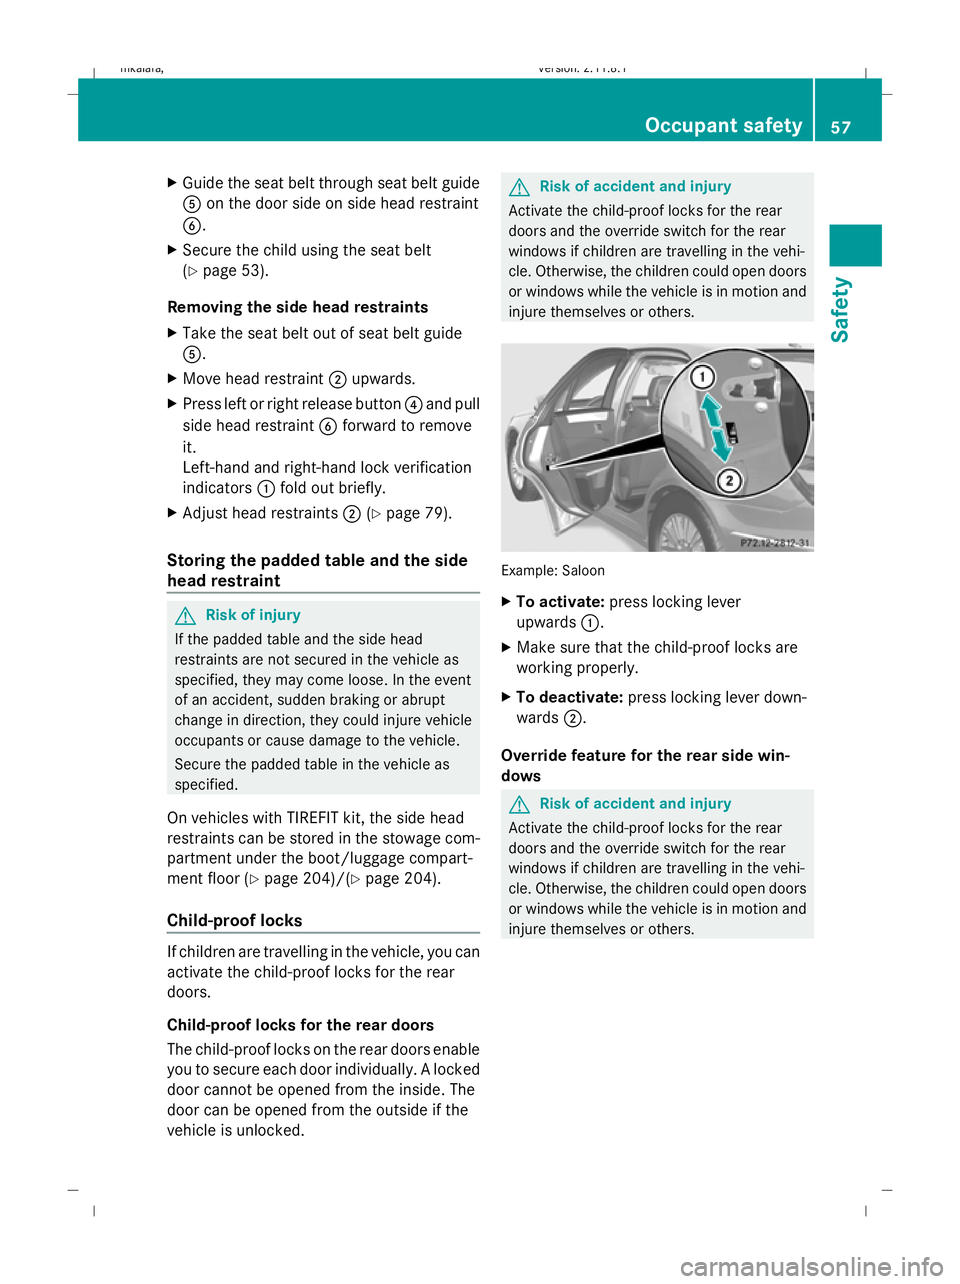
injure themselves or others. Example: Saloon
X
To activate: press locking lever
upwards :.
X Make sure that the child-proof locks are
working properly.
X To deactivate: press locking lever down-
wards ;.
Override feature for the rear side win-
dows G
Risk of accident and injury
Activate the child-proof locks for the rear
doors and the override switch for the rear
windows if children are travelling in the vehi-
cle. Otherwise, the children could open doors
or windows while the vehicle is in motion and
injure themselves or others. Occupant safety
57Safety
212_AKB; 2; 4, en-GB
mkalafa,V ersion: 2.11.8.1
2009-05-05T14:17:16+02:00 - Seite 57 Z
Dateiname: 6515346702_buchblock.pdf; erzeugt am 07. May 2009 14:15:42; WK
Page 70 of 373

X
Remove the key from the ignition lock.
X Press button :.
Indicator lamp ;lights up briefly.
X Lock the vehicle using the key. Vehicles
with KEYLESS GO* can also be locked by
touching the door handle on the outside.
Tow-away protection remains deactivated
until:
R
the vehicle is unlocked again.
R a door is opened and closed again.
R the vehicle is locked again. Interior motion sensor*
If the interior motion sensor is primed, a vis-
ual and audible alarm is triggered when move-
ment is detected in the vehicle interior while
the vehicle is locked. This occurs, for exam-
ple, if someone breaks the side windows of
your vehicle or reaches into the vehicle's inte-
rior.
Priming the interior motion sensor X
Make sure that:
R
the side windows are closed.
R the sliding/tilting sunroof* or panorama
sliding sunroof* is closed.
R there are no objects, e.g. mascots, hang-
ing on the rear-view mirror or on the roof
grab handles.
This will prevent false alarms.
X Lock the vehicle using the key. Vehicles
with KEYLESS GO* can also be locked by
touching the door handle on the outside.
The interior motion sensor is primed after
approximately 30 seconds.
Deactivating the interior motion sensor When you unlock your vehicle using the key
or KEYLESS GO*, the interior motion sensor
is automatically deactivated. To prevent a false alarm, deactivate the inte-
rior motion sensor if you lock your vehicle
and:
R
people or animals remain in the vehicle.
R the side windows remain open.
R the sliding/tilting sunroof* or panorama
sliding sunroof* remains opened. X
Remove the key from the ignition lock.
X Press button :.
Indicator lamp ;flashes briefly.
X Lock the vehicle using the key. Vehicles
with KEYLESS GO* can also be locked by
touching the door handle on the outside.
The interior motion sensor remains deacti-
vated until:
R the vehicle is unlocked again.
R a door is opened and closed again.
R the vehicle is locked again. Anti-theft systems
67Safety
* optional
212_AKB; 2; 4, en-GB
mkalafa,
Version: 2.11.8.1 2009-05-05T14:17:16+02:00 - Seite 67 Z
Dateiname: 6515346702_buchblock.pdf; erzeugt am 07. May 2009 14:15:45; WK
Page 72 of 373
Opening and closing
...........................70
Boot/luggage compartment ..............72
Key positions ....................................... 75
Seats .................................................... 76
Steering wheel .................................... 84
Mirrors ................................................. 86
Memory functions* .............................87
Seat belts ............................................. 89
Lights ................................................... 93
Windscreen wipers .............................99
Side windows .................................... 100
Driving and parking ..........................103
Transmission ..................................... 110
Instrument cluster ............................117
On-board computer ..........................118
Driving systems ................................ 137
Air conditioning ................................. 171
Sliding sunroof .................................. 184
Loading and stowing ........................187
Features ............................................. 207 69Controls
212_AKB; 2; 4, en-GB
mkalafa,
Version: 2.11.8.1 2009-05-05T14:17:16+02:00 - Seite 69
Dateiname: 6515346702_buchblock.pdf; erzeugt am 07. May 2009 14:15:46; WK
Page 74 of 373

Individual settings
You can change the setting of the locking
system in such a way that only the driver's
door and the fuel filler flap are unlocked. This
could be useful if you frequently travel on your
own.
X To change the setting: press the%
and & buttons simultaneously for
approximately six seconds until the battery
check lamp flashes twice.
The key now functions as follows:
X To unlock the driver's door: press the
% button once.
X To unlock centrally: press the%but-
ton twice.
X To lock centrally: press the&button.
The KEYLESS GO* function is changed as fol-
lows:
X To unlock the driver's door: touch the
inner surface of the door handle on the
driver's door.
X To unlock centrally: touch the inner sur-
face of the door handle on the front-
passenger door or the rear door.
X To lock centrally: touch sensor sur-
face :on one of the door handles.
Restoring the factory settings X
Press the %and& buttons simulta-
neously for approximately six seconds until
the battery check lamp flashes twice.
Additional information R
Convenience opening (Y page 102)
R Convenience closing (Y page 102)
R Opening and closing in an emergency
(Y page 299) Opening the doors from the inside
You can open a door from the inside even if it
has been locked, unless the child-proof locks
have been activated ( Ypage 57). X
Pull door handle ;.
If the door is locked, locking knob :pops
up. The door is unlocked and can be
opened. Locking/unlocking the vehicle from
the inside
You can centrally lock or unlock the vehicle
from the inside. This feature may be useful if,
for example, you wish to unlock the front-
passenger door from the inside or lock the
vehicle before you pull away. G
Risk of accident
Do not leave children unsupervised in the
vehicle. They could open a door from the
inside – even if it is locked – and thereby
endanger themselves and others. Opening and closing
71Controls
* optional
212_AKB; 2; 4, en-GB
mkalafa
,V ersion: 2.11.8.1
2009-05-05T14:17:16+02:00 - Seite 71 Z
Dateiname: 6515346702_buchblock.pdf; erzeugt am 07. May 2009 14:15:46; WK
Page 84 of 373
Massage function (PULSE)
The massage function helps you to prevent
muscle tension on long journeys. You can
choose between two different levels.
X To switch on: press button?once or
twice until the required level is set.
One or two indicator lamps in button ?
light up. The air cushions in the lumbar
region vibrate for approximately 20
minutes.
Luxury head restraint G
Risk of injury
When folding back the head restraint side bol-
sters, do not put your hands between the side
bolster and the cushion holder. There is a
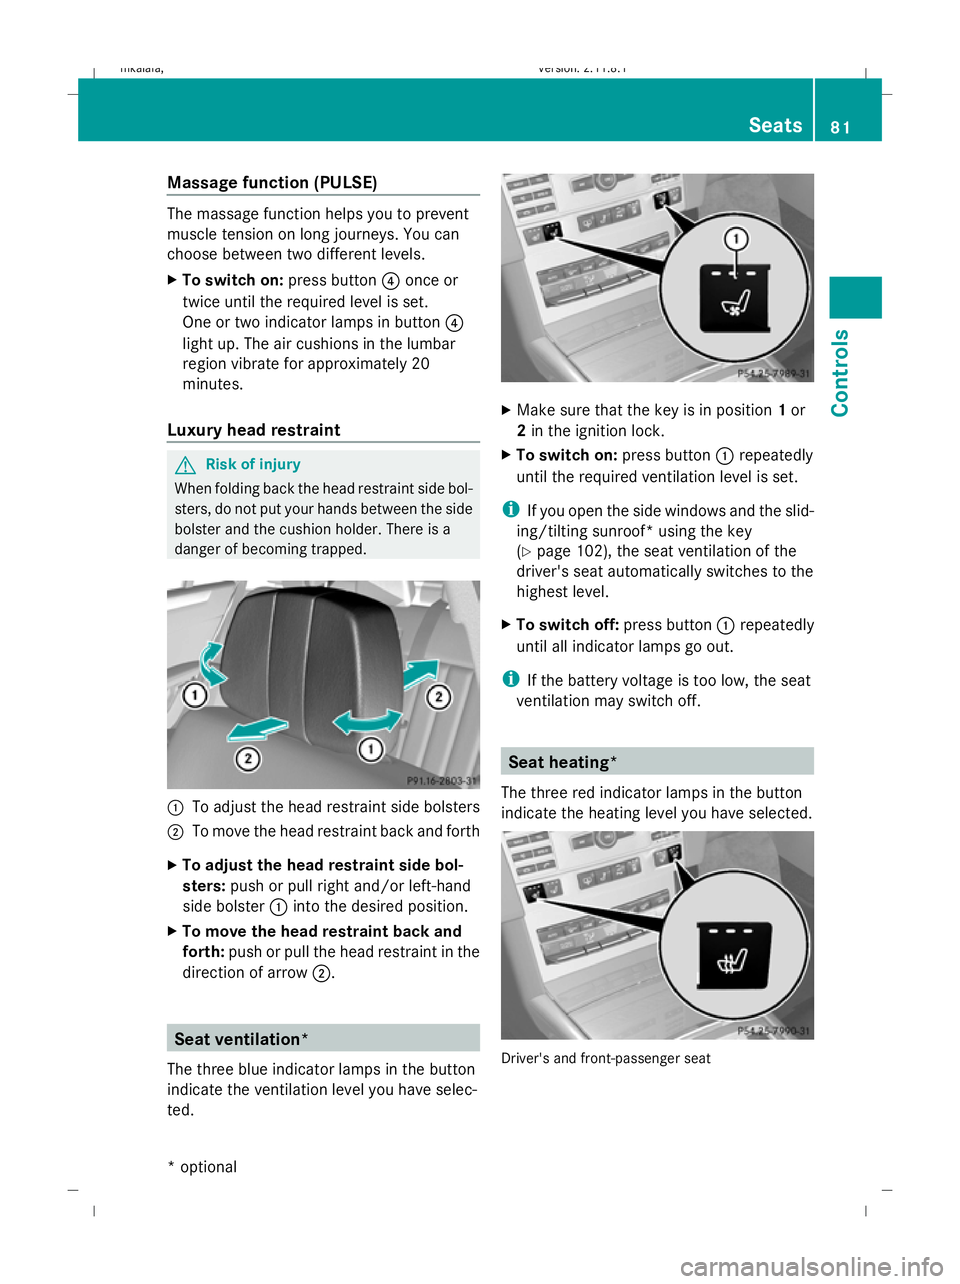
danger of becoming trapped. :
To adjust the head restraint side bolsters
; To move the head restraint back and forth
X To adjust the head restraint side bol-
sters: push or pull right and/or left-hand
side bolster :into the desired position.
X To move the head restraint back and
forth: push or pull the head restraint in the
direction of arrow ;. Seat ventilation*
The three blue indicator lamps in the button
indicate the ventilation level you have selec-
ted. X
Make sure that the key is in position 1or
2 in the ignition lock.
X To switch on: press button:repeatedly
until the required ventilation level is set.
i If you open the side windows and the slid-
ing/tilting sunroof* using the key
(Y page 102), the seat ventilation of the
driver's seat automatically switches to the
highest level.
X To switch off: press button:repeatedly
until all indicator lamps go out.
i If the battery voltage is too low, the seat
ventilation may switch off. Seat heating*
The three red indicator lamps in the button
indicate the heating level you have selected. Driver's and front-passenger seat Seats
81Controls
* optional
212_AKB; 2; 4, en-GB
mkalafa,
Version: 2.11.8.1 2009-05-05T14:17:16+02:00 - Seite 81 Z
Dateiname: 6515346702_buchblock.pdf; erzeugt am 07. May 2009 14:15:53; WK
Page 104 of 373
G
Risk of injury
Do not leave children unsupervised in the
vehicle, even if they are secured in a child
restraint system. The children could:
R be seriously or even fatally injured on parts
of the vehicle
R be seriously or even fatally injured by pro-
longed exposure to extremely high or
extremely low temperatures
If children open a door, they could:
R seriously or even fatally injure other people
R get out of the vehicle and injure them-
selves, or be seriously or even fatally
injured by a passing vehicle
Activate the child-proof locks/override fea-
ture if children are travelling in the vehicle.
They could otherwise open doors or side win-
dows while the vehicle is in motion and
thereby injure themselves or others.
i Related topics:
R convenience opening from the out-
side (Y page 102) or from the inside
(Y page 180)
R convenience closing from the out-
side (Y page 102) or from the inside
(Y page 180)
R disabling the controls in the rear com-
partment (override feature)
R automatic closing of the side windows
(PRE-SAFE ®
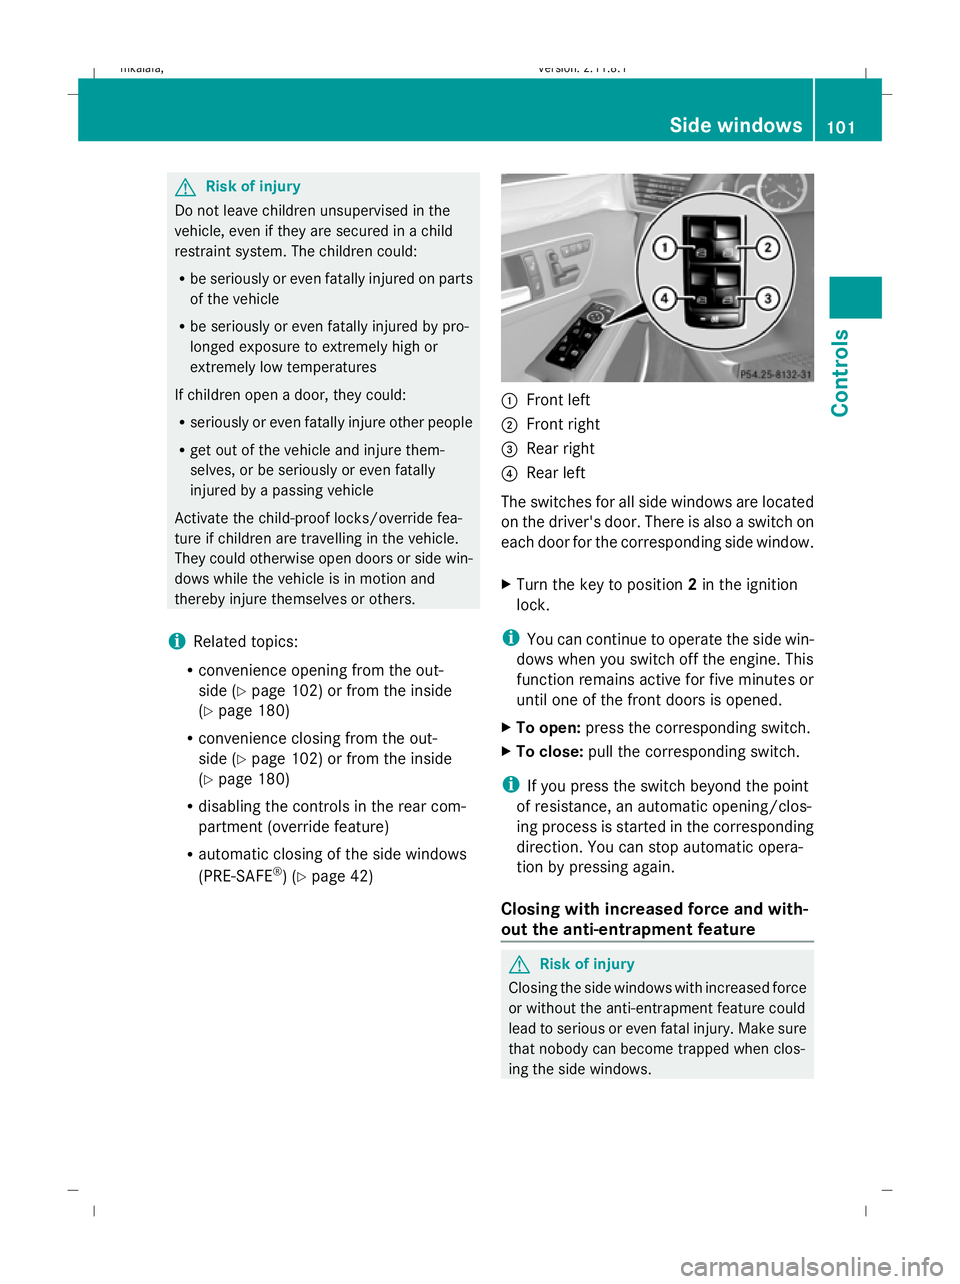
) (Y page 42) :
Front left
; Front right
= Rear right
? Rear left
The switches for all side windows are located
on the driver's door. There is also a switch on
each door for the corresponding side window.
X Turn the key to position 2in the ignition
lock.
i You can continue to operate the side win-
dows when you switch off the engine. This
function remains active for five minutes or
until one of the front doors is opened.
X To open: press the corresponding switch.
X To close: pull the corresponding switch.
i If you press the switch beyond the point
of resistance, an automatic opening/clos-
ing process is started in the corresponding
direction. You can stop automatic opera-
tion by pressing again.
Closing with increased force and with-
out the anti-entrapment feature G
Risk of injury
Closing the side windows with increased force
or without the anti-entrapment feature could
lead to serious or even fatal injury. Make sure
that nobody can become trapped when clos-
ing the side windows. Side windows
101Controls
212_AKB; 2; 4, en-GB
mkalafa,V ersion: 2.11.8.1
2009-05-05T14:17:16+02:00 - Seite 101 Z
Dateiname: 6515346702_buchblock.pdf; erzeugt am 07. May 2009 14:16:02; WK