2009 MERCEDES-BENZ E-CLASS ESTATE window
[x] Cancel search: windowPage 184 of 373
X
Convenience opening: press and hold the
g button for a second until the side win-
dows and the sliding/tilting sunroof*/pan-
orama sliding sunroof* have reached their
original position.
The indicator lamp above the gbutton
goes out. Air-recirculation mode is deacti-
vated.
i If you open the side windows or the slid-
ing/tilting sunroof* or panorama sliding
sunroof* manually after closing with the
convenience closing feature, they will
remain in this position when opened using
the convenience opening feature. Switching the residual heat on/off
The "residual heat" function is only available
with Thermotronic luxury 3-zone automatic
climate control*.
It is possible to make use of the residual heat
of the engine to continue heating the station-
ary vehicle for up to 30 minutes after the
engine has been switched off. The heating
time depends on the temperature that has
been set.
i The blower will run at a low speed regard-
less of the airflow setting.
i If you activate the "residual heat" function
at high temperatures, only the ventilation
will be activated. The blower runs at
medium speed.
i It is possible that the "residual heat" func-
tion may be activated automatically an hour
after the key is removed. The vehicle is then
ventilated for 30 minutes to dry the air con-
ditioning system.
X Turn the key to position 0in the ignition
lock or remove it.
X To switch on: press theÌbutton.
The indicator lamp above the Ìbutton
lights up. X
To deactivate: press theÌbutton.
The indicator lamp above the Ìbutton
goes out.
i The residual heat automatically switches
off after around 30 minutes or if:
R the ignition is switched on
R the battery voltage drops Switching the auxiliary heating/ven-
tilation* on/off
Notes on the auxiliary heating/ventila-
tion system G
Risk of poisoning
Exhaust fumes are produced when the auxili-
ary heating is in operation. Inhaling these
exhaust fumes can be poisonous. You should
therefore switch off the auxiliary heating in
confined spaces without an extraction sys-
tem, e.g. a garage. G
Risk of fire
When operating the auxiliary heating, parts of
the vehicle may become very hot, and highly
inflammable material such as fuels could be
ignited. Operating the auxiliary heating is thus
prohibited at filling stations or when your vehi-
cle is being refuelled. You must therefore
switch off the auxiliary heating at filling sta-
tions.
i Switch the auxiliary heating on regularly
once a month for about ten minutes.
The auxiliary heating heats the air in the vehi-
cle interior to the set temperature without
using the heat of the running engine. The aux-
iliary heating is operated using the vehicle's
fuel. For this reason, the tank content must
be at least at reserve fuel level to ensure that
the auxiliary heating functions.
The auxiliary heating/ventilation automati-
cally adjusts to changes in temperature and
weather conditions. For this reason, the aux-
iliary heating could switch from ventilation Air conditioning
181Controls
* optional
212_AKB; 2; 4, en-GB
mkalafa,
Version: 2.11.8.1 2009-05-05T14:17:16+02:00 - Seite 181 Z
Dateiname: 6515346702_buchblock.pdf; erzeugt am 07. May 2009 14:16:31; WK
Page 187 of 373
X
Press the uand^ buttons simulta-
neously.
The new departure time is stored.
Activating a set departure time
X Press the ,or. button repeatedly
until the desired departure time appears in
the display.
X Press the ubutton.
The Ísymbol and the departure time
appear in the display.
Deactivating a set departure time
X Press the ,or. button.
The status of the auxiliary heating is shown
in the display.
X Press the .button.
The first departure time stored appears in
the display.
X Press the ^button.
The display message OFFappears in the
display. Sliding sunroof
General notes
G
Risk of injury
Make sure that nobody can become trapped
when closing the sliding sunroof. If there is a
risk of entrapment, release the switch and
push it briefly in any direction to stop the slid-
ing sunroof. G
Risk of injury
Children could injure themselves if they oper-
ate the sliding sunroof.
Never leave children unsupervised in the vehi-
cle. Always take the key with you when leaving
the vehicle, even if you are only leaving it for
a short time. G
Risk of injury
The glass in the panorama sunroof could
break in an accident. If you are not wearing a seat belt, there is a risk that you could be
thrown through the opening in the event of the
vehicle overturning. Therefore, always wear a
seat belt to reduce the risk of injuries.
! Only open the panorama sliding sunroof
if it is free of snow and ice. Otherwise, mal-
functions may occur.
Do not allow anything to protrude from the
sliding sunroof. The seals could otherwise
be damaged.
i When the sliding sunroof is open, apart
from the normal airflow noises resonance
noises may also occur. They are caused by
minor pressure fluctuations in the vehicle
interior. Change the position of the sliding
sunroof or open a side window slightly to
reduce or eliminate these noises.
i Related topics:
R convenience opening from the out-
side (Y page 102) or from the inside
(Y page 180)
R convenience closing from the out-
side (Y page 102) or from the inside
(Y page 180)
R automatic closing of the sliding sunroof
(PRE-SAFE) (Y page 42) 184
Sliding sunroofControls
212_AKB; 2; 4, en-GB
mkalafa,
Version: 2.11.8.1 2009-05-05T14:17:16+02:00 - Seite 184
Dateiname: 6515346702_buchblock.pdf; erzeugt am 07. May 2009 14:16:32; WK
Page 201 of 373
Otherwise, vehicle occupants could be
injured by objects being thrown around if you:
R brake sharply
R change direction suddenly
R are involved in an accident
Please observe the loading guidelines.
Observe the following points or guidelines
when securing loads:
R secure the load using the lashing eyelets.
R do not use elastic straps or nets to secure
a load, as these are only intended as an
anti-slip protection for light loads.
R do not route lashing materials across sharp
edges or corners.
R pad sharp edges for protection.
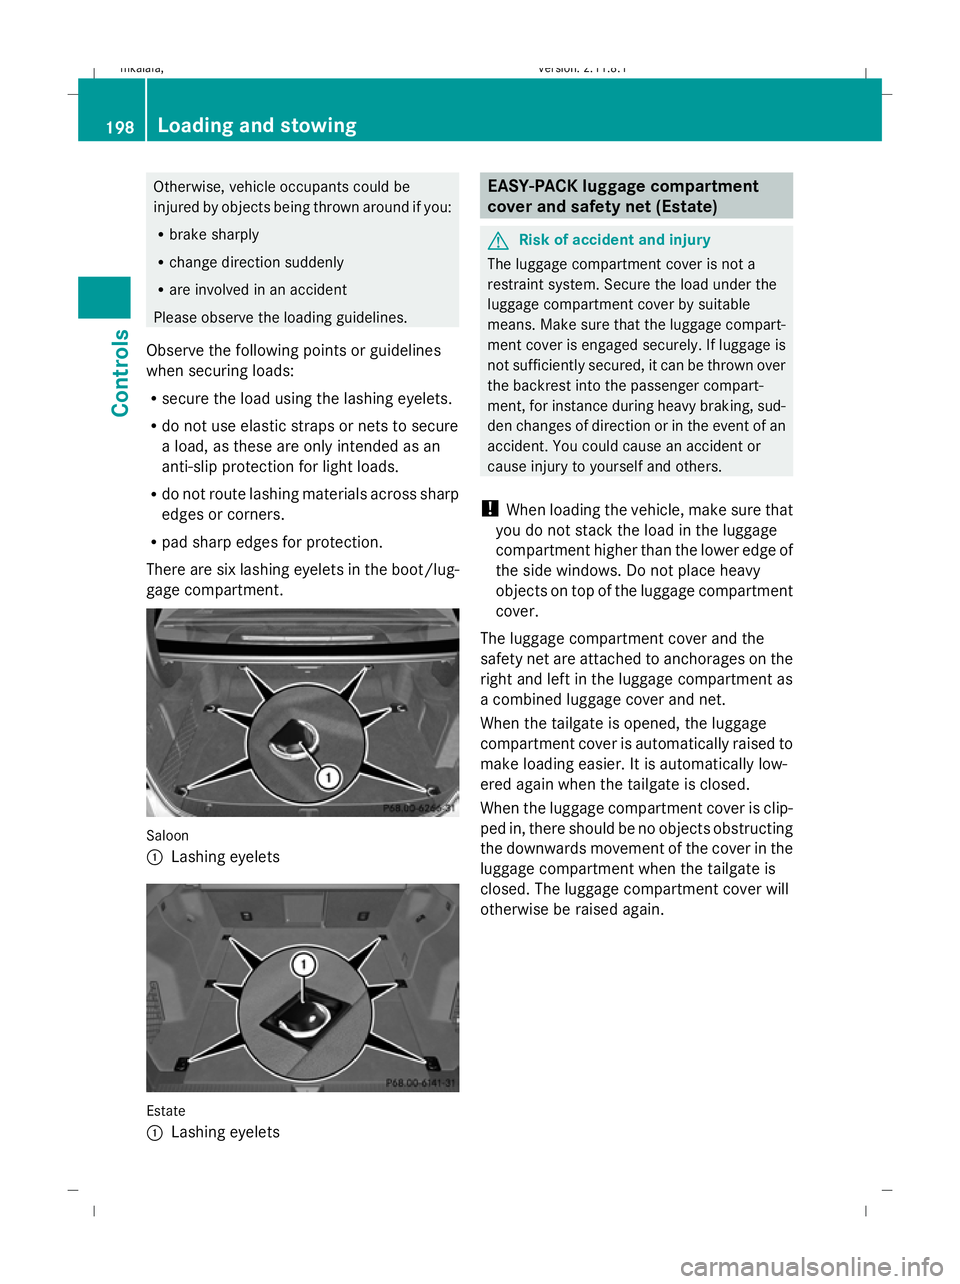
There are six lashing eyelets in the boot/lug-
gage compartment. Saloon
:
Lashing eyelets Estate
:
Lashing eyelets EASY-PACK luggage compartment
cover and safety net (Estate)
G
Risk of accident and injury
The luggage compartment cover is not a
restraint system. Secure the load under the
luggage compartment cover by suitable
means. Make sure that the luggage compart-
ment cover is engaged securely. If luggage is
not sufficiently secured, it can be thrown over
the backrest into the passenger compart-
ment, for instance during heavy braking, sud-
den changes of direction or in the event of an
accident. You could cause an accident or
cause injury to yourself and others.
! When loading the vehicle, make sure that
you do not stack the load in the luggage
compartment higher than the lower edge of
the side windows. Do not place heavy
objects on top of the luggage compartment
cover.
The luggage compartment cover and the
safety net are attached to anchorages on the
right and left in the luggage compartment as
a combined luggage cover and net.
When the tailgate is opened, the luggage
compartment cover is automatically raised to
make loading easier. It is automatically low-
ered again when the tailgate is closed.
When the luggage compartment cover is clip-
ped in, there should be no objects obstructing
the downwards movement of the cover in the
luggage compartment when the tailgate is
closed. The luggage compartment cover will
otherwise be raised again. 198
Loading and stowingControls
212_AKB; 2; 4, en-GB
mkalafa,
Version: 2.11.8.1 2009-05-05T14:17:16+02:00 - Seite 198
Dateiname: 6515346702_buchblock.pdf; erzeugt am 07. May 2009 14:16:42; WK
Page 210 of 373
Features
Sun visors
G
Risk of accident
Keep the mirrors in the sun visors covered
while driving. Otherwise, you could be daz-
zled, impairing your view of traffic conditions.
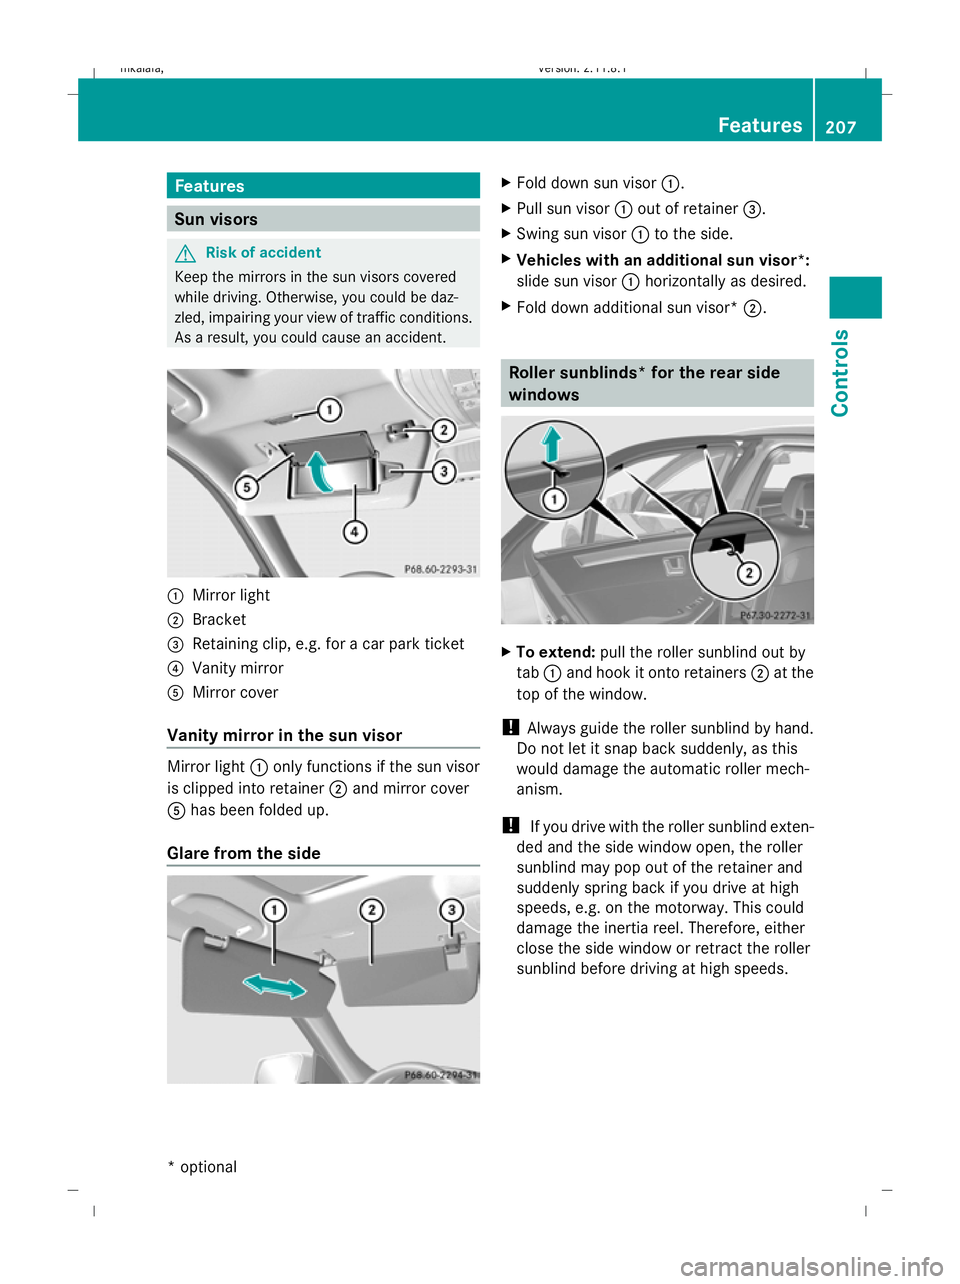
As a result, you could cause an accident. :
Mirror light
; Bracket
= Retaining clip, e.g. for a car park ticket
? Vanity mirror
A Mirror cover
Vanity mirror in the sun visor Mirror light
:only functions if the sun visor
is clipped into retainer ;and mirror cover
A has been folded up.
Glare from the side X
Fold down sun visor :.
X Pull sun visor :out of retainer =.
X Swing sun visor :to the side.
X Vehicles with an additional sun visor *:
sl ide sun visor :horizontally as desired.
X Fold down additional sun visor* ;. Roller sunblinds* for the rear side
windows
X
To extend: pull the roller sunblind out by
tab :and hook it onto retainers ;at the
top of the window.
! Always guide the roller sunblind by hand.
Do not let it snap back suddenly, as this
would damage the automatic roller mech-
anism.
! If you drive with the roller sunblind exten-
ded and the side window open, the roller
sunblind may pop out of the retainer and
suddenly spring back if you drive at high
speeds, e.g. on the motorway. This could
damage the inertia reel. Therefore, either
close the side window or retract the roller
sunblind before driving at high speeds. Features
207Controls
* optional
212_AKB; 2; 4, en-GB
mkalafa,
Version: 2.11.8.1 2009-05-05T14:17:16+02:00 - Seite 207 Z
Dateiname: 6515346702_buchblock.pdf; erzeugt am 07. May 2009 14:16:49; WK
Page 211 of 373
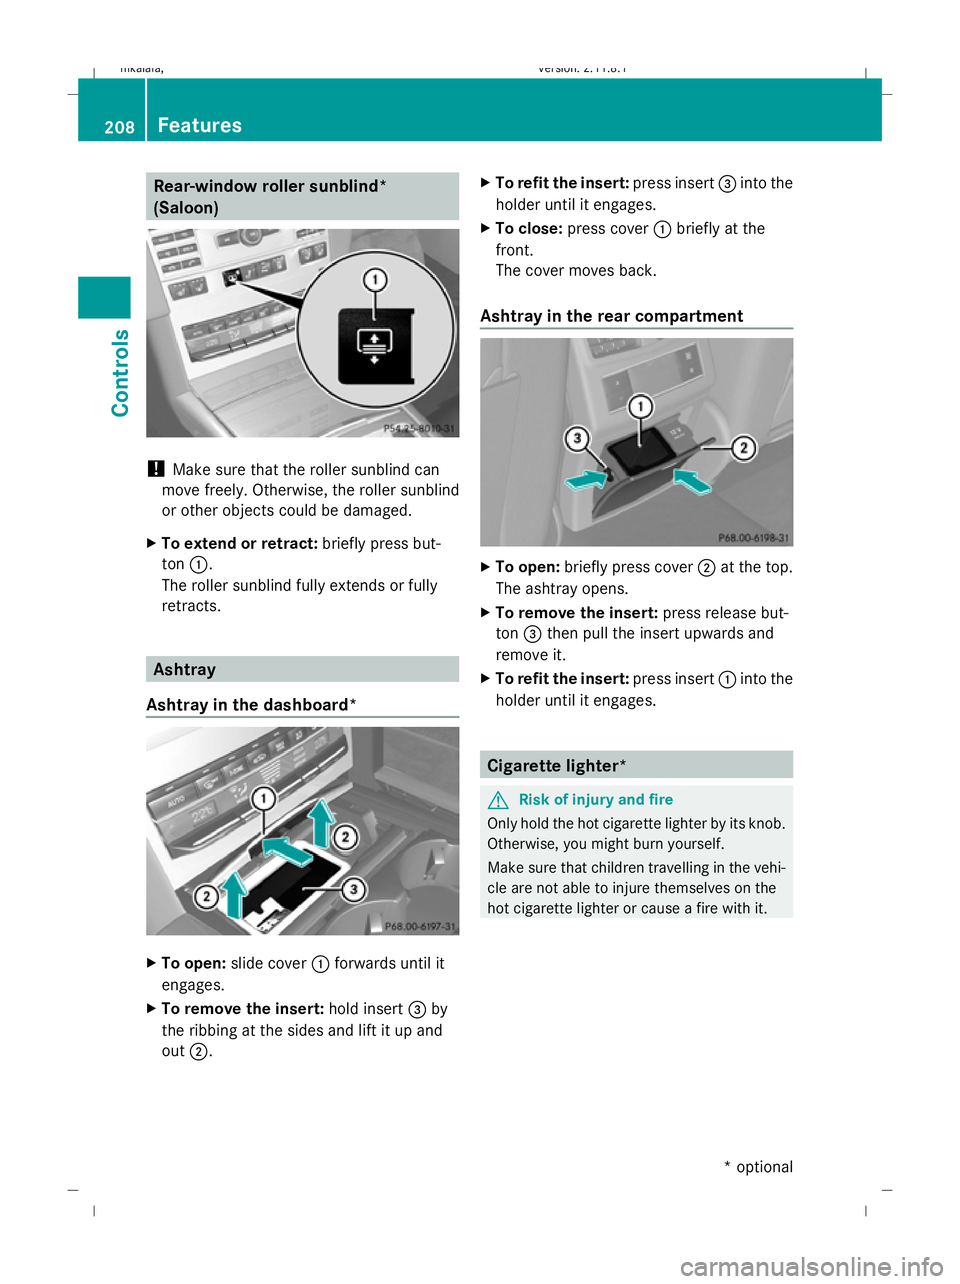
Rear-window roller sunblind*
(Saloon)
!
Make sure that the roller sunblind can
move freely. Otherwise, the roller sunblind
or other objects could be damaged.
X To extend or retract: briefly press but-
ton :.
The roller sunblind fully extends or fully
retracts. Ashtray
Ashtray in the dashboard* X
To open: slide cover :forwards until it
engages.
X To remove the insert: hold insert=by
the ribbing at the sides and lift it up and
out ;. X
To refit the insert: press insert=into the
holder until it engages.
X To close: press cover :briefly at the
front.
The cover moves back.
Ashtray in the rear compartment X
To open: briefly press cover ;at the top.
The ashtray opens.
X To remove the insert: press release but-
ton =then pull the insert upwards and
remove it.
X To refit the insert: press insert:into the
holder until it engages. Cigarette lighter*
G
Risk of injury and fire
Only hold the hot cigarette lighter by its knob.
Otherwise, you might burn yourself.
Make sure that children travelling in the vehi-
cle are not able to injure themselves on the
hot cigarette lighter or cause a fire with it. 208
FeaturesControls
* optional
212_AKB; 2; 4, en-GB
mkalafa
,V ersion: 2.11.8.1
2009-05-05T14:17:16+02:00 - Seite 208
Dateiname: 6515346702_buchblock.pdf; erzeugt am 07. May 2009 14:16:50; WK
Page 244 of 373
If the vehicle is very dirty, pre-wash it before
cleaning it in an automatic car wash.
! Make sure that the automatic car wash is
suitable for the size of the vehicle. Fold in
the exterior mirrors before the vehicle is
washed. There is otherwise a risk of dam-
age to the exterior mirrors.
! When washing your vehicle in a tow-
through car wash, make sure that the auto-
matic transmission* is in position N. The
vehicle could otherwise be damaged.
R Vehicles with DIRECT SELECT lever and
key:
Do not remove the key from the ignition
lock. Do not open the driver's or front-
passenger door when the engine is
switched off, as this automatically shifts
the automatic transmission to park posi-
tion Pand locks the wheels, unless you
have previously shifted the automatic
transmission to N.
R Vehicles with DIRECT SELECT lever and
KEYLESS GO*:
Do not open the driver's or front-
passenger door when the engine is
switched off, as this shifts the automatic
transmission to park position Pand locks
the wheels.
! Make sure that the side windows are
closed completely, that the blower for the
ventilation/heating is switched off and that
the windscreen wiper switch is in position
0. The rain/light sensor could otherwise be
activated and thereby cause unintentional
wiping. This could result in damage to the
vehicle.
After using an automatic car wash, wipe off
wax and drying agents from the windscreen
and the wiper blades. This will prevent smears
and reduce wiping noises caused by residue
on the windscreen. High-pressure cleaners G
Risk of accident
Do not use high-pressure cleaners with circu-
lar-jet nozzles (dirt grinders) to clean your
vehicle, in particular the tyres. You could oth-
erwise damage the tyres and cause an acci-
dent.
! Observe the instructions issued by the
equipment manufacturer concerning the
distance to be maintained between the
nozzle of the high-pressure cleaner and the
vehicle (at least 30 cm).
Move the high-pressure cleaner nozzle
around when cleaning your vehicle.
Do not aim directly at any of the following:
R tyres
R door joint
R electrical components
R battery
R connectors
R lights
R seals
R trim elements
R ventilation slots
Damaged seals or electrical components
can lead to failures or leaks.
Care and treatment of matt paint-
work* Your vehicle has a clear matt finish. For this
reason, you should make sure that you
adhere to the following instructions to avoid
damage to paintwork due to improper treat-
ment.
!
Under no circumstances should you pol-
ish the vehicle. Polishing will make the
paintwork shine.
! When caring for your paintwork, do not
use paint cleaner, grinding or polishing Care
241Operation
* optional
212_AKB; 2; 4, en-GB
mkalafa
,V ersion: 2.11.8.1
2009-05-05T14:17:16+02:00 - Seite 241 Z
Dateiname: 6515346702_buchblock.pdf; erzeugt am 07. May 2009 14:17:01; WK
Page 245 of 373
products, or gloss preservers such as wax.
These products are only suitable for high-
gloss finishes. Using them on a vehicle with
a matt finish results in serious damage to
the surface (gleaming, spotted areas).
Always have paintwork repairs carried out
at a qualified specialist workshop, e.g. a
Mercedes-Benz Service Centre.
i From the range of available Mercedes-
Benz care products, use only the insect
remover and the car shampoo.
Cleaning the paintwork Scratches, corrosive deposits, areas affected
by corrosion and damage caused by inade-
quate care cannot always be completely
repaired. In such cases, visit a qualified spe-
cialist workshop immediately, e.g. a
Mercedes-Benz Service Centre.
X Remove the following types of dirt immedi-
ately, whilst avoiding rubbing too hard.
Soak:
R insect remains with insect remover
R bird droppings with water
and rinse off the treated surface after-
wards.
Remove:
R tree resin, oils, fuels and greases by rub-
bing gently with a cloth soaked in petro-
leum ether or lighter fluid.
R tar stain with tar remover
R wax with silicone remover
! Do not affix:
R stickers
R films
R magnetic plates or similar items
to painted surfaces. Otherwise, you could
damage the paintwork. Cleaning the wheels !
Do not use acidic wheel cleaners to
remove brake dust. This could damage
wheel bolts and brake components.
Cleaning the windows X
Clean the inside and outside of the win-
dows with a damp cloth and a cleaning
product approved and recommended by
Mercedes-Benz.
! Clean the water drainage channels of the
windscreen and the rear window at regular
intervals. Under certain circumstances,
deposits such as leaves, petals and pollen
may prevent water from draining away
leading to corrosion damage.
Cleaning the wiper blades G
Risk of injury
Before cleaning the windscreen or wiper
blades, turn the key to position 0in the igni-
tion lock or press the Start/Stop button* until
all indicator lamps have gone out in the instru-
ment cluster. The windscreen wipers could
otherwise move and cause injury.
! Do not clean the wiper blades too often
and do not rub them too hard, as this will
result in damage to the graphite coating.
This could cause wiper noise.
X Fold the wiper arms away from the wind-
screen.
X Clean the wiper blades carefully with a
damp cloth.
X Fold the wiper arms back again before
switching on the ignition.
Cleaning the headlamps X
Clean the plastic lenses of the headlamps
with a wet sponge and windscreen washer
fluid or cleaning cloths. 242
CareOperation
* optional
212_AKB; 2; 4, en-GB
mkalafa,
Version: 2.11.8.1 2009-05-05T14:17:16+02:00 - Seite 242
Dateiname: 6515346702_buchblock.pdf; erzeugt am 07. May 2009 14:17:01; WK
Page 281 of 373

Display messages
Possible causes/consequences and
X
X Solutions 6 Rear
centre
malfunc‐
tion Con‐
sult work‐
shop
G
Risk of injury
SRS has malfunctioned at the rear centre*. The 6warning
lamp also lights up in the instrument cluster.
X Visit a qualified specialist workshop. 6 Left
windowbag
malfunc‐
tion Con‐
sult work‐
shop
or
Right
windowbag
malfunc‐
tion Con‐
sult work‐
shop
G
Risk of injury
There is a malfunction in the left-hand or right-hand window-
bag. The 6warning lamp also lights up in the instrument
cluster.
X Visit a qualified specialist workshop. C There is only a small amount of fuel in the fuel tank.
X
Refuel at the nearest filling station. 8 Reserve
fuel level The fuel level has fallen below the reserve range. The opera-
tion of the auxiliary heating* can no longer be guaranteed.
X
Refuel at the nearest filling station. ¥ Top up
washer
fluid The washer fluid level in the washer fluid reservoir has drop-
ped below the minimum.
X
Top up the windscreen washer fluid (Y page 222).Troubleshooting
Points to remember
G
Risk of accident and injury
The operating safety of the vehicle can be compromised if maintenance work is carried out
incorrectly. This could cause you to lose control of the vehicle and cause an accident. The safety
systems may also not be able to protect you or others as they are designed to do.
Always have maintenance work carried out at a qualified specialist workshop. The qualified spe-
cialist workshop must have the necessary specialist knowledge and tools to carry out the work
required. Mercedes-Benz recommends that you use a Mercedes-Benz Service Centre for this
purpose. In particular, work relevant to safety or on safety-related systems must be carried out
at a qualified specialist workshop. 278
TroubleshootingPractical advice
* optional
212_AKB; 2; 4, en-GB
mkalafa,
Version: 2.11.8.1 2009-05-05T14:17:16+02:00 - Seite 278
Dateiname: 6515346702_buchblock.pdf; erzeugt am 07. May 2009 14:17:11; WK