2009 MERCEDES-BENZ E-CLASS ESTATE warning
[x] Cancel search: warningPage 68 of 373
G
Risk of accident
If, in a critical driving situation, you do not
receive a visual and acoustic warning:
R PRE-SAFE ®
Brake did not detect the risk of
a collision
R PRE-SAFE ®
Brake is switched off
R PRE-SAFE ®
Brake has failed
You must then brake to avoid a collision.
X To activate: activate PRE-SAFE ®
Brake in
the on-board computer (Y page 130).
The Ä symbol appears in the lower
multi-function display, as long as the HOLD
function is not activated (Y page 151).
On vehicles with parking guidance*, drive
range Pmust be engaged for the symbol to
be displayed.
The radar sensors are automatically deacti-
vated in the vicinity of radio telescope facili-
ties (Y page 362).
For PRE-SAFE ®
Brake to assist you when driv-
ing, the radar sensor system must be
switched on and operational.
PRE-SAFE ®
Brake does not always detect
complex traffic situations properly. You can
terminate the braking action of PRE-SAFE ®
Brake in a non-critical driving situation at any
time if:
R an acoustic and visual warning occurs
R the vehicle brakes
To end this you can either depress the accel-
erator pedal further, activate kickdown or
release the brake pedal.
The braking action of PRE-SAFE ®
Brake is
ended automatically if:
R you manoeuvre to avoid the obstacle.
R you drive slower than approximately
15 km/h.
R there is no longer an obstacle detected in
front of your vehicle.
R there is no longer any danger of a collision. Following a collision or crash-related damage
to the front end of the vehicle, have the con-
figuration and operation of the radar sensors
checked. Choose a qualified specialist work-
shop for this which has the necessary spe-
cialist knowledge and tools for the work
required. Mercedes-Benz recommends that
you use a Mercedes-Benz Service Centre for
this purpose.
Anti-theft systems
Immobiliser
The immobiliser prevents your vehicle from
being started without the correct key.
Activating the immobiliser X
With the key: remove the key from the
ignition lock.
X With KEYLESS GO*: press the start/stop
button on the dashboard.
The engine switches off.
Deactivating the immobiliser X
With the key: turn the key to position 2in
the ignition lock.
X With KEYLESS GO*: press the start/stop
button on the dashboard twice without
depressing the brake.
i The immobiliser is always deactivated
when you start the engine. ATA* (anti-theft alarm system)
A visual and audible alarm is triggered when
the alarm system is primed and you open:
R a door
R a door or the boot lid with the emergency
key element
R the boot lid/tailgate
R the bonnet Anti-theft systems
65Safety
* optional
212_AKB; 2; 4, en-GB
mkalafa
,V ersion: 2.11.8.1
2009-05-05T14:17:16+02:00 - Seite 65 Z
Dateiname: 6515346702_buchblock.pdf; erzeugt am 07. May 2009 14:15:44; WK
Page 94 of 373
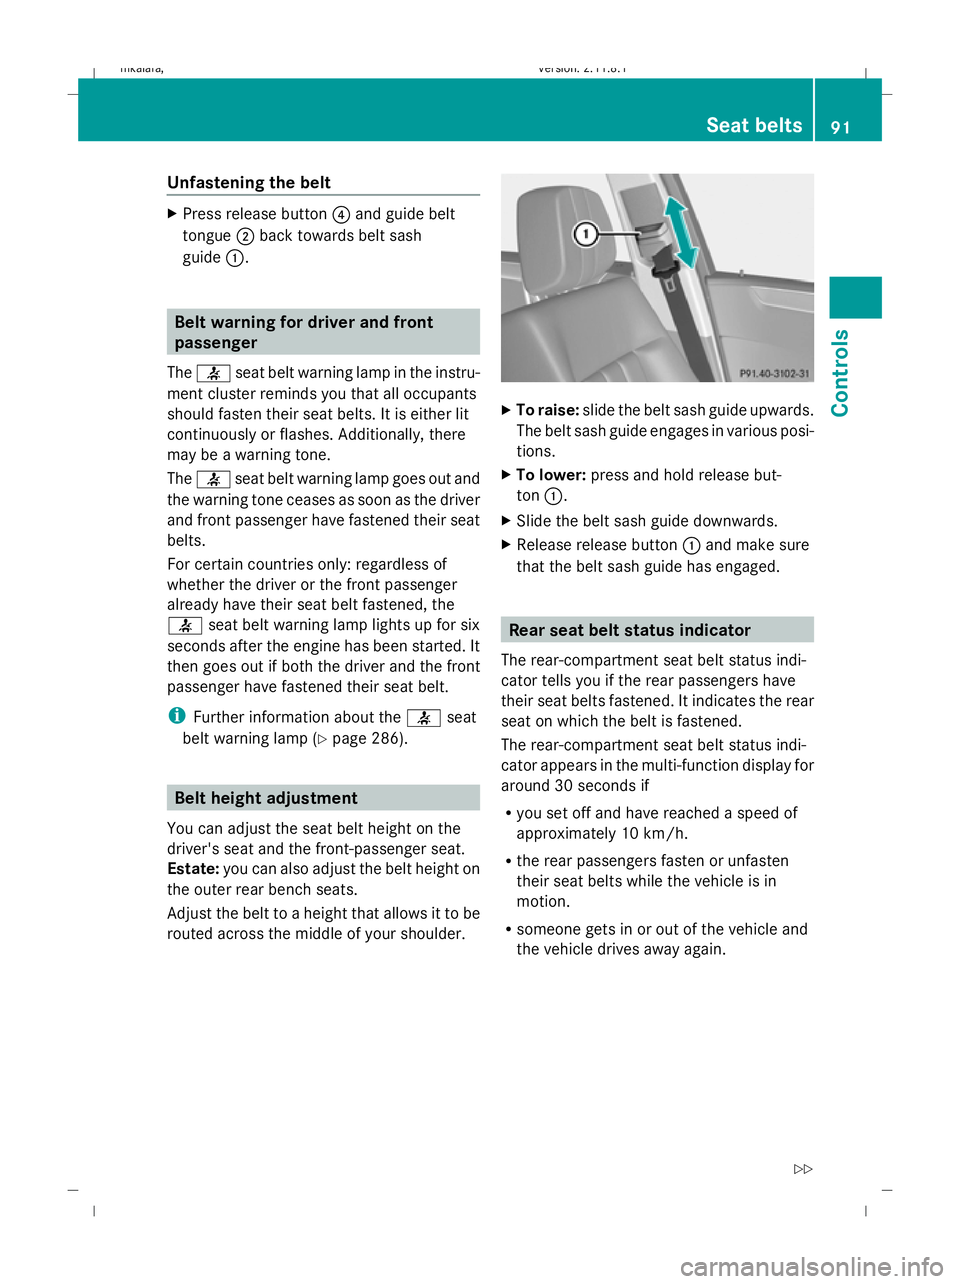
Unfastening the belt
X
Press release button ?and guide belt
tongue ;back towards belt sash
guide :. Belt warning for driver and front
passenger
The 7 seat belt warning lamp in the instru-
ment cluster reminds you that all occupants
should fasten their seat belts. It is either lit
continuously or flashes. Additionally, there
may be a warning tone.
The 7 seat belt warning lamp goes out and
the warning tone ceases as soon as the driver
and front passenger have fastened their seat
belts.
For certain countries only: regardless of
whether the driver or the front passenger
already have their seat belt fastened, the
7 seat belt warning lamp lights up for six
seconds after the engine has been started. It
then goes out if both the driver and the front
passenger have fastened their seat belt.
i Further information about the 7seat
belt warning lamp (Y page 286). Belt height adjustment
You can adjust the seat belt height on the
driver's seat and the front-passenger seat.
Estate: you can also adjust the belt height on
the outer rear bench seats.
Adjust the belt to a height that allows it to be
routed across the middle of your shoulder. X
To raise: slide the belt sash guide upwards.
The belt sash guide engages in various posi-
tions.
X To lower: press and hold release but-
ton :.
X Slide the belt sash guide downwards.
X Release release button :and make sure
that the belt sash guide has engaged. Rear seat belt status indicator
The rear-compartment seat belt status indi-
cator tells you if the rear passengers have
their seat belts fastened. It indicates the rear
seat on which the belt is fastened.
The rear-compartment seat belt status indi-
cator appears in the multi-function display for
around 30 seconds if
R you set off and have reached a speed of
approximately 10 km/h.
R the rear passengers fasten or unfasten
their seat belts while the vehicle is in
motion.
R someone gets in or out of the vehicle and
the vehicle drives away again. Seat belts
91Controls
212_AKB; 2; 4, en-GB
mkalafa, Version: 2.11.8.1 2009-05-05T14:17:16+02:00 - Seite 91 Z
Dateiname: 6515346702_buchblock.pdf; erzeugt am 07. May 2009 14:15:57; WK
Page 99 of 373
The system may not recognise the following
road users
R
Road users that have no lighting, e.g.
pedestrians
R Road users that have poor lighting, e.g.
cyclists
R Road users whose lighting is not clearly
visible, e.g. road users behind a crash bar-
rier
R On rare occasions: road users that have
lights may be recognised too late or not at
all.
The automatic main-beam headlamps will not
be deactivated, or they may be activated
despite road users travelling in front of, or
approaching, the vehicle.
Thus, you could cause an accident and injure
yourself and others. Always observe traffic
conditions and, if necessary, dip the lights
manually.
X To activate: activate the Adaptive High-
beam Assist using the on-board computer
(Y page 133).
X Turn the light switch to c.
X Press the combination switch beyond the
pressure point in the direction of arrow
D (Ypage 94).
When the dipped-beam headlamps are
switched on, the _indicator lamp in the
instrument cluster lights up.
If you are driving faster than approximately
40 km/h, the headlamp range is set auto-
matically depending on the distance
between the vehicle and other road users.
If you are driving faster than approximately
55 km/h and no other road users are rec-
ognised, the main-beam headlamps are
switched on automatically. The Kindi-
cator lamp in the instrument cluster also
lights up.
If you are driving slower than approximately
45 km/h and other road users are recog-
nised or the roads are adequately lit, the main-beam headlamps are switched off
automatically. The
Kindicator lamp in
the instrument cluster goes out. The _
indicator lamp in the instrument cluster
stays on.
X To deactivate: move the combination
switch back to its normal position.
The _ indicator lamp in the instrument
cluster goes out.
Turn signal lamp X
To indicate a minor change of direc-
tion: press the combination switch briefly
in the direction of arrow EorG
(Y page 94).
The corresponding turn signal flashes three
times.
X To indicate: push the combination switch
beyond the pressure point in the direction
of arrow EorG (Ypage 94).
The corresponding turn signal indicator
lamp ! or# in the instrument clus-
ter flashes.
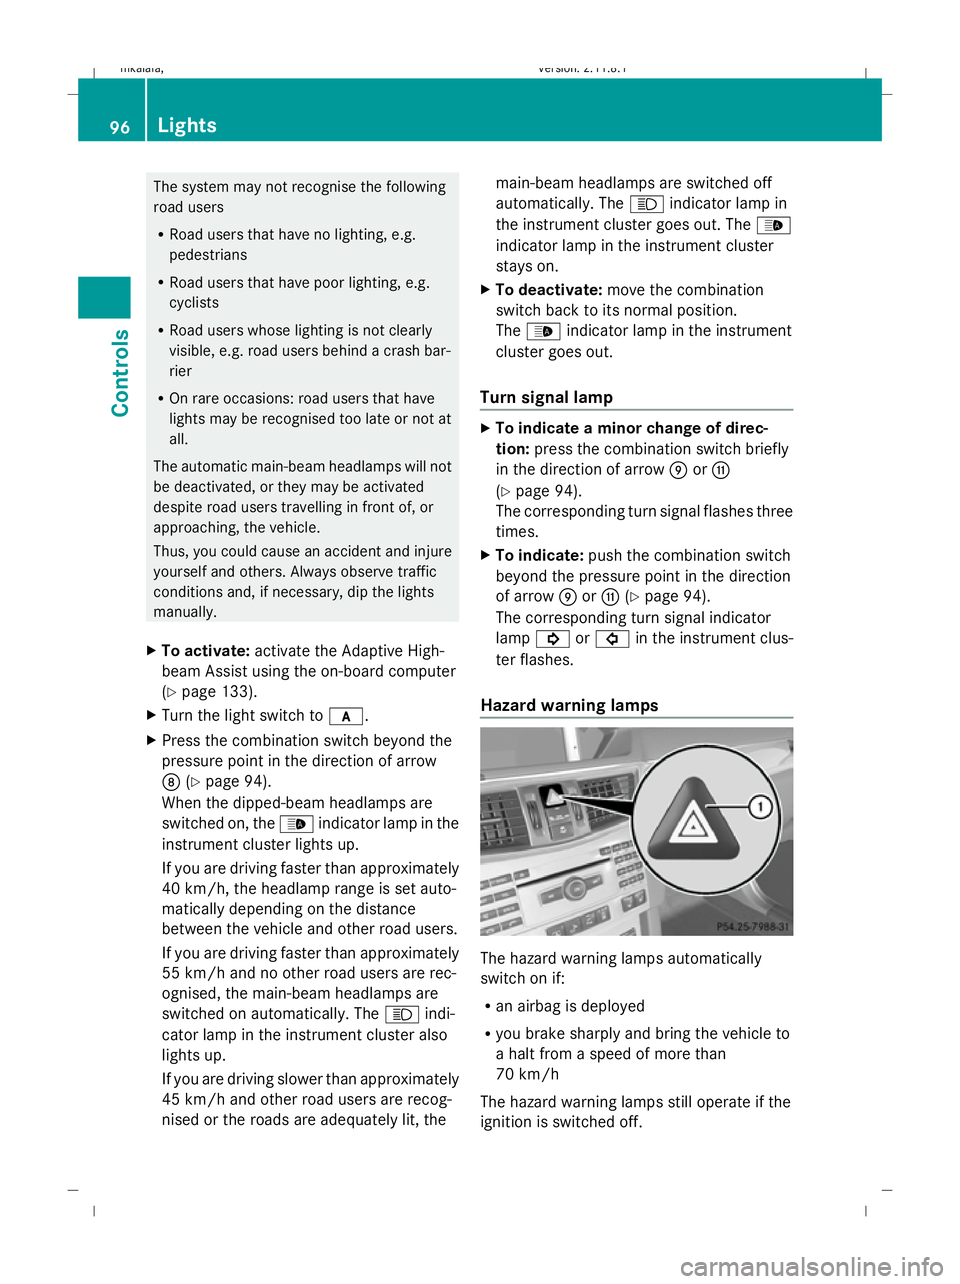
Hazard warning lamps The hazard warning lamps automatically
switch on if:
R
an airbag is deployed
R you brake sharply and bring the vehicle to
a halt from a speed of more than
70 km/h
The hazard warning lamps still operate if the
ignition is switched off. 96
LightsControls
212_AKB; 2; 4, en-GB
mkalafa,
Version: 2.11.8.1 2009-05-05T14:17:16+02:00 - Seite 96
Dateiname: 6515346702_buchblock.pdf; erzeugt am 07. May 2009 14:16:00; WK
Page 100 of 373

X
To switch on: press button:.
All turn signals flash.
X To switch on the hazard warning lamps
on one side: also push the combination
switch beyond the pressure point in the
direction of arrow EorG (Ypage 94).
The indicator lamp on the corresponding
side flashes.
X To switch off: press button:.
The hazard warning lamp switches off auto-
matically after full brake application if the
vehicle then reaches a speed of over
10 km/h again.
Intelligent Light System* (bi-xenon
headlamps*) The Intelligent Light System is a system which
adjusts the headlamps automatically to suit
the prevailing driving and weather conditions.
The bi-xenon headlamps offer enhanced func-
tions to improve illumination of the road sur-
face, e.g. depending on the vehicle speed or
weather conditions. The system includes the
active light function, cornering light function,
motorway mode and extended range fog-
lamps. The system is only active when it is
dark.
You can activate or deactivate the "Intelligent
Light System" using the on-board computer
(Y page 132).
Active light function The active light function is a system that
moves the headlamps according to the steer-
ing movements of the front wheels. In this way, relevant areas remain illuminated while
driving. This allows you to recognise pedes-
trians, cyclists and animals.
Cornering light function
The cornering light function improves the illu-
mination of the road surface in the broad
direction you are turning, e.g. making it easier
to see in tight corners. It can only be activated
when the dipped-beam headlamps are
switched on.
Active:
R
if you are driving at speeds below
40 km/h, the cornering light function is
activated either by the turn signal or by the
steering wheel being turned.
R if you are driving at speeds between
40 km/h and 70 km/h, the cornering light
function is activated by the steering wheel
being turned.
Not active: if you are driving at speeds above
70 km/h or you switch off the turn signal or
move the steering wheel to the straight-
ahead position.
The cornering lamp may remain lit for a short
time, but is automatically switched off after
no more than three minutes. Lights
97Controls
* optional
212_AKB; 2; 4, en-GB
mkalafa,
Version: 2.11.8.1 2009-05-05T14:17:16+02:00 - Seite 97 Z
Dateiname: 6515346702_buchblock.pdf; erzeugt am 07. May 2009 14:16:00; WK
Page 102 of 373
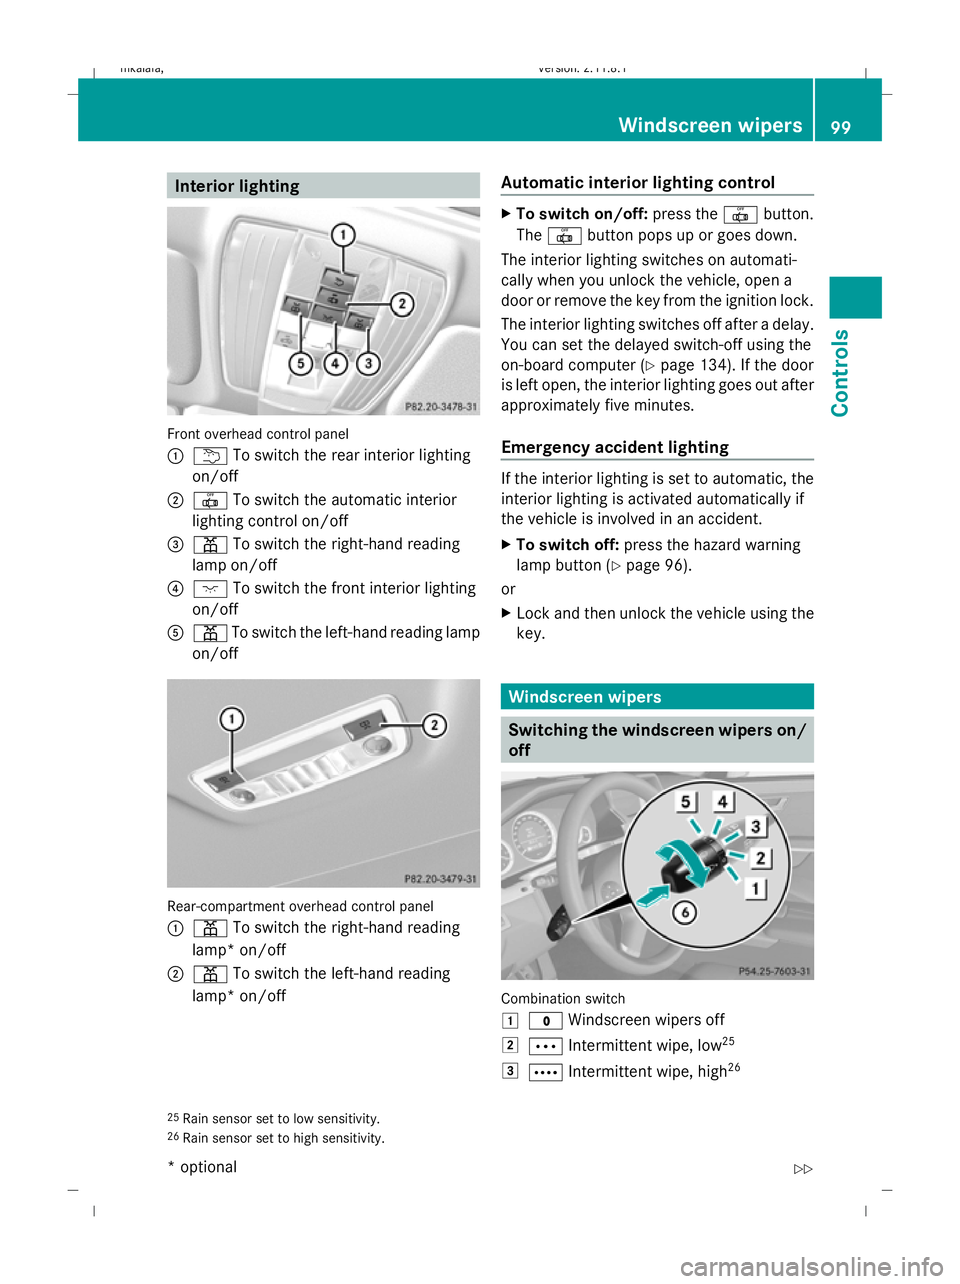
Interior lighting
Front overhead control panel
: u To switch the rear interior lighting
on/off
; | To switch the automatic interior
lighting control on/off
= p To switch the right-hand reading
lamp on/off
? c To switch the front interior lighting
on/off
A p To switch the left-hand reading lamp
on/off Rear-compartment overhead control panel
:
p To switch the right-hand reading
lamp* on/off
; p To switch the left-hand reading
lamp* on/off Automatic interior lighting control X
To switch on/off: press the|button.
The | button pops up or goes down.
The interior lighting switches on automati-
cally when you unlock the vehicle, open a
door or remove the key from the ignition lock.
The interior lighting switches off after a delay.
You can set the delayed switch-off using the
on-board computer (Y page 134). If the door
is left open, the interior lighting goes out after
approximately five minutes.
Emergency accident lighting If the interior lighting is set to automatic, the
interior lighting is activated automatically if
the vehicle is involved in an accident.
X To switch off: press the hazard warning
lamp button (Y page 96).
or
X Lock and then unlock the vehicle using the
key. Windscreen wipers
Switching the windscreen wipers on/
off
Combination switch
1
$ Windscreen wipers off
2 Ä Intermittent wipe, low 25
3 Å Intermittent wipe, high 26
25 Rain sensor set to low sensitivity.
26 Rain sensor set to high sensitivity. Windscreen wipers
99Controls
* optional
212_AKB; 2; 4, en-GB
mkalafa
,V ersion: 2.11.8.1
2009-05-05T14:17:16+02:00 - Seite 99 Z
Dateiname: 6515346702_buchblock.pdf; erzeugt am 07. May 2009 14:16:01; WK
Page 110 of 373
Parking
G
Risk of accident
Only remove the key from the ignition lock
when the vehicle is stationary, as you cannot
steer the vehicle with the key removed.
Never leave children unsupervised in the vehi-
cle. They could release the parking brake. This
could lead to a serious or fatal accident. G
Risk of fire
Make sure that the exhaust system does not
under any circumstances come into contact
with easily ignitable material such as dry grass
or petrol. Otherwise, the flammable material
may ignite and set the vehicle on fire.
To ensure that the vehicle is secured against
rolling away unintentionally:
R the parking brake must be applied
R on vehicles with manual transmission,
engage first gear or reverse gear
R on vehicles with automatic transmission*,
the transmission must be in position Pand
the key must be removed from the ignition
lock
R on steep uphill or downhill gradients, turn
the front wheels towards the kerb
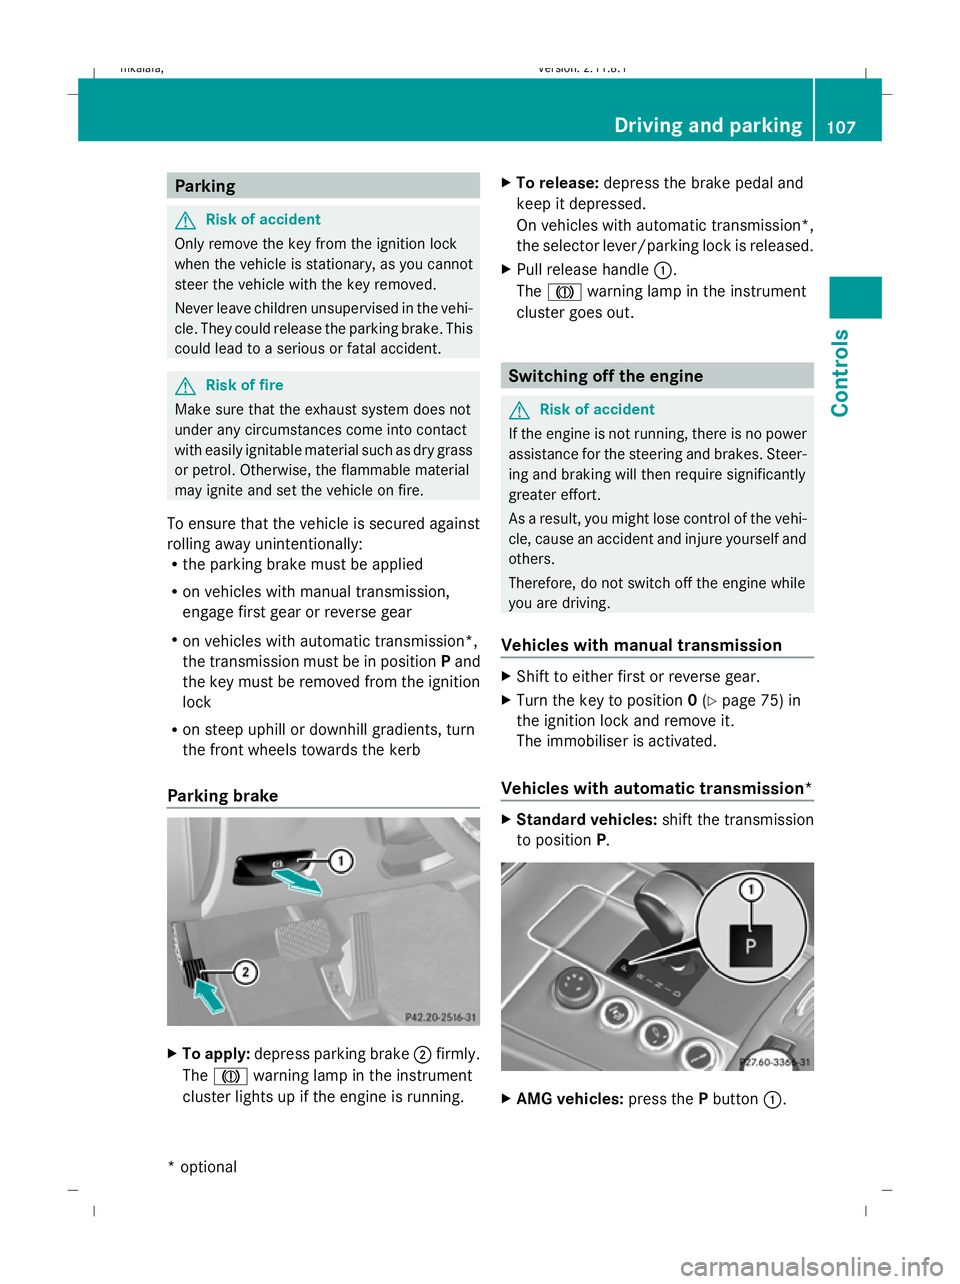
Parking brake X
To apply: depress parking brake ;firmly.
The J warning lamp in the instrument
cluster lights up if the engine is running. X
To release: depress the brake pedal and
keep it depressed.
On vehicles with automatic transmission*,
the selector lever/parking lock is released.
X Pull release handle :.
The J warning lamp in the instrument
cluster goes out. Switching off the engine
G
Risk of accident
If the engine is not running, there is no power
assistance for the steering and brakes. Steer-
ing and braking will then require significantly
greater effort.
As a result, you might lose control of the vehi-
cle, cause an accident and injure yourself and
others.
Therefore, do not switch off the engine while
you are driving.
Vehicles with manual transmission X
Shift to either first or reverse gear.
X Turn the key to position 0(Y page 75) in
the ignition lock and remove it.
The immobiliser is activated.
Vehicles with automatic transmission* X
Standard vehicles: shift the transmission
to position P. X
AMG vehicles: press thePbutton :. Driving and parking
107Controls
* optional
212_AKB; 2; 4, en-GB
mkalafa,
Version: 2.11.8.1 2009-05-05T14:17:16+02:00 - Seite 107 Z
Dateiname: 6515346702_buchblock.pdf; erzeugt am 07. May 2009 14:16:05; WK
Page 120 of 373
Downshifting
G
Risk of accident
Do not shift down to brake on a slippery road
surface. This could cause the drive wheels to
lose their grip, and the vehicle could skid.
X Pull the left-hand paddle ( Ypage 114).
The automatic transmission shifts down to
the next gear.
i For maximum acceleration, pull the left-
hand steering wheel gearshift paddle until
the transmission selects the optimum gear
for the current speed.
Kickdown
i On vehicles with AMG engines, it is not
possible to use kickdown in manual drive
program M. Instrument cluster
Points to remember
You will find an illustration of the instrument
cluster in the "At a glance" section
(Y page 27). G
Risk of accident
If the instrument cluster or the multi-function
display fails, then no display messages can be
shown.
You will not then be able to see information
about the vehicle status, such as speed and
outside temperature, warning and indicator
lamps, display messages or the failure of sys-
tems. The vehicle’s handling characteristics
may be affected. Adapt your driving style and
speed accordingly.
Immediately consult a qualified specialist
workshop which has the necessary specialist
knowledge and tools to carry out the work
required. Mercedes-Benz recommends that
you use a Mercedes-Benz Service Centre for
this purpose. In particular, work relevant to
safety or on safety-related systems must be
carried out at a qualified specialist workshop. Coolant temperature display
The coolant temperature gauge is in the
instrument cluster on the right-hand side.
Under normal operating conditions and with
the specified coolant level, the coolant tem-
perature may rise to 120 †. The coolant tem-
perature may rise to the top end of the scale
at high outside temperatures and on long
uphill stretches. Speedometer with segments
The segments in the speedometer indicate
which speed range is available.
Cruise control mode:
The segments light up from the stored speed
to the maximum speed.
Variable Speedtronic mode:
The segments light up from the start of the
scale to the selected limit speed.
Distronic Plus* mode:
One or two segments around the stored
speed light up. Rev counter
The red band in the rev counter indicates the
engine's overrevving range. The fuel supply is
interrupted to protect the engine when the
red band is reached.
! Do not drive in the overrevving range.
Doing so will damage the engine. Outside temperature display
G
Risk of accident
At temperatures just above freezing point, the
road could be icy, particularly in wooded areas
or on bridges. The vehicle could start skidding
if you fail to adapt your driving style. You
should therefore always adapt your driving
style and speed to suit the weather condi-
tions. Inst
rument cluster
117Controls
* optional
212_AKB; 2; 4, en-GB
mkalafa
,V ersion: 2.11.8.1
2009-05-05T14:17:16+02:00 - Seite 117 Z
Dateiname: 6515346702_buchblock.pdf; erzeugt am 07. May 2009 14:16:09; WK
Page 124 of 373

Function
C
Service
(Ypage 130) menu
R calls up display messages
(Y page 252)
R Tyre pressure loss warning
(Y page 226) or checks the tyre
pressure electroni-
cally* (Y page 228)
R ASSYST PLUS service interval dis-
play (Y page 239) D
Settings
menu (Ypage 131) The number of menus shown depends on the
optional equipment in the vehicle.
The Audio, Navi* and Telmenus are dis-
played slightly differently in vehicles with an
audio system and vehicles with COMAND
APS*. The examples given in this Owner's
Manual apply to vehicles equipped with
COMAND APS*. Trip menu
i Reset the trip meter or trip computer
(Y page 122).
Standard display X
Press and hold the %button on the
steering wheel until the Tripmenu with
trip meter :and total distance
recorder ;is shown. Trip computer "From start" or "From
reset" The values in the
From startsubmenu are
calculated from the start of a journey whilst
the values in the From resetsubmenu are
calculated from the last time the submenu
was reset.
X Press =or; on the steering wheel
to select the Tripmenu.
X Press 9or: to select From start
or From reset. Trip computer "From start" (example)
:
Distance
; Time
= Average speed
? Average fuel consumption
The trip computer function From startis
automatically reset when:
R the ignition has been switched off for more
than 4 hours.
R 999 hours have been exceeded.
R 9,999 kilometres/miles have been excee-
ded.
The From reset message is shown and the
trip computer is automatically reset if the
value exceeds 9,999 hours or 99,999 kilome-
tres/miles.
Displaying the range and current fuel
consumption X
Press =or; on the steering wheel
to select the Tripmenu. On-board computer
121Controls
* optional
212_AKB; 2; 4, en-GB
mkalafa
,V ersion: 2.11.8.1
2009-05-05T14:17:16+02:00 - Seite 121 Z
Dateiname: 6515346702_buchblock.pdf; erzeugt am 07. May 2009 14:16:12; WK