2009 MERCEDES-BENZ E-CLASS ESTATE instrument cluster
[x] Cancel search: instrument clusterPage 72 of 373
Opening and closing
...........................70
Boot/luggage compartment ..............72
Key positions ....................................... 75
Seats .................................................... 76
Steering wheel .................................... 84
Mirrors ................................................. 86
Memory functions* .............................87
Seat belts ............................................. 89
Lights ................................................... 93
Windscreen wipers .............................99
Side windows .................................... 100
Driving and parking ..........................103
Transmission ..................................... 110
Instrument cluster ............................117
On-board computer ..........................118
Driving systems ................................ 137
Air conditioning ................................. 171
Sliding sunroof .................................. 184
Loading and stowing ........................187
Features ............................................. 207 69Controls
212_AKB; 2; 4, en-GB
mkalafa,
Version: 2.11.8.1 2009-05-05T14:17:16+02:00 - Seite 69
Dateiname: 6515346702_buchblock.pdf; erzeugt am 07. May 2009 14:15:46; WK
Page 97 of 373
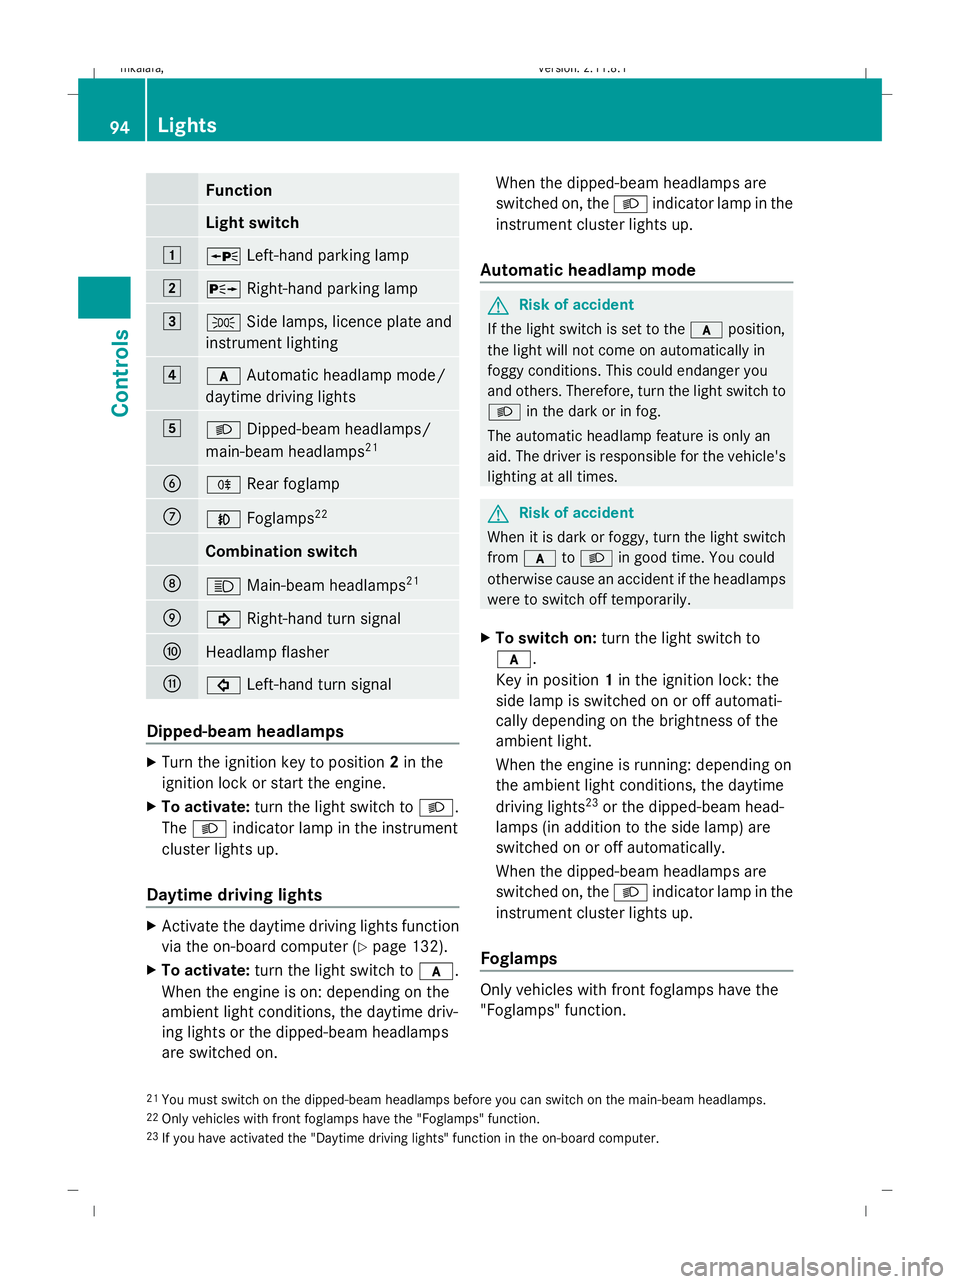
Function
Light switch
1
W
Left-hand parking lamp 2
X
Right-hand parking lamp 3
T
Side lamps, licence plate and
instrument lighting 4
c
Automatic headlamp mode/
daytime driving lights 5
L
Dipped-beam headlamps/
main-beam headlamps 21 B
R
Rear foglamp C
N
Foglamps 22 Combination switch
D
K
Main-beam headlamps 21 E
!
Right-hand turn signal F
Headlamp flasher
G
#
Left-hand turn signal Dipped-beam headlamps
X
Turn the ignition key to position 2in the
ignition lock or start the engine.
X To activate: turn the light switch to L.
The L indicator lamp in the instrument
cluster lights up.
Daytime driving lights X
Activate the daytime driving lights function
via the on-board computer (Y page 132).
X To activate: turn the light switch to c.
When the engine is on: depending on the
ambient light conditions, the daytime driv-
ing lights or the dipped-beam headlamps
are switched on. When the dipped-beam headlamps are
switched on, the Lindicator lamp in the
instrument cluster lights up.
Automatic headlamp mode G
Risk of accident
If the light switch is set to the cposition,
the light will not come on automatically in
foggy conditions. This could endanger you
and others. Therefore, turn the light switch to
L in the dark or in fog.
The automatic headlamp feature is only an
aid. The driver is responsible for the vehicle's
lighting at all times. G
Risk of accident
When it is dark or foggy, turn the light switch
from c toL in good time. You could
otherwise cause an accident if the headlamps
were to switch off temporarily.
X To switch on: turn the light switch to
c.
Key in position 1in the ignition lock: the
side lamp is switched on or off automati-
cally depending on the brightness of the
ambient light.
When the engine is running: depending on
the ambient light conditions, the daytime
driving lights 23
or the dipped-beam head-
lamps (in addition to the side lamp) are
switched on or off automatically.
When the dipped-beam headlamps are
switched on, the Lindicator lamp in the
instrument cluster lights up.
Foglamps Only vehicles with front foglamps have the
"Foglamps" function.
21 You must switch on the dipped-beam headlamps before you can switch on the main-beam headlamps.
22 Only vehicles with front foglamps have the "Foglamps" function.
23 If you have activated the "Daytime driving lights" function in the on-board computer. 94
LightsControls
212_AKB; 2; 4, en-GB
mkalafa
,V ersion: 2.11.8.1
2009-05-05T14:17:16+02:00 - Seite 94
Dateiname: 6515346702_buchblock.pdf; erzeugt am 07. May 2009 14:15:59; WK
Page 98 of 373
G
Risk of accident
If you suspect that driving conditions will be
foggy, turn the light switch to Lbefore you
start your journey. Otherwise, your vehicle
may not be visible and you could endanger
yourself and others.
i If you switch the engine off (key in posi-
tion 1 in the ignition lock) and then restart
it, the previous foglamp settings are
restored.
X Turn the ignition key to position 2in the
ignition lock or start the engine.
X To switch on: turn the light switch to
T, Lorc.
X Press the Nbutton.
The green Nindicator lamp in the instru-
ment cluster lights up.
X To switch off: press theNbutton.
The green Nindicator lamp in the instru-
ment cluster goes out.
Rear foglamp i
If you switch the engine off (key in posi-
tion 1 in the ignition lock) and then restart
it, the previous settings for the rear fog
lamp are restored.
X Turn the ignition key to position 2in the
ignition lock or start the engine.
X Turn the light switch to Lorc 24
.
X To switch on: press theRbutton.
The yellow Rindicator lamp in the
instrument cluster lights up.
X To switch off: press theRbutton.
The yellow Rindicator lamp in the
instrument cluster goes out.
Vehicles with foglamps: when the light switch
is in position T, the rear fog lamp can only
be switched on if the foglamps (without
dipped-beam headlamps) are switched on. Manual main-beam headlamps X
Turn the ignition key to position 2in the
ignition lock or start the engine.
X To activate: turn the light switch to L.
X Press the combination switch beyond the
pressure point in the direction of arrow
D (Ypage 94).
The K indicator lamp in the instrument
cluster lights up.
X To deactivate: move the combination
switch back to its normal position.
The K indicator lamp in the instrument
cluster goes out.
Adaptive Highbeam Assist* Depending on the road and traffic conditions,
the headlamp range control of the dipped-
beam headlamps and the main-beam head-
lamps is controlled using an optical sensor.
This is located on the front overhead control
panel. This reduces the glare to other road
users and improves the illumination of the
road. There is no sudden change in light inten-
sity during the transition from dipped-beam
to main beam.
G
Risk of accident
Adaptive Highbeam Assist is only an aid
designed to assist driving. The driver is
responsible for adjusting the vehicle's lighting
to the prevailing light, vision and traffic con-
ditions.
The system may be impaired or deactivated:
R if there is poor visibility, e.g. due to snow,
rain, fog or spray
R if the area of the windscreen around the
optical sensor is dirty, misted up or covered
up, e.g. by a sticker.
24 The automatic headlamps are only switched on if you start the engine. Lights
95Controls
* optional
212_AKB; 2; 4, en-GB
mkalafa
,V ersion: 2.11.8.1
2009-05-05T14:17:16+02:00 - Seite 95 Z
Dateiname: 6515346702_buchblock.pdf; erzeugt am 07. May 2009 14:15:59; WK
Page 99 of 373
The system may not recognise the following
road users
R
Road users that have no lighting, e.g.
pedestrians
R Road users that have poor lighting, e.g.
cyclists
R Road users whose lighting is not clearly
visible, e.g. road users behind a crash bar-
rier
R On rare occasions: road users that have
lights may be recognised too late or not at
all.
The automatic main-beam headlamps will not
be deactivated, or they may be activated
despite road users travelling in front of, or
approaching, the vehicle.
Thus, you could cause an accident and injure
yourself and others. Always observe traffic
conditions and, if necessary, dip the lights
manually.
X To activate: activate the Adaptive High-
beam Assist using the on-board computer
(Y page 133).
X Turn the light switch to c.
X Press the combination switch beyond the
pressure point in the direction of arrow
D (Ypage 94).
When the dipped-beam headlamps are
switched on, the _indicator lamp in the
instrument cluster lights up.
If you are driving faster than approximately
40 km/h, the headlamp range is set auto-
matically depending on the distance
between the vehicle and other road users.
If you are driving faster than approximately
55 km/h and no other road users are rec-
ognised, the main-beam headlamps are
switched on automatically. The Kindi-
cator lamp in the instrument cluster also
lights up.
If you are driving slower than approximately
45 km/h and other road users are recog-
nised or the roads are adequately lit, the main-beam headlamps are switched off
automatically. The
Kindicator lamp in
the instrument cluster goes out. The _
indicator lamp in the instrument cluster
stays on.
X To deactivate: move the combination
switch back to its normal position.
The _ indicator lamp in the instrument
cluster goes out.
Turn signal lamp X
To indicate a minor change of direc-
tion: press the combination switch briefly
in the direction of arrow EorG
(Y page 94).
The corresponding turn signal flashes three
times.
X To indicate: push the combination switch
beyond the pressure point in the direction
of arrow EorG (Ypage 94).
The corresponding turn signal indicator
lamp ! or# in the instrument clus-
ter flashes.
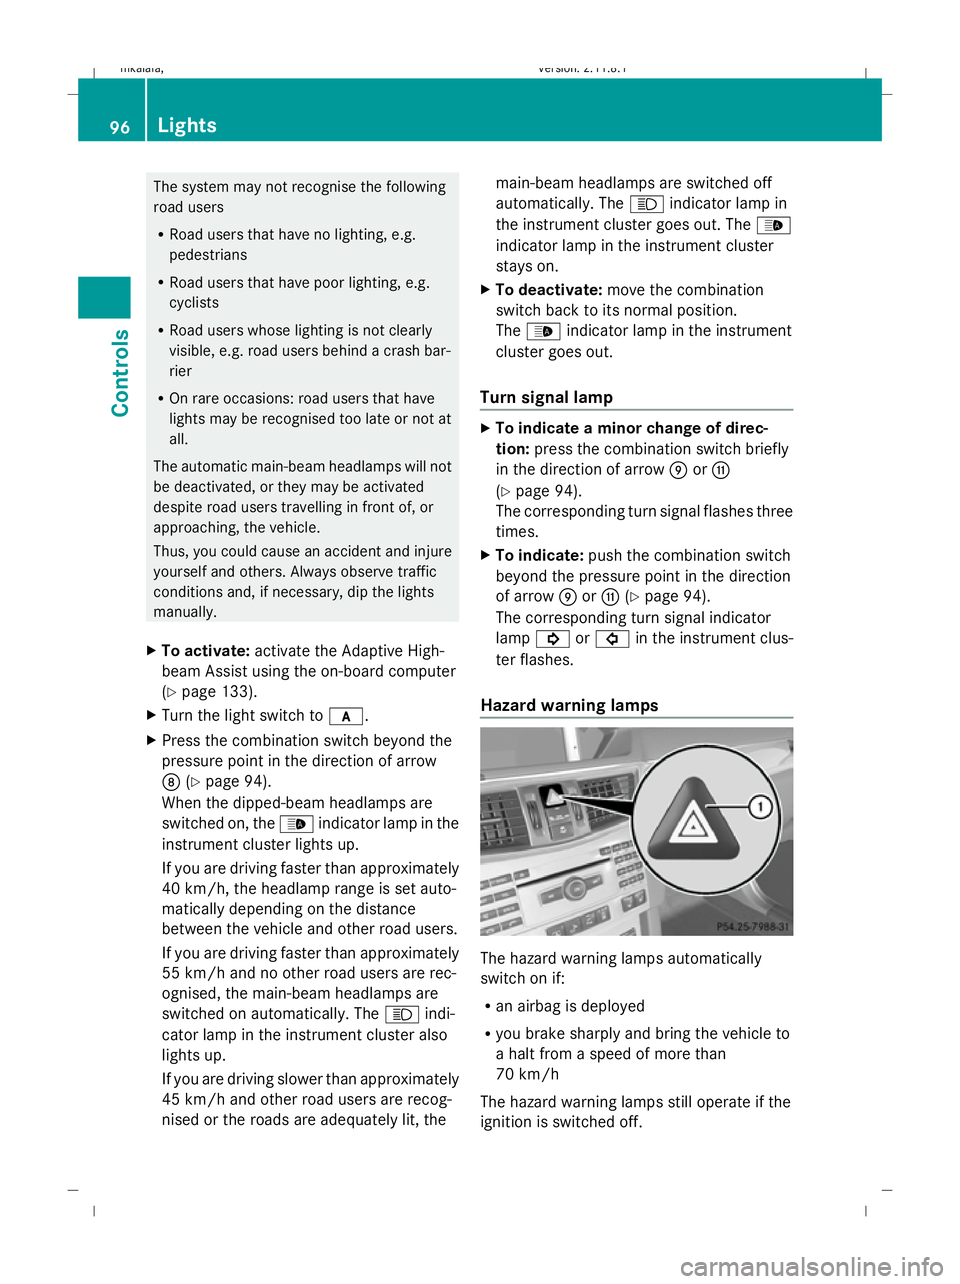
Hazard warning lamps The hazard warning lamps automatically
switch on if:
R
an airbag is deployed
R you brake sharply and bring the vehicle to
a halt from a speed of more than
70 km/h
The hazard warning lamps still operate if the
ignition is switched off. 96
LightsControls
212_AKB; 2; 4, en-GB
mkalafa,
Version: 2.11.8.1 2009-05-05T14:17:16+02:00 - Seite 96
Dateiname: 6515346702_buchblock.pdf; erzeugt am 07. May 2009 14:16:00; WK
Page 103 of 373

4
° Continuous wipe, slow
5 ¯ Continuous wipe, fast
B í Single wipe/ îTo wipe the
windscreen using washer fluid
! With intermittent wiping with rain sensor:
Due to optical influences and the wind-
screen becoming dirty in dry weather con-
ditions, the windscreen wipers may be acti-
vated inadvertently. This could then dam-
age the windscreen wiper blades or scratch
the windscreen.
For this reason, you should always switch
off the windscreen wipers in dry weather.
X Turn the key to position 1or 2in the ignition
lock.
X Turn the combination switch to the corre-
sponding position.
In the ÄorÅ position, the appropriate
wiping frequency is set automatically accord-
ing to the intensity of the rain. In the Å
position, the rain sensor is more sensitive
than in the Äposition and therefore the
windscreen wiper will wipe more frequently. Rear window wiper (Estate)
Combination switch
:
è Switch
2 ô To wipe with washer fluid
3 ITo switch on intermittent wiping
4 0To switch off intermittent wiping
5 ô To wipe with washer fluid X
Turn the key to position 1or 2in the ignition
lock.
X Turn switch :on the combination switch
to the corresponding position.
When the rear window wiper is switched on
the icon appears in the instrument cluster. Side windows
Opening and closing the side win-
dows
G
Risk of injury
When opening the side windows, make sure
that nobody can become trapped between the
side window and the door frame. Keep clear
of the side window during the opening proce-
dure. Otherwise, you could be drawn in or
trapped between the side window and the
door frame by the downwards movement of
the window. If there is a risk of becoming
trapped, release the switch or pull it upwards
to close the side window again. G
Risk of injury
Make sure that nobody can become trapped
as you close the side windows. If there is a
risk of entrapment, release the button or
press the button again to open the side win-
dow. G
Risk of injury
Children may injure themselves if they oper-
ate the side windows.
Never leave children unsupervised in the vehi-
cle. Always take the key with you when leaving
the vehicle, even if you are only leaving it for
a short time. 100
Side windowsCont
rols
212_AKB; 2; 4, en-GB
mkalafa,V ersion: 2.11.8.1
2009-05-05T14:17:16+02:00 - Seite 100
Dateiname: 6515346702_buchblock.pdf; erzeugt am 07. May 2009 14:16:02; WK
Page 108 of 373
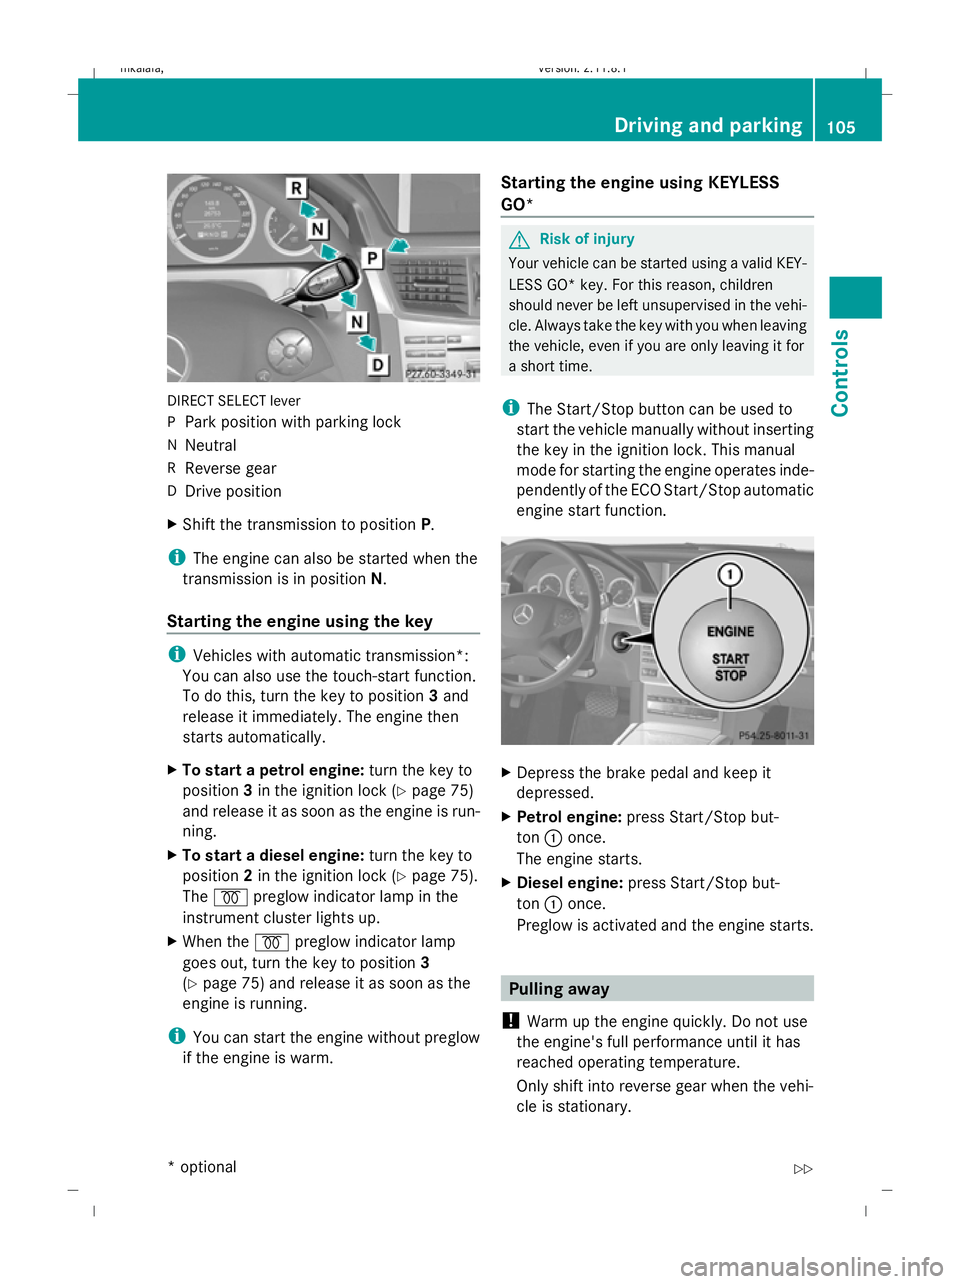
DIRECT SELECT lever
P
Park position with parking lock
N Neutral
R Reverse gear
D Drive position
X Shift the transmission to position P.
i The engine can also be started when the
transmission is in position N.
Starting the engine using the key i
Vehicles with automatic transmission*:
You can also use the touch-start function.
To do this, turn the key to position 3and
release it immediately. The engine then
starts automatically.
X To start a petrol engine: turn the key to
position 3in the ignition lock (Y page 75)
and release it as soon as the engine is run-
ning.
X To start a diesel engine: turn the key to
position 2in the ignition lock (Y page 75).
The % preglow indicator lamp in the
instrument cluster lights up.
X When the %preglow indicator lamp
goes out, turn the key to position 3
(Y page 75) and release it as soon as the
engine is running.
i You can start the engine without preglow
if the engine is warm. Starting the engine using KEYLESS
GO* G
Risk of injury
Your vehicle can be started using a valid KEY-
LESS GO* key. For this reason, children
should never be left unsupervised in the vehi-
cle. Always take the key with you when leaving
the vehicle, even if you are only leaving it for
a short time.
i The Start/Stop button can be used to
start the vehicle manually without inserting
the key in the ignition lock. This manual
mode for starting the engine operates inde-
pendently of the ECO Start/Stop automatic
engine start function. X
Depress the brake pedal and keep it
depressed.
X Petrol engine: press Start/Stop but-
ton :once.
The engine starts.
X Diesel engine: press Start/Stop but-
ton :once.
Preglow is activated and the engine starts. Pulling away
! Warm up the engine quickly. Do not use
the engine's full performance until it has
reached operating temperature.
Only shift into reverse gear when the vehi-
cle is stationary. Driving and parking
105Controls
* optional
212_AKB; 2; 4, en-GB
mkalafa,
Version: 2.11.8.1 2009-05-05T14:17:16+02:00 - Seite 105 Z
Dateiname: 6515346702_buchblock.pdf; erzeugt am 07. May 2009 14:16:04; WK
Page 110 of 373
Parking
G
Risk of accident
Only remove the key from the ignition lock
when the vehicle is stationary, as you cannot
steer the vehicle with the key removed.
Never leave children unsupervised in the vehi-
cle. They could release the parking brake. This
could lead to a serious or fatal accident. G
Risk of fire
Make sure that the exhaust system does not
under any circumstances come into contact
with easily ignitable material such as dry grass
or petrol. Otherwise, the flammable material
may ignite and set the vehicle on fire.
To ensure that the vehicle is secured against
rolling away unintentionally:
R the parking brake must be applied
R on vehicles with manual transmission,
engage first gear or reverse gear
R on vehicles with automatic transmission*,
the transmission must be in position Pand
the key must be removed from the ignition
lock
R on steep uphill or downhill gradients, turn
the front wheels towards the kerb
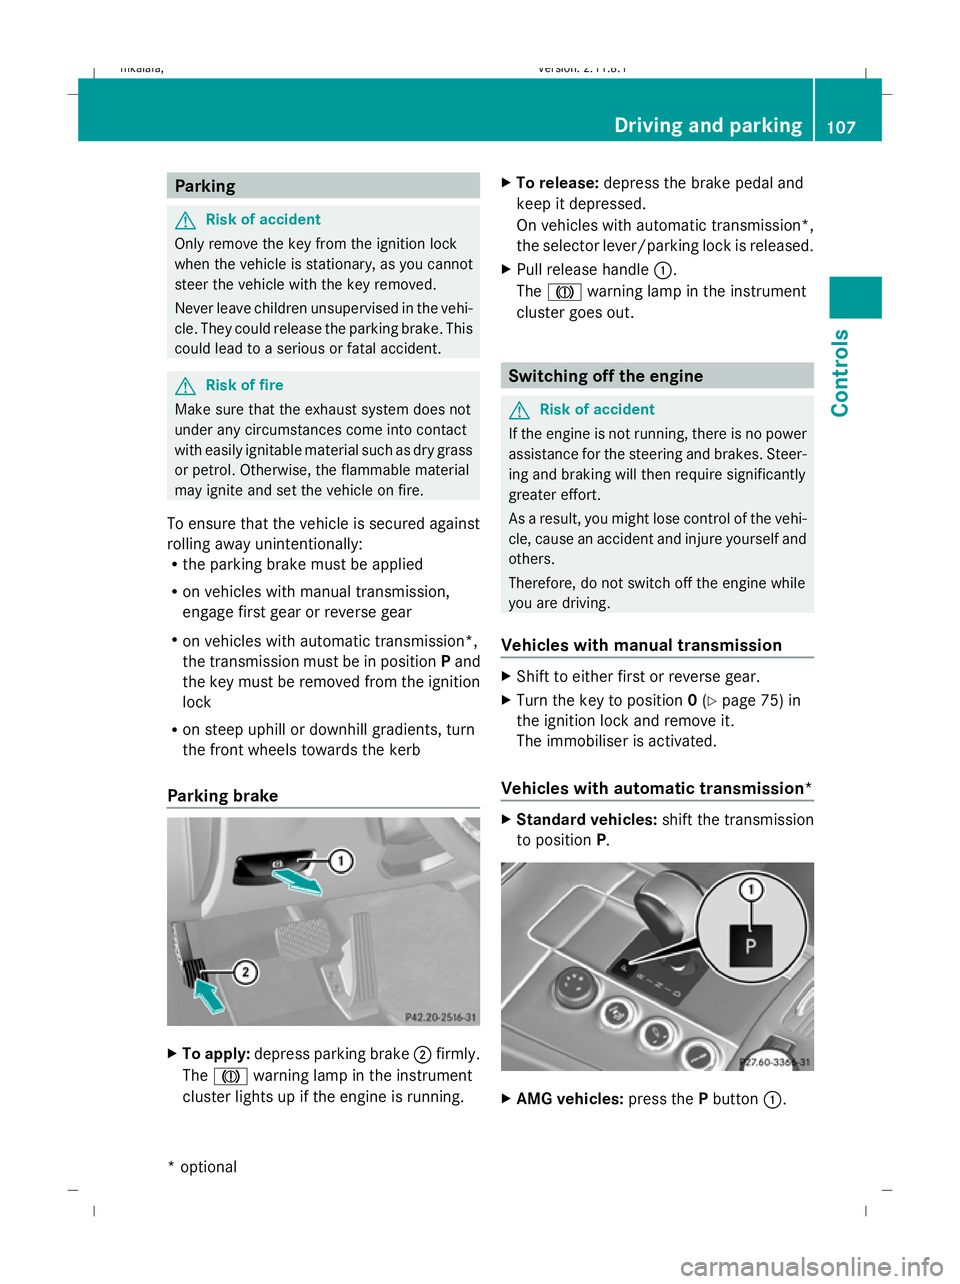
Parking brake X
To apply: depress parking brake ;firmly.
The J warning lamp in the instrument
cluster lights up if the engine is running. X
To release: depress the brake pedal and
keep it depressed.
On vehicles with automatic transmission*,
the selector lever/parking lock is released.
X Pull release handle :.
The J warning lamp in the instrument
cluster goes out. Switching off the engine
G
Risk of accident
If the engine is not running, there is no power
assistance for the steering and brakes. Steer-
ing and braking will then require significantly
greater effort.
As a result, you might lose control of the vehi-
cle, cause an accident and injure yourself and
others.
Therefore, do not switch off the engine while
you are driving.
Vehicles with manual transmission X
Shift to either first or reverse gear.
X Turn the key to position 0(Y page 75) in
the ignition lock and remove it.
The immobiliser is activated.
Vehicles with automatic transmission* X
Standard vehicles: shift the transmission
to position P. X
AMG vehicles: press thePbutton :. Driving and parking
107Controls
* optional
212_AKB; 2; 4, en-GB
mkalafa,
Version: 2.11.8.1 2009-05-05T14:17:16+02:00 - Seite 107 Z
Dateiname: 6515346702_buchblock.pdf; erzeugt am 07. May 2009 14:16:05; WK
Page 111 of 373
Using the key
X
Turn the key to position 0(Y page 75) in
the ignition lock and remove it.
The immobiliser is activated.
i Vehicles with a selector lever: you can
only remove the key if the transmission is
in position P.
i Vehicles with a DIRECT SELECT lever:
if you switch off the engine with the trans-
mission in position Ror D, the automatic
transmission automatically shifts to N.
If you then open the driver's door or the
front-passenger door or remove the key
from the ignition, the automatic transmis-
sion shifts to P.
If you shift the automatic transmission to
N before switching off the engine, the auto-
matic transmission remains in Neven when
a door is opened.
Using KEYLESS GO*
X Press the Start/Stop button (Y page 75).
The engine stops and all the indicator
lamps in the instrument cluster go out
(Y page 27).
i Vehicles with a DIRECT SELECT lever:
if you switch off the engine using the Start/
Stop button, the automatic transmission
automatically shifts to N. If you open the
driver's or front-passenger door, the auto-
matic transmission shifts to P.
i The engine can be turned off while the
vehicle is in motion by pressing and holding
the Start/Stop button for three seconds.
This function operates independently from
the ECO Start/Stop automatic engine
switch-off function. ECO start/stop function
i The ECO Start/Stop function is only avail-
able for the A 200 CGI model with manual
transmission. The ECO Start/Stop function ensures that the
engine is switched off automatically under
certain conditions when the vehicle is moving
slowly.
The engine starts automatically when you pull
away again.
The ECO Start/Stop function thereby helps
you to reduce the fuel consumption and emis-
sions of your vehicle.
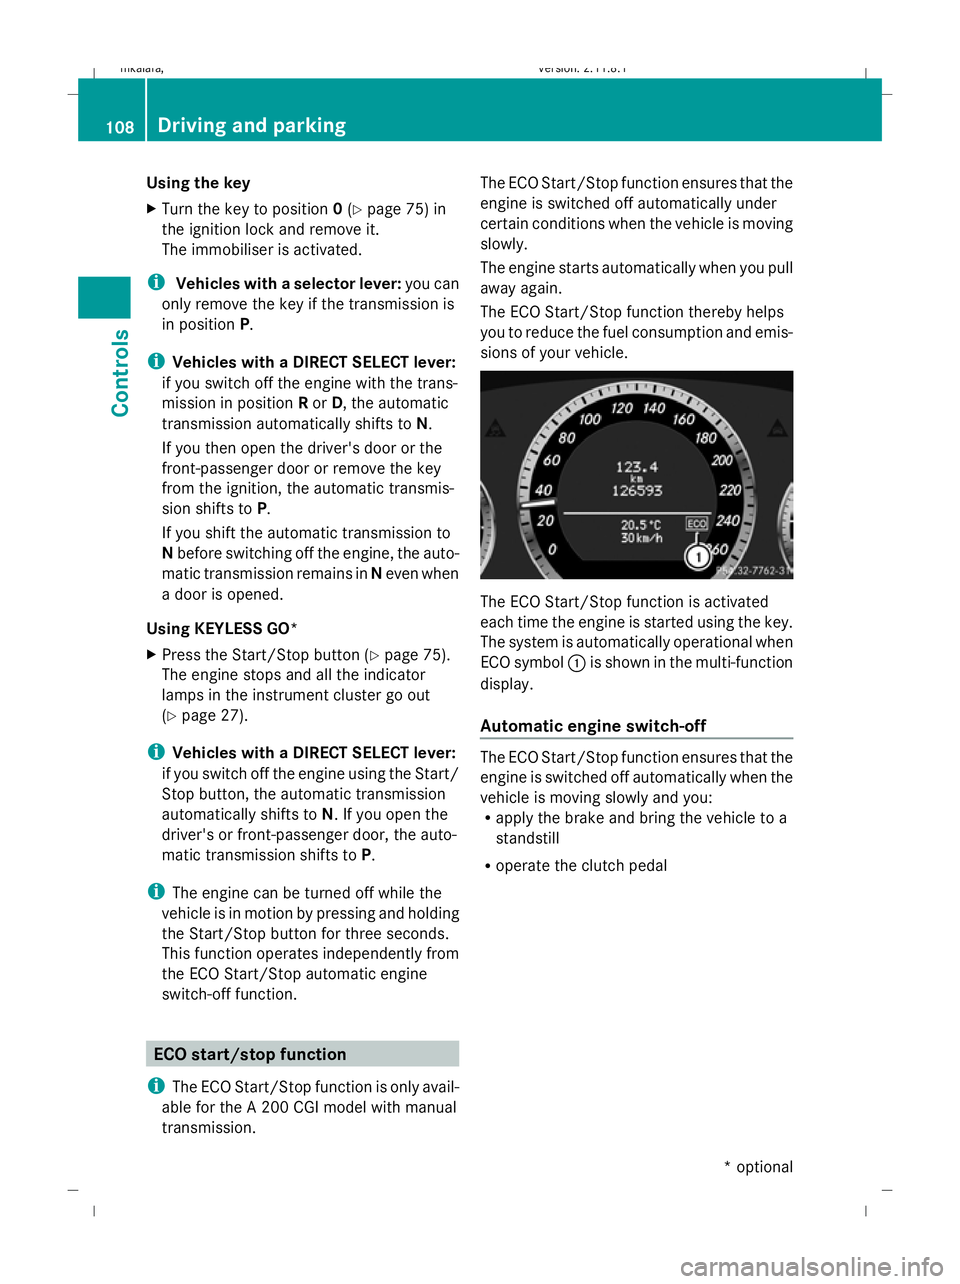
The ECO Start/Stop function is activated
each time the engine is started using the key.
The system is automatically operational when
ECO symbol
:is shown in the multi-function
display.
Automatic engine switch-off The ECO Start/Stop function ensures that the
engine is switched off automatically when the
vehicle is moving slowly and you:
R
apply the brake and bring the vehicle to a
standstill
R operate the clutch pedal 108
Driving and parkingControls
* optional
212_AKB; 2; 4, en-GB
mkalafa,
Version: 2.11.8.1 2009-05-05T14:17:16+02:00 - Seite 108
Dateiname: 6515346702_buchblock.pdf; erzeugt am 07. May 2009 14:16:05; WK