2009 MERCEDES-BENZ E-CLASS ESTATE seats
[x] Cancel search: seatsPage 80 of 373
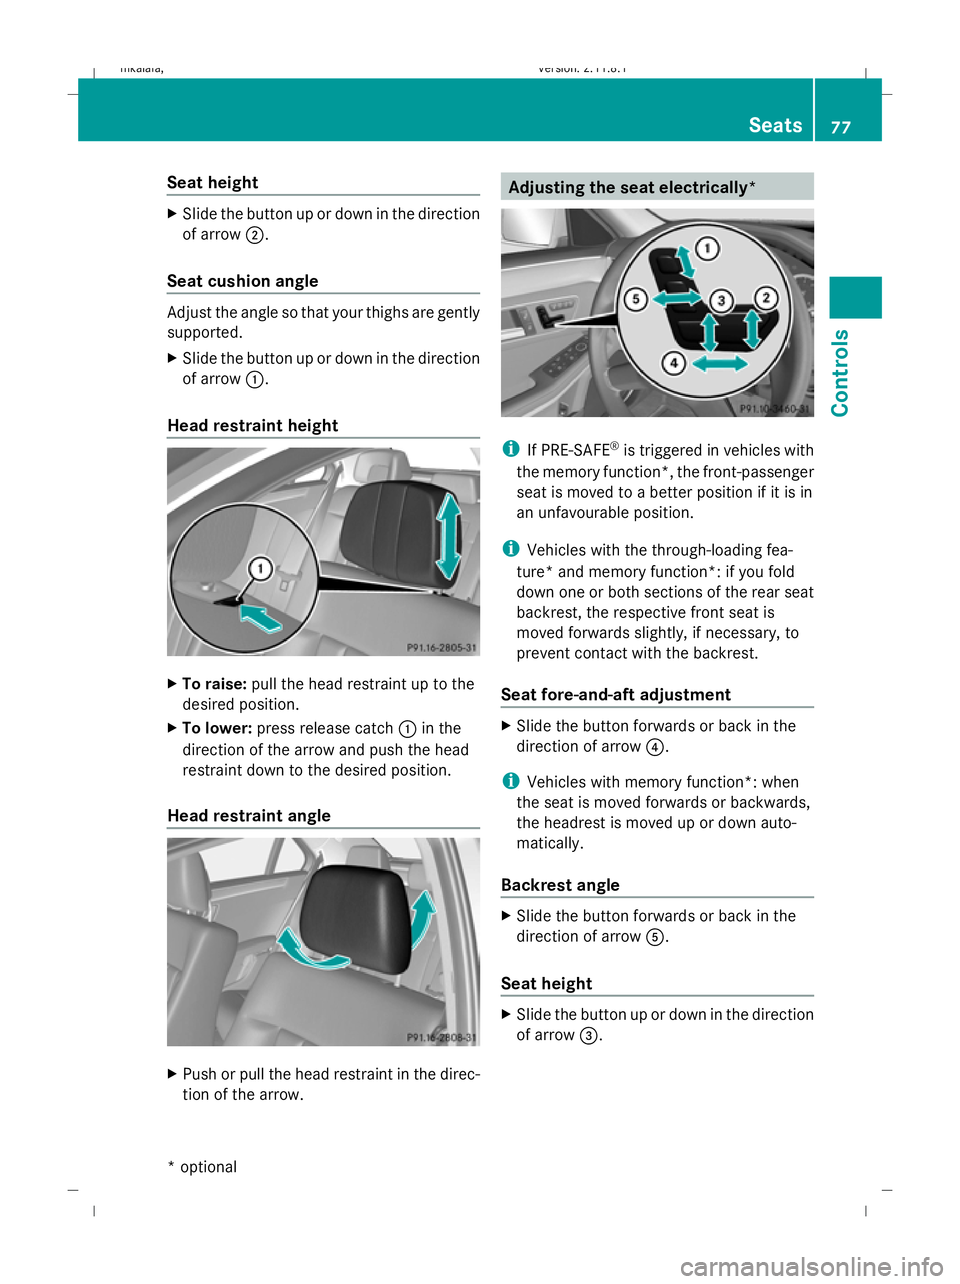
Seat height
X
Slide the button up or down in the direction
of arrow ;.
Seat cushion angle Adjust the angle so that your thighs are gently
supported.
X Slide the button up or down in the direction
of arrow :.
Head restraint height X
To raise: pull the head restraint up to the
desired position.
X To lower: press release catch :in the
direction of the arrow and push the head
restraint down to the desired position.
Head restraint angle X
Push or pull the head restraint in the direc-
tion of the arrow. Adjusting the seat electrically*
i
If PRE-SAFE ®
is triggered in vehicles with
the memory function*, the front-passenger
seat is moved to a better position if it is in
an unfavourable position.
i Vehicles with the through-loading fea-
ture* and memory function*: if you fold
down one or both sections of the rear seat
backrest, the respective front seat is
moved forwards slightly, if necessary, to
prevent contact with the backrest.
Seat fore-and-aft adjustment X
Slide the button forwards or back in the
direction of arrow ?.
i Vehicles with memory function*: when
the seat is moved forwards or backwards,
the headrest is moved up or down auto-
matically.
Backrest angle X
Slide the button forwards or back in the
direction of arrow A.
Seat height X
Slide the button up or down in the direction
of arrow =. Seats
77Controls
* optional
212_AKB; 2; 4, en-GB
mkalafa,
Version: 2.11.8.1 2009-05-05T14:17:16+02:00 - Seite 77 Z
Dateiname: 6515346702_buchblock.pdf; erzeugt am 07. May 2009 14:15:50; WK
Page 81 of 373
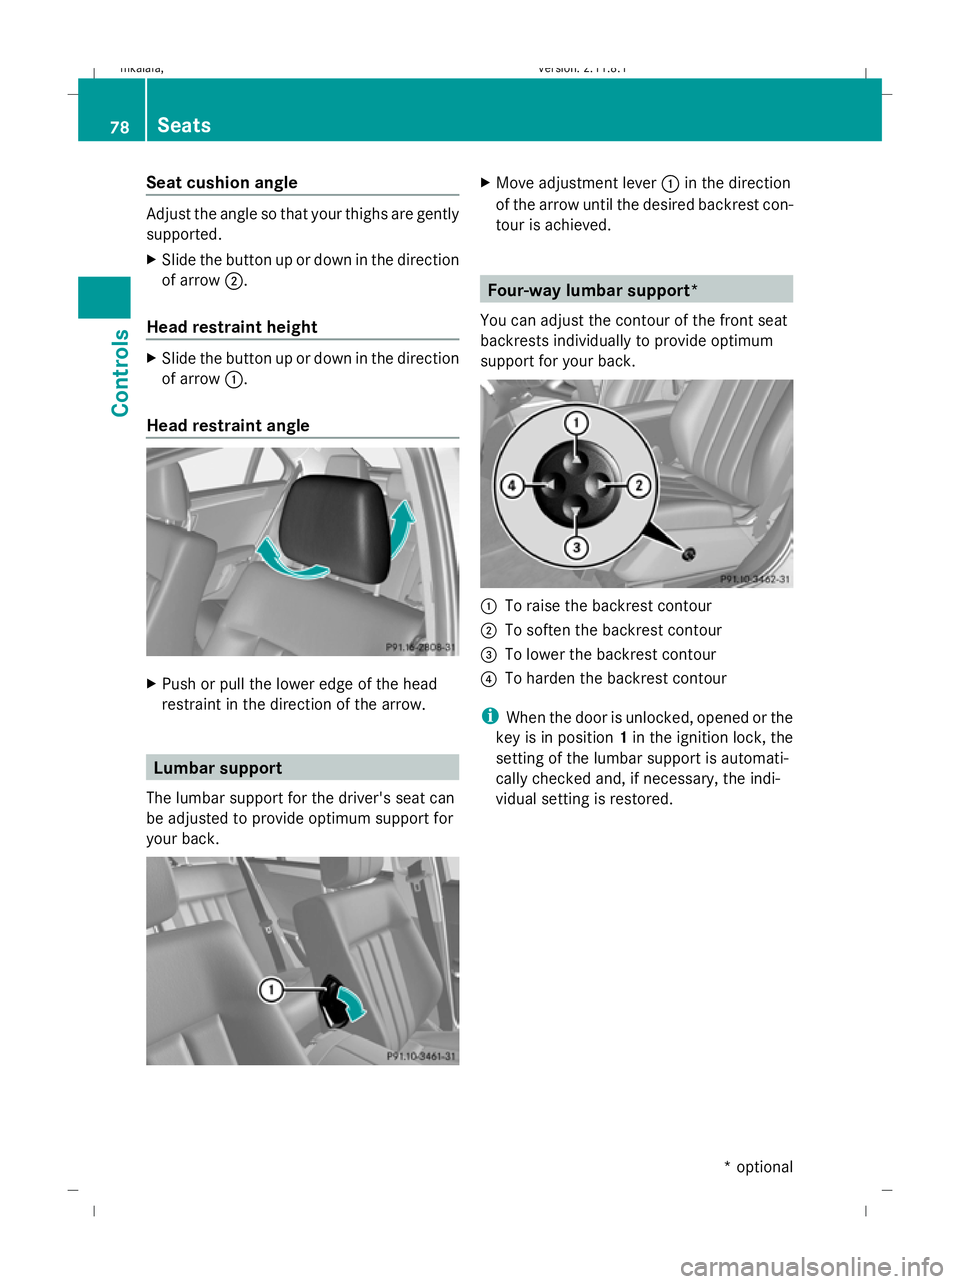
Seat cushion angle
Adjust the angle so that your thighs are gently
supported.
X Slide the button up or down in the direction
of arrow ;.
Head restraint height X
Slide the button up or down in the direction
of arrow :.
Head restraint angle X
Push or pull the lower edge of the head
restraint in the direction of the arrow. Lumbar support
The lumbar support for the driver's seat can
be adjusted to provide optimum support for
your back. X
Move adjustment lever :in the direction
of the arrow until the desired backrest con-
tour is achieved. Four-way lumbar support*
You can adjust the contour of the front seat
backrests individually to provide optimum
support for your back. :
To raise the backrest contour
; To soften the backrest contour
= To lower the backrest contour
? To harden the backrest contour
i When the door is unlocked, opened or the
key is in position 1in the ignition lock, the
setting of the lumbar support is automati-
cally checked and, if necessary, the indi-
vidual setting is restored. 78
SeatsControls
* optional
212_AKB; 2; 4, en-GB
mkalafa,
Version: 2.11.8.1 2009-05-05T14:17:16+02:00 - Seite 78
Dateiname: 6515346702_buchblock.pdf; erzeugt am 07. May 2009 14:15:51; WK
Page 82 of 373
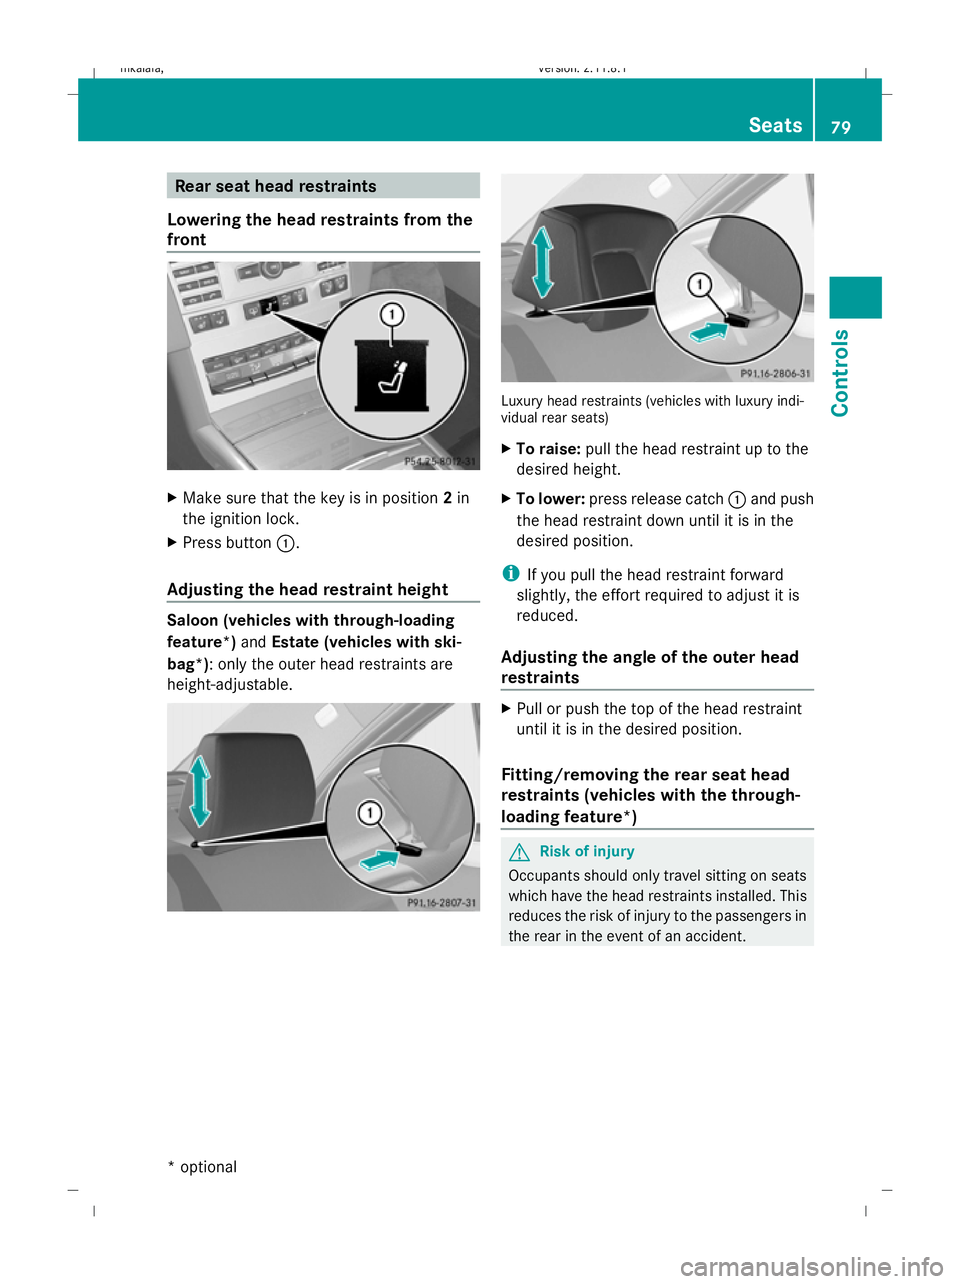
Rear seat head restraints
Lowering the head restraints from the
front X
Make sure that the key is in position 2in
the ignition lock.
X Press button :.
Adjusting the head restraint height Saloon (vehicles with through-loading
feature*)
andEstate (vehicles with ski-
bag*): only the outer head restraints are
height-adjustable. Luxury head restraints (vehicles with luxury indi-
vidual rear seats)
X To raise: pull the head restraint up to the
desired height.
X To lower: press release catch :and push
the head restraint down until it is in the
desired position.
i If you pull the head restraint forward
slightly, the effort required to adjust it is
reduced.
Adjusting the angle of the outer head
restraints X
Pull or push the top of the head restraint
until it is in the desired position.
Fitting/removing the rear seat head
restraints (vehicles with the through-
loading feature*) G
Risk of injury
Occupants should only travel sitting on seats
which have the head restraints installed. This
reduces the risk of injury to the passengers in
the rear in the event of an accident. Seats
79Controls
* optional
212_AKB; 2; 4, en-GB
mkalafa
,V ersion: 2.11.8.1
2009-05-05T14:17:16+02:00 - Seite 79 Z
Dateiname: 6515346702_buchblock.pdf; erzeugt am 07. May 2009 14:15:51; WK
Page 83 of 373
X
Release the rear seat backrest and fold it
slightly forwards ( Ypage 195).
X To remove: pull the head restraint up to
the stop.
X Press release catch :and pull the head
restraint out of the guides.
X To refit: insert the head restraint so that
the notches on the bar are on the left when
viewed in the direction of travel.
X Push the head restraint down until you hear
it click into place.
X Fold back the rear seat backrest until it
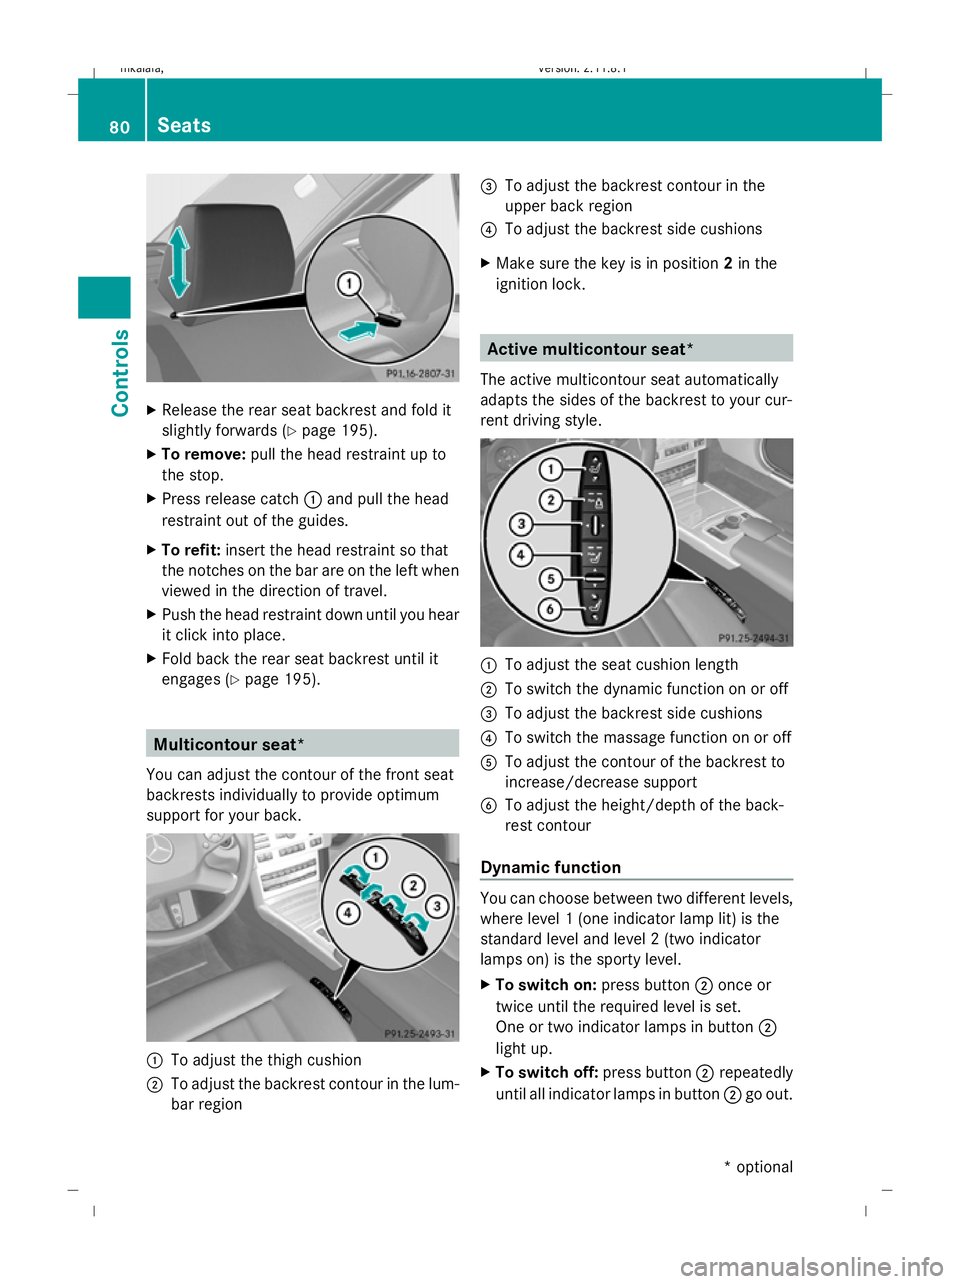
engages (Y page 195). Multicontour seat*
You can adjust the contour of the front seat
backrests individually to provide optimum
support for your back. :
To adjust the thigh cushion
; To adjust the backrest contour in the lum-
bar region =
To adjust the backrest contour in the
upper back region
? To adjust the backrest side cushions
X Make sure the key is in position 2in the
ignition lock. Active multicontour seat*
The active multicontour seat automatically
adapts the sides of the backrest to your cur-
rent driving style. :
To adjust the seat cushion length
; To switch the dynamic function on or off
= To adjust the backrest side cushions
? To switch the massage function on or off
A To adjust the contour of the backrest to
increase/decrease support
B To adjust the height/depth of the back-
rest contour
Dynamic function You can choose between two different levels,
where level 1 (one indicator lamp lit) is the
standard level and level 2 (two indicator
lamps on) is the sporty level.
X To switch on: press button;once or
twice until the required level is set.
One or two indicator lamps in button ;
light up.
X To switch off: press button;repeatedly
until all indicator lamps in button ;go out. 80
SeatsCont
rols
* optional
212_AKB; 2; 4, en-GB
mkalafa
,V ersion: 2.11.8.1
2009-05-05T14:17:16+02:00 - Seite 80
Dateiname: 6515346702_buchblock.pdf; erzeugt am 07. May 2009 14:15:52; WK
Page 84 of 373
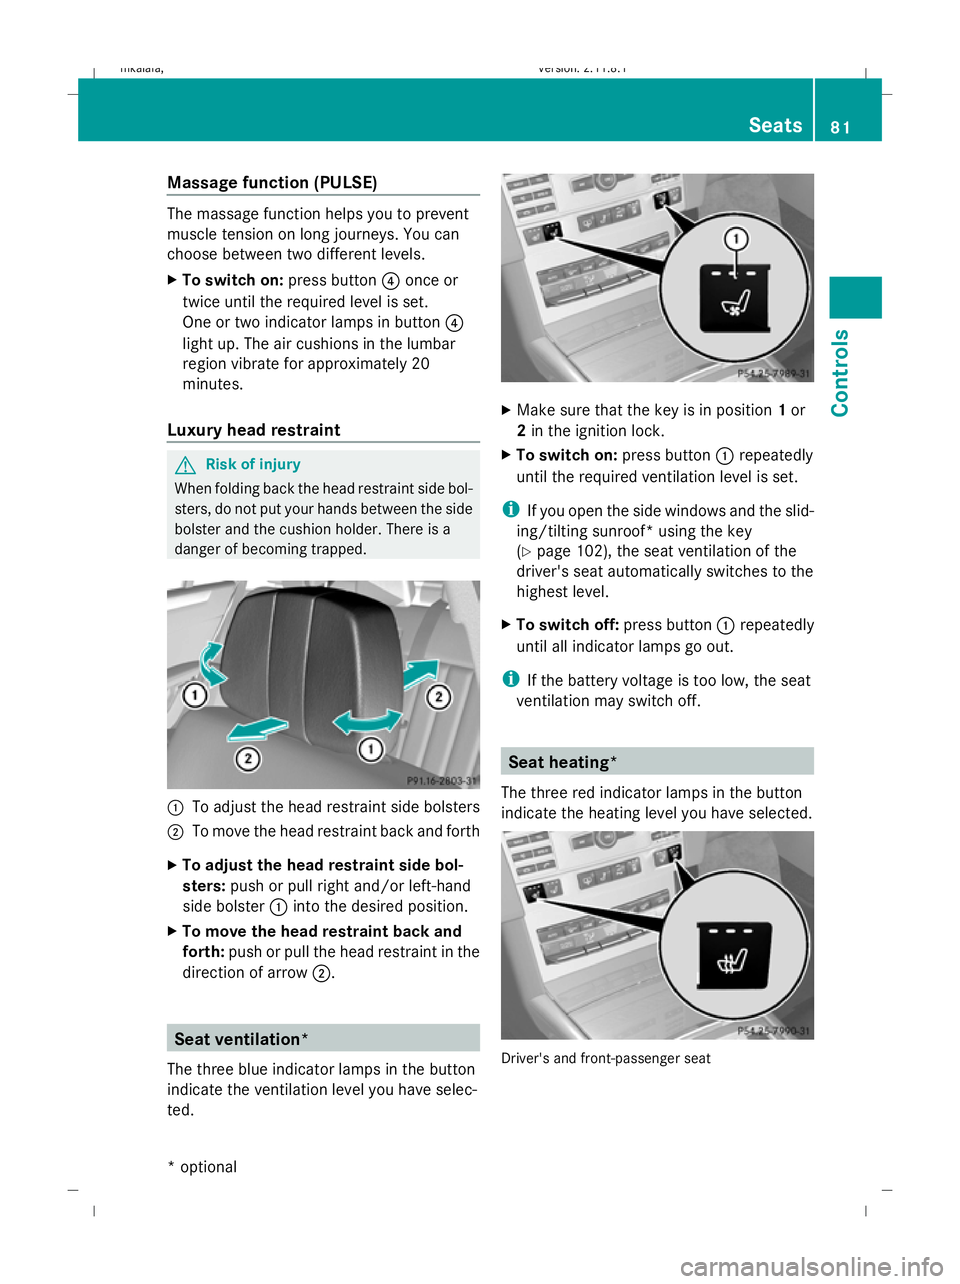
Massage function (PULSE)
The massage function helps you to prevent
muscle tension on long journeys. You can
choose between two different levels.
X To switch on: press button?once or
twice until the required level is set.
One or two indicator lamps in button ?
light up. The air cushions in the lumbar
region vibrate for approximately 20
minutes.
Luxury head restraint G
Risk of injury
When folding back the head restraint side bol-
sters, do not put your hands between the side
bolster and the cushion holder. There is a
danger of becoming trapped. :
To adjust the head restraint side bolsters
; To move the head restraint back and forth
X To adjust the head restraint side bol-
sters: push or pull right and/or left-hand
side bolster :into the desired position.
X To move the head restraint back and
forth: push or pull the head restraint in the
direction of arrow ;. Seat ventilation*
The three blue indicator lamps in the button
indicate the ventilation level you have selec-
ted. X
Make sure that the key is in position 1or
2 in the ignition lock.
X To switch on: press button:repeatedly
until the required ventilation level is set.
i If you open the side windows and the slid-
ing/tilting sunroof* using the key
(Y page 102), the seat ventilation of the
driver's seat automatically switches to the
highest level.
X To switch off: press button:repeatedly
until all indicator lamps go out.
i If the battery voltage is too low, the seat
ventilation may switch off. Seat heating*
The three red indicator lamps in the button
indicate the heating level you have selected. Driver's and front-passenger seat Seats
81Controls
* optional
212_AKB; 2; 4, en-GB
mkalafa,
Version: 2.11.8.1 2009-05-05T14:17:16+02:00 - Seite 81 Z
Dateiname: 6515346702_buchblock.pdf; erzeugt am 07. May 2009 14:15:53; WK
Page 85 of 373
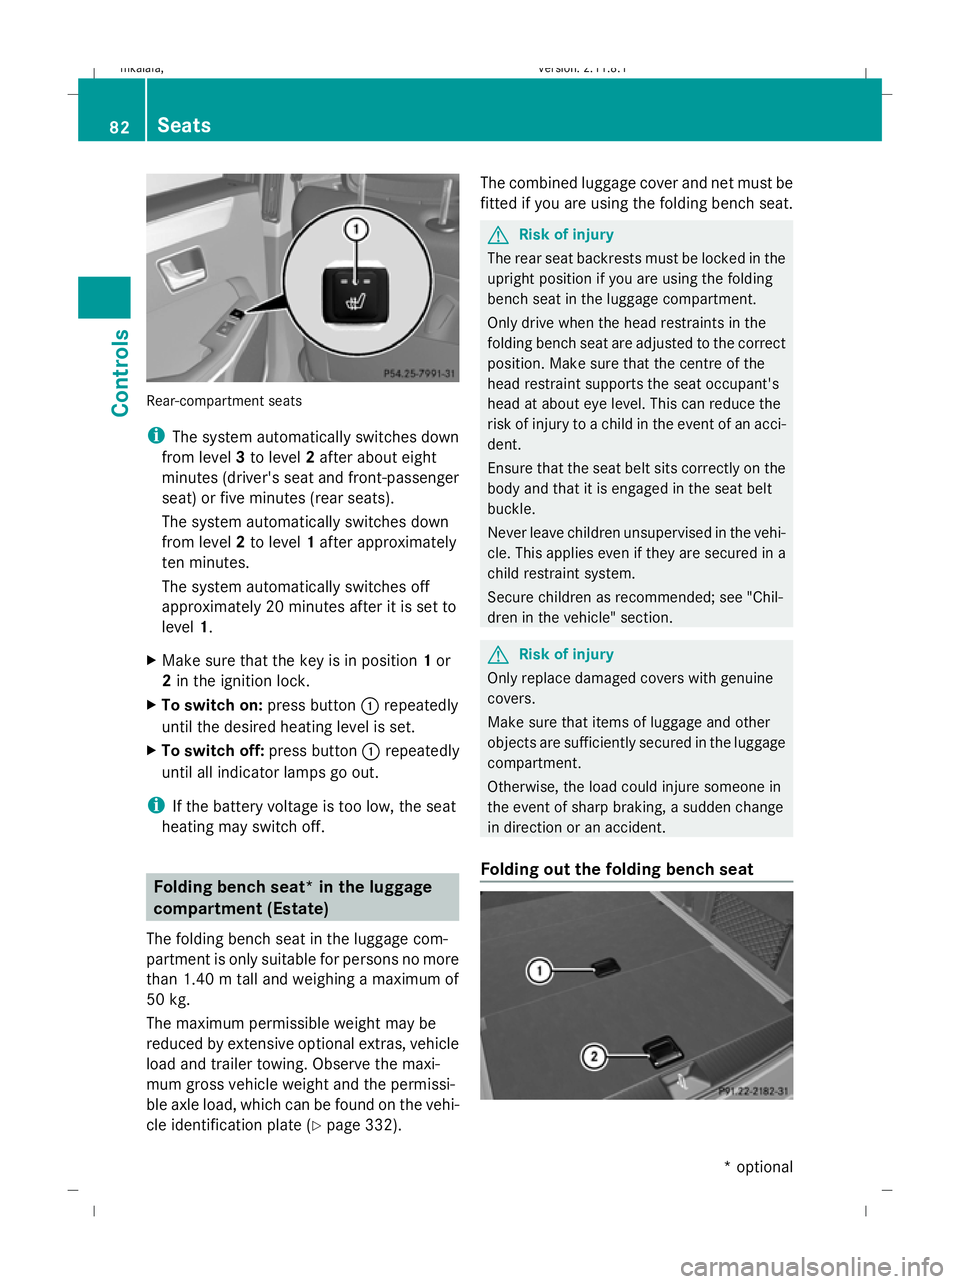
Rear-compartment seats
i
The system automatically switches down
from level 3to level 2after about eight
minutes (driver's seat and front-passenger
seat) or five minutes (rear seats).
The system automatically switches down
from level 2to level 1after approximately
ten minutes.
The system automatically switches off
approximately 20 minutes after it is set to
level 1.
X Make sure that the key is in position 1or
2 in the ignition lock.
X To switch on: press button:repeatedly
until the desired heating level is set.
X To switch off: press button:repeatedly
until all indicator lamps go out.
i If the battery voltage is too low, the seat
heating may switch off. Folding bench seat* in the luggage
compartment (Estate)
The folding bench seat in the luggage com-
partment is only suitable for persons no more
than 1.40 m tall and weighing a maximum of
50 kg.
The maximum permissible weight may be
reduced by extensive optional extras, vehicle
load and trailer towing. Observe the maxi-
mum gross vehicle weight and the permissi-
ble axle load, which can be found on the vehi-
cle identification plate (Y page 332).The combined luggage cover and net must be
fitted if you are using the folding bench seat. G
Risk of injury
The rear seat backrests must be locked in the
upright position if you are using the folding
bench seat in the luggage compartment.
Only drive when the head restraints in the
folding bench seat are adjusted to the correct
position. Make sure that the centre of the
head restraint supports the seat occupant's
head at about eye level. This can reduce the
risk of injury to a child in the event of an acci-
dent.
Ensure that the seat belt sits correctly on the
body and that it is engaged in the seat belt
buckle.
Never leave children unsupervised in the vehi-
cle. This applies even if they are secured in a
child restraint system.
Secure children as recommended; see "Chil-
dren in the vehicle" section. G
Risk of injury
Only replace damaged covers with genuine
covers.
Make sure that items of luggage and other
objects are sufficiently secured in the luggage
compartment.
Otherwise, the load could injure someone in
the event of sharp braking, a sudden change
in direction or an accident.
Folding out the folding bench seat 82
SeatsCont
rols
* optional
212_AKB; 2; 4, en-GB
mkalafa
,V ersion: 2.11.8.1
2009-05-05T14:17:16+02:00 - Seite 82
Dateiname: 6515346702_buchblock.pdf; erzeugt am 07. May 2009 14:15:53; WK
Page 86 of 373
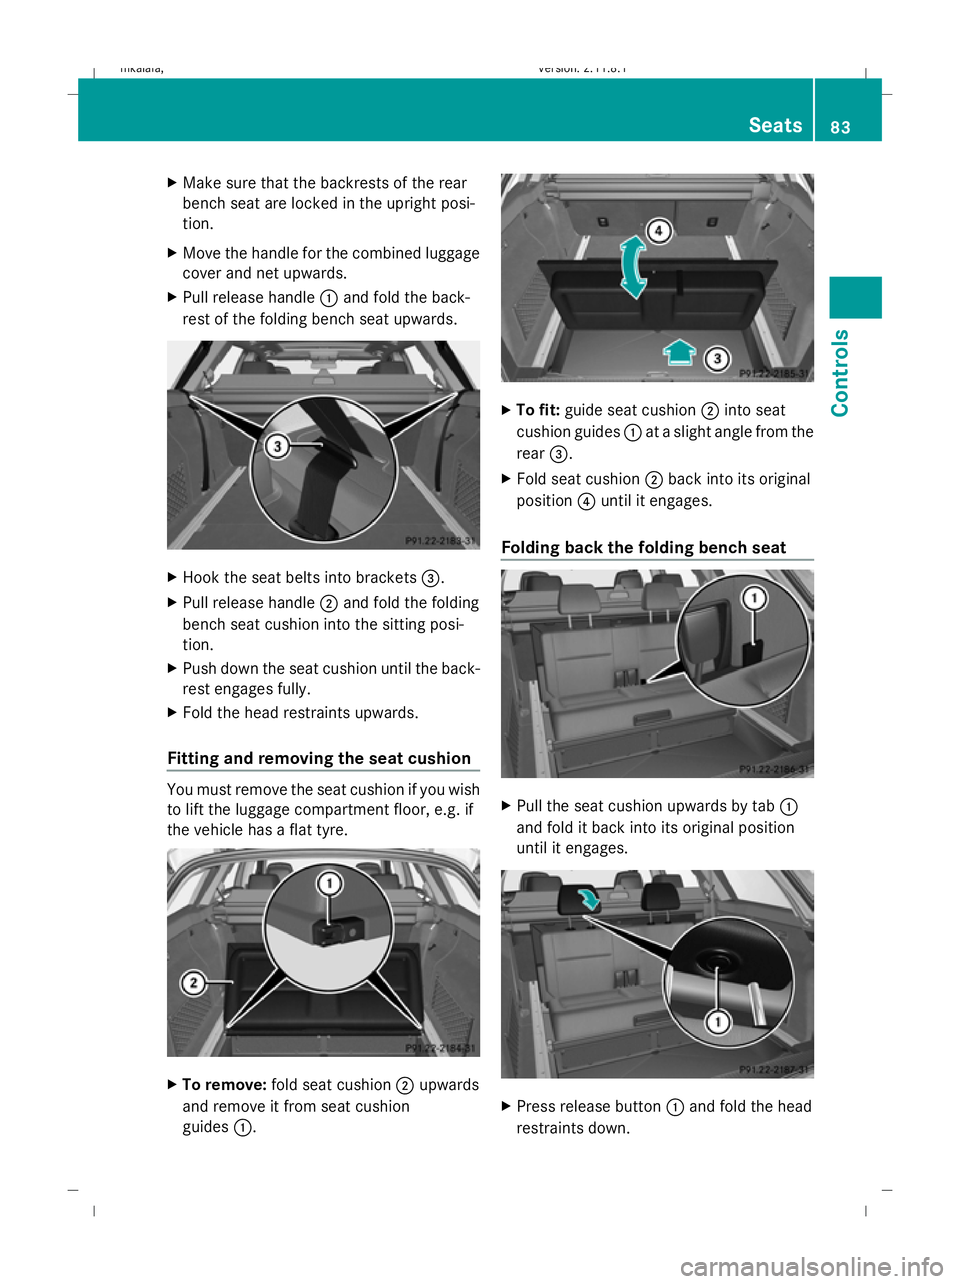
X
Make sure that the backrests of the rear
bench seat are locked in the upright posi-
tion.
X Move the handle for the combined luggage
cover and net upwards.
X Pull release handle :and fold the back-
rest of the folding bench seat upwards. X
Hook the seat belts into brackets =.
X Pull release handle ;and fold the folding
bench seat cushion into the sitting posi-
tion.
X Push down the seat cushion until the back-
rest engages fully.
X Fold the head restraints upwards.
Fitting and removing the seat cushion You must remove the seat cushion if you wish
to lift the luggage compartment floor, e.g. if
the vehicle has a flat tyre. X
To remove: fold seat cushion ;upwards
and remove it from seat cushion
guides :. X
To fit: guide seat cushion ;into seat
cushion guides :at a slight angle from the
rear =.
X Fold seat cushion ;back into its original
position ?until it engages.
Folding back the folding bench seat X
Pull the seat cushion upwards by tab :
and fold it back into its original position
until it engages. X
Press release button :and fold the head
restraints down. Seats
83Controls
212_AKB; 2; 4, en-GB
mkalafa, Version: 2.11.8.1 2009-05-05T14:17:16+02:00 - Seite 83 Z
Dateiname: 6515346702_buchblock.pdf; erzeugt am 07. May 2009 14:15:54; WK
Page 94 of 373
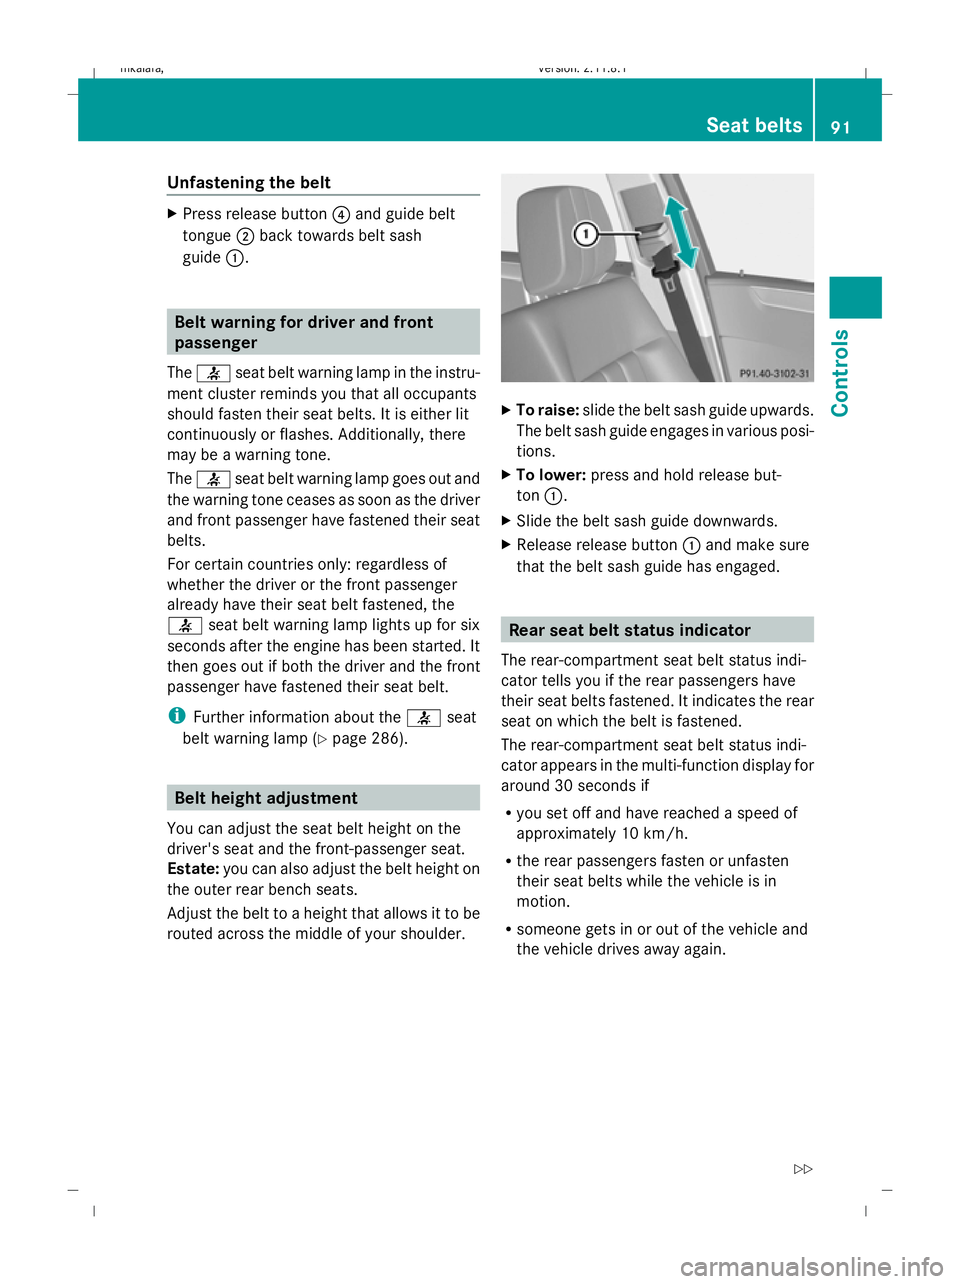
Unfastening the belt
X
Press release button ?and guide belt
tongue ;back towards belt sash
guide :. Belt warning for driver and front
passenger
The 7 seat belt warning lamp in the instru-
ment cluster reminds you that all occupants
should fasten their seat belts. It is either lit
continuously or flashes. Additionally, there
may be a warning tone.
The 7 seat belt warning lamp goes out and
the warning tone ceases as soon as the driver
and front passenger have fastened their seat
belts.
For certain countries only: regardless of
whether the driver or the front passenger
already have their seat belt fastened, the
7 seat belt warning lamp lights up for six
seconds after the engine has been started. It
then goes out if both the driver and the front
passenger have fastened their seat belt.
i Further information about the 7seat
belt warning lamp (Y page 286). Belt height adjustment
You can adjust the seat belt height on the
driver's seat and the front-passenger seat.
Estate: you can also adjust the belt height on
the outer rear bench seats.
Adjust the belt to a height that allows it to be
routed across the middle of your shoulder. X
To raise: slide the belt sash guide upwards.
The belt sash guide engages in various posi-
tions.
X To lower: press and hold release but-
ton :.
X Slide the belt sash guide downwards.
X Release release button :and make sure
that the belt sash guide has engaged. Rear seat belt status indicator
The rear-compartment seat belt status indi-
cator tells you if the rear passengers have
their seat belts fastened. It indicates the rear
seat on which the belt is fastened.
The rear-compartment seat belt status indi-
cator appears in the multi-function display for
around 30 seconds if
R you set off and have reached a speed of
approximately 10 km/h.
R the rear passengers fasten or unfasten
their seat belts while the vehicle is in
motion.
R someone gets in or out of the vehicle and
the vehicle drives away again. Seat belts
91Controls
212_AKB; 2; 4, en-GB
mkalafa, Version: 2.11.8.1 2009-05-05T14:17:16+02:00 - Seite 91 Z
Dateiname: 6515346702_buchblock.pdf; erzeugt am 07. May 2009 14:15:57; WK