2009 MERCEDES-BENZ E-CLASS ESTATE ignition
[x] Cancel search: ignitionPage 73 of 373
Opening and closing
Key
The key centrally locks/unlocks:
R the doors
R the boot lid/tailgate
R the fuel filler flap G
Risk of accident
If children are left unsupervised in the vehicle,
they could:
R open a door from the inside at any time,
even if it has been locked
R start the vehicle using a key which has been
left in the vehicle
R release the parking brake
They could thereby endanger themselves and
others. Never leave children unsupervised in
the vehicle. Always take the key with you
when leaving the vehicle, even if you are only
leaving it for a short time. :
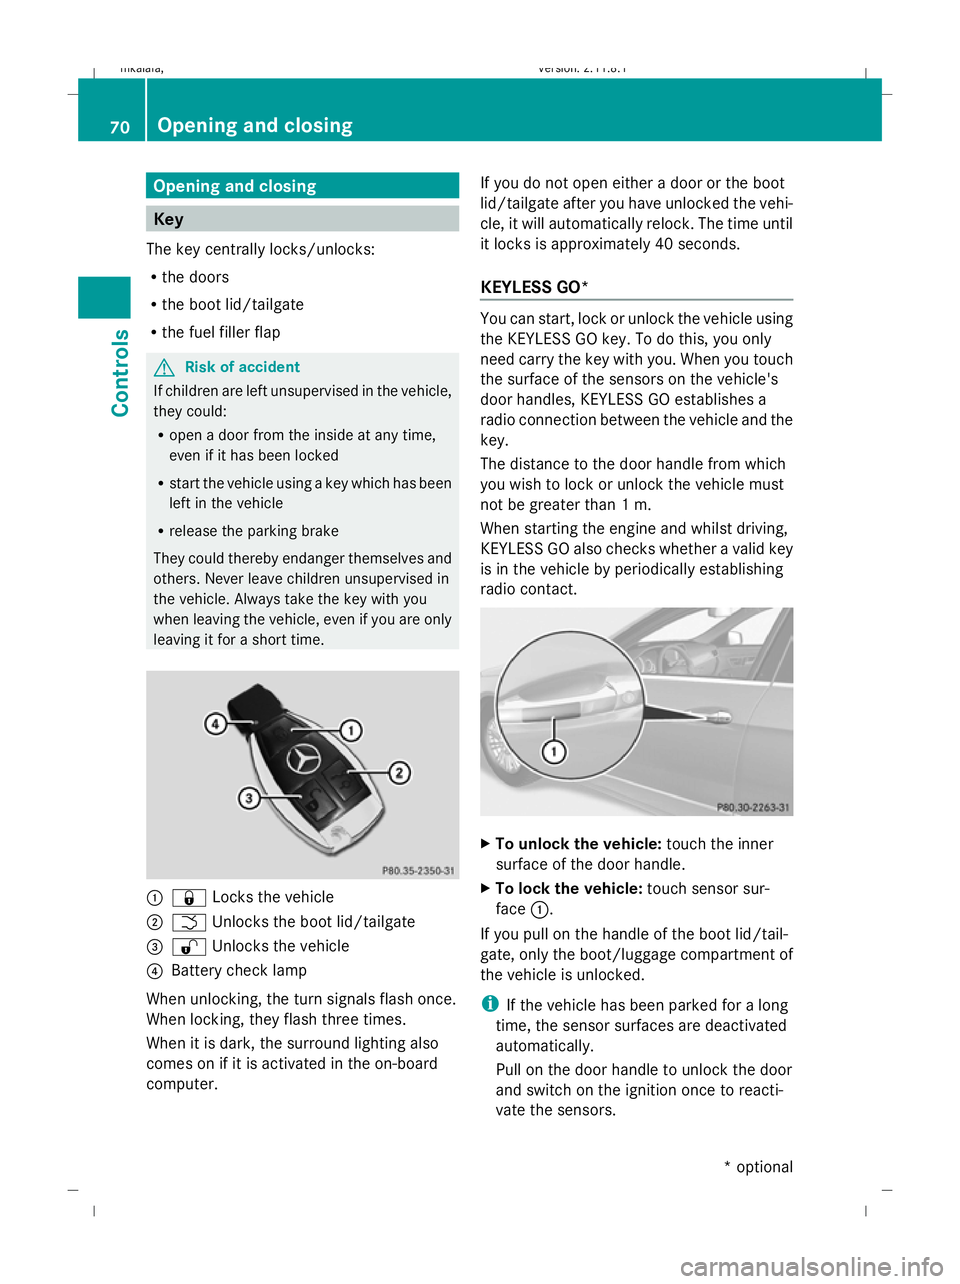
& Locks the vehicle
; F Unlocks the boot lid/tailgate
= % Unlocks the vehicle
? Battery check lamp
When unlocking, the turn signals flash once.
When locking, they flash three times.
When it is dark, the surround lighting also
comes on if it is activated in the on-board
computer. If you do not open either a door or the boot
lid/tailgate after you have unlocked the vehi-
cle, it will automatically relock. The time until
it locks is approximately 40 seconds.
KEYLESS GO* You can start, lock or unlock the vehicle using
the KEYLESS GO key. To do this, you only
need carry the key with you. When you touch
the surface of the sensors on the vehicle's
door handles, KEYLESS GO establishes a
radio connection between the vehicle and the
key.
The distance to the door handle from which
you wish to lock or unlock the vehicle must
not be greater than 1 m.
When starting the engine and whilst driving,
KEYLESS GO also checks whether a valid key
is in the vehicle by periodically establishing
radio contact. X
To unlock the vehicle: touch the inner
surface of the door handle.
X To lock the vehicle: touch sensor sur-
face :.
If you pull on the handle of the boot lid/tail-
gate, only the boot/luggage compartment of
the vehicle is unlocked.
i If the vehicle has been parked for a long
time, the sensor surfaces are deactivated
automatically.
Pull on the door handle to unlock the door
and switch on the ignition once to reacti-
vate the sensors. 70
Opening and closingControls
* optional
212_AKB; 2; 4, en-GB
mkalafa,
Version: 2.11.8.1 2009-05-05T14:17:16+02:00 - Seite 70
Dateiname: 6515346702_buchblock.pdf; erzeugt am 07. May 2009 14:15:46; WK
Page 75 of 373
X
To unlock: press button :.
X To lock: press button ;.
Automatic locking The vehicle will lock automatically once you
have pulled away.
You can also switch the automatic locking
function on and off using the on-board com-
puter (Y page 134).
i The vehicle is locked automatically when
the ignition is switched on and the wheels
begin to turn. There is a risk of being locked
out when the vehicle is being pushed or
tested on a dynamometer.
X To switch off: press and hold button :for
approximately five seconds, until a tone
sounds.
X To switch on: press and hold button ;for
approximately five seconds, until a tone
sounds. Boot/luggage compartment
Points to remember
G
Risk of poisoning
Exhaust fumes could enter the vehicle interior
if the engine is running and the boot lid/tail-
gate is open. This could poison you. There-
fore, you should make sure that the boot lid/
tailgate is always closed when the engine is
running.
! The boot lid/tailgate swings upwards and
to the rear when opened. Therefore, make
sure that there is sufficient clearance
above and behind the boot lid/tailgate.
Do not leave the key in the boot/luggage
compartment. Otherwise, you could lock
yourself out. You can:
R
open and close the boot lid/tailgate man-
ually (Y page 72)
R opened and closed* automatically from
outside (Y page 73)
R opened and closed* automatically from
inside (Y page 74) Opening and closing manually
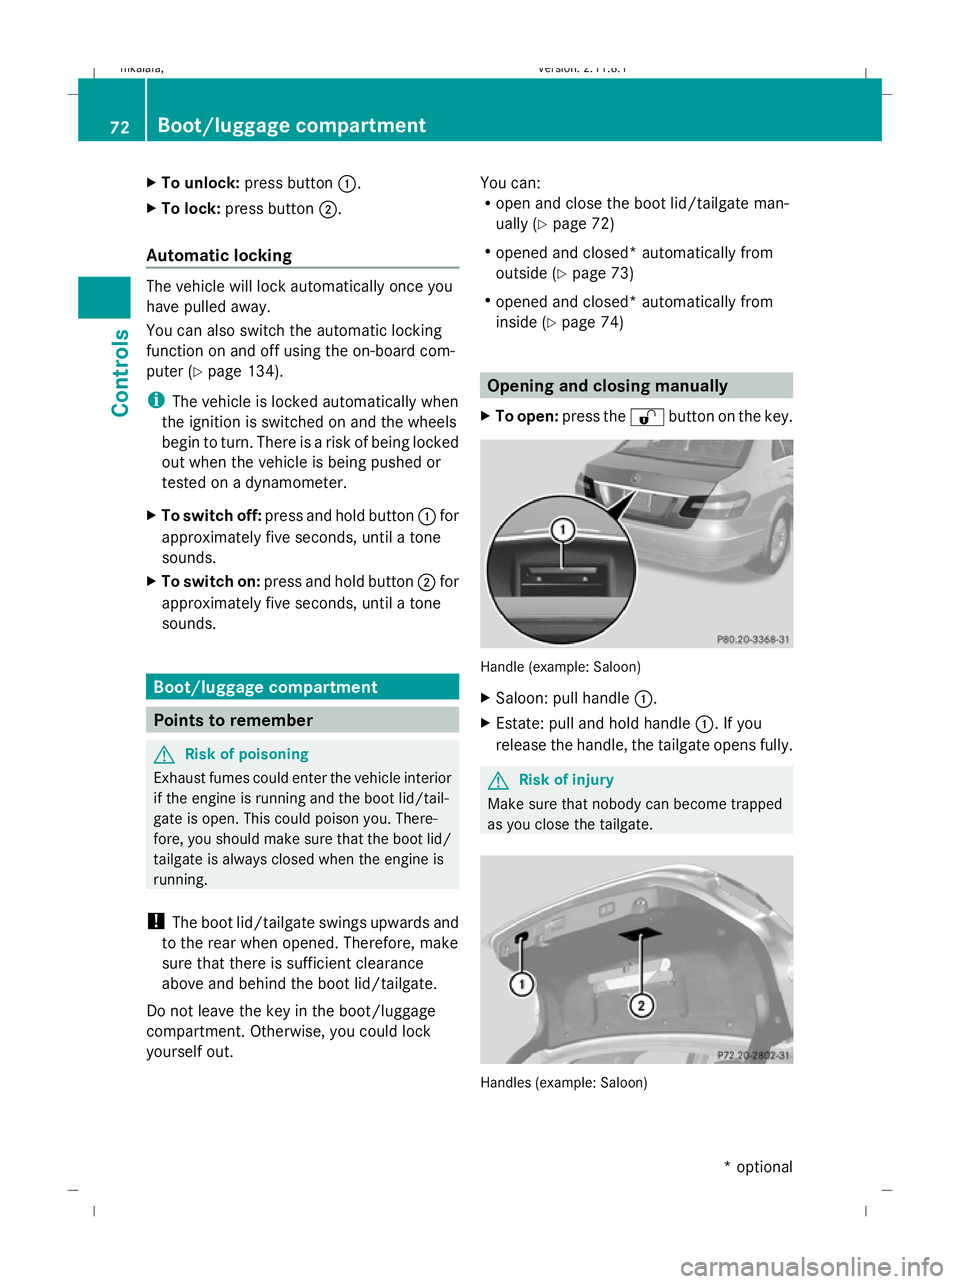
X To open: press the %button on the key. Handle (example: Saloon)
X
Saloon: pull handle :.
X Estate: pull and hold handle :. If you
release the handle, the tailgate opens fully. G
Risk of injury
Make sure that nobody can become trapped
as you close the tailgate. Handles (example: Saloon)72
Boot/luggage compartmentControls
* optional
212_AKB; 2; 4, en-GB
mkalafa,
Version: 2.11.8.1 2009-05-05T14:17:16+02:00 - Seite 72
Dateiname: 6515346702_buchblock.pdf; erzeugt am 07. May 2009 14:15:47; WK
Page 77 of 373
Estate:
you can close the tailgate automati-
cally using either the closing button or the
locking button 20
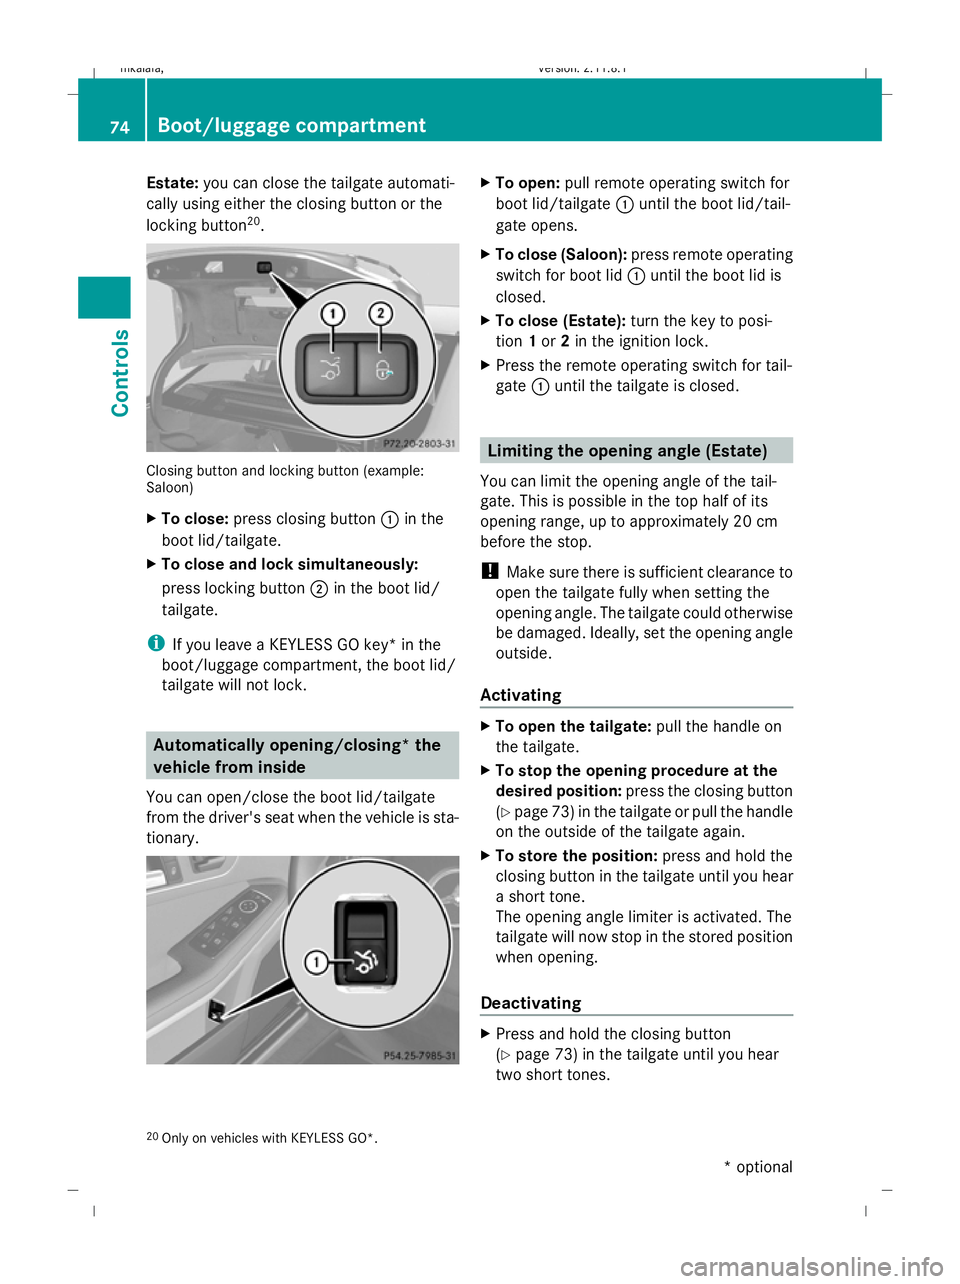
. Closing button and locking button (example:
Saloon)
X To close: press closing button :in the
boot lid/tailgate.
X To close and lock simultaneously:
press locking button ;in the boot lid/
tailgate.
i If you leave a KEYLESS GO key* in the
boot/luggage compartment, the boot lid/
tailgate will not lock. Automatically opening/closing* the
vehicle from inside
You can open/close the boot lid/tailgate
from the driver's seat when the vehicle is sta-
tionary. X
To open: pull remote operating switch for
boot lid/tailgate :until the boot lid/tail-
gate opens.
X To close (Saloon): press remote operating
switch for boot lid :until the boot lid is
closed.
X To close (Estate): turn the key to posi-
tion 1or 2in the ignition lock.
X Press the remote operating switch for tail-
gate :until the tailgate is closed. Limiting the opening angle (Estate)
You can limit the opening angle of the tail-
gate. This is possible in the top half of its
opening range, up to approximately 20 cm
before the stop.
! Make sure there is sufficient clearance to
open the tailgate fully when setting the
opening angle. The tailgate could otherwise
be damaged. Ideally, set the opening angle
outside.
Activating X
To open the tailgate: pull the handle on
the tailgate.
X To stop the opening procedure at the
desired position: press the closing button
(Y page 73 )in the tailgate or pull the handle
on the outside of the tailgate again.
X To store the position: press and hold the
closing button in the tailgate until you hear
a short tone.
The opening angle limiter is activated. The
tailgate will now stop in the stored position
when opening.
Deactivating X
Press and hold the closing button
(Y page 73) in the tailgate until you hear
two short tones.
20 Only on vehicles with KEYLESS GO*. 74
Boot/luggage compartmentControls
* optional
212_AKB; 2; 4, en-GB
mkalafa,
Version: 2.11.8.1 2009-05-05T14:17:16+02:00 - Seite 74
Dateiname: 6515346702_buchblock.pdf; erzeugt am 07. May 2009 14:15:48; WK
Page 78 of 373
Key positions
Key
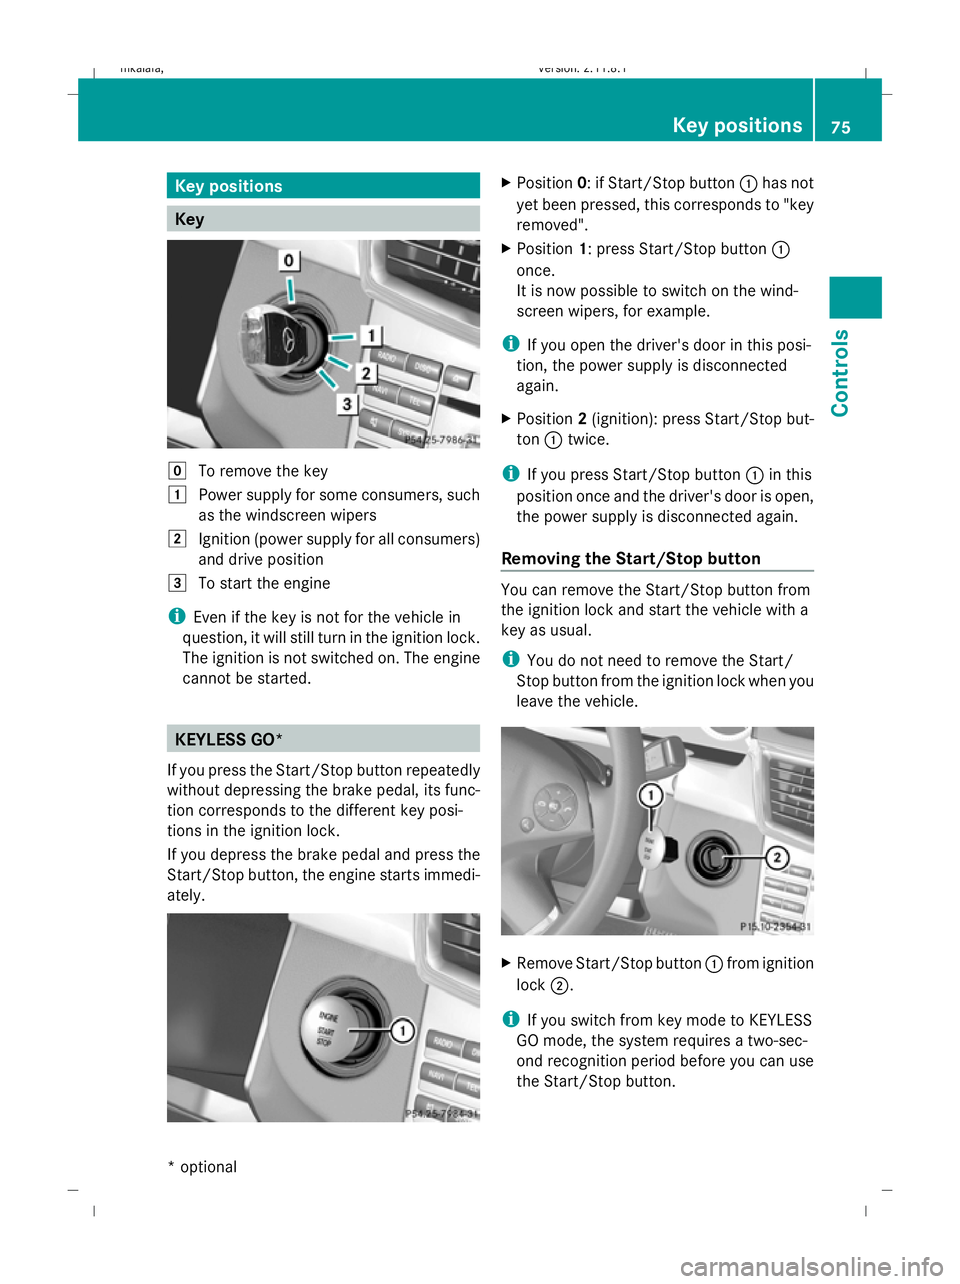
g
To remove the key
1 Power supply for some consumers, such
as the windscreen wipers
2 Ignition (power supply for all consumers)
and drive position
3 To start the engine
i Even if the key is not for the vehicle in
question, it will still turn in the ignition lock.
The ignition is not switched on. The engine
cannot be started. KEYLESS GO*
If you press the Start/Stop button repeatedly
without depressing the brake pedal, its func-
tion corresponds to the different key posi-
tions in the ignition lock.
If you depress the brake pedal and press the
Start/Stop button, the engine starts immedi-
ately. X
Position 0: if Start/Stop button :has not
yet been pressed, this corresponds to "key
removed".
X Position 1: press Start/Stop button :
once.
It is now possible to switch on the wind-
screen wipers, for example.
i If you open the driver's door in this posi-
tion, the power supply is disconnected
again.
X Position 2(ignition): press Start/Stop but-
ton :twice.
i If you press Start/Stop button :in this
position once and the driver's door is open,
the power supply is disconnected again.
Removing the Start/Stop button You can remove the Start/Stop button from
the ignition lock and start the vehicle with a
key as usual.
i You do not need to remove the Start/
Stop button from the ignition lock when you
leave the vehicle. X
Remove Start/Stop button :from ignition
lock ;.
i If you switch from key mode to KEYLESS
GO mode, the system requires a two-sec-
ond recognition period before you can use
the Start/Stop button. Key positions
75Controls
* optional
212_AKB; 2; 4, en-GB
mkalafa
,V ersion: 2.11.8.1
2009-05-05T14:17:16+02:00 - Seite 75 Z
Dateiname: 6515346702_buchblock.pdf; erzeugt am 07. May 2009 14:15:49; WK
Page 79 of 373
Seats
Points to remember
You will find information about folding the
rear bench seat forwards in the "Through-
loading feature in the rear bench seat"
(Saloon) (Y page 195) and "EASY-PACK load-
ing-aid feature rear bench seat (Estate)"
(Y page 196) sections.
Depending on the vehicle's equipment, the
seats can adjusted either manually/electri-
cally or electrically*. G
Risk of injury
The seats can still be adjusted when there is
no key in the ignition lock. For this reason,
children should never be left unsupervised in
the vehicle. They could become trapped when
adjusting a seat. G
Risk of accident
Only adjust the driver's seat when the vehicle
is stationary. You will otherwise be distracted
from the road and traffic conditions and you
could lose control of the vehicle as a result of
the seat moving. This could cause an acci-
dent. G
Risk of injury
Make sure that nobody can become trapped
when you adjust the seat.
Observe the notes concerning the airbag sys-
tem.
Secure children as recommended; see "Chil-
dren in the vehicle" section. G
Risk of injury
Make sure that the central area of the head
restraint supports the back of your head at
about eye level. You could seriously injure
your neck if your head is not correctly sup-
ported by the head restraint in the event of an
accident. Never travel without a correctly
adjusted and engaged head restraint.
! When you move the seats, make sure that
there are no objects in the footwell or behind the seats. Otherwise, you could
damage the seats and the objects.
i The head restraints in the front seats are
fitted with the NECK-PRO system
(Y page 43). For this reason, it is not pos-
sible to remove the head restraints from
the front seats.
The head restraints cannot be removed
from the rear compartment seats on vehi-
cles without the through-loading feature*.
Please contact a Mercedes-Benz Service
Centre for more information. Adjusting the seats manually and
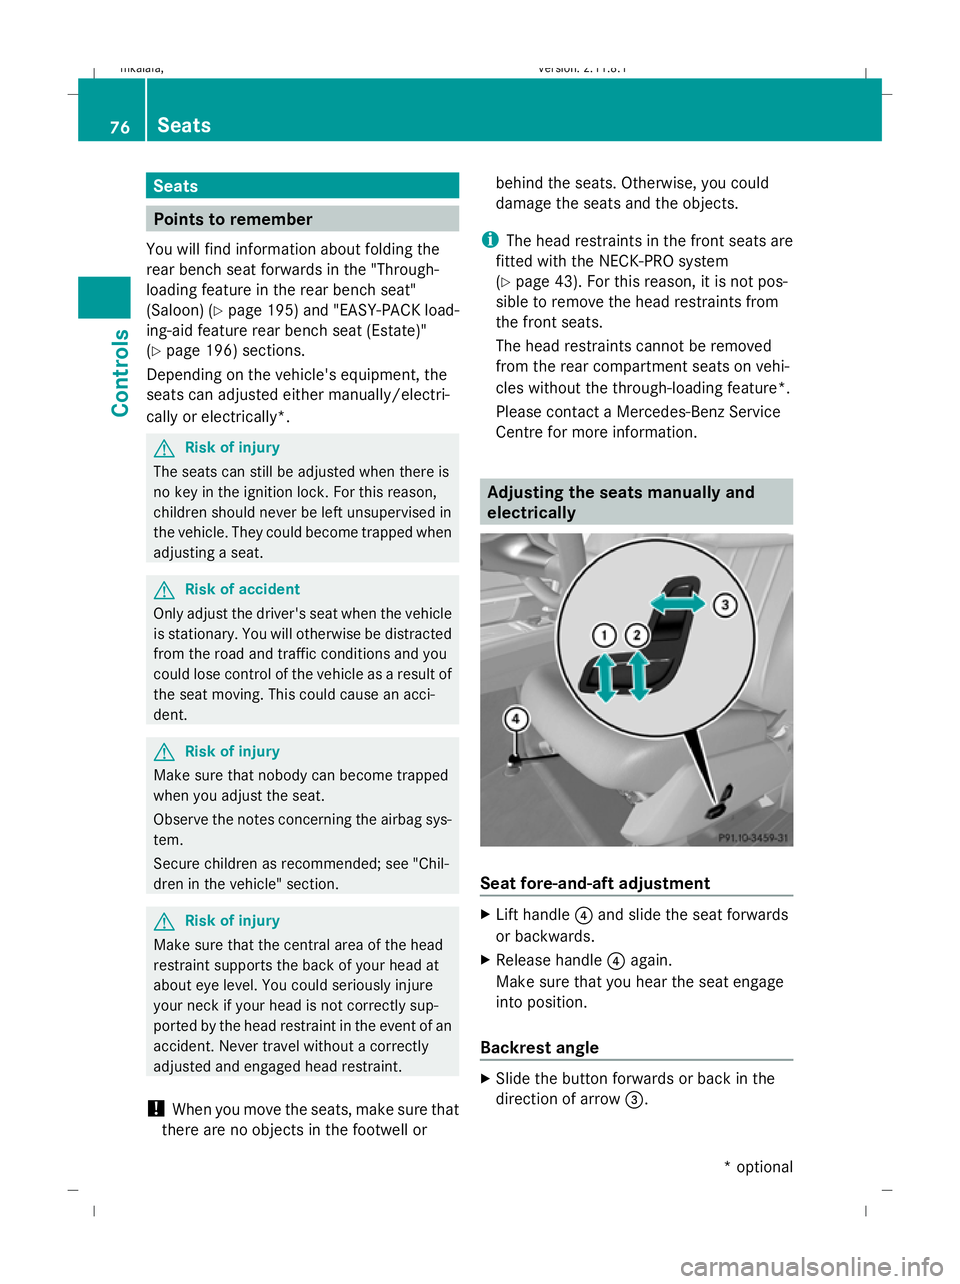
electrically Seat fore-and-aft adjustment
X
Lift handle ?and slide the seat forwards
or backwards.
X Release handle ?again.
Make sure that you hear the seat engage
into position.
Backrest angle X
Slide the button forwards or back in the
direction of arrow =.76
SeatsControls
* optional
212_AKB; 2; 4, en-GB
mkalafa,
Version: 2.11.8.1 2009-05-05T14:17:16+02:00 - Seite 76
Dateiname: 6515346702_buchblock.pdf; erzeugt am 07. May 2009 14:15:49; WK
Page 81 of 373
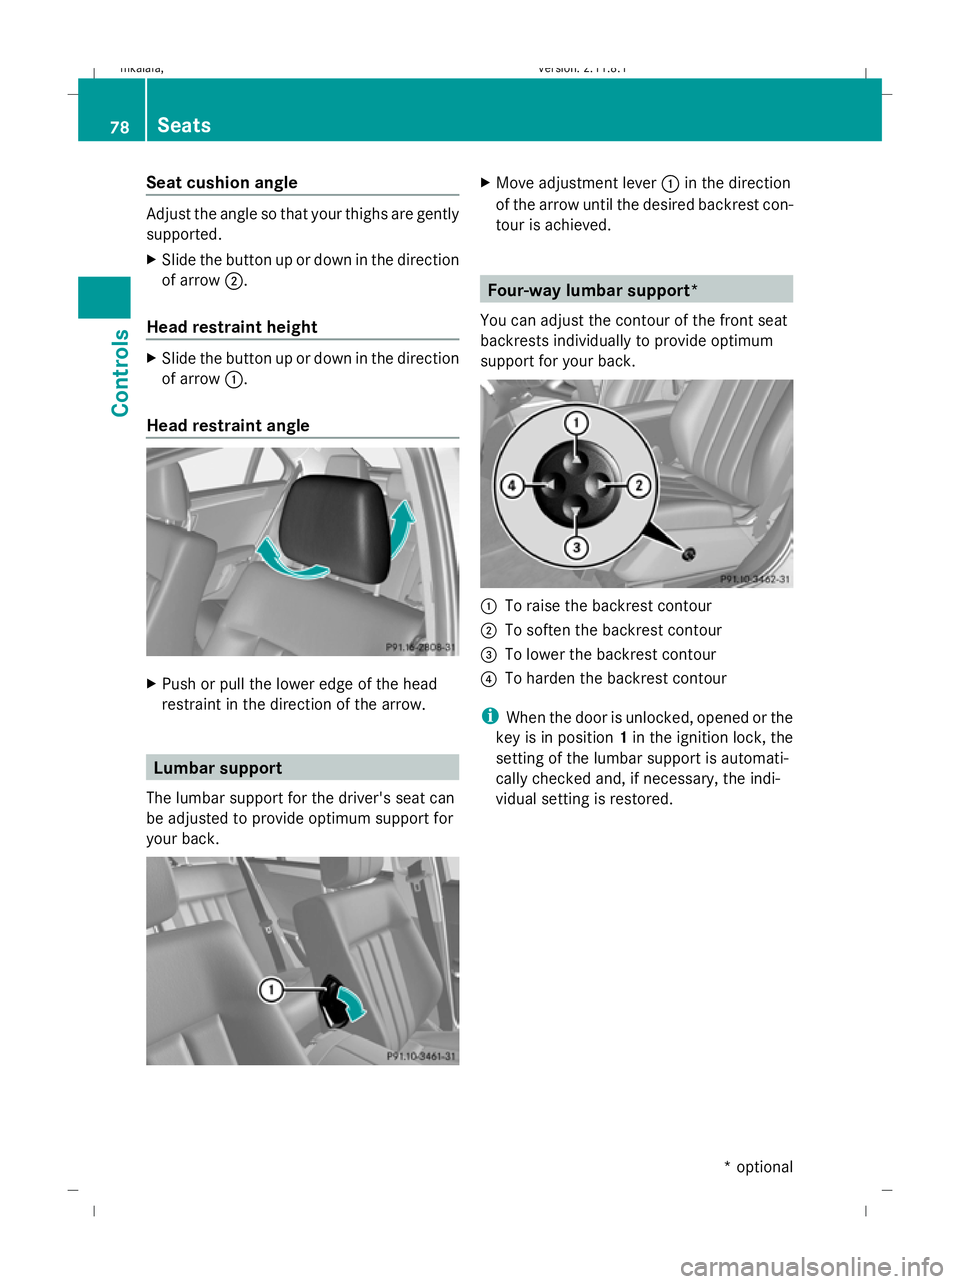
Seat cushion angle
Adjust the angle so that your thighs are gently
supported.
X Slide the button up or down in the direction
of arrow ;.
Head restraint height X
Slide the button up or down in the direction
of arrow :.
Head restraint angle X
Push or pull the lower edge of the head
restraint in the direction of the arrow. Lumbar support
The lumbar support for the driver's seat can
be adjusted to provide optimum support for
your back. X
Move adjustment lever :in the direction
of the arrow until the desired backrest con-
tour is achieved. Four-way lumbar support*
You can adjust the contour of the front seat
backrests individually to provide optimum
support for your back. :
To raise the backrest contour
; To soften the backrest contour
= To lower the backrest contour
? To harden the backrest contour
i When the door is unlocked, opened or the
key is in position 1in the ignition lock, the
setting of the lumbar support is automati-
cally checked and, if necessary, the indi-
vidual setting is restored. 78
SeatsControls
* optional
212_AKB; 2; 4, en-GB
mkalafa,
Version: 2.11.8.1 2009-05-05T14:17:16+02:00 - Seite 78
Dateiname: 6515346702_buchblock.pdf; erzeugt am 07. May 2009 14:15:51; WK
Page 82 of 373
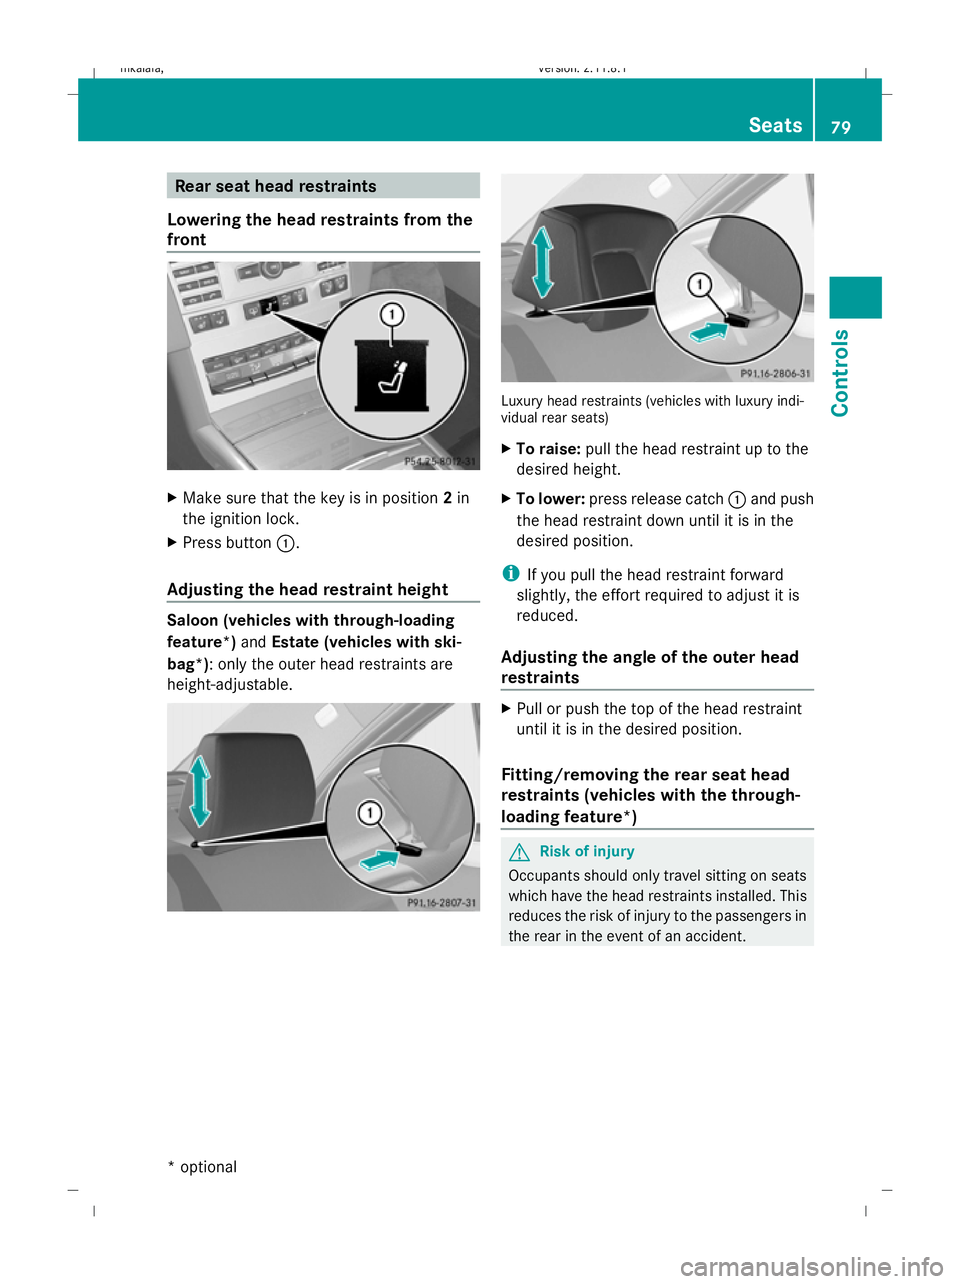
Rear seat head restraints
Lowering the head restraints from the
front X
Make sure that the key is in position 2in
the ignition lock.
X Press button :.
Adjusting the head restraint height Saloon (vehicles with through-loading
feature*)
andEstate (vehicles with ski-
bag*): only the outer head restraints are
height-adjustable. Luxury head restraints (vehicles with luxury indi-
vidual rear seats)
X To raise: pull the head restraint up to the
desired height.
X To lower: press release catch :and push
the head restraint down until it is in the
desired position.
i If you pull the head restraint forward
slightly, the effort required to adjust it is
reduced.
Adjusting the angle of the outer head
restraints X
Pull or push the top of the head restraint
until it is in the desired position.
Fitting/removing the rear seat head
restraints (vehicles with the through-
loading feature*) G
Risk of injury
Occupants should only travel sitting on seats
which have the head restraints installed. This
reduces the risk of injury to the passengers in
the rear in the event of an accident. Seats
79Controls
* optional
212_AKB; 2; 4, en-GB
mkalafa
,V ersion: 2.11.8.1
2009-05-05T14:17:16+02:00 - Seite 79 Z
Dateiname: 6515346702_buchblock.pdf; erzeugt am 07. May 2009 14:15:51; WK
Page 83 of 373
X
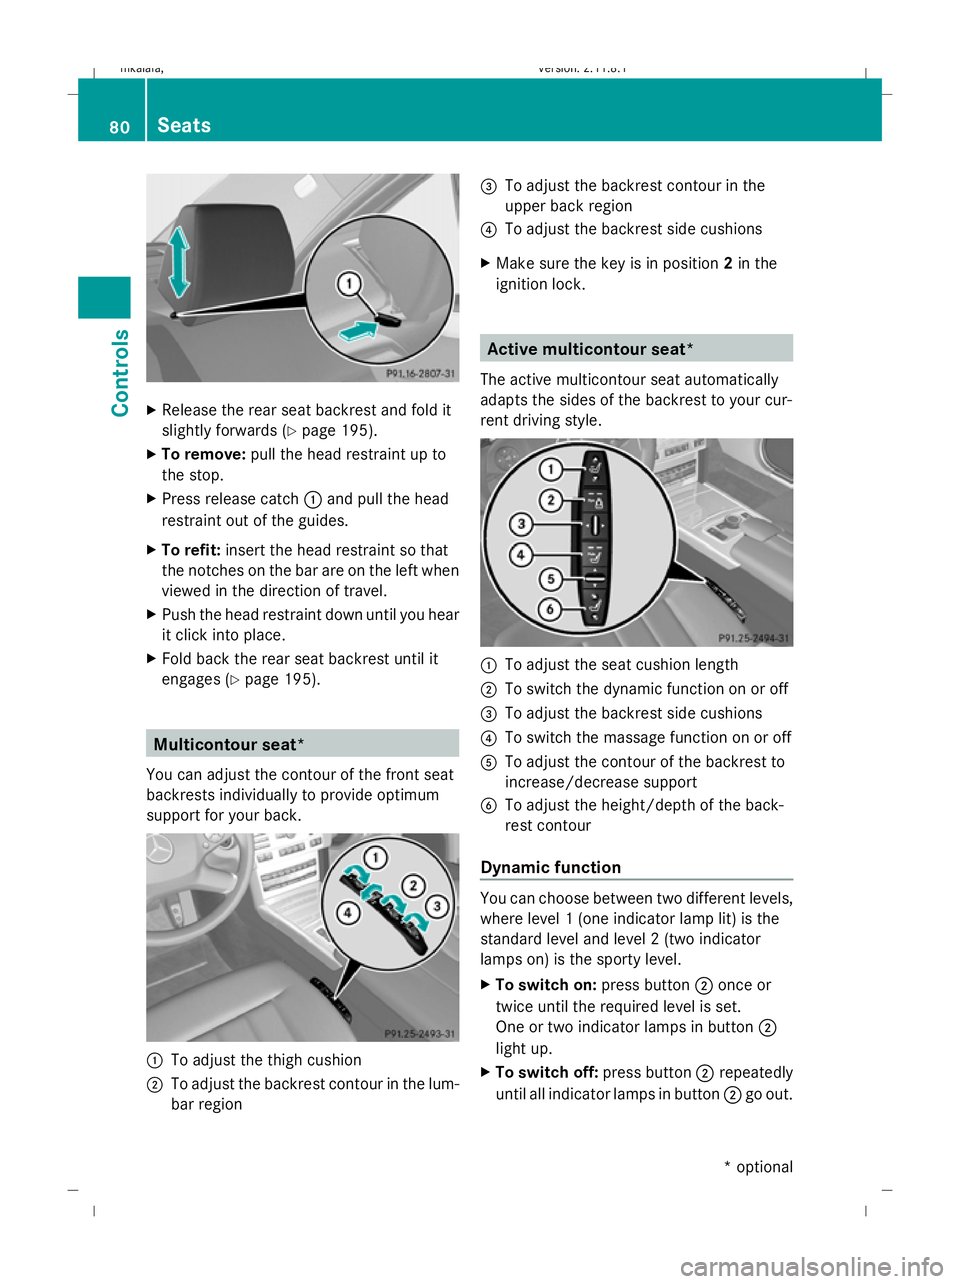
Release the rear seat backrest and fold it
slightly forwards ( Ypage 195).
X To remove: pull the head restraint up to
the stop.
X Press release catch :and pull the head
restraint out of the guides.
X To refit: insert the head restraint so that
the notches on the bar are on the left when
viewed in the direction of travel.
X Push the head restraint down until you hear
it click into place.
X Fold back the rear seat backrest until it
engages (Y page 195). Multicontour seat*
You can adjust the contour of the front seat
backrests individually to provide optimum
support for your back. :
To adjust the thigh cushion
; To adjust the backrest contour in the lum-
bar region =
To adjust the backrest contour in the
upper back region
? To adjust the backrest side cushions
X Make sure the key is in position 2in the
ignition lock. Active multicontour seat*
The active multicontour seat automatically
adapts the sides of the backrest to your cur-
rent driving style. :
To adjust the seat cushion length
; To switch the dynamic function on or off
= To adjust the backrest side cushions
? To switch the massage function on or off
A To adjust the contour of the backrest to
increase/decrease support
B To adjust the height/depth of the back-
rest contour
Dynamic function You can choose between two different levels,
where level 1 (one indicator lamp lit) is the
standard level and level 2 (two indicator
lamps on) is the sporty level.
X To switch on: press button;once or
twice until the required level is set.
One or two indicator lamps in button ;
light up.
X To switch off: press button;repeatedly
until all indicator lamps in button ;go out. 80
SeatsCont
rols
* optional
212_AKB; 2; 4, en-GB
mkalafa
,V ersion: 2.11.8.1
2009-05-05T14:17:16+02:00 - Seite 80
Dateiname: 6515346702_buchblock.pdf; erzeugt am 07. May 2009 14:15:52; WK