2009 MERCEDES-BENZ E-CLASS COUPE roof
[x] Cancel search: roofPage 174 of 313

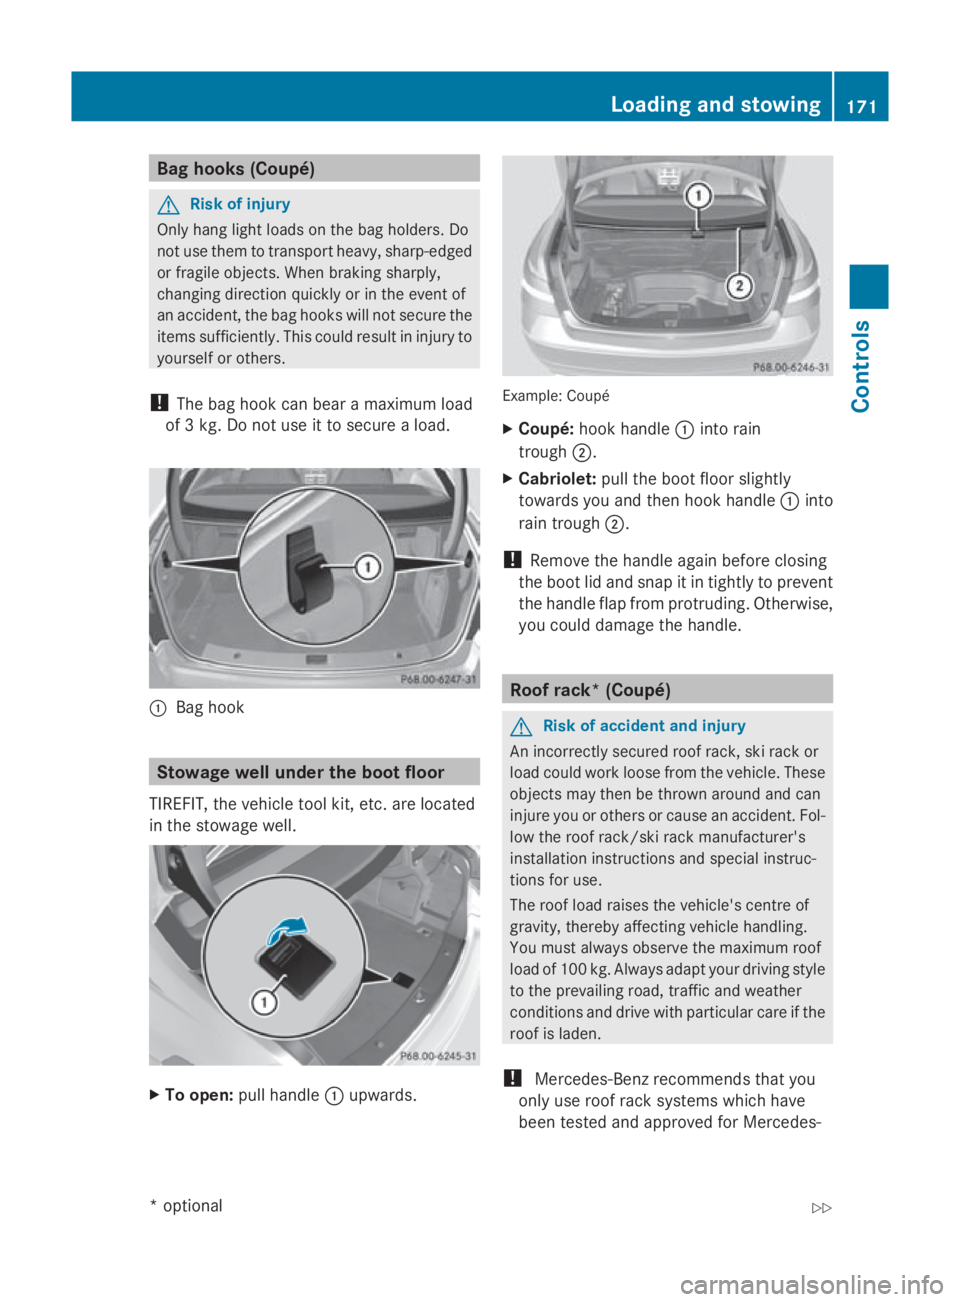
Bag hooks (Coupé)
G
Ris
kofi njury
Onl yhanglight load sonthe bagholders. Do
not us ethem to transport heavy ,sharp-edged
or fragile objects. Whe nbraking sharply,
changing direction quickl yorinthe event of
an accident, the ba ghooks will not secure the
items sufficiently .Thisc ould resul tininjury to
yoursel forothers.
! The ba ghookc an bear amaximu mload
of 3k g. Do not us eittosecureaload. 0046
Bag hook Stowage well unde
rthe boot floor
TIREFIT, the vehicl etool kit, etc. ar eloc ated
in the stowag ewell. X
To open: pull handle 0046upwards. Example: Coupé
X
Coupé: hookhandle 0046into rain
trough 0047.
X Cabriolet: pull the boot floor slightly
towards yo uand then hoo khandle 0046into
rain trough 0047.
! Remove the handl eagain before closing
the boot li dand sna pitint ightlytop revent
the handl eflapf rom protruding .Otherwise,
yo uc ould damage the handle. Roo
frack *(Co upé) G
Ris
kofa ccident and injury
An incorrectly secured roo frack, ski rac kor
load could work loose from the vehicle. These
objects ma ythen be thrown around and can
injure yo uorothers or cause an accident. Fol-
lo wt he roo frack/ski rac kmanufacturer's
installatio ninstructions and specia linstruc-
tions for use.
The roo floa dr aises the vehicle's centre of
gravity ,thereb yaffecting vehicl ehandling.
Yo um usta lway sobserve the maximu mroof
load of 100 kg. Alway sadapt your driving style
to the prevailing road, traffic and weather
conditions and drive with particula rcareift he
roo fisl aden.
! Mercedes-Benz recommends tha tyou
onl yuseroo frac ks ystem swhich have
been teste dand approved for Mercedes- Loadin
gand stowing
171Controls
*optional
207_AKB; 2; 3, en-GB
mkalafa,
Version: 2.11.8.1 2009-07-23T10:23:49+02:00-Seite 171 Z
Page 175 of 313

Benz vehicles. Thi
shelps to prevent dam-
ag etot he vehicle.
Position the loa donthe roof rack in such a
wa ythat the vehicle will not sustai ndam-
ag ee venw henitisinm otion.
Depending on the vehicle's equipment,
make sure that yo ucan:
R ope nthe panorama sliding sunroof* fully
R ope nthe boo tlid fully Vehicles with
astee lroof Vehicles with
apanorama sliding sunroof*
! To avoid damaging or scratching the cov-
ers, do not us emetallic or hard objects to
ope nthem.
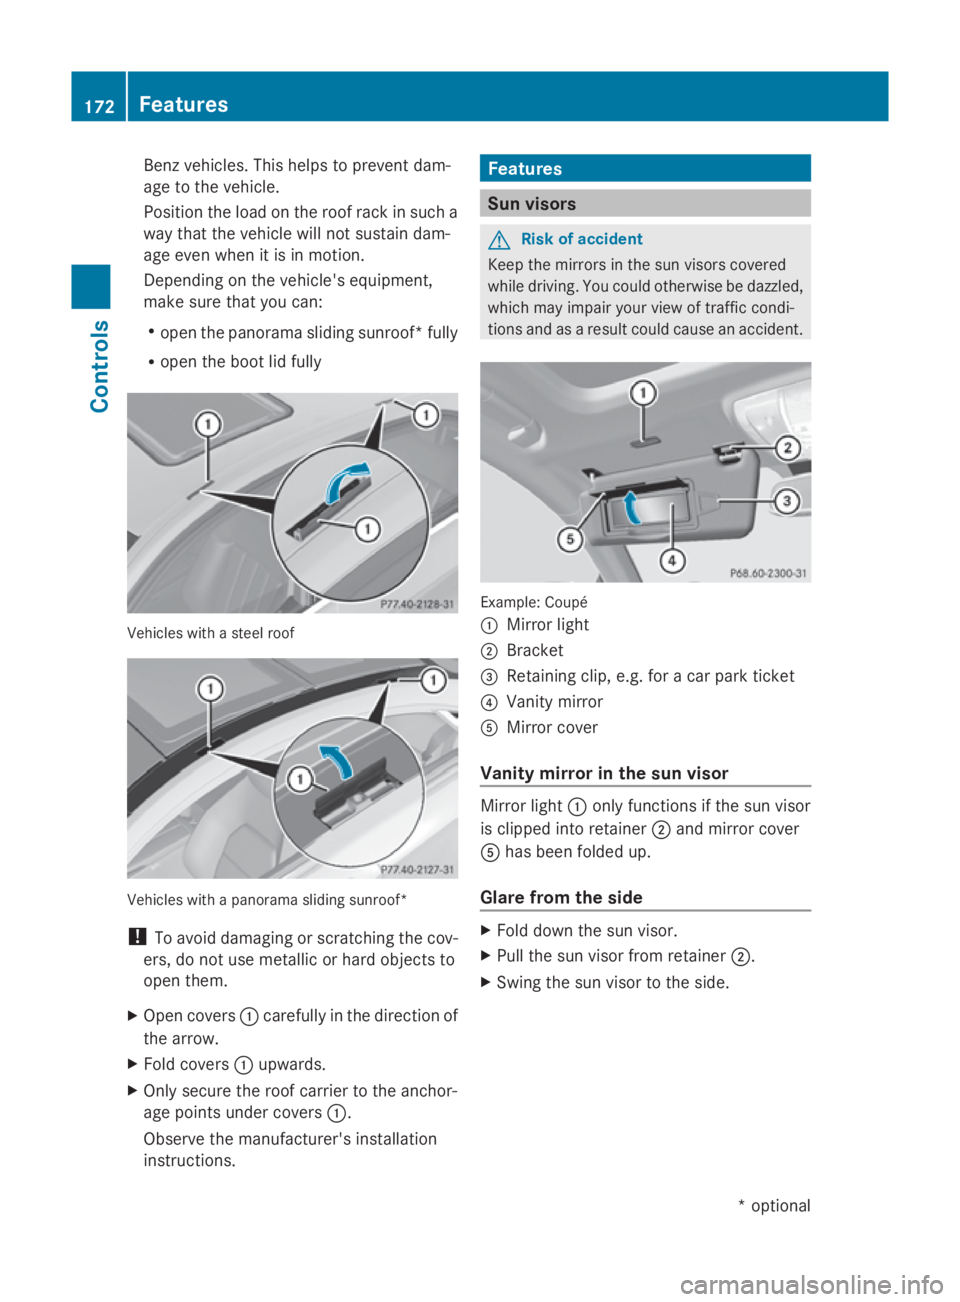
X Ope ncovers 0046carefully in the direction of
the arrow.
X Fold covers 0046upwards.
X Only secure the roof carrie rtothe anchor-
ag ep oints under covers 0046.
Observe the manufacturer' sinstallation
instructions. Features
Sun visors
G
Risk of accident
Kee pthe mirrors in the su nvisors covered
while driving .You could otherwise be dazzled,
which may impai ryourv iewoft rafficcondi-
tions and as aresult could cause an accident. Example: Coupé
0046
Mirror light
0047 Bracket
008A Retaining clip, e.g. for acar park ticket
0088 Vanity mirror
0086 Mirror cover
Vanity mirror in the sun visor Mirror light
0046only functions if the su nvisor
is clippe dinto retainer 0047and mirror cover
0086 hasb eenf olded up.
Glare from the side X
Fold dow nthe su nvisor.
X Pull the su nvisor from retainer 0047.
X Swing the su nvisor to the side. 172
FeaturesControls
*o
ptional
207_AKB; 2; 3, en-GB
mkalafa
,V ersion: 2.11.8.1
2009-07-23T10:23:49+02:00
-Seite 172
Page 191 of 313

The tyre pressure loss warning system does
not replace the need to regularly check your
vehicle's tyre pressures, since an even loss of
pressure on several tyres at the same time
cannot be detected by the tyre pressure loss
warning system.
The tyre pressure monitor is not able to warn
you of asudden loss of pressure, e.g. if the
tyre is penetrated by aforeign object.
In the event of asudden loss of pressure, bring
the vehicle to ahalt by braking carefully. Do
not make any sudden steerin gmovements
when doing so.
The function of the tyre pressure loss warning
system is limited or delaye dif:
R snow chains are fitted to your vehicle's
tyres.
R road conditions are wintry.
R you are driving on sand or gravel.
R you adopt avery sporty driving style (cor-
nering at high speeds or driving with high
rates of acceleration).
R you are towing avery heavy or large trailer.
R you are driving with aheavy load (in the
vehicle or on the roof).
Restarting the tyrep ressureloss warn-
ing system Restart the tyre pressure loss warning system
if you have:
R
changed the tyre pressure
R changed the wheels or tyres
R fitted new wheels or tyres
X Before restarting, consult the table of tyre
pressures on the inside of the fuel filler flap
to ensure that the tyre pressure in all four
tyres is set correctly for the respective
operating conditions.
X Observe the notes in the section on tyre
pressures (Y page 186). G
Risk of accident
The tyre pressure loss warning system can
only give reliable warnings if you have set the
correc ttyre pressure.
If an incorrect tyre pressure is set, these
incorrect values will be monitored.
At yre with insufficien tpressure results in
vehicle instability when driving, thus increas-
ing the risk of an accident.
X Make sure that the key is in position 2in
the ignition lock.
In the multi-function display you will see the
standard display (Y page 108).
X Press the 0040or003E button to select the
Service menu.
X Press the 003Cor003D button to select
Tyre pressure.
X Press the 0064button.
The multi-function display shows the mes-
sage:
Run Flat Indicator active Restart
with OK
If you wish to confirm the restart:
X Press the 0064button.
The multi-function display shows the mes-
sage:
Tyre press. now OK?
X Press the 003Cor003D button to select
Yes.
X Press the 0064button.
You will see the following message in the
multi-function display:
Run Flat Indicator restarted
After ateach-in period, the tyre pressure
loss warning system will monitor the set
tyre pressures of all four tyres.
If you wish to cancel the restart:
X Press the 0041button.
or
X When the Tyre press. now OK? message
appears, press 003Cor003D to select
Cancel. 188
Tyres and wheelsOperation
207_AKB; 2; 3, en-GB
mkalafa,
Version: 2.11.8.1 2009-07-23T10:23:49+02:00-Seite 188
Page 192 of 313

X
Press the 0064button.
The tyre pressure values stored at the last
restart will continue to be monitored. Interchanging the wheels
G
Risk of accident
Interchange the fron tand rear wheels only if
they have the same dimensions :for example
size, offset ,etc.
After awheel is changed, have the tightening
torque checked at aspecialist workshop that
has the necessary specialist knowledge and
tools to carry out the work required.
Mercedes-Benz recommends that you use a
Mercedes-Benz Servic eCentre for this pur-
pose. In particular, work relevant to safety or
on safety-related systems must be carried out
at aq ualified specialist workshop.
The wheels could work loose if they are not
tightened to atorque of 130 Nm.
For safety reasons, Mercedes-Benz recom-
mends that you only use wheel bolts of the
correc tsize which have been approved for
Mercedes-Benz vehicles.
The wear patterns on the fronta nd rear tyres
differ, depending on the operating conditions.
Interchange the wheels before aclear wear
patter nhas formed on the tyres. Frontt yres
typically wear more on the shoulders and the
rear tyres in the centre.
On vehicles that have the same size fronta nd
rear wheels you can interchange the wheels
every 5,000 km to 10,00 0kmdepending on
the degree of tyre wear. Do not reverse the
direction of tyre rotation.
Clean the contact surfaces of the wheel and
the brake disc thoroughly every time awheel
is interchanged. Check the tyre pressure and,
if necessary, restart the tyre pressure loss
warning system*. Winter driving
Points to remember
Have your vehicle winterproofed at aqualified
specialist workshop, e.g. at aMercedes-Benz
Servic eCentre, at the onset of winter.
Observe the notes in the "Changing awheel"
section (Y page 189). Winter tyres
Use winter tyres at temperatures below
+7 ˚C and in wintry road conditions. Only
winter tyres displaying the 004Dsnowflake
symbol in addition to the M+S markin gpro-
vide optimum grip in wintry road conditions.
Only these tyres will allow the ABS and ESP
driving systems to function optimally in win-
ter, as these tyres have been designed spe-
cifically for driving on snow.
Use winter tyres of the same make and tread
on all wheels to maintain safe handling char-
acteristics. G
Risk of accident
Winter tyres with atread depth of less than
4mmm ust be replaced immediately. They are
no longer suitable for winter use and can no
longer provide sufficient grip. This could
cause you to lose control of your vehicle and
cause an accident.
Always observe the maximum permissible
speed specified for the winter tyres you have
fitted. If you fit winter tyres which have a
lower maximum permissible speed than that
of the vehicle, affix an appropriate warning
sign in the driver's field of vision. This can be
obtained at aqualified specialist workshop,
e.g. from aMercedes-Benz Servic eCentre.
Under these circumstances, you should also
restrict the maximum speed of the vehicle
using permanen tSpeedtronic 37
to the maxi-
mum permissible speed for the winter tyres
(Y page 135).
37 Only available for certain countries. Winter driving
189Operation
*optional
207_AKB; 2; 3, en-GB
mkalafa,
Version: 2.11.8.1 2009-07-23T10:23:49+02:00-Seite 189 Z
Page 232 of 313

Display messages Possible causes/consequences and
0050
0050 Solutions 0073 Malfunc‐
tio
nC on‐
sul tw ork‐
shop G
Risk of injury
The rol lbars are defective.
X Visit aqualified specialist workshop immediately. 0059 Converti‐
ble Top
Operation
possible
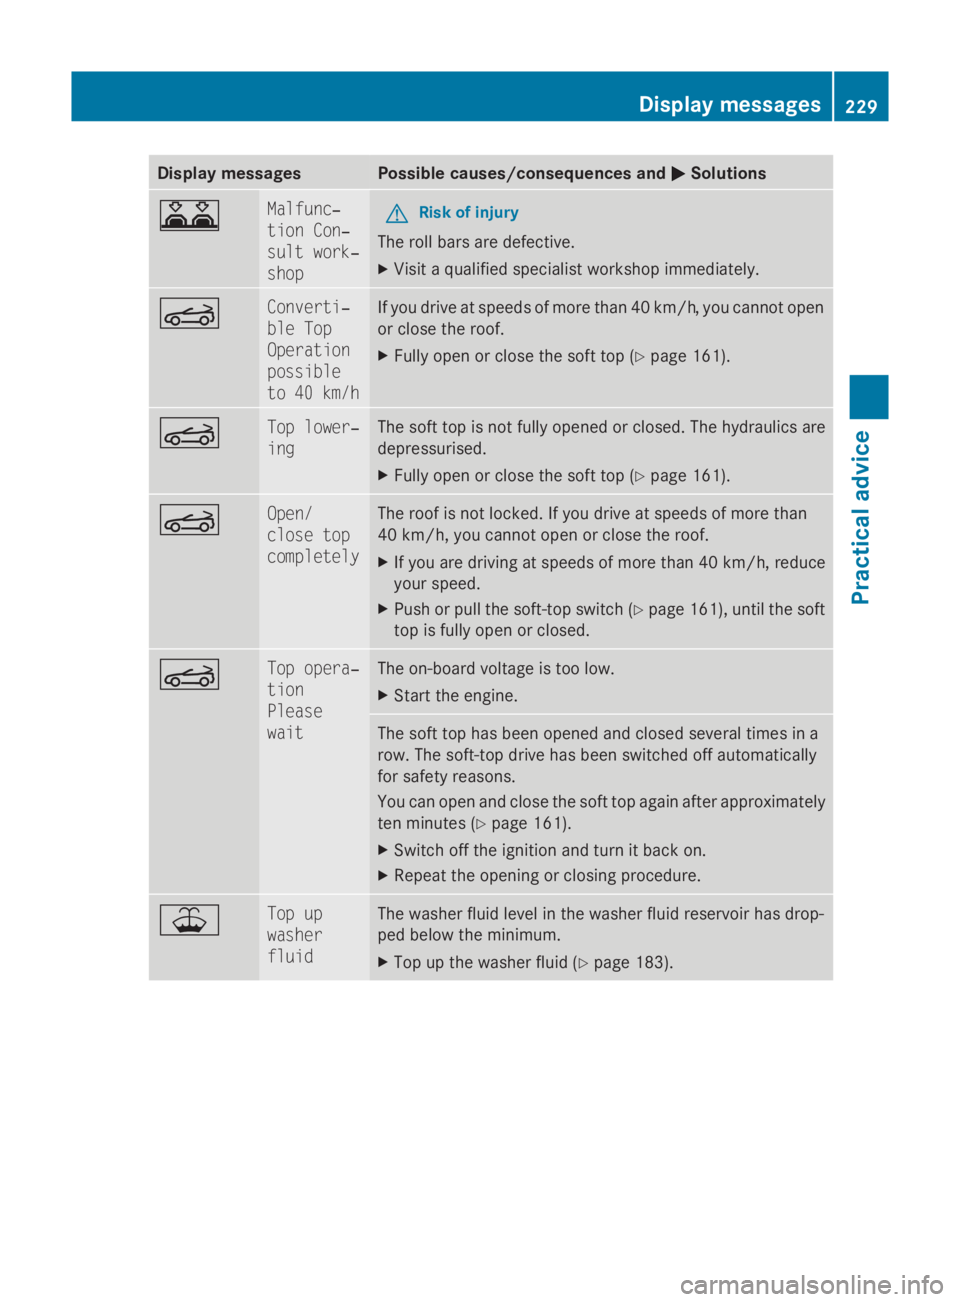
to 40 km/h If you drive at speeds of mor
ethan40k m/h,you canno topen
or close th eroof.
X Full yopen or close th esoftt op ( Ypage 161). 0059 Top lower‐
ing The sof
ttop is no tfull yo pened or closed .The hydraulic sare
depressurised.
X Full yopen or close th esoftt op ( Ypage 161). 0059 Open/
close top
completely The roo
fisnotlocked. If you drive at speeds of mor ethan
40 km/h, you canno topen or close th eroof.
X If you are drivin gatspeeds of mor ethan4 0km/ h,reduce
your speed.
X Push or pull th esoft-to pswitch (Y page 161), until th esoft
to pisf ullyo pen or closed. 0059 Top opera‐
tion
Please
wait The on-boar
dvoltag eistoolow.
X Start th eengine. The sof
ttop has been opened and closed several times in a
row .The soft-to pdrive has been switched of fautomatically
fo rs afet yreasons.
You can open and close th esoftt op again after approximately
te nm inute s(Ypage 161).
X Switc hoffthei gnition and tur nitbacko n.
X Repea tthe openin gorclosingprocedure. 00BE Top up
washer
fluid The washer flui
dlevel in th ewasher flui dreservoir has drop-
ped belo wthe minimum.
X Top up th ewasher flui d(Ypage 183). Display
messages
229Practical advice
207_AKB; 2; 3, en-GB
mkalafa,V ersion: 2.11.8.1
2009-07-23T10:23:49+02:00
-Seite 229 Z
Page 257 of 313

0074
To close
0075 To lock
X Pull off the cover of the roof lock behind the
overhead control panel.
X Insert the hex-socket wrench into the roof
lock.
X Turn the hex-socket wrench clockwise 0074
as far as possible.
! Make sure the hex-socket wrench is
turned anti-clockwise as far as possible
during the following step. The soft top may
otherwise not be fully locked.
X Turn the hex-socket wrench anti-clockwise
as far as possible 0074.
The soft top is now pre-locked on the wind-
screen frame. X
Move material tensioning frame 0076to an
upright position.
! Make sure the soft-top compartment
cover does not collide with the material
tensioning frame during the following step. X
Lower soft-top compartment cover 0077. X
With your hand flat, press down the mate-
rial tensioning frame until it rests on soft-
top support 0078of the soft-top compart-
ment cover. G
Risk of injury
You could trap your hands.
Do not push the soft-top compartment cover
forwards in frontoft he soft-top support with
your hands.
X Press the soft top compartment cover with
your hand flat forwards/downwards on
both sides simultaneously until it engages
in the guide. Apply your hands to the points
indicated with arrows.
At the same time press the material ten-
sioning frame gently downwards with your
flat hand. 254
Locking/unlocking in an emergencyPractical advice
207_AKB; 2; 3, en-GB
mkalafa,
Version: 2.11.8.1 2009-07-23T10:23:49+02:00-Seite 254
Page 258 of 313

0079
To lock
X Insert the hex-socket wrench into the roof
lock.
X Turn the hex-socket wrench anti-clockwise
0079 as far as possible.
X Have the soft-top mechanism repaired
immediately at aqualified specialist work-
shop, e.g. aMercedes-Benz Service
Centre.
i Press the soft-top compartment cover
again if the boot lid cannot be opened.
! Do not under any circumstances open the
boot lid with the emergenc ykey. You could
otherwise damage the boot lid and the soft-
top compartment cover. Boot
! The boot lid swings upwards when
opened. Therefore, make sure that there is
sufficient clearance above the boot lid.
If the boot can no longer be unlocked with the
key or KEYLESS GO*:
X Remove the emergenc ykey element from
the key (Y page 249). X
Insert the emergenc ykey element into the
boot lid lock as far as the stop.
X Turn the emergenc ykey element anti-
clockwise as far as it will go to position
004A and pull the boot lid handle.
The boot is unlocked.
X Turn the emergenc ykey element back and
remove it. Releasing the parking lock manually
(vehicles with automatic transmis-
sion*)
In the event of an electrical fault, it is possible
to release the selector lever lock manually to
move it out of position P,e.g. if you wish to
tow the vehicle away. X
Depress the parking brake firmly.
X Prise out selector lever gaiter 0046with aflat,
blunt object ,(e. g. ascrewdriver wrapped Locking/unlocking in an emergency
255Practical advice
*optional
207_AKB; 2; 3, en-GB
mkalafa,
Version: 2.11.8.1 2009-07-23T10:23:49+02:00-Seite 255 Z
Page 288 of 313

Retrofitting of two-wa
yradio sand
mobil ephones (RF transmitter)
Use the Technica lSpecification
ISO/T S21609 44
implementation regulation
when retrofitting RF (radi ofrequency) trans-
mitters.
If your vehicl ehasfittings for two-way radio
equipment (e.g. taxis, hir ecars or officia lvehi-
cles), us ethe power supply or aeria lconnec-
tions intended for us ewitht he basic wiring.
Be sure to observe the manufacturer' saddi-
tiona linstructions when installing the fittings.
! Damage resulting from installation work
that ha snot bee ncarrie doutcorrectly is
not covered by the Mercedes-Benz implied
warranty.
To ensure proper installation, Mercedes-
Benz recommend shaving this work done
at aM ercedes-Benz Service Centre or at a
qualified specialist workshop.
Transmission output Transmission outpu
tatthe aeria lbasem ust
not excee dthe maximum value sbelow. Waveband Maximum trans-
missio
noutput
(PEAK) Short wave
(f <54M Hz) 100 W
4mw
aveband 30 W
2mw
aveband 50 W
Trunked radio/Tetra 35 W
70 cm waveband 35 W
GSM 900/AMPS 10 W
GSM 1800 10 W
UMTS 10 W Aerial positions
The following aeria
lpositions may be used if
RF transmitters have bee nproperly installed: Aerial positions, Coupé
0046
Front roo farea( vehicle swithp anorama
sliding sunroof*: this are aisnot author-
ise dfor use)
0047 Rear roo farea( vehicle swithp anorama
sliding sunroof*: this are aisnot author-
ise dfor use)
008A Rear mudguard (recommended installa-
tion position: on the sid ewhich face sthe
centre of the road)
0088 Boot lid Aerial positions, Cabriolet
0046
Rear mudguard (recommended installa-
tion position: on the sid ewhich face sthe
centre of the road)
44 ISO/T S21609 –Technica lSpecification for Road Vehicles -- (EMC )guideli nesfor installation of aftermarket
radio frequency transmitting equipment. Vehicl
eelect ronics
285Technical data
*optional
207_AKB; 2; 3, en-GB
mkalafa
,V ersion: 2.11.8.1
2009-07-23T10:23:49+02:00
-Seite 285 Z