2009 MERCEDES-BENZ CL COUPE wiper blades
[x] Cancel search: wiper bladesPage 9 of 421

Brake Assist
. . . . . . . . . . . . . . . . . . . . .49
See BAS . . . . . . . . . . . . . . . . . . . . . .49
see BAS
Brake fluid . . . . . . . . . . . . . . . . . . . . .400
Display message . . . . . . . . . . . . . .333
Brake lamps
Adaptive . . . . . . . . . . . . . . . . . . . . . .50
Display message . . . . . . . . . . . . . .346
Brakes
Warning lamp . . . . . . . . . . . . .352, 354
Brake system
Display message . . . . . . . . . . . . . .334
Brake wear
Display message . . . . . . . . . . . . . .334
Bulbs . . . . . . . . . . . . . . . . . . . . . . . . . .369
Cornering light . . . . . . . . . . . . . . . .372
Display message . . . . . . . . . . . . . .343
Infrared light . . . . . . . . . . . . . . . . .371
Main-beam spot lamp . . . . . . . . . .371
Motorway spot lamp . . . . . . . . . . .371
Replacing . . . . . . . . . . . . . . . . . . . .371
see Lamp C
Calling up a fault see Display message . . . . . . . . . . .316
Calling voicemail . . . . . . . . . . . . . . . .114
Call lists . . . . . . . . . . . . . . . . . . . . . . .123
Displaying details . . . . . . . . . . . . . .120
Saving a list entry . . . . . . . . . . . . .124
Call waiting . . . . . . . . . . . . . . . . . . . .115
Care Automatic car wash . . . . . . . . . . . .307
Care products . . . . . . . . . . . . . . . .307
Cleaning agents . . . . . . . . . . . . . . .307
Dashboard . . . . . . . . . . . . . . . . . . .310
Display . . . . . . . . . . . . . . . . . . . . . .310
Exterior . . . . . . . . . . . . . . . . . . . . .307
Headlamps . . . . . . . . . . . . . . . . . . .309
High-pressure cleaners . . . . . . . . .308
Interior . . . . . . . . . . . . . . . . . . . . . .310
Matt paintwork . . . . . . . . . . . . . . . .308
Night View Assist . . . . . . . . . . . . . .311
Paintwork . . . . . . . . . . . . . . . . . . . .308
Plastic trim . . . . . . . . . . . . . . . . . . .312
Reversing camera . . . . . . . . . . . . .310
Seat covers . . . . . . . . . . . . . . . . . .311 Sensors . . . . . . . . . . . . . . . . . . . .
.310
Steering wheel boss . . . . . . . . . . . .310
Tail pipes . . . . . . . . . . . . . . . . . . . .310
Trim strips . . . . . . . . . . . . . . . . . . .312
Windows . . . . . . . . . . . . . . . . . . . .309
Wiper blades . . . . . . . . . . . . . . . . .309
Wooden trim . . . . . . . . . . . . . . . . .312
Care products . . . . . . . . . . . . . . . . . .307
CD Inserting . . . . . . . . . . . . . . . . . . . . . .77
Menu overview . . . . . . . . . . . . . . . . .79
Playback options . . . . . . . . . . . . . . .83
Selecting a mediu m.. . . . . . . . . . . .81
Selecting a titl e.. . . . . . . . . . . . . . .81
CD player/CD changer
Operation (COMAND) . . . . . . . . . . . .77
Operation (on-board computer) . . .219
Central locking
Activating/deactivating
(COMAND) . . . . . . . . . . . . . . . . . . .167
Key . . . . . . . . . . . . . . . . . . . . . . . . .178
Central locking/unlocking button ..1 79
Central unlocking Key . . . . . . . . . . . . . . . . . . . . . . . . .178
Centre console
Overview . . . . . . . . . . . . . . . . . . . . .31
Changing a wheel
see Flat tyre
Changing direction (COMAND) . . . ..148
Changing direction (on-board com-
puter) . . . . . . . . . . . . . . . . . . . . . . . . .217
Children In the vehicle . . . . . . . . . . . . . . . . . .42
Restraint systems . . . . . . . . . . . . . .43
Child seat
Automatic recognitio n.. . . . . . . . . .44
Automatic recognition (malfunc-
tion) . . . . . . . . . . . . . . . . . . . . . . . .350
Display message . . . . . . . . . . . . . .323
ISOFIX . . . . . . . . . . . . . . . . . . . . . . .47
Recommendation s.. . . . . . . . . . . . .46
Suitable positions . . . . . . . . . . . . . .45
Cigarette lighter . . . . . . . . . . . . . . . .282
Cleaning agents . . . . . . . . . . . . . . . . .307
Cockpit Overview . . . . . . . . . . . . . . . . . . . . .256
Index 216_AKB; 2; 3, en-GB
bjanott
,V ersion: 2.11.7.7
2009-02-27T14:54:17+01:00 - Seite 6Dateiname: 6515230602_buchblock.pdf; erzeugt am 04. Mar 2009 11:14:34; WK
Page 21 of 421

Windowbag
. . . . . . . . . . . . . . . . . . . . . .41
Windows Cleaning . . . . . . . . . . . . . . . . . . . . .309
see Side windows
Windscreen
Infrared reflective . . . . . . . . . . . . . .284
Windscreen washer fluid
Topping up . . . . . . . . . . . . . . . . . . .295
Windscreen washer system . . . . . ..295
Windscreen wipers . . . . . . . . . . . . ..199
Malfunction . . . . . . . . . . . . . . . . . .361
Replacing the wiper blades . . . . . .372
Winter driving . . . . . . . . . . . . . .302, 303
Winter tyres . . . . . . . . . . . . . . . . . . . .302
Limiting the speed (on-board com-
puter) . . . . . . . . . . . . . . . . . . . . . . .245
Wiper blades
Cleaning . . . . . . . . . . . . . . . . . . . . .309
Replacing . . . . . . . . . . . . . . . . . . . .372
WMA
Notes . . . . . . . . . . . . . . . . . . . . . . . .75
Wooden trim
Cleaning . . . . . . . . . . . . . . . . . . . . .312 18
Index 216_AKB; 2; 3, en-GB
bjanott,
Version: 2.11.7.7 2009-02-27T14:54:17+01:00 - Seite 18Dateiname: 6515230602_buchblock.pdf; erzeugt am 04. Mar 2009 11:14:36; WK
Page 202 of 421
?
| To switch the automatic interior
lighting control on/off
A p To switch the right-hand reading
lamp on/off
Automatic interior lighting control X
To switch on/off: press the|button.
The OFF indicator lamp goes out/lights up.
The interior lighting switches on automati-
cally in darkness, when you unlock the vehi-
cle, open a door or remove the key from the
ignition lock.
The interior lighting switches off after a delay.
You can set the delayed switch-off using
COMAND (Y page 166). If the door is left
open, the interior lighting goes out after
approximately five minutes.
Emergency accident lighting The interior lighting is activated automatically
if the vehicle is involved in an accident.
X To switch off: press the hazard warning
lamp button (Y page 196).
or
X Unlock the vehicle using the key.
or
X Press the |button (Y page 199). Windscreen wipers
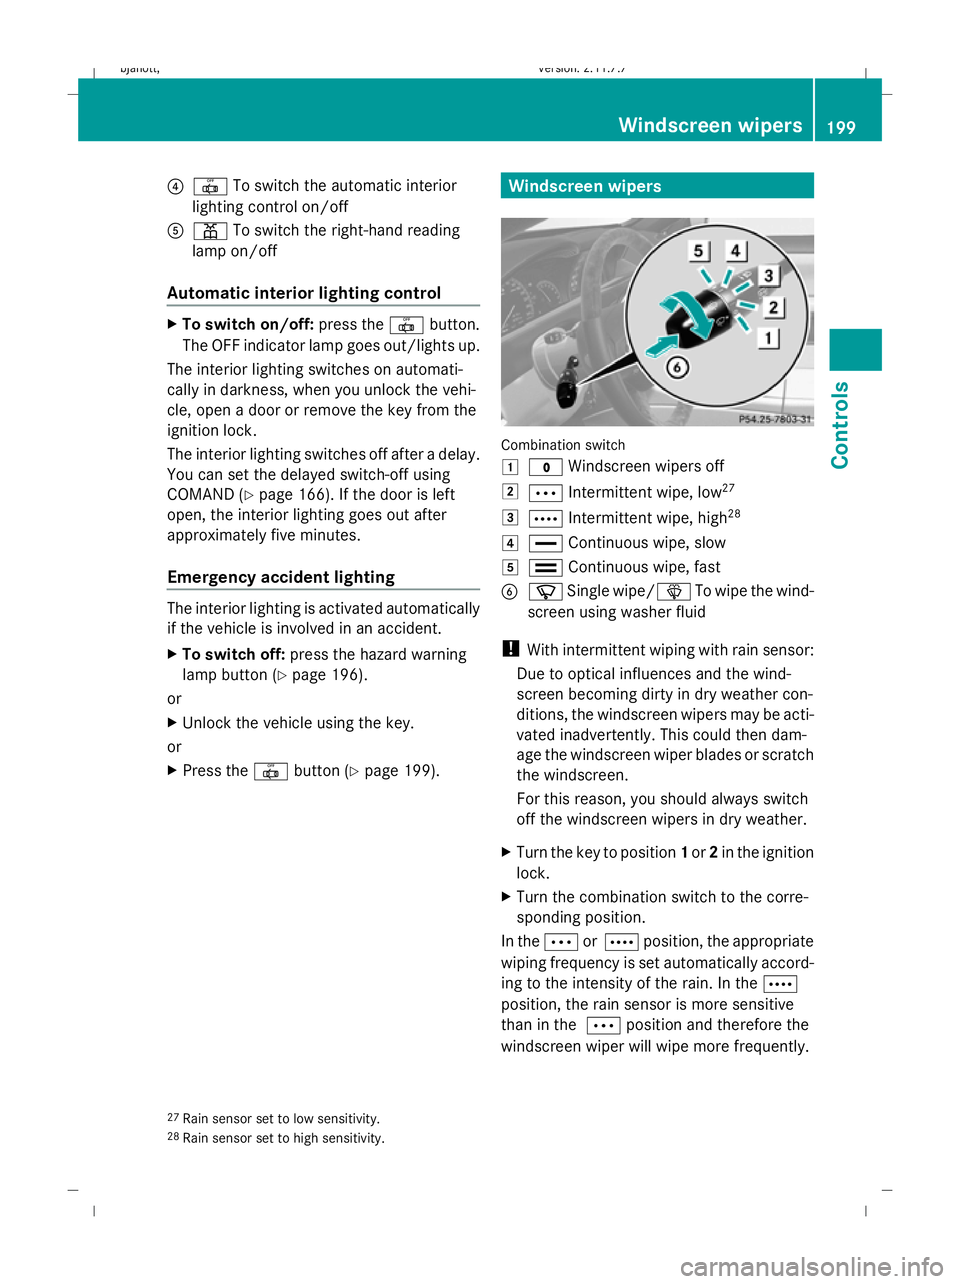
Combination switch
1
$ Windscreen wipers off
2 Ä Intermittent wipe, low 27
3 Å Intermittent wipe, high 28
4 ° Continuous wipe, slow
5 ¯ Continuous wipe, fast
B í Single wipe/î To wipe the wind-
screen using washer fluid
! With intermittent wiping with rain sensor:
Due to optical influences and the wind-
screen becoming dirty in dry weather con-
ditions, the windscreen wipers may be acti-
vated inadvertently. This could then dam-
age the windscreen wiper blades or scratch
the windscreen.
For this reason, you should always switch
off the windscreen wipers in dry weather.
X Turn the key to position 1or 2in the ignition
lock.
X Turn the combination switch to the corre-
sponding position.
In the ÄorÅ position, the appropriate
wiping frequency is set automatically accord-
ing to the intensity of the rain. In the Å
position, the rain sensor is more sensitive
than in the Äposition and therefore the
windscreen wiper will wipe more frequently.
27 Rain sensor set to low sensitivity.
28 Rain sensor set to high sensitivity. Windscreen wipers
199Controls
216_AKB; 2; 3, en-GB
bjanott, Version: 2.11.7.7 2009-02-27T14:54:17+01:00 - Seite 199 Z
Dateiname: 6515230602_buchblock.pdf; erzeugt am 04. Mar 2009 11:15:46; WK
Page 311 of 421

R
Vehicles with a key:
Do not remove the key from the ignition
lock. Do not open the driver's or front-
passenger door when the engine is
switched off, as this automatically shifts
the automatic transmission to park posi-
tion Pand locks the wheels, unless you
have previously shifted the automatic
transmission to N.
R Vehicles with KEYLESS GO*:
Do not open the driver's or front-
passenger door when the engine is
switched off, as this shifts the automatic
transmission to park position Pand locks
the wheels.
! Make sure that the side windows are com-
pletely closed, that the ventilation/heater
blower is turned off and that the wind-
screen wiper switch is set to 0. Otherwise,
the rain/light sensor may be activated, trig-
gering unintended wiper movements. This
could cause damage to the vehicle.
After using an automatic car wash, wipe off
wax and drying agents from the windscreen
and the wiper blades. This will prevent smears
and reduce wiping noises caused by residue
on the windscreen.
High-pressure cleaners G
Risk of accident
Do not use high-pressure cleaners with circu-
lar-jet nozzles (dirt grinders) to clean your
vehicle, in particular the tyres. You could oth-
erwise damage the tyres and cause an acci-
dent.
! Observe the instructions issued by the
equipment manufacturer concerning the
distance to be maintained between the
nozzle of the high-pressure cleaner and the
vehicle (at least 30 cm).
Move the high-pressure cleaner nozzle
around when cleaning your vehicle. Do not aim directly at any of the following:
R
tyres
R door joint
R electrical components
R battery
R connectors
R lights
R seals
R trim elements
Damaged seals or electrical components
can lead to failures or leaks.
Matt finish care* Your vehicle has a clear matt finish. For this
reason, you should make sure that you
adhere to the following instructions to avoid
damage to paintwork due to improper treat-
ment.
! Under no circumstances should you pol-
ish the vehicle. Polishing will make the
paintwork shine.
! When caring for your paintwork, do not
use paint cleaner, grinding or polishing
products, or gloss preservers such as wax.
These products are only suitable for high-
gloss finishes. Using them on a vehicle with
a matt finish results in serious damage to
the surface (gleaming, spotted areas).
Always have paintwork repairs carried out
at a qualified specialist workshop, e.g. a
Mercedes-Benz Service Centre.
i From the range of available Mercedes-
Benz care products, use only the insect
remover and the car shampoo.
Cleaning the paintwork Scratches, corrosive deposits, areas affected
by corrosion and damage caused by inade-
quate care cannot always be completely
repaired. In such cases, visit a qualified spe-308
CareOperation
* optional
216_AKB; 2; 3, en-GB
bjanott,
Version: 2.11.7.7 2009-02-27T14:54:17+01:00 - Seite 308
Dateiname: 6515230602_buchblock.pdf; erzeugt am 04. Mar 2009 11:16:30; WK
Page 312 of 421

cialist workshop immediately, e.g. a
Mercedes-Benz Service Centre.
X
Remove the following types of dirt immedi-
ately, whilst avoiding rubbing too hard.
Soak:
R
insect remains with insect remover
R bird droppings with water
and rinse off the treated surface after-
wards.
Remove:
R tree resin, oils, fuels and greases by rub-
bing gently with a cloth soaked in petro-
leum ether or lighter fluid.
R tar stains with tar remover
R wax with silicone remover
! Do not affix:
R stickers
R films
R magnetic plates or similar items
to painted surfaces. Otherwise, you could
damage the paintwork.
Cleaning the windows X
Clean the inside and outside of the win-
dows with a damp cloth and a cleaning
product approved and recommended by
Mercedes-Benz.
! Clean the water drainage channels of the
windscreen and the rear window at regular
intervals. Under certain circumstances,
deposits such as leaves, petals and pollen
may prevent water from draining away
leading to corrosion damage.
Cleaning the wiper blades G
Risk of injury
Before cleaning the windscreen or wiper
blades, turn the key to position 0in the igni-
tion lock or press the Start/Stop button* until all indicator lamps have gone out in the instru-
ment cluster. The windscreen wipers could
otherwise move and cause injury.
! Only fold the windscreen wipers away
from the windscreen when vertical. Other-
wise, you will damage the bonnet.
! Do not clean the wiper blades too often,
as this will result in damage to the graphite
coating. This could cause wiper noise.
X Fold the wiper arms away from the wind-
screen.
X Clean the wiper blades carefully with a
damp cloth.
X Fold the wiper arms back again before
switching on the ignition.
Cleaning the headlamps X
Clean the plastic lenses of the headlamps
with a wet sponge and windscreen washer
fluid or cleaning cloths.
! Only use washer fluid or cleaning cloths
suitable for plastic lenses. Unsuitable
washer fluid or cleaning cloths could
scratch or damage the plastic lenses of the
headlamps. Care
309Operation
* optional
216_AKB; 2; 3, en-GB
bjanott,
Version: 2.11.7.7 2009-02-27T14:54:17+01:00 - Seite 309 Z
Dateiname: 6515230602_buchblock.pdf; erzeugt am 04. Mar 2009 11:16:30; WK
Page 316 of 421

Where will I find...?
...........................314
Display messages ............................. 316
Troubleshooting ................................ 349
Locking/unlocking in an emer-
gency ................................................. 365
Replacing batteries (key, remote
control, etc.) ...................................... 367
Changing bulbs ................................. 369
Replacing the wiper blades ..............372
Flat tyre ............................................. 373
Battery ............................................... 382
Towing and tow-starting ..................386
Fuses .................................................. 389 313Practical advice
216_AKB; 2; 3, en-GB
bjanott,
Version: 2.11.7.7 2009-02-27T14:54:17+01:00 - Seite 313
Dateiname: 6515230602_buchblock.pdf; erzeugt am 04. Mar 2009 11:16:32; WK
Page 367 of 421

Auxiliary heating/ventilation*
Display messages
Possible causes/consequences and
X
X Solutions FAIL The starter battery is not charged sufficiently or the system
is faulty.
X
Charge the starter battery.
X Make another attempt to switch on the auxiliary heating
using the remote control.
X Have the auxiliary heating checked at a qualified specialist
workshop. $ FAIL The signal transmission between the transmitter and the vehi-
cle is faulty.
X
Change your position in relation to the vehicle, moving
closer if necessary.
X Make another attempt to switch the auxiliary heating on or
off using the remote control. © FAIL There is not enough fuel in the fuel tank, or the auxiliary heat-
ing is faulty.
X
Refuel at the nearest filling station.
X Make another attempt to switch on the auxiliary heating
using the remote control.
X Have the auxiliary heating checked at a qualified specialist
workshop. Night View Assist*
Problem
Possible causes/consequences and
X XSolutions The picture quality of
Night View Assist has
deteriorated. The windscreen wipers are smearing the windscreen.
X
Replace the wiper blades (Y page 372). The windscreen is smeared after cleaning the vehicle in a car wash.
X
Clean the windscreen . Windscreen chip damage in the camera's field of vision.
X
Replace the windscreen. The windscreen is misted up on the inside.
X
Demist the windscreen (Y page 268). The windscreen is iced up.
X
De-ice the windscreen (Y page 267).364
TroubleshootingPractical advice
* optional
216_AKB; 2; 3, en-GB
bjanott,
Version: 2.11.7.7 2009-02-27T14:54:17+01:00 - Seite 364
Dateiname: 6515230602_buchblock.pdf; erzeugt am 04. Mar 2009 11:16:43; WK
Page 375 of 421

Cornering light
X
Switch off the lights.
X Open the bonnet.
X Pull housing cover :by retaining lug ;in
the direction of the arrow and remove it.
X Turn bulb holder ?anti-clockwise and
remove it.
X Remove the bulb from bulb holder ?.
X Insert the new bulb into bulb holder ?and
push it down as far as it will go.
X Insert bulb holder ?into the guide in the
headlamp.
Left-hand headlamp: cable outlet =of
bulb holder ?must be pointing down and
to the left.
Right-hand headlamp: cable outlet =of
bulb holder ?must be pointing up and to
the right.
X Turn bulb holder ?clockwise.
X Replace housing cover :and tighten it
until it engages audibly. Replacing the wiper blades
G
Risk of accident
The windscreen will no longer be wiped prop-
erly if the wiper blades are worn. This could
prevent you from observing the traffic condi-
tions, thereby causing an accident. Replace
the wiper blades twice a year, ideally in spring
and autumn. G
Risk of accident
The wiper arms could start moving and cause
an injury if you leave the windscreen wipers
switched on.
Remove the key from the ignition lock before
replacing the wiper blades.
! To avoid damaging the windscreen wiper
blades, make sure that you touch only the
wiper arm of the windscreen wiper. Removing
Moving the wiper blades to a vertical
position Vehicles without KEYLESS GO*
X
Turn the key to position 1or 2in the ignition
lock.
X Set the windscreen wipers to posi-
tion ° on the combination switch.
X When the wiper arms have reached a ver-
tical position, turn the key to position 0and
remove it from the ignition lock.
X Fold the wiper arm away from the wind-
screen until it engages.
X Set the wiper blade at right angles to the
wiper arm.
Vehicles with KEYLESS GO*
X Switch off the engine.
X Take your foot off the brake pedal.
X Set the windscreen wipers to posi-
tion ° on the combination switch.
X Press the Start/Stop button repeatedly
until the windscreen wipers start.
X When the wiper arms have reached a ver-
tical position: press the Start/Stop button.
X Fold the wiper arm away from the wind-
screen until it engages.
X Set the wiper blade at right angles to the
wiper arm. 372
Replacing the wiper bladesPractical advice
* optional
216_AKB; 2; 3, en-GB
bjanott
,V ersion: 2.11.7.7
2009-02-27T14:54:17+01:00 - Seite 372
Dateiname: 6515230602_buchblock.pdf; erzeugt am 04. Mar 2009 11:16:46; WK