2009 MERCEDES-BENZ CL COUPE turn signal
[x] Cancel search: turn signalPage 199 of 421

X
Pull the light switch out to the first detent.
The N green indicator lamp on the light
switch lights up.
X To switch off: press the light switch in as
far as it will go.
The N green indicator lamp on the light
switch goes out.
Rear foglamp X
Turn the key to position 2in the ignition
lock.
X To switch on: turn the light switch to
L orT. When the light switch is set
to c, you cannot switch on the rear fog-
lamp.
X Pull the light switch out to the second stop.
The R yellow indicator lamp on the light
switch lights up.
X To switch off: press the light switch in as
far as it will go.
The R yellow indicator lamp on the light
switch goes out. Combination switch (turn signals,
main-beam headlamps and headlamp
flasher) Turn signal lamp
X
To switch on: press the combination
switch in the direction of arrow ;or?.
The corresponding turn signal indicator
lamp ! or# in the instrument clus-
ter flashes.
i If you only wish to indicate a minor change
of direction, press the combination switch
briefly in the respective direction. The cor-
responding turn signal flashes three times.
Main-beam headlamps X
Turn the ignition key to position 2in the
ignition lock or start the engine.
X Turn the light switch to Lorc 26
.
X To switch on: press the combination
switch in the direction of arrow :.
The K indicator lamp in the instrument
cluster lights up.
X To deactivate: move the combination
switch back to its normal position.
The K indicator lamp in the instrument
cluster goes out.
Headlamp flasher X
To switch on: briefly pull the combination
switch in the direction of arrow =. Hazard warning lamps
26
In the cposition, the main-beam headlamps are only switched on when it is dark. 196
LightsControls
216_AKB; 2; 3, en-GB
bjanott,
Version: 2.11.7.7 2009-02-27T14:54:17+01:00 - Seite 196
Dateiname: 6515230602_buchblock.pdf; erzeugt am 04. Mar 2009 11:15:44; WK
Page 200 of 421

The hazard warning lamps still operate if the
ignition is switched off. They switch on auto-
matically if an airbag is deployed or if you
brake sharply and bring the vehicle to a halt
from a speed of more than 70 km/h.
X To switch on: press button:.
All turn signals flash. If you now switch on
a turn signal using the combination switch
(Y page 196), only the turn signal lamp on
the corresponding side of the vehicle will
flash.
X To switch off: press button:. Headlamp cleaning system
The headlamps are cleaned automatically if
the "Wipe with washer fluid" function is oper-
ated five times while the lights are on and the
engine is running. When you switch off the
ignition, the automatic headlamp cleaning
system is reset and counting is resumed
from 0. Intelligent Light System
The Intelligent Light System is a system which
adjusts the headlamps automatically to suit
the prevailing driving and weather conditions.
The bi-xenon headlamps offer enhanced func-
tions to improve illumination of the road sur-
face, e.g. depending on the vehicle speed or
weather conditions. The system includes the
active light system, cornering light function,
motorway mode and extended range fog-
lamps. The system is only active when it is
dark. Active light system The active light function is a system that
moves the headlamps according to the steer-
ing movements of the front wheels. In this
way, relevant areas remain illuminated while
driving. This allows you to recognise pedes-
trians, cyclists and animals.
Cornering light
The cornering light function improves the illu-
mination of the road surface in the broad
direction you are turning, e.g. making it easier
to see in tight corners. It can only be activated
when the dipped-beam headlamps are
switched on.
Active:
R
if you are driving at speeds below
40 km/h, the cornering light function is
activated either by the turn signal or by the
steering wheel being turned.
R if you are driving at speeds between
40 km/h and 70 km/h, the cornering light Lights
197Controls
216_AKB; 2; 3, en-GB
bjanott, Version: 2.11.7.7 2009-02-27T14:54:17+01:00 - Seite 197 Z
Dateiname: 6515230602_buchblock.pdf; erzeugt am 04. Mar 2009 11:15:45; WK
Page 201 of 421
function is activated by the steering wheel
being turned.
Not active: if you are driving at speeds above
70 km/h or you switch off the turn signal or
move the steering wheel to the straight-
ahead position.
The cornering lamp may remain lit for a short
time, but is automatically switched off after
no more than three minutes.
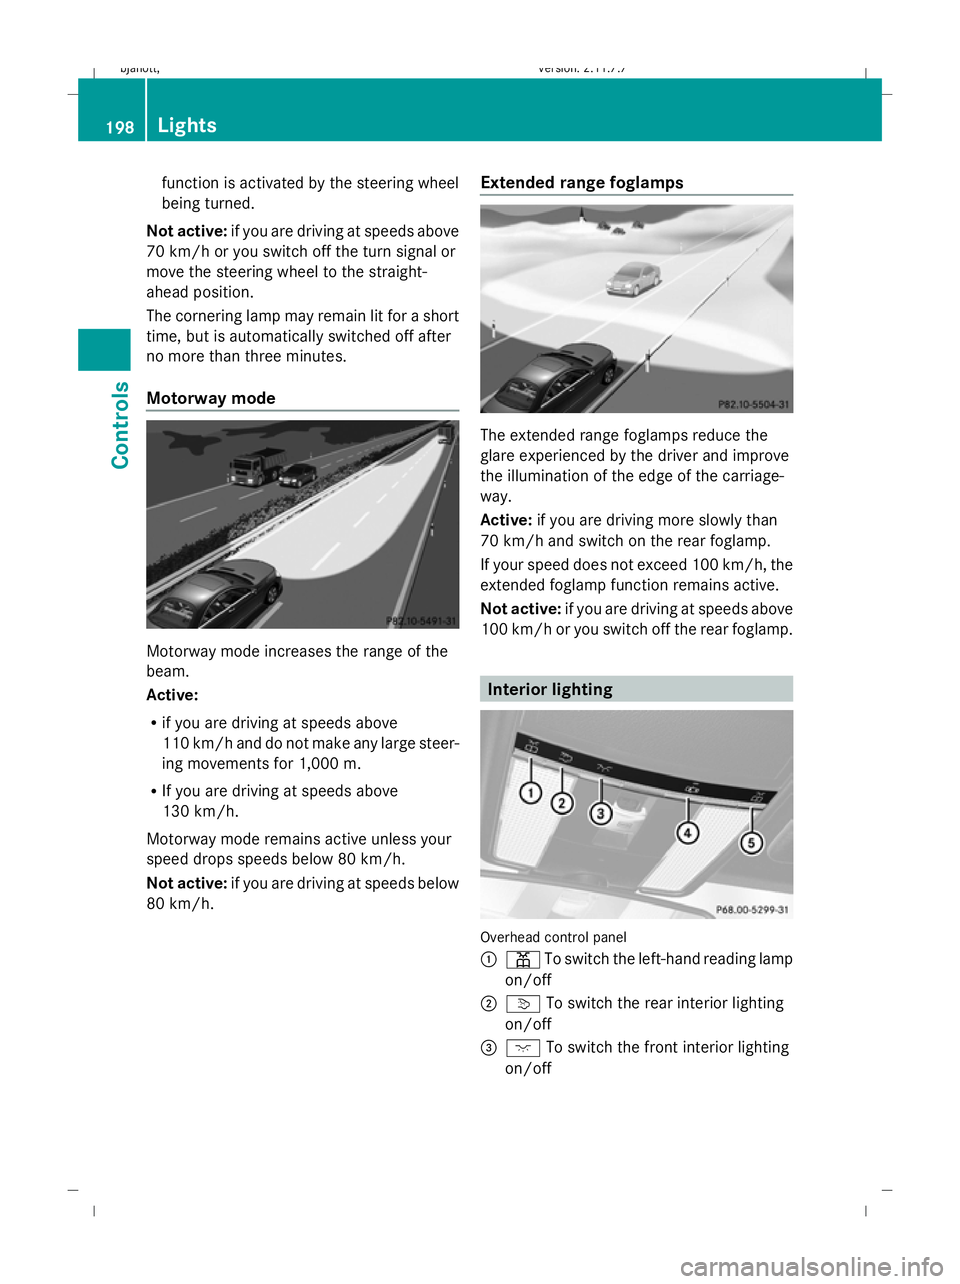
Motorway mode Motorway mode increases the range of the
beam.
Active:
R if you are driving at speeds above
110 km/h and do not make any large steer-
ing movements for 1,000 m.
R If you are driving at speeds above
130 km/h.
Motorway mode remains active unless your
speed drops speeds below 80 km/h.
Not active: if you are driving at speeds below
80 km/h. Extended range foglamps The extended range foglamps reduce the
glare experienced by the driver and improve
the illumination of the edge of the carriage-
way.
Active:
if you are driving more slowly than
70 km/h and switch on the rear foglamp.
If your speed does not exceed 100 km/h, the
extended foglamp function remains active.
Not active: if you are driving at speeds above
100 km/h or you switch off the rear foglamp. Interior lighting
Overhead control panel
:
p To switch the left-hand reading lamp
on/off
; v To switch the rear interior lighting
on/off
= c To switch the front interior lighting
on/off 198
LightsControls
216_AKB; 2; 3, en-GB
bjanott,
Version: 2.11.7.7 2009-02-27T14:54:17+01:00 - Seite 198
Dateiname: 6515230602_buchblock.pdf; erzeugt am 04. Mar 2009 11:15:45; WK
Page 258 of 421

Detected parking space
1
Detected parking space on the left
2 Parking space symbol
3 Detected parking space on the right
Parking Guidance will only detect parking
spaces:
R that are closed in at the back.
R that are parallel to the direction of travel.
R that are at least 1.5 m wide.
R that are at least 1.0 m longer than your
vehicle.
A parking space is displayed while you are
driving past it, and until you are 15 m away
from it. Parking Guidance only displays park-
ing spaces on the front-passenger side as
standard. Parking spaces on the driver's side
are displayed as soon as the turn signal on
the driver's side is activated. If you wish to
park in a space on the driver's side, the indi-
cator on the driver's side must remain on until
reverse gear is engaged.
Parking The following instructions refer to parking in
a space on the front-passenger side. To park
in a space on the driver's side, mirror the
instructions.
Parking Guidance will emit a warning tone if
it detects an obstacle behind the vehicle
while you are parking. Stop immediately. The
parking space and the lane begin to flash in
the instrument cluster. Make sure that there
is no danger before continuing to drive. The display in the instrument cluster stops flash-
ing when Parking Guidance no longer detects
an obstacle. You can continue parking. G
Risk of accident
Parking Guidance is only an aid and may not
detect all obstacles. Parking Guidance may
not be able to detect objects in corners or on
smooth surfaces. Parking Guidance does not
relieve you of the responsibility for paying
attention.
You are always responsible for safety and
must continue to pay attention to your imme-
diate surroundings when parking and
manoeuvring. Otherwise, you could endanger
yourself and others.
X Stop the vehicle when the blue parking
space symbol shows the desired parking
space in the instrument cluster.
X Engage reverse gear.
The multi-function display shows the mes-
sage: Check surroundings Confirm
with OK.
X Press #on the multi-function steering
wheel to confirm.
The display in the instrument cluster
switches to Parking Guidance. 1
Green lane
2 The white bracket marks the target posi-
tion.
X Depending on the distance, you may have
to reverse along the lane towards the park- Driving systems
255Controls
216_AKB; 2; 3, en-GB
bjanott, Version: 2.11.7.7 2009-02-27T14:54:17+01:00 - Seite 255 Z
Dateiname: 6515230602_buchblock.pdf; erzeugt am 04. Mar 2009 11:16:05; WK
Page 263 of 421

and cannot check whether Night View
Assist is working.
Multi-function display If you activate Night View Assist, the speed
display in the multi-function display changes.
The speed display is shown as a bar at the
bottom edge of the multi-function display.
This line is no longer available for basic
menus. You have to deactivate Night View
Assist if you wish to change a setting using
the buttons on the multi-function steering
wheel. :
Night View Assist display
; Speed display
Adjusting the brightness of the multi-
function display X
To make brighter or dimmer : make sure
that Night View Assist is activated.
X Turn control knob :to the right or left. Misted up or dirty windscreen If the windscreen in front of the camera is
misted up or dirty on the inside or outside, the
Night View Assist display is affected.
X
To demist: check the automatic air-condi-
tioning settings (Y page 268) and fold
down the camera cover.
X To clean the windscreen on the inside:
fold down the camera cover and use a soft
cloth to clean the windscreen in front of the
camera. Blind Spot Assist*
Blind Spot Assist uses a radar sensor system
to monitor the area on both sides of your
vehicle. It supports you when you change
lanes at speeds above 30 km/h. In each case,
a warning lamp appears in the exterior mirror
as soon as a vehicle is detected in the area
monitored. When you switch on the corre-
sponding turn signal prior to changing lanes,
you receive an optical and acoustic collision
warning. Blind Spot Assist uses two sensors
in the front bumper and four sensors in the
rear bumper. G
Risk of accident
Blind Spot Assist is only an aid and may not
detect all vehicles. Blind Spot Assist does not
relieve you of the responsibility of paying
attention.
Always pay attention to traffic conditions and
your surroundings. Otherwise, you may fail to
recognise dangers in time, could cause an
accident and injure yourself and others.
! You must deactivate the radar sensor sys-
tem in certain countries and near radio
telescope facilities. Further information
can be found in the index under "Radar
sensor system".
Vehicles with COMAND and navigation sys-
tem*: you must deactivate the radar sensor 260
Driving systemsCont
rols
* option al
216_AKB; 2; 3, en-GB
bjanott
,V ersion: 2.11.7.7
2009-02-27T14:54:17+01:00 - Seite 260
Dateiname: 6515230602_buchblock.pdf; erzeugt am 04. Mar 2009 11:16:08; WK
Page 265 of 421

Information and warning display
:
Yellow indicator lamp/red warning lamp
When you turn the key to position 2in the
ignition lock, warning lamps :in the exterior
mirrors light up red.
If Blind Spot Assist is switched on and the
engine is running, indicator lamps :in the
exterior mirrors light up yellow up to a speed
of 30 km/h. At speeds above 30 km/h, the
indicator lamp goes out and Blind Spot Assist
is operational.
If a vehicle is detected within the monitoring
range of Blind Spot Assist at speeds above
30 km/h, warning lamp :on the corre-
sponding side lights up red.
The yellow indicator lamp goes out three sec-
onds after reverse gear is engaged. In this
event, Blind-Spot Assist is no longer active.
The brightness of the indicator/warning
lamps is adjusted automatically according to
the ambient light. G
Risk of accident
Blind Spot Assist is not active at speeds below
30 km/h, and the indicator lamps in the exte-
rior mirrors are yellow. Vehicles in the moni-
toring range are then not indicated.
Always pay attention to traffic conditions and
your surroundings. Otherwise, you may fail to
recognise dangers in time, could cause an
accident and injure yourself and others. Collision warning If a vehicle is detected in the monitoring range
of Blind Spot Assist and you switch on the turn
signal, a double warning tone sounds. Red
warning lamp
:flashes. If the turn signal
remains on, detected vehicles are indicated
by the flashing of red warning lamp :. There
are no further warning tones.
Activating X
Make sure that the radar sensor system
(Y page 226) and Blind Spot Assist
(Y page 224) are activated in the on-board
computer.
X Turn the key to position 2in the ignition
lock.
Red warning lamps :in the exterior mir-
rors are lit.
X Start the engine.
Warning lamps :in the exterior mirrors
now light up yellow. Air conditioning
General notes
The automatic air conditioning controls the
temperature and the humidity of the vehicle
interior and filters out undesirable substan-
ces from the air.
The automatic air conditioning is only opera-
tional when the engine is running. 31
Optimum
operation is only achieved when you drive
with the side windows and sliding/tilting sun-
roof closed.
i Ventilate the vehicle for a brief period
during warm weather, e.g. using the con-
venience opening feature (Y page 201).
This will speed up the cooling process and
the desired vehicle interior temperature
will be reached more quickly.
31 The "residual heat" function can only be switched on/off if the ignition is switched off. 262
Air conditioningCont
rols
216_AKB; 2; 3, en-GB
bjanott, Version: 2.11.7.7 2009-02-27T14:54:17+01:00 - Seite 262
Dateiname: 6515230602_buchblock.pdf; erzeugt am 04. Mar 2009 11:16:09; WK
Page 289 of 421

X
Press and hold one of transmitter but-
tons ;to? on the integrated remote
control.
Indicator lamp :starts to flash after a
short while. It flashes about once a second.
i Indicator lamp :flashes immediately
the first time the transmitter button is pro-
grammed. If this transmitter button has
already been programmed, indicator
lamp :will only start flashing at a rate of
once a second after 20 seconds have
elapsed.
X Keep the transmitter buttons depressed.
X Point the garage door's remote control with
the transmitter towards the left-hand side
of the rear-view mirror from a distance of 5
to 20 cm.
i The distance between the garage door's
remote control and the integrated garage
door opener depends on the system of the
garage door drive. You might require sev-
eral attempts. You should test every posi-
tion for at least 20 seconds before trying
another position.
X Keep the transmitter button on the garage
door's remote control depressed until indi-
cator lamp :starts to flash rapidly.
The programming was successful if indica-
tor lamp :flashes rapidly.
X Release the transmitter buttons on the
garage door's remote control and the inte-
grated remote control.
If indicator lamp :goes out after approx-
imately 20 seconds and did not flash rapidly
before this:
X Release the transmitter buttons on the
integrated and portable remote controls.
X Repeat the programming procedure. When
doing so, change the distance between the
garage door's remote control and the trans-
mitter buttons in the rear-view mirror.
i If the garage door system works with a
rolling code, after programming you must synchronise the remote control integrated
in the rear-view mirror with the garage door
system receiver.
You will find further information in the
garage door opening system's operating
instructions, e.g. the sections on "Synchro-
nising the transmitter" or "Registering a
new transmitter". You can also call the hot-
line mentioned above.
Opening or closing the garage door Once programmed, the integrated remote
control will assume the function of the garage
door system's remote control. Please read
the operating instructions for the garage door
system.
X Turn the key to position 2in the ignition
lock.
X Press the transmitter button on the rear-
view mirror that you have programmed to
operate the garage door.
Garage door system with fixed code: indi-
cator lamp :lights up continuously.
Garage door system with rolling code: indi-
cator lamp :flashes briefly and then lights
up for approximately two seconds. This is
repeated for up to 20 seconds.
i The transmitter will transmit a signal for
as long as the transmitter button is being
pressed. The transmission will be halted
after a maximum of 20 seconds and indi-
cator lamp :will flash. Press the trans-
mitter button again, if necessary.
Clearing the remote control memory X
Turn the key to position 2in the ignition
lock.
X Press and hold transmitter buttons ;
and ?for approximately 20 seconds until
indicator lamp :flashes rapidly.
The memory is cleared. 286
FeaturesControls
216_AKB; 2; 3, en-GB
bjanott,
Version: 2.11.7.7 2009-02-27T14:54:17+01:00 - Seite 286
Dateiname: 6515230602_buchblock.pdf; erzeugt am 04. Mar 2009 11:16:23; WK
Page 347 of 421

Display messages
Possible causes/consequences and
X
X Solutions b AUTO
lights
inopera‐
tive The light sensor is faulty. Daytime driving lights are switched
on.
X
Switch off the daytime driving lights in the on-board com-
puter (Y page 225).
X Switch the lighting on or off using the light switch.
X Visit a qualified specialist workshop. b Rear left-
hand turn
signal
or
Rear
right-
hand turn
signal The rear left-hand or right-hand turn signal is faulty.
X
Visit a qualified specialist workshop. b Turn sig‐
nal in
left-hand
exterior
mirror
or
Turn sig‐
nal in
right-
hand exte‐
rior mir‐
ror The left-hand or right-hand turn signal on the exterior mirror
is faulty. The display message will only appear if all LEDs have
failed.
X
Visit a qualified specialist workshop. b Front
left-hand
turn sig‐
nal
or
Front
right-
hand turn
signal The front left-hand or right-hand turn signal is faulty.
X
Visit a qualified specialist workshop. b Left-hand
main beam
or
Right-
hand main
beam The left-hand or right-hand main beam headlamp is faulty.
X
Change the bulb (Y page 369).344
Display
messagesPractical advice
216_AKB; 2; 3, en-GB
bjanott ,V ersion: 2.11.7.7
2009-02-27T14:54:17+01:00 - Seite 344
Dateiname: 6515230602_buchblock.pdf; erzeugt am 04. Mar 2009 11:16:39; WK