2009 MERCEDES-BENZ CL COUPE ECU
[x] Cancel search: ECUPage 101 of 421

Media Interface* mode
Information on operating with Media
Interface
Connection options i
Stow the equipment in a secure location.
Use only genuine Mercedes-Benz connect-
ing cables.
You can connect the following data carriers
to COMAND via the Media Interface:
R iPod ®9
R USB devices
For more details and a comprehensive list of
supported devices, please contact a
Mercedes-Benz Service Centre or visit
http://www.mercedes-benz.com/connect
and proceed as described under "Media Inter-
face".
Supported iPod ®
variants
The following are examples of supported
iPod ®
variants:
R iPod ®
mini
R iPod ®
nano
R iPod ®
classic
R iPod ®
touch
Supported USB devices
The following USB devices are supported:
R USB sticks (flash memory)
R USB hard drives (1-inch, 1.8-inch and 2.5-
inch drives) with a starting/continuous cur-
rent of up to 800 mA (a separate power
supply may be necessary)
R certain MP3 players
i The Media Interface supports USB stor-
age media of USB Device Subclass 6. Infor-
mation concerning USB Device Subclass 6 is available from the equipment manufac-
turer.
Supported data formats (USB devices) The following data types are supported:
R
MP3: CBR, VBR (up to 320 kbit/s)
R WMA: CBR, VBR (up to 320 kbit/s)
Notes on USB devices
R Avoid storing data other than music data on
the USB device so that the start-up time is
not extended unnecessarily.
R Up to eight directory levels with up to 1,000
tracks are supported.
R Do not use a USB extension cable or
adapter. These may impair functionality.
R A background search of the USB device is
performed and any playlists found are pro-
vided in a separate category in addition to
the folders. Initialisation of larger USB
mass storage devices containing a high
number of files can take up to several
minutes.
i Files protected with DRM (Digital Rights
Management) are not supported by the
Media Interface. Connecting external devices
Device-specific adapter cables are needed to
connect external equipment to the Media
Interface. These cables are included in the
Media Interface scope of delivery.
You will find the connection sockets in the
glove compartment.
Never connect more than one device at a
time. You will otherwise not be able to play
back from the external device. Please consult
a Mercedes-Benz Service Centre for further
information.
9 iPod ®
is a registered trademark of Apple Inc., Cupertino, California, USA. 98
Media Interface* modeCOMAND
* optional
216_AKB; 2; 3, en-GB
bjanott,
Version: 2.11.7.7 2009-02-27T14:54:17+01:00 - Seite 98
Dateiname: 6515230602_buchblock.pdf; erzeugt am 04. Mar 2009 11:15:04; WK
Page 111 of 421

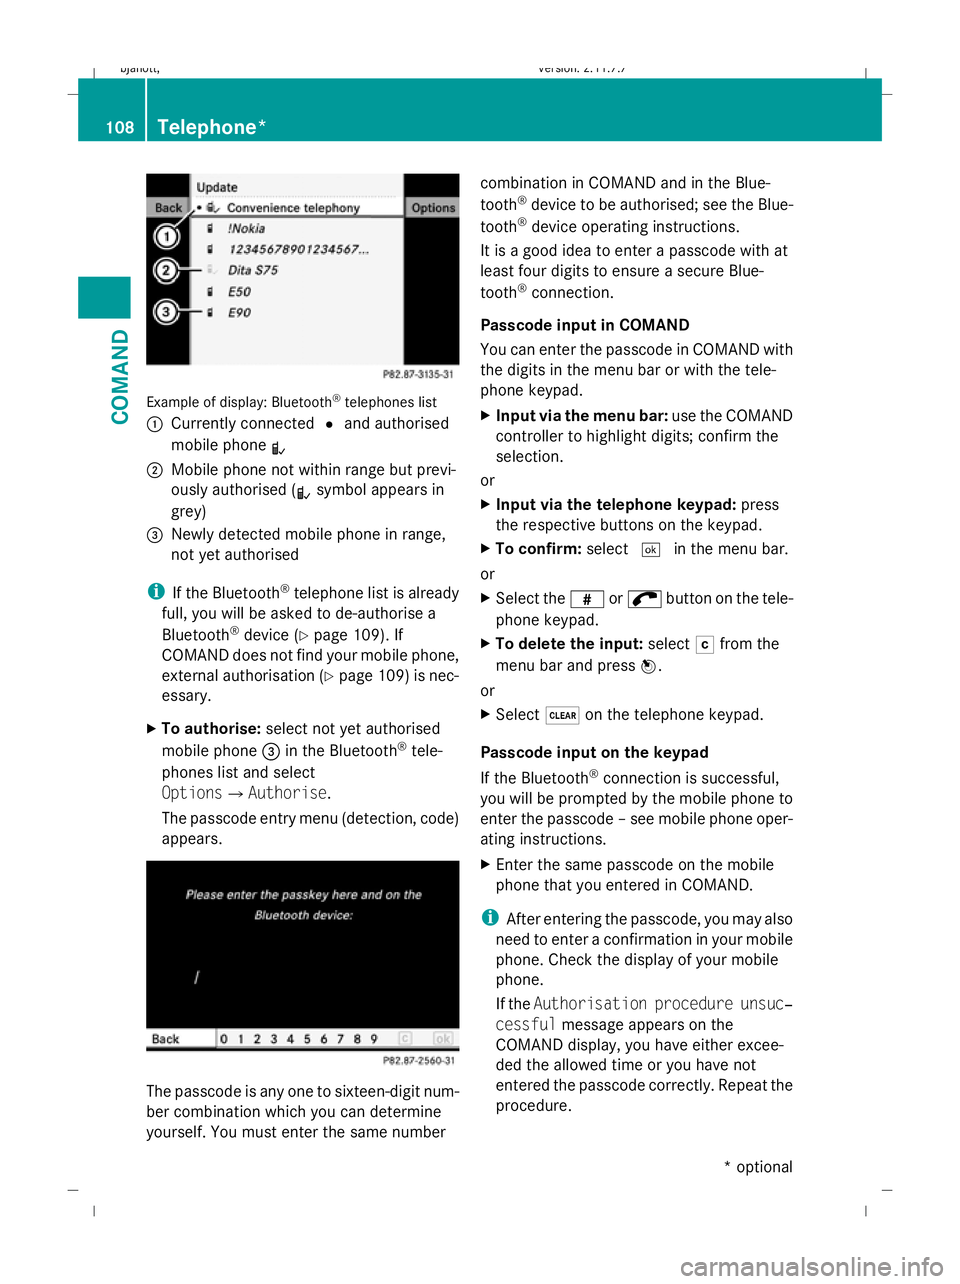
Example of display: Bluetooth
®
telephones list
: Currently connected #and authorised
mobile phone L
; Mobile phone not within range but previ-
ously authorised ( Lsymbol appears in
grey)
= Newly detected mobile phone in range,
not yet authorised
i If the Bluetooth ®
telephone list is already
full, you will be asked to de-authorise a
Bluetooth ®
device (Y page 109). If
COMAND does not find your mobile phone,
external authorisation (Y page 109) is nec-
essary.
X To authorise: select not yet authorised
mobile phone =in the Bluetooth ®
tele-
phones list and select
OptionsQAuthorise.
The passcode entry menu (detection, code)
appears. The passcode is any one to sixteen-digit num-
ber combination which you can determine
yourself. You must enter the same number combination in COMAND and in the Blue-
tooth
®
device to be authorised; see the Blue-
tooth ®
device operating instructions.
It is a good idea to enter a passcode with at
least four digits to ensure a secure Blue-
tooth ®
connection.
Passcode input in COMAND
You can enter the passcode in COMAND with
the digits in the menu bar or with the tele-
phone keypad.
X Input via the menu bar: use the COMAND
controller to highlight digits; confirm the
selection.
or
X Input via the telephone keypad: press
the respective buttons on the keypad.
X To confirm: select¬in the menu bar.
or
X Select the zor; button on the tele-
phone keypad.
X To delete the input: selectFfrom the
menu bar and press W.
or
X Select $on the telephone keypad.
Passcode input on the keypad
If the Bluetooth ®
connection is successful,
you will be prompted by the mobile phone to
enter the passcode – see mobile phone oper-
ating instructions.
X Enter the same passcode on the mobile
phone that you entered in COMAND.
i After entering the passcode, you may also
need to enter a confirmation in your mobile
phone. Check the display of your mobile
phone.
If the Authorisation procedure unsuc‐
cessful message appears on the
COMAND display, you have either excee-
ded the allowed time or you have not
entered the passcode correctly. Repeat the
procedure. 108
Telephone*COMAND
* optional
216_AKB; 2; 3, en-GB
bjanott,
Version: 2.11.7.7 2009-02-27T14:54:17+01:00 - Seite 108
Dateiname: 6515230602_buchblock.pdf; erzeugt am 04. Mar 2009 11:15:06; WK
Page 112 of 421

The mobile phone is connected to COMAND
(authorised). You can now phone using the
COMAND hands-free system.
External authorisation
If COMAND does not detect your mobile
phone, this may be due to particular security
settings on your mobile phone. In this case,
you can test if your mobile phone can find
COMAND. COMAND's Bluetooth ®
device
name is MB Bluetooth.
X Select Data/connectionsQBlue‐
tooth telephones .
X Go to Update and select Options
QExternal authorisation.
X Start the Bluetooth ®
search on the mobile
phone – see mobile phone operating
instructions.
X Select MB Bluetooth on the mobile phone.
X Input the passcode in COMAND when
requested to and then enter it on the
mobile phone ( Ypage 108).
Displaying details
There is a display showing the details for each
mobile phone in the Bluetooth ®
telephones
list.
X Select Data/connectionsQBlue‐
tooth telephones .
X Select the mobile phone from the list and
select Options QDetails.
The following information concerning the
selected mobile phone is shown:
R Bluetooth ®
name
R Bluetooth ®
address
R availability
R authorisation
R Bluetooth ®
class (e.g. telephone, note-
book)
X To close the display showing the
details: slideXVY. De-registering (de-authorising) a mobile
phone
X
Select Data/connectionsQBlue‐
tooth telephones .
X Select the mobile phone from the list and
select Options QDe-authorise.
A prompt appears asking whether you
really wish to revoke authorisation for this
device.
X Select Yes.
i Before reauthorising the mobile phone,
also delete the MB Bluetooth device
names from the Bluetooth ®
list on the
mobile phone.
Connecting another mobile phone
If you have authorised several mobile phones,
you can switch between the individual
phones.
i You can only switch to another authorised
mobile phone if no phone call is active.
X Select Data/connectionsQBlue‐
tooth telephones .
X Select the mobile phone from the Blue-
tooth ®
telephones list.
X Confirm your selection.
If the selected mobile phone is within Blue-
tooth ®
range and Bluetooth ®
is activated,
a search is started and the phone is con-
nected.
Only one mobile phone can be connected
at any one time. The currently connected
mobile phone is indicated by the #dot in
the Bluetooth ®
telephones list
(Y page 108).
Telephone basic menu (Bluetooth ®
interface) If the mobile phone is ready for use, the fol-
lowing display appears: Telephone*
109COMAND
* optional
216_AKB; 2; 3, en-GB
bjanott,
Version: 2.11.7.7 2009-02-27T14:54:17+01:00 - Seite 109 Z
Dateiname: 6515230602_buchblock.pdf; erzeugt am 04. Mar 2009 11:15:06; WK
Page 186 of 421

i
If you press Start/Stop button :in this
position once and the driver's door is open,
the power supply is disconnected again.
Removing the Start/Stop button You can remove Start/Stop button from igni-
tion lock and start the vehicle with a key as
usual.
i
You do not need to remove the Start/
Stop button from the ignition lock when you
leave the vehicle. X
Remove Start/Stop button :from ignition
lock ;.
i If you switch from key mode to KEYLESS
GO mode, the system requires a two-sec-
ond recognition period before you can use
the Start/Stop button. Seats
Points to remember
G
Risk of injury
The seats can still be adjusted when there is
no key in the ignition lock. For this reason,
children should never be left unsupervised in
the vehicle. They could become trapped when
adjusting a seat. G
Risk of accident
Only adjust the driver's seat when the vehicle
is stationary. You will otherwise be distracted from the road and traffic conditions and you
could lose control of the vehicle as a result of
the seat moving. This could cause an acci-
dent. G
Risk of injury
Make sure that nobody can become trapped
when you adjust the seat.
Observe the notes concerning the airbag sys-
tem.
Secure children as recommended; see "Chil-
dren in the vehicle" section. G
Risk of injury
Make sure that the central area of the head
restraint supports the back of your head at
about eye level. You could seriously injure
your neck if your head is not correctly sup-
ported by the head restraint in the event of an
accident. Never travel without a correctly
adjusted and engaged head restraint.
! When you move the seats, make sure that
there are no objects in the footwell or
behind the seats. Otherwise, you could
damage the seats and the objects.
i The head restraints cannot be removed. Adjusting the seat electrically
:
Head restraint height
; Seat height
= Seat cushion angle
? Seat cushion length Seats
183Controls
216_AKB; 2; 3, en-GB
bjanott, Version: 2.11.7.7 2009-02-27T14:54:17+01:00 - Seite 183 Z
Dateiname: 6515230602_buchblock.pdf; erzeugt am 04. Mar 2009 11:15:38; WK
Page 195 of 421

Make sure that all occupants – in particular,
pregnant women – wear their seat belt cor-
rectly at all times.
R The seat belt must pass closely over your
body and must not be twisted. Therefore,
you should avoid wearing bulky clothing
(e.g. a winter coat). The shoulder belt sec-
tion must be routed across the middle of
your shoulder – on no account across your
neck or under your arm – and pulled tight
against your upper body. The lap belt must
always pass across your lap as low down as
possible, i.e. over your hip joints – not
across your abdomen. If necessary, push
down the belt strap slightly and then
retighten it in the roll-up direction.
R Do not route the belt strap across sharp or
fragile objects, especially if these are loca-
ted on or in your clothing, e.g. spectacles,
pens, keys, etc. The seat belt strap could
be damaged and tear in an accident, and
you or other vehicle occupants could be
injured.
R Only one person should use each seat belt
at any one time. Children must never travel
sitting on the lap of other occupants. It
would not be possible to restrain the child
in the event of a sudden change in direc-
tion, braking or an accident. This could
result in severe or even fatal injuries to the
child and other occupants.
R Persons less than 1.50 m tall cannot wear
the seat belts correctly. For this reason,
secure persons less than 1.50 m tall in spe-
cially designed, suitable restraint systems.
R Children less than 1.50 m tall or under
12 years of age cannot wear the seat belts
properly. Therefore, they always should be
secured in a suitable child restraint system
on a suitable vehicle seat. You can find
more information under "Children in the
vehicle" in the "Safety" section of the Own-
er's Manual. Follow the manufacturer's installation instructions when fitting the
child restraint system.
R Do not secure any objects with a seat belt
if the seat belt is also being used by one of
the vehicle's occupants. G
Risk of injury
If the backrest is not almost vertical, the seat
belt does not offer the intended level of pro-
tection. Under certain circumstances, this
could cause severe or even fatal injuries.
Before starting a journey, make sure that the
seat is properly adjusted and that the back-
rest is almost vertical. G
Risk of injury
A dirty or damaged seat belt or a seat belt that
has been subjected to a load in an accident
or which has been modified no longer offers
the intended level of protection. Under certain
circumstances, this could cause severe or
even fatal injuries.
For this reason, check regularly that the seat
belts are not damaged or dirty.
Always have damaged seat belts or seat belts
that have been subjected to a load in an acci-
dent replaced at a qualified specialist work-
shop. Consult a qualified specialist workshop
which has the necessary specialist knowledge
and tools to carry out the work required.
Mercedes-Benz recommends that you use a
Mercedes-Benz Service Centre for this pur-
pose.
For safety reasons, Mercedes-Benz recom-
mends that you only use seat belts which have
been approved by Mercedes-Benz for your
vehicle. 192
Seat beltsControls
216_AKB; 2; 3, en-GB
bjanott,V
ersion: 2.11.7.7
2009-02-27T14:54:17+01:00 - Seite 192
Dateiname: 6515230602_buchblock.pdf; erzeugt am 04. Mar 2009 11:15:42; WK
Page 203 of 421

Side windows
Opening and closing the side win-
dows G
Risk of injury
When opening the side windows, make sure
that nobody can become trapped between the
side window and the door frame. Keep clear
of the side window during the opening proce-
dure. Otherwise, you could be drawn in or
trapped between the side window and the
door frame by the downwards movement of
the window. If there is a risk of becoming
trapped, release the switch or pull it upwards
to close the side window again. G
Risk of injury
Make sure that nobody can become trapped
as you close a hinged window. If there is a risk
of becoming trapped, release the switch or
press it again to open the side window again. G
Risk of injury
Children may injure themselves if they oper-
ate the side windows.
Never leave children unsupervised in the vehi-
cle. Always take the key with you when leaving
the vehicle, even if you are only leaving it for
a short time. G
Risk of injury
Do not leave children unsupervised in the
vehicle, even if they are secured in a child
restraint system. The children could:
R be seriously or even fatally injured on parts
of the vehicle
R be seriously or even fatally injured by pro-
longed exposure to extremely high or
extremely low temperatures
If children open a door, they could:
R seriously or even fatally injure other people
R get out of the vehicle and injure them-
selves, or be seriously or even fatally
injured by a passing vehicle Activate the override feature if children are
travelling in the vehicle. They could otherwise
open side windows while the vehicle is in
motion and thereby injure themselves or oth-
ers.
i Related topics:
R convenience opening from the out-
side (Y page 201) or from the inside
(Y page 269)
R convenience closing from the out-
side (Y page 201) or from the inside
(Y page 269)
R disabling the controls in the rear com-
partment (override feature) (Y page 48)
R automatic closing of the front side win-
dows (PRE-SAFE ®
) (Y page 42) :
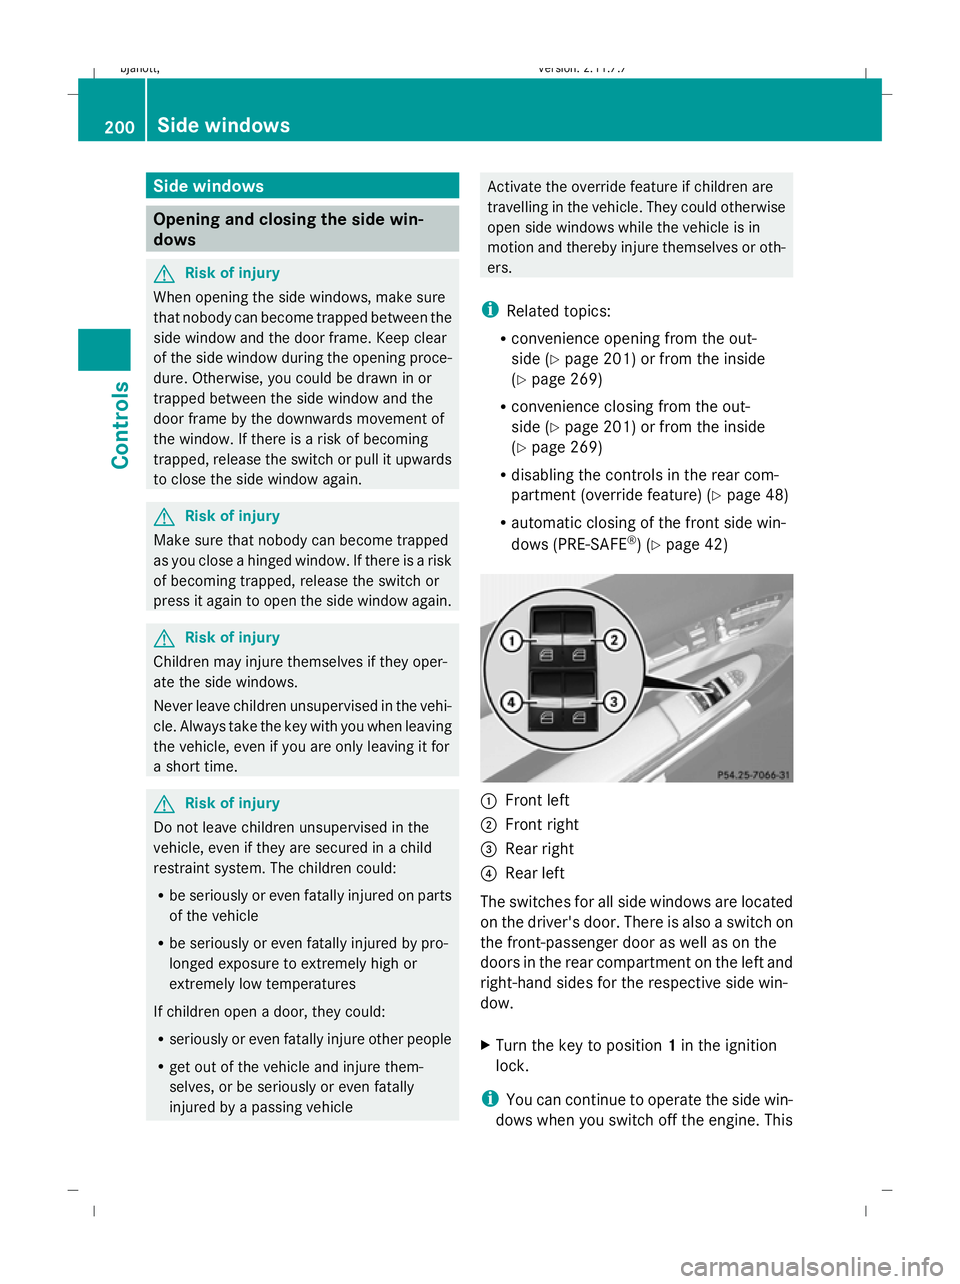
Front left
; Front right
= Rear right
? Rear left
The switches for all side windows are located
on the driver's door. There is also a switch on
the front-passenger door as well as on the
doors in the rear compartment on the left and
right-hand sides for the respective side win-
dow.
X Turn the key to position 1in the ignition
lock.
i You can continue to operate the side win-
dows when you switch off the engine. This 200
Side windowsControls
216_AKB; 2; 3, en-GB
bjanott,
Version: 2.11.7.7 2009-02-27T14:54:17+01:00 - Seite 200
Dateiname: 6515230602_buchblock.pdf; erzeugt am 04. Mar 2009 11:15:46; WK
Page 205 of 421

With the key:
R
release the &button.
R press and hold the %button until the
side windows and the sliding/tilting sun-
roof open again.
With KEYLESS GO*:
R release the sensor surface on the door han-
dle.
R pull the door handle immediately and hold
it.
The side windows and the sliding/tilting
sunroof open.
Using the key X
Point the tip of the key at the driver's door
handle.
X Lock the vehicle with the &button.
X Press and hold the &button until the
side windows and the sliding/tilting sun-
roof are fully closed.
X Make sure that all the side windows and the
sliding/tilting sunroof are closed. Using KEYLESS GO* X
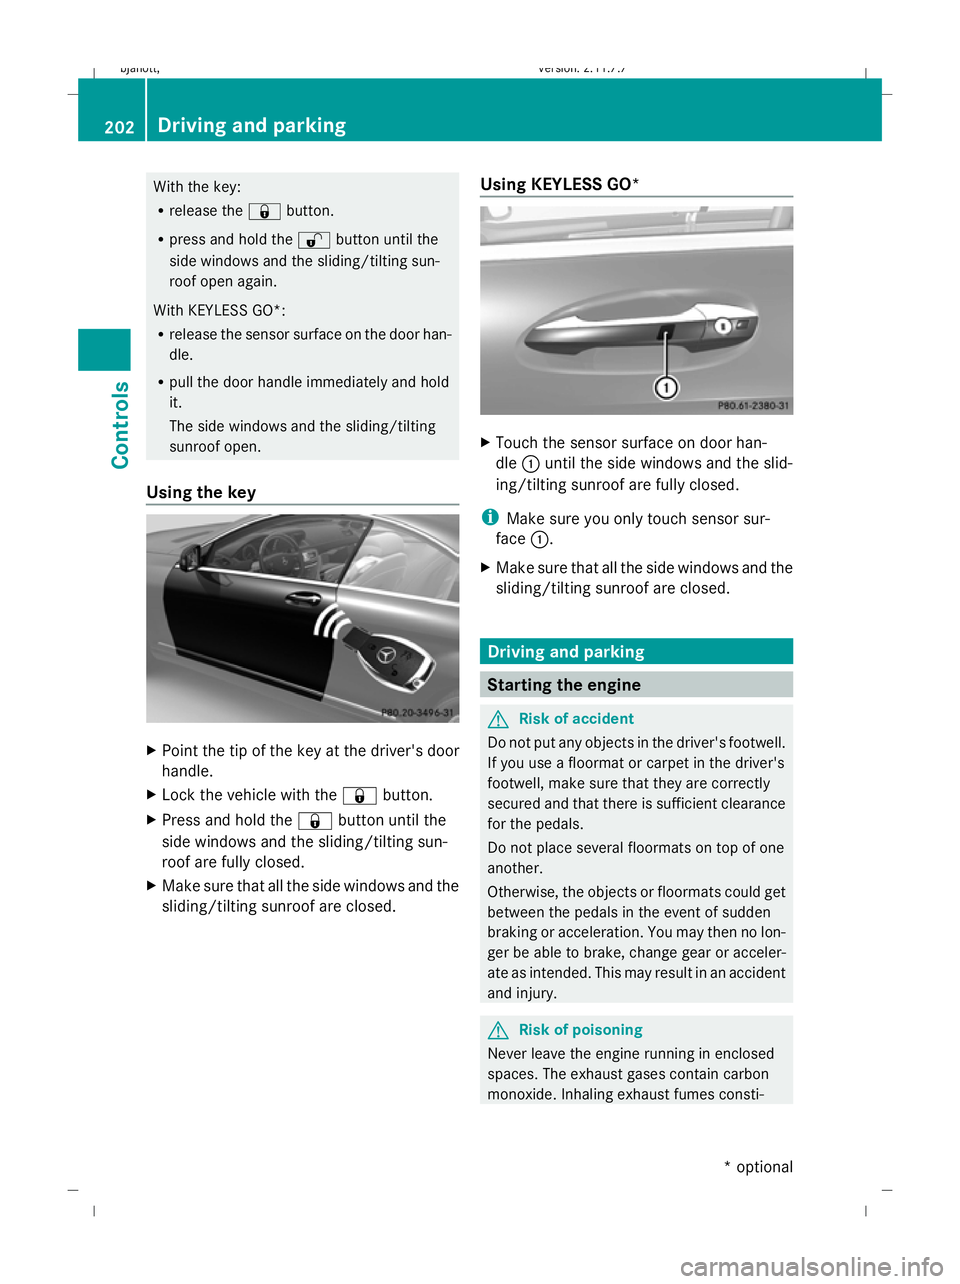
Touch the sensor surface on door han-
dle :until the side windows and the slid-
ing/tilting sunroof are fully closed.
i Make sure you only touch sensor sur-
face :.
X Make sure that all the side windows and the
sliding/tilting sunroof are closed. Driving and parking
Starting the engine
G
Risk of accident
Do not put any objects in the driver's footwell.
If you use a floormat or carpet in the driver's
footwell, make sure that they are correctly
secured and that there is sufficient clearance
for the pedals.
Do not place several floormats on top of one
another.
Otherwise, the objects or floormats could get
between the pedals in the event of sudden
braking or acceleration. You may then no lon-
ger be able to brake, change gear or acceler-
ate as intended. This may result in an accident
and injury. G
Risk of poisoning
Never leave the engine running in enclosed
spaces. The exhaust gases contain carbon
monoxide. Inhaling exhaust fumes consti- 202
Driving and parkingControls
* optional
216_AKB; 2; 3, en-GB
bjanott,
Version: 2.11.7.7 2009-02-27T14:54:17+01:00 - Seite 202
Dateiname: 6515230602_buchblock.pdf; erzeugt am 04. Mar 2009 11:15:47; WK
Page 207 of 421

i
The vehicle locks centrally once you have
pulled away. The locking knobs in the doors
drop down.
You can open the doors from the inside at
any time.
You can also deactivate the automatic lock-
ing feature (Y page 167).
X Depress the brake pedal and keep it
depressed.
X Move the DIRECT SELECT lever to position
D or R.
X Release the brake pedal.
X Carefully depress the accelerator pedal.
The electric parking brake is automatically
released (Y page 205).
i Upshifts take place at higher engine
speeds after a cold start. This helps the
catalytic converter to reach its operating
temperature more quickly.
Hill start assist Hill start assist helps you when pulling away
on uphill gradients. It holds the vehicle for a
short time after you have removed your foot
from the brake pedal. This gives you time to
move your foot from the brake pedal to the
accelerator pedal and depress it before the
vehicle begins to roll. G
Risk of accident
Never leave the vehicle when it is held by hill
start assist. After approximately one second,
hill start assist will no longer brake your vehi-
cle and it could roll away.
X Take your foot off the brake pedal.
i Once you have taken your foot off the
brake pedal, the vehicle is held for around
one second.
X Pull away. Hill start assist will not function if:
R
you are pulling away on a level road or a
downhill gradient.
R the DIRECT SELECT lever is in position N.
R the vehicle is secured with the electric
parking brake.
R ESP ®
is malfunctioning. Parking
G
Risk of accident
Only remove the key from the ignition lock
when the vehicle is stationary, as you cannot
steer the vehicle with the key removed.
Never leave children unsupervised in the vehi-
cle. They might release the electric parking
brake. This could lead to a serious or fatal
accident. G
Risk of fire
Make sure that the exhaust system does not
under any circumstances come into contact
with flammable materials such as dry grass or
petrol. The material could otherwise ignite
and set the vehicle on fire.
To ensure that the vehicle is secured against
rolling away unintentionally:
R the parking brake must be applied
R move the DIRECT SELECT lever into posi-
tion Pand remove the ignition key
R for steep uphill or downhill gradients, turn
the front wheels towards kerb 204
Driving and parkingControls
216_AKB; 2; 3, en-GB
bjanott,
Version: 2.11.7.7 2009-02-27T14:54:17+01:00 - Seite 204
Dateiname: 6515230602_buchblock.pdf; erzeugt am 04. Mar 2009 11:15:47; WK