Page 9 of 81

JOBNAME: No Job Name PAGE: 9 SESS: 1 OUTPUT: Thu Mar 6 14:57:32 2008
/ford_pdm/ford/supplement/ng2/navi
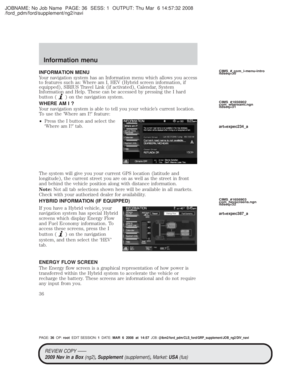
NAVIGATION SYSTEM
WARNING:Driving while distracted can result in loss of vehicle
control, accident and injury. Ford strongly recommends that
drivers use extreme caution when using any device that may take their
focus off the road. The driver's primary responsibility is the safe
operation of their vehicle. Only use cell phones and other devices not
essential to the driving task when it is safe to do so.
1. Memory presets: In radio and
satellite radio mode (if
activated): Press 1-6 to access
your previously saved preset
stations/channels. To save to a preset: Tune to the desired
station/channel. Press and hold the desired preset button in which you
would like to store the station/channel. The sound will momentarily mute
and then return when the preset is saved.
CIMS # com_navinabox.maz itdseq=4
art=expec189_a
art=expec192_a
REVIEW COPY ÐÐ
2009 Nav in a Box (ng2), Supplement(supplement),Market:USA(fus)
PAGE: 9OP: root EDIT SESSION: 1DATE: MAR 6 2008 at 14:57JOB:@ibm2/ford_pdm/CLS_ford/GRP_supplement/JOB_ng2/DIV_navi
System overview
9
Page 10 of 81
: Press(Eject) to
eject the disc in")
JOBNAME: No Job Name PAGE: 10 SESS: 1 OUTPUT: Thu Mar 6 14:57:32 2008
/ford_pdm/ford/supplement/ng2/navi
2.CD/DVD slot: Insert a CD or
DVD, label side up.
3.
(Eject): Press(Eject) to
eject the disc in the slot.
4. TUNE: In radio or satellite
radio mode (if activated) , turn to
advance in individual increments
up/down the frequency/channel
listing.
In MP3 mode, turn to advance to the next/previous folder.
RPT: In navigation mode, press the knob in while navigation guidance
is active to repeat the last spoken navigation guidance prompt.
5. MAP: Press MAP to access the
navigation map. Press while the map
display is active to center the map
on the current vehicle position. Press while the map display is active and
a route is active to step through the different map guidance views.
6. DEST: Press DEST to access the
navigation destination entry menu.
Press while the navigation
destination entry menu is active to
show additional destination entry techniques.
7. N AV: Press NAV to access the
navigation menu. Press while the
navigation menu is active to step
through the navigation menu tabs.
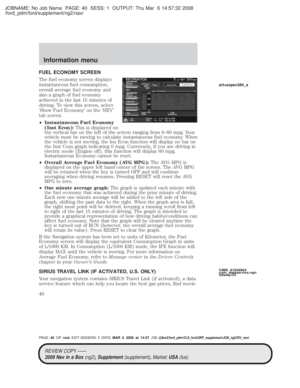
8. I (Information): Press I to
access the information menu. Press
while the information menu is active
to step through the information tabs
of: Where am I?, HEV (if equipped), SIRIUS Travel Link (if activated),
the Calendar, System Info., and Help.
art=expec207_a
art=expec193_a
art=expec194_a
art=expec195_a
art=expec196_a
art=expec197_a
art=expec198_a
REVIEW COPY ÐÐ
2009 Nav in a Box (ng2), Supplement(supplement),Market:USA(fus)
PAGE: 10OP: root EDIT SESSION: 1DATE: MAR 6 2008 at 14:57JOB:@ibm2/ford_pdm/CLS_ford/GRP_supplement/JOB_ng2/DIV_navi
System overview
10
Page 11 of 81
.
10. DISP: Press the DISP")
JOBNAME: No Job Name PAGE: 11 SESS: 1 OUTPUT: Thu Mar 6 14:57:32 2008
/ford_pdm/ford/supplement/ng2/navi
9.PHONE: Press PHONE to access
the phone menu (if equipped with
SYNC).
10. DISP: Press the DISP button to
step through the following display
modes: On, Status Bar Only, and
Off.
11. SEEK:In radio and satellite
radio mode (if activated),
Press
/to seek to the
previous/next available station or
channel within the currently selected Category/Genre..
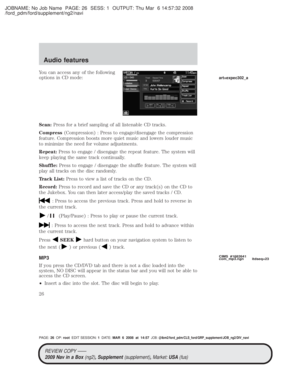
In CD/DVD mode, Press
/to access the previous/next track or
chapter.
12. MENU: Press MENU to access
the system menu. Press while the
system menu is active to step
through the system menu tabs of Display, Clock, Feedback Settings,
System Settings and Valet Mode.
13. SOUND: Press SOUND to
access the sound menu. Press while
the sound menu is active to step
through the sound menu tabs of
Bass/Treble, Balance/Fade, SCV (Speed compensated volume), DSP and
the Visualizer.
14. MEDIA: Press MEDIA to access
the media menu. Press while the
media menu is active to step
through the available media sources
of CD/DVD, Jukebox, User Device, Rear DVD (if equipped) and Rear
AUX (if equipped).
15. RADIO: Press RADIO to access
the radio menu. Press while the
radio menu is active to step through
the available radio sources of AM, FM1, FM2, SAT1, SAT2, and SAT3
(satellite radio, if activated).
art=expec199_a
art=expec200_a
art=expec201_a
art=expec202_a
art=expec203_a
art=expec204_a
art=expec205_a
REVIEW COPY ÐÐ
2009 Nav in a Box (ng2), Supplement(supplement),Market:USA(fus)
PAGE: 11OP: root EDIT SESSION: 1DATE: MAR 6 2008 at 14:57JOB:@ibm2/ford_pdm/CLS_ford/GRP_supplement/JOB_ng2/DIV_navi
System overview
11
Page 12 of 81
: Press to
turn the audio system on/off. Press
and hold to turn the navig")
JOBNAME: No Job Name PAGE: 12 SESS: 1 OUTPUT: Thu Mar 6 14:57:32 2008
/ford_pdm/ford/supplement/ng2/navi
16.VOL (On/off/volume): Press to
turn the audio system on/off. Press
and hold to turn the navigation
radio completely off. Turn to adjust
the volume of the audio system or the navigation voice prompts as they
are being given.
Note: If a route is active when the navigation system is turned off, the
route is resumed when the system is turned on again.
After the system initializes, the screen will be divided in two sections:
² Status bars: This is the top and bottom portion of screen that
displays the clock or date and useful information, depending on the
current mode.
² Display area: The interactive screen that is activated by finger touch
and changes depending on current system operation. Graphical
buttons are displayed in this area depending on the current screen for
you to make choices.
SCREEN DIFFERENCES
Depending on your vehicle line and option package, your navigation
screen may vary in appearance from the screens shown in this
supplement. These differences could include: background color, tab
options, climate controls and other features. Your features may also be
limited depending on your market. (For example, SIRIUS Travel Link is
only available in the continental United States). Please check with your
authorized dealer for availability.
Display options
You can choose to turn your navigation screen on/off and also if you
would like to view the status bars on the top and bottom of the screen.
To access:
Press DISP on the navigation system repeatedly to cycle through these
options.
STATUS BARS
Your navigation screens may have status bars on the top and bottom of
each screen.
CIMS #1678491
com_differnces.ngn
itdseq=5
CIMS #1659995
com_display-button
itdseq=6
CIMS #1655927
com_statusbars itdseq=7
art=expec206_a
REVIEW COPY ÐÐ 2009 Nav in a Box (ng2), Supplement(supplement),Market:USA(fus)
PAGE: 12OP: root EDIT SESSION: 1DATE: MAR 6 2008 at 14:57JOB:@ibm2/ford_pdm/CLS_ford/GRP_supplement/JOB_ng2/DIV_navi
System overview
12
Page 13 of 81

JOBNAME: No Job Name PAGE: 13 SESS: 1 OUTPUT: Thu Mar 6 14:57:32 2008
/ford_pdm/ford/supplement/ng2/navi
The status bar on the top of the
screen will tell your current mode,
the exterior temperature, the time
as well as display icons if you have
enabledBluetooth, are using headphones with your Family
entertainment DVD system among others.
The status bar on the bottom of the
screen may list the Home icon, the
current temperature selected for the
Driver and Passenger as well as the fan speed and air flow direction, the
current mode being used (if equipped), the Artist and Title of the
currently playing CD (if available), Artist and Title for Jukebox (if
available) and satellite radio (if activated).
Note: As climate controls are vehicle dependent, some vehicles may not
display climate readings in the status bar.
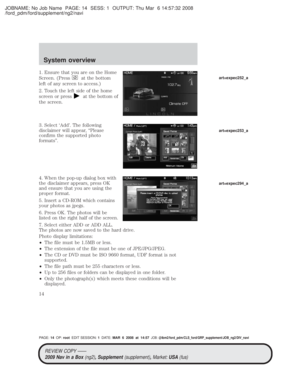
HOME SCREEN
Your navigation system has a Home Screen where you can save/view
favorite pictures, view your current audio and climate control settings as
well as display the audio visualizer or the hybrid fuel economy (if
equipped). You can split the screen into three different sections, or you
can choose to have one main view.
To access your home screen, press the house icon (
) at the bottom
left hand corner of any screen.
The left side of the screen will
display an uploaded photo or the
map screen. The right side can also
display the uploaded photo. The
upper right panel will only display
the current audio settings. The
lower right panel displays the
vehicle's climate settings (if
equipped), the visualizer or the
hybrid fuel economy (if equipped).
Press
on the bottom of the display to access the settings screen for
the left or right side.
Loading pictures
Your navigation system allows you to save and view up to 32 photos. To
access:
CIMS #1655928
com_homescreen
itdseq=8
CIMS #1655929
com_loading-pics
itdseq=9
art=expec250_a
art=expec251_a
art=expec252_a
REVIEW COPY ÐÐ
2009 Nav in a Box (ng2), Supplement(supplement),Market:USA(fus)
PAGE: 13OP: root EDIT SESSION: 1DATE: MAR 6 2008 at 14:57JOB:@ibm2/ford_pdm/CLS_ford/GRP_supplement/JOB_ng2/DIV_navi
System overview
13
Page 14 of 81
")
JOBNAME: No Job Name PAGE: 14 SESS: 1 OUTPUT: Thu Mar 6 14:57:32 2008
/ford_pdm/ford/supplement/ng2/navi
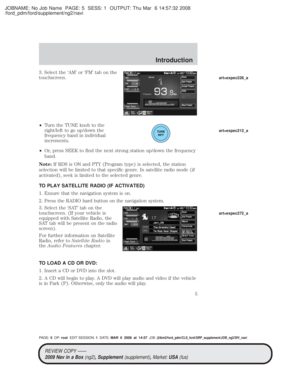
1. Ensure that you are on the Home
Screen. (Press
at the bottom
left of any screen to access.)
2. Touch the left side of the home
screen or press
at the bottom of
the screen.
3. Select `Add'. The following
disclaimer will appear, ªPlease
confirm the supported photo
formatsº.
4. When the pop-up dialog box with
the disclaimer appears, press OK
and ensure that you are using the
proper format.
5. Insert a CD-ROM which contains
your photos as jpegs.
6. Press OK. The photos will be
listed on the right half of the screen.
7. Select either ADD or ADD ALL.
The photos are now saved to the hard drive.
Photo display limitations:
² The file must be 1.5MB or less.
² The extension of the file must be one of JPE/JPG/JPEG.
² The CD or DVD must be ISO 9660 format, UDF format is not
supported.
² The file path must be 255 characters or less.
² Up to 256 files or folders can be displayed in one folder.
² Only the photograph(s) which meets these conditions will be
displayed.
art=expec252_a
art=expec253_a
art=expec294_a
REVIEW COPY ÐÐ
2009 Nav in a Box (ng2), Supplement(supplement),Market:USA(fus)
PAGE: 14OP: root EDIT SESSION: 1DATE: MAR 6 2008 at 14:57JOB:@ibm2/ford_pdm/CLS_ford/GRP_supplement/JOB_ng2/DIV_navi
System overview
14
Page 15 of 81

JOBNAME: No Job Name PAGE: 15 SESS: 1 OUTPUT: Thu Mar 6 14:57:32 2008
/ford_pdm/ford/supplement/ng2/navi
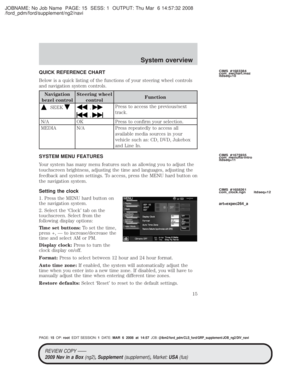
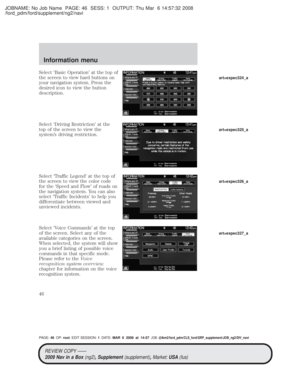
QUICK REFERENCE CHART
Below is a quick listing of the functions of your steering wheel controls
and navigation system controls.
Navigation
bezel control Steering wheel
control Function
SEEK,
,
Press to access the previous/next
track.
N/A OK Press to confirm your selection.
MEDIA N/A Press repeatedly to access all available media sources in your
vehicle such as: CD, DVD, Jukebox
and Line In.
SYSTEM MENU FEATURES
Your system has many menu features such as allowing you to adjust the
touchscreen brightness, adjusting the time and languages, adjusting the
feedback and system settings. To access, press the MENU hard button on
the navigation system.
Setting the clock
1. Press the MENU hard button on
the navigation system.
2. Select the `Clock' tab on the
touchscreen. Select from the
following display options:
Time set buttons: To set the time,
press +, Ð to increase/decrease the
time and select AM or PM.
Display clock: Press to turn the
clock display on/off.
Format: Press to select between 12 hour and 24 hour format.
Auto time zone: If enabled, the system will automatically adjust the
time when you enter into a new time zone. If disabled, you will have to
manually adjust the time when entering different time zones.
Restore defaults: Select `Reset' to reset to the default settings.
CIMS #1683384
com_swchart.maz
itdseq=10
CIMS #1675935
com_menufts-intro
itdseq=11
CIMS #1658261
com_clock.ngn itdseq=12
art=expec264_a
REVIEW COPY ÐÐ
2009 Nav in a Box (ng2), Supplement(supplement),Market:USA(fus)
PAGE: 15OP: root EDIT SESSION: 1DATE: MAR 6 2008 at 14:57JOB:@ibm2/ford_pdm/CLS_ford/GRP_supplement/JOB_ng2/DIV_navi
System overview
15
Page 16 of 81

JOBNAME: No Job Name PAGE: 16 SESS: 1 OUTPUT: Thu Mar 6 14:57:32 2008
/ford_pdm/ford/supplement/ng2/navi
Feedback settings
1. Press the MENU hard button on
the navigation system.
2. Select the `Feedback Settings' tab
on the touchscreen. Select from the
following display options:
Voice recognition user profile:You can `train' the system to better
recognize your voice. Two profiles can be created. Refer to the Voice
Recognition section for more information.
Button tone: Select to select/adjust when the system will sound a tone.
Press `Button tone' to then select from:
² All Buttons: Select to have the system sound a tone when any hard
or soft key is touched.
² Touch Screen: Select to have the system only sound a tone when a
selection is made on the touch screen.
² Off: Select to turn off all tones.
Voice volume: Press + to increase or Ð to decrease the volume level of
the navigation voice. Voice volume adjustment also includes the volume
level of chimes.
Voice recognition interaction mode: This feature determines the level
of interaction/feedback you will receive from the system.
² Standard: This is the default setting. The `Standard setting' provides
you with the most interaction / feedback in the form of prompts.
² Advanced: This feature has less prompts and feedback.
Voice recognition confirmation:
² On: Select to have the system always ask to confirm/verify a
command.
² Off: Select to have the system ask less frequently to confirm /verify a
command.CIMS #1658262
com_feedback.ngn
itdseq=13
art=expec265_a
REVIEW COPY ÐÐ
2009 Nav in a Box (ng2), Supplement(supplement),Market:USA(fus)
PAGE: 16OP: root EDIT SESSION: 1DATE: MAR 6 2008 at 14:57JOB:@ibm2/ford_pdm/CLS_ford/GRP_supplement/JOB_ng2/DIV_navi
System overview
16