Page 13 of 30
12
indicator LightAuto-Dimming On and Off
homeLink
Auto-Dimming mirror
• Auto-Dimming will automatically darken your rear view mirror to
reduce headlight glare from vehicles behind you.
•
The Auto-Dimming feature is active when the vehicle is started and
cancels when the transmission in placed in Reverse.
homeLink
®
•
This feature provides a convenient way to replace up to three
transmitters such as garage door openers, home lighting remotes
and other radio frequency devices.
• Refer to your Owner’s Manual for complete programming details.
A UTO -Dimmi Ng mi RROR AND hO mE LiNK®
Light Sensor
164817_09a_Mazda CX-7_SSG_080808.indd 138/8/08 2:25:08 PM
Page 18 of 30

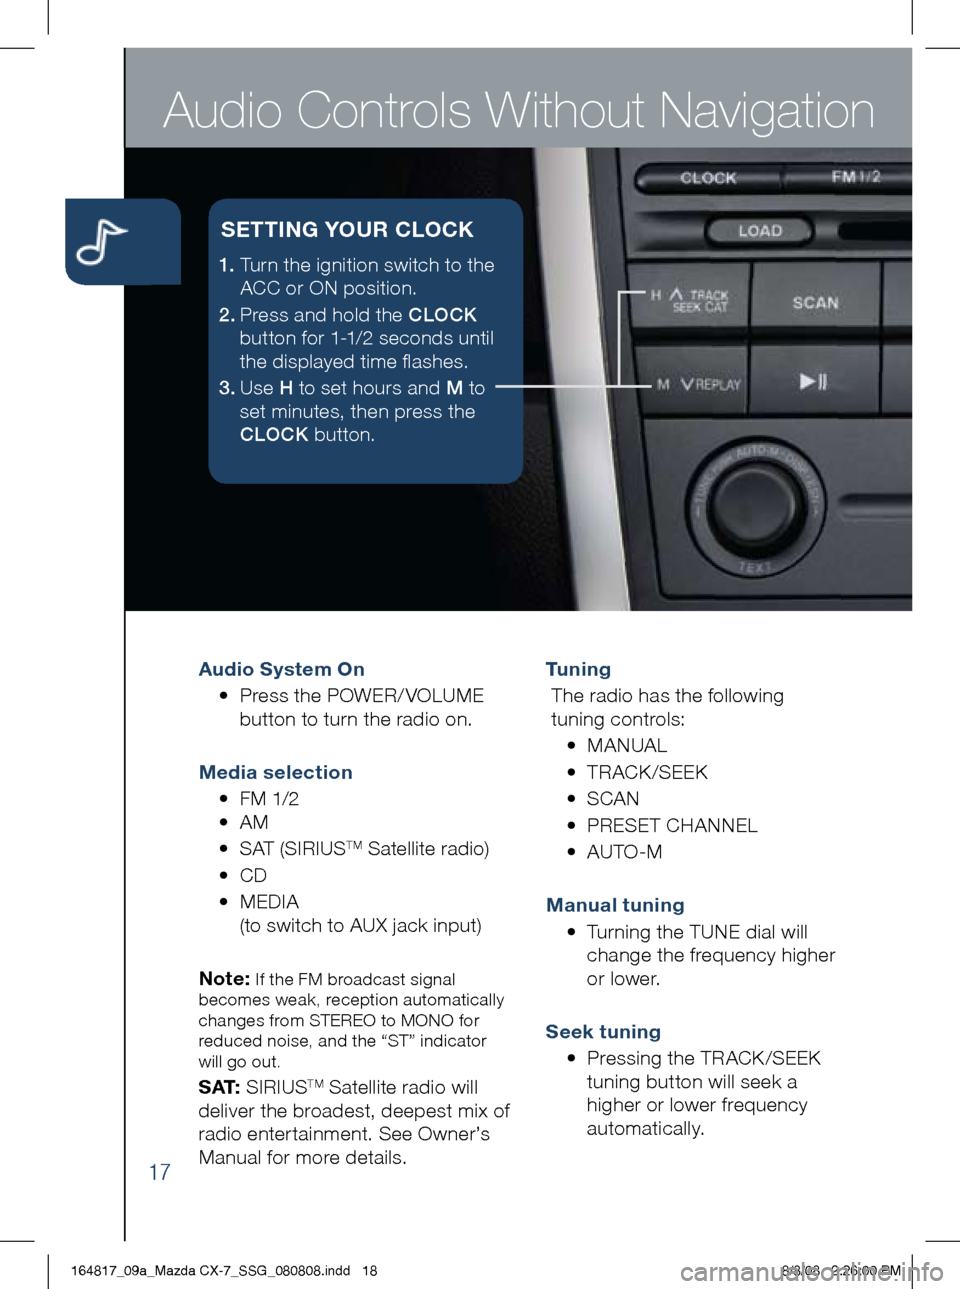
Audio Controls Without Navigation
17
Audio System On
• Press the POWER/ VOLUME
button to turn the radio on.
m edia selection
• FM 1/2
• AM
• SAT (SIRIUS
TM Satellite radio)
• CD
•
MEDIA
(to switch to AUX jack input)
Note:
If the FM broadcast signal
becomes weak, reception automatically
changes from STEREO to MONO for
reduced noise, and the “ST” indicator
will go out.
S AT: SIRIUSTM Satellite radio will
deliver the broadest, deepest mix of
radio enter tainment. See Owner’s
Manual for more details. Tu n i n g
The radio has the following
tuning controls:
• M ANUAL
• T RACK /SEEK
• S CAN
• P RESET CHANNEL
• A UTO-M
m anual tuning
•
Turning the TUNE dial will
change the frequency higher
or lower.
Seek tuning
• Pressing the TRACK /SEEK
tuning button will seek a
higher or lower frequency
automatically.
1. Turn the ignition switch to the
ACC or ON position.
2 . Press and hold the CLOCK
button for 1-1/2 seconds until
the displayed time flashes.
3 . Use H to set hours and M to
set minutes, then press the
CLOCK button.
SETT iN g YOUR CLOCK
164817_09a_Mazda CX-7_SSG_080808.indd 188/8/08 2:26:00 PM
Page 20 of 30
Audio Controls With Navigation
19
Audio System On
• Press a band selector button
(FM/AM) to turn the radio on.
m edia selection
•
Press the appropriate button:
FM/AM, SAT (SIRIUS
TM Satellite
radio), CD, MEDIA (to switch to
AUX jack input)
Tu n i n g
• The radio has the following
tuning methods: Manual, Seek,
Scan, Preset channel, and
auto-memory tuning.
m anual tuning
•
Press the SEEK TUNE button
to change the frequency
higher or lower.
Seek tuning
•
Press and hold the SEEK TUNE
button
to automatically
seek a higher or lower
frequency or track, depending
on media selected.
Note:
If you continue to press and hold
the button, the frequency will continue
changing without stopping.
Scan tuning
• Press the SCAN button
to automatically sample
strong stations.
•
To hold a station, press the
SCAN button again during
this inter val.
Audio
• Press the AUDIO button to
display the audio screen.
164817_09a_Mazda CX-7_SSG_080808.indd 208/8/08 2:26:18 PM
Page 21 of 30

20
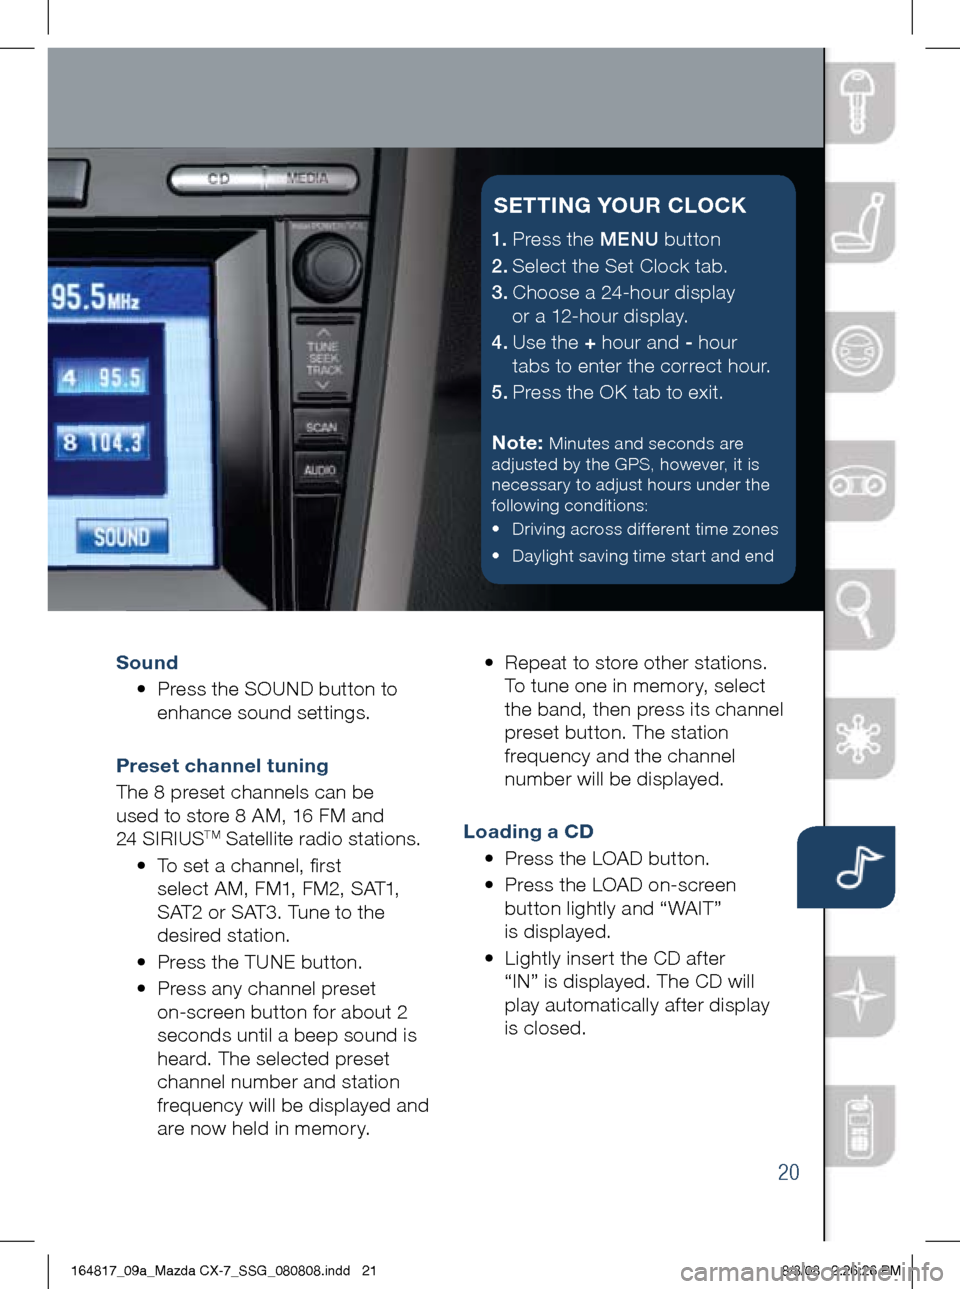
Sound
• Press the SOUND button to
enhance sound settings.
Preset channel tuning
The 8 preset channels can be
used to store 8 AM, 16 FM and
24 SIRIUS
TM Satellite radio stations.
• To set a channel, first
select AM, FM1, FM2, SAT1,
SAT2 or SAT3. Tune to the
desired station.
• Press the TUNE button.
• Press any channel preset
on-screen button for about 2
seconds until a beep sound is
heard. The selected preset
channel number and station
frequency will be displayed and
are now held in memory. •
Repeat to store other stations.
To tune one in memor y, select
the band, then press its channel
preset button. The station
frequency and the channel
number will be displayed.
Loading a CD
• Press the LOAD button.
•
Press the LOAD on-screen
button lightly and “WAIT”
is displayed.
•
Lightly inser t the CD af ter
“IN” is displayed. The CD will
play automatically after display
is closed.
1.
Press the MENU button
2.
Select the Set Clock tab.
3.
Choose a 24-hour display
or a 12-hour display.
4.
Use the + hour and - hour
tabs to enter the correct hour.
5.
Press the OK tab to exit.
Note:
Minutes and seconds are
adjusted by the GPS, however, it is
necessary to adjust hours under the
following conditions:
• Driving across different time zones
• Daylight saving time start and end
SETT iN g YOUR CLOCK
164817_09a_Mazda CX-7_SSG_080808.indd 218/8/08 2:26:26 PM
Page 28 of 30

SALES
CONSULTANT
CUSTOm
ER
initialsAll items in the Customer Delivery Checklist have been reviewed
with the customer and the first maintenance appointment
has been scheduled:
*if equippedSigned copy must be placed in dealer jacket
Keyless Entr y
.................................1
• Keyless Entr y Transmitter
• Advanced Key*
• Door Request Switches*
• Liftgate Request Switch*
• Power Door Locks
Starting The Engine
.......................2
• Start Knob Ignition
(Advanced Key*)
Driver’s Seat
...................................3
• Driver Seat Adjustment
Rear Seat Access
..........................4
• 2nd row seating access & folding
Driver’s View
...............................5-6
• Location of Switches and Controls
i
nstrument Cluster ......................7- 8
• Review indicator light function
and location
w
iper / w asher ...............................9
VE hi CLE PRESENTAT iON :
Refer to the Smart Start Guide during presentation
Exterior Lighting Controls
..........10
AU
x input ......................................14
Climate Control
..........................15 -16 • Auto Mode* • Manual Mode
Audio Contro
ls ..........................17-2 0
• SIRIUSTM Satellite Radio Operation
Set Clock
..................................17, 20
Navigation System*
..................21-2 2
• Enter Destination
• Enter Customer Address (Home)
Bluetooth®
h ands-Free* ..........23-24
• Tutorial
• Pair Phone
• Make a Call
• Toll-Free Customer Service
800-430-0153
Customer Delivery Checklist
164817_09a_Mazda CX-7_SSG_080808.indd 288/8/08 2:27:02 PM