Page 17 of 30
information Display Functions
• Clock
• Audio Display
• B l u e t o o t h
® Hands-Free Display
•
Climate Control Display
•
Ambient Temperature Display
•
Passenger Air Bag Off Indicator
Push to defrost the front windshield.
Push to select desired airflow.
Push to manually turn on/off and control the air conditioning
system. Rotate fan speed dial to desired fan speed.
Push to recirculate cabin air and reduce outside exhaust,
odors and improve cooling.
Push to defrost the rear window.
Push to display the ambient temperature in the
Information Display.
AUTO mAT iC A iR COND iT iON iN g
1 Push AUTO dial to turn the automatic air conditioning system on.
2 Rotate AUTO dial to the desired cabin air temperature setting
(shown in the Information Display above).
3 Push OFF dial to turn climate control system off.
Automatic Climate Control
16
information Display
164817_09a_Mazda CX-7_SSG_080808.indd 178/8/08 2:25:53 PM
Page 18 of 30

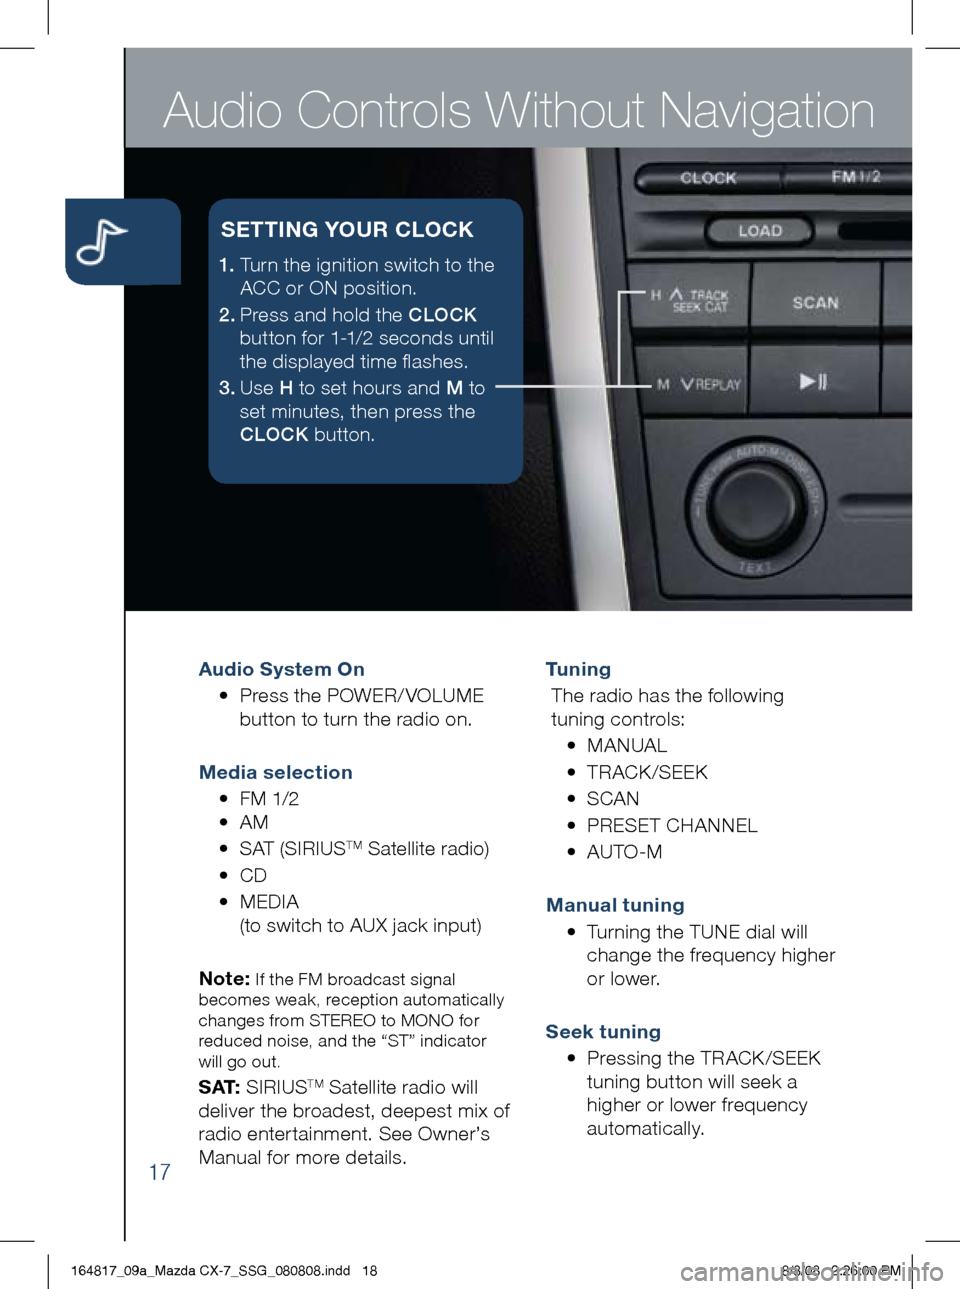
Audio Controls Without Navigation
17
Audio System On
• Press the POWER/ VOLUME
button to turn the radio on.
m edia selection
• FM 1/2
• AM
• SAT (SIRIUS
TM Satellite radio)
• CD
•
MEDIA
(to switch to AUX jack input)
Note:
If the FM broadcast signal
becomes weak, reception automatically
changes from STEREO to MONO for
reduced noise, and the “ST” indicator
will go out.
S AT: SIRIUSTM Satellite radio will
deliver the broadest, deepest mix of
radio enter tainment. See Owner’s
Manual for more details. Tu n i n g
The radio has the following
tuning controls:
• M ANUAL
• T RACK /SEEK
• S CAN
• P RESET CHANNEL
• A UTO-M
m anual tuning
•
Turning the TUNE dial will
change the frequency higher
or lower.
Seek tuning
• Pressing the TRACK /SEEK
tuning button will seek a
higher or lower frequency
automatically.
1. Turn the ignition switch to the
ACC or ON position.
2 . Press and hold the CLOCK
button for 1-1/2 seconds until
the displayed time flashes.
3 . Use H to set hours and M to
set minutes, then press the
CLOCK button.
SETT iN g YOUR CLOCK
164817_09a_Mazda CX-7_SSG_080808.indd 188/8/08 2:26:00 PM
Page 19 of 30
18
Scan tu ning
•
Press the SCAN button
to automatically sample
strong stations.
•
To hold a station, press
the SCAN button again
during this inter val.
Preset channel tuning
The 6 preset channels can be used
to store 6 AM and 12 FM stations.
• To set a channel, first select
AM, FM1, or FM2.
• Tune to the desired station.
•
Press and hold a preset button
until a beep is heard.
•
Repeat this operation for the
other stations and bands you
want to store. Auto-memory
This is especially useful when
driving in an area where the local
stations are not known. Additional
AM/FM stations can be stored
without disturbing the previously
set channels. Refer to your Owner’s
Manual for complete details.
164817_09a_Mazda CX-7_SSG_080808.indd 198/8/08 2:26:08 PM
Page 20 of 30
Audio Controls With Navigation
19
Audio System On
• Press a band selector button
(FM/AM) to turn the radio on.
m edia selection
•
Press the appropriate button:
FM/AM, SAT (SIRIUS
TM Satellite
radio), CD, MEDIA (to switch to
AUX jack input)
Tu n i n g
• The radio has the following
tuning methods: Manual, Seek,
Scan, Preset channel, and
auto-memory tuning.
m anual tuning
•
Press the SEEK TUNE button
to change the frequency
higher or lower.
Seek tuning
•
Press and hold the SEEK TUNE
button
to automatically
seek a higher or lower
frequency or track, depending
on media selected.
Note:
If you continue to press and hold
the button, the frequency will continue
changing without stopping.
Scan tuning
• Press the SCAN button
to automatically sample
strong stations.
•
To hold a station, press the
SCAN button again during
this inter val.
Audio
• Press the AUDIO button to
display the audio screen.
164817_09a_Mazda CX-7_SSG_080808.indd 208/8/08 2:26:18 PM
Page 21 of 30

20
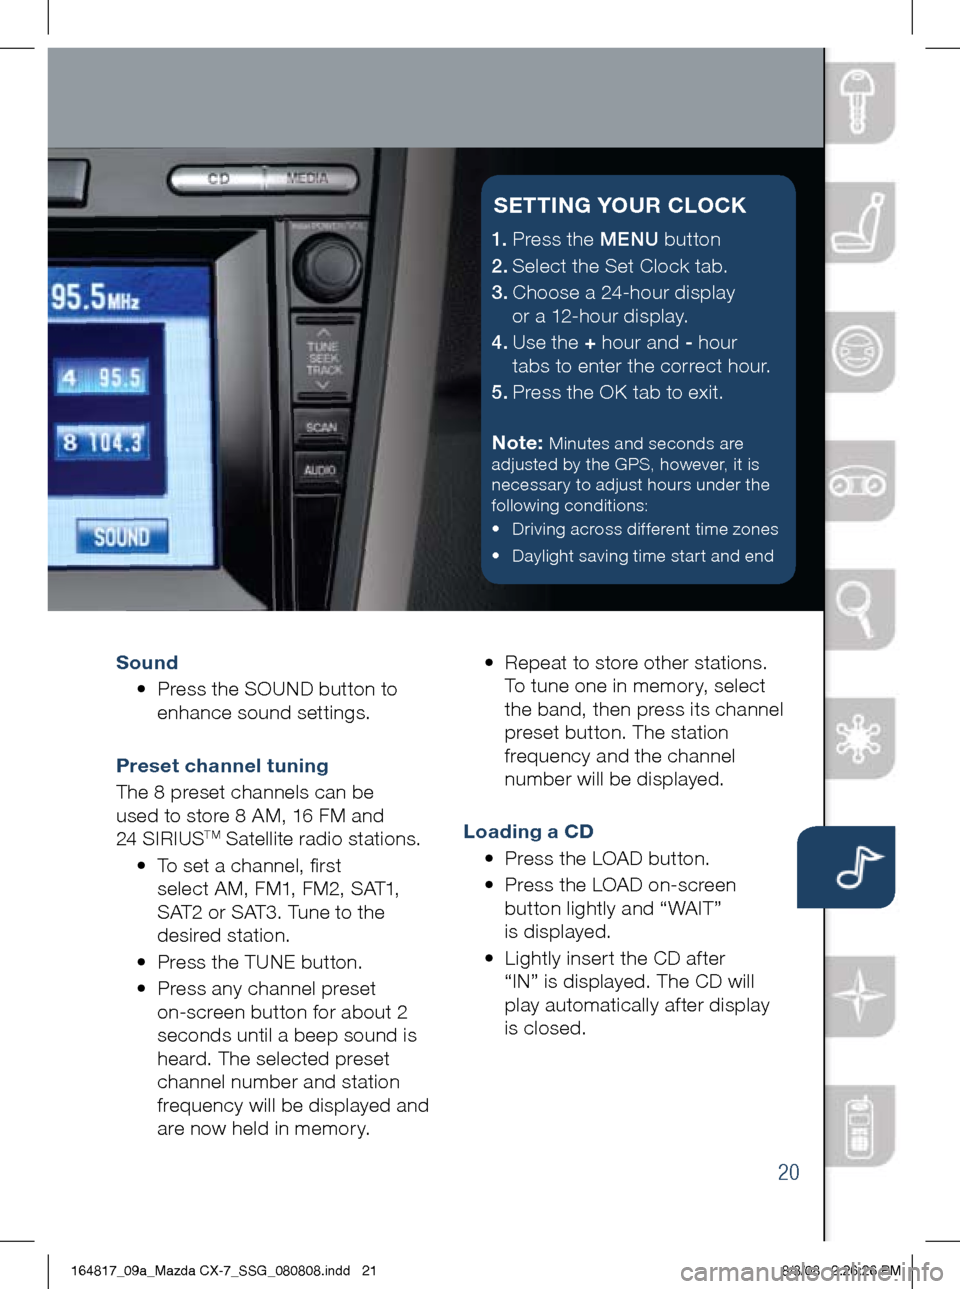
Sound
• Press the SOUND button to
enhance sound settings.
Preset channel tuning
The 8 preset channels can be
used to store 8 AM, 16 FM and
24 SIRIUS
TM Satellite radio stations.
• To set a channel, first
select AM, FM1, FM2, SAT1,
SAT2 or SAT3. Tune to the
desired station.
• Press the TUNE button.
• Press any channel preset
on-screen button for about 2
seconds until a beep sound is
heard. The selected preset
channel number and station
frequency will be displayed and
are now held in memory. •
Repeat to store other stations.
To tune one in memor y, select
the band, then press its channel
preset button. The station
frequency and the channel
number will be displayed.
Loading a CD
• Press the LOAD button.
•
Press the LOAD on-screen
button lightly and “WAIT”
is displayed.
•
Lightly inser t the CD af ter
“IN” is displayed. The CD will
play automatically after display
is closed.
1.
Press the MENU button
2.
Select the Set Clock tab.
3.
Choose a 24-hour display
or a 12-hour display.
4.
Use the + hour and - hour
tabs to enter the correct hour.
5.
Press the OK tab to exit.
Note:
Minutes and seconds are
adjusted by the GPS, however, it is
necessary to adjust hours under the
following conditions:
• Driving across different time zones
• Daylight saving time start and end
SETT iN g YOUR CLOCK
164817_09a_Mazda CX-7_SSG_080808.indd 218/8/08 2:26:26 PM
Page 22 of 30
Navigation System
21
You can choose setting a destination using a street address, a point of
interest, the nearest restaurants, ATMs, gas stations, hospitals and more.
1 Press the “Menu” button on the navigation face.
2 Select “Destination Entry”.
3 Select “Change” and then select your desired search area.
4 Select State (or scroll past States to find Canadian Provinces)
5 Select “Address”.
6
Select “City”.
7 Select “Input City Name”.
8
Use keyboard to enter city name, street name and house number.
9 When all the information is correct, press “OK”.
Note:
When entering numbers for a street name, (e.g. 1st Ave.), press “Sym.”
button to switch to the numeric keyboard.
Note: If you cannot find the address in the state you are looking for, you may have
the wrong area selected. Press “Menu” to go back to the beginning and select the
correct area on the US map.
S ELECT iN g A DEST iNAT iON US iN g A STREET ADDRESS
164817_09a_Mazda CX-7_SSG_080808.indd 228/8/08 2:26:27 PM
Page 23 of 30
22
1 Press the “Menu” button on the navigation face.
2 Select “Destination Entry”.
3 Select “Point of Interest”.
4 Select “Nearest”.
5 Select “Current Position”.
6
In the QUICK POI screen, select the category of the point of interest you
want to find. You can set multiple categories for searching up to five.
7 After selecting categories, press “List”.
8
Search result shows up as a list in “LOCAL POIs” screen. Select the
point of interest you want to set as the destination from the list.
9 Press “Destination”.
10 Press “Guide” or just start driving.
SELECTiN g A PO iNT OF i NTEREST (PO i)
NEAR YOUR CURRENT LOCAT iON
Please refer to your Navigation System Owner’s Manual for complete details
and important safety information.
164817_09a_Mazda CX-7_SSG_080808.indd 238/8/08 2:26:28 PM
Page 24 of 30

Bluetooth
®
23
without Navigation System
(Refer to your Owner’s Manual for Bluetooth® with Navigation operations)
PA iR iN g Y OUR B LUETOOT h® PhONE
Note: Before pairing your cell phone, it is recomended that you refer to you phone’s
manual for steps to turn on Bluetooth and perform pairing. These steps will be
required to perform steps 7-8 below.
1 Press the button located on the steering wheel.
2 From the options and after the beep say, “Set-up” .
3
From the next prompt options after the beep, say, “Pairing options” .
4
The prompt will give you some more options. After the beep,
s a y, “Pair” .
5
The prompt will ask you for a 4-digit pairing code. After the beep,
say any 4-digit code you’d like to use.
6
The prompt will repeat the number and ask if it is correct. After the
beep, say, “ Ye s ” if it is or “No” if it isn’t. If it’s not, the system will
repeat the process.
7
Use your phone’s manual for instructions on how to proceed.
Select your model, then select Bluetooth.
Note:
You can also find this information on MyMazda.com/bluetooth. Select
your model, then select Bluetooth® and then follow the screen prompts.
8 Input the 4-digit code you chose earlier.
9
You will be asked to name your phone. Say the name you want to
give the phone like, “ heather’s Phone” .
10
The prompt will then say that it is adding that phone name and ask
if this is correct. After the beep say, “ Ye s ” .
11 The prompt should then say that the pairing is complete.
12
You will also be asked if you would like to use this device for
streaming audio as well if your phone is capable.
Please call 800-430-0153 for questions regarding Bluetooth compatibility
or problems pairing the phone.
164817_09a_Mazda CX-7_SSG_080808.indd 248/8/08 2:26:29 PM