Page 17 of 26
 16
Scan Tu ning
•
Push the SCAN button
to automatically sample
strong stations.
•
To hold a station, push
the SCAN button again
during this inter val.
Preset Ch")
16
Scan Tu ning
•
Push the SCAN button
to automatically sample
strong stations.
•
To hold a station, push
the SCAN button again
during this inter val.
Preset Channel Tuning
The 6 preset channels can be used
to store 6 AM and 12 FM stations.
• To set a channel first select AM,
FM1, or FM2.
• Tune to the desired station.
•
Push a channel preset button
for about 2 seconds until a
beep is heard.
•
Repeat this operation for the
other stations and bands you
want to store. Auto-Memor y Tuning
When driving in an area where
the local stations are not known,
additional AM/FM stations can
be stored without disturbing the
previously set channels. Refer
to your Owner’s Manual for
complete details.
1. Push and hold the H (hours)
button to the correct hour.
2. Push and hold the M (minutes)
button to the correct minute.
NOTE:
Push the :00 button to zero
out the minutes.
SETT iN g YOUR CLOCK
(not equipped with Trip Computer)
1. Push the “ CLOCK” button.
2. Push and hold the H (hours)
button to the correct hour.
3. Push and hold the M (minutes)
button to the correct minute.
SETT iN g YOUR CLOCK
(if equipped with Trip Computer)
189242_09c_Mazda6_SSG_112108.indd 1711/21/08 3:22:34 PM
Page 18 of 26
 Audio Controls With Navigation
17
Audio System ON
• Push POWER/ VOLUME on.
• Push SOURCE button.
Media Selection
• AM, FM, DISC, SAT
(SIRIUS™
Satellite radio),
AUX (to switch")
Audio Controls With Navigation
17
Audio System ON
• Push POWER/ VOLUME on.
• Push SOURCE button.
Media Selection
• AM, FM, DISC, SAT
(SIRIUS™
Satellite radio),
AUX (to switch to
AUX jack input and Bluetooth®
streaming audio if equipped).
Tu n i n g
• The radio has the following
tuning methods: Manual, Seek,
Scan, Auto Memory tuning, and
Preset channel.
Manual Tuning
• Turning the TUNE AUDIO dial
will change the frequency higher
or lower.
Seek / Track Tuning
• Pushing and holding the
SEE k/TRACk buttons
will cause the tuner to automatically
seek a higher or lower
frequency or track depending
on media selected.
NOTE:
If you continue to push and
hold the button, the frequency will
continue changing without stopping.
Scan Tuning
• Push the SCAN button
to automatically sample
strong stations.
•
To hold a station, push the
SCAN button again during
this inter val.
Auto-Memor y Tuning
When driving in an area where
the local stations are not known,
additional AM/FM stations can
be stored without disturbing the
previously set channels. Refer to your
Owner’s Manual for complete details.
1. P u s h LOAD /
2.
Push the LOAD on-screen
button lightly.
3.
Wait for the screen
to lower.
4 . Af ter “IN” is displayed on
the Information Display,
insert the CD.
The CD will begin playing
after the screen closes.
T O LOAD /PLAY A CD
189242_09c_Mazda6_SSG_112108.indd 1811/21/08 3:22:39 PM
Page 19 of 26
 18
Preset Channel Tuning
The 8 preset channels can be
used to store 8 AM, 16 FM stations
and 24 SIRIUS™ Satellite radio
stations (if equipped).
• To set a channel first select")
18
Preset Channel Tuning
The 8 preset channels can be
used to store 8 AM, 16 FM stations
and 24 SIRIUS™ Satellite radio
stations (if equipped).
• To set a channel first select AM,
FM1, FM2, SAT1, SAT2 or SAT3.
Tune to the desired station.
• Push the TUNE AUDIO dial.
•
Select any channel preset
on-screen button for about 2
seconds until a beep is heard.
The selected preset channel
number and station frequency
will be displayed and is now
held in memory.
•
Repeat to store other stations.
To tune one in memor y, select
band then push its channel
preset button. The station
frequency and the channel
number will be displayed.
1.
Push the MENU button.
2.
Select the Set Clock tab.
3.
Choose a 24-hour display or
a 12-hour display.
4.
Use the + hour and - hour
tabs to enter the correct hour.
5.
Use the + min (minutes)
and - min to set the
correct minutes.
6.
Exit by pushing the O k tab.
NOTE:
Minutes and seconds are
adjusted by the gPS, however, it is
necessary to adjust hours under the
following conditions:
•
Driving across different
time zones
•
Daylight saving time start
and end
SETT iN g YOUR CLOCK
189242_09c_Mazda6_SSG_112108.indd 1911/21/08 3:22:42 PM
Page 20 of 26
 Navigation System
19
insert Map Disc into lower DVD slot
Your navigation system operates using the Map Discs supplied.
•
Disc A covers most of the Midwest and Western states including
Hawa")
Navigation System
19
insert Map Disc into lower DVD slot
Your navigation system operates using the Map Discs supplied.
•
Disc A covers most of the Midwest and Western states including
Hawaii and Alaska.
•
Disc B covers some of the Midwest and all of the Eastern states
including Puerto Rico.
• Both discs cover all of Canada.
NOTE:
If the state your address is in is not displayed when entering a destination,
you may have the wrong disc in the navigation system.
1 Push LO AD /.
2
When “Load/Eject” screen appears select “MAP”. Wait for navigation
screen to tilt open.
3
Insert the correct Map Disc with the printed side facing up, into the
lower DVD MAP slot.
4 Read the Caution carefully and select the “ AgREE” on-screen button.
5
To remove the Map Disc, place the ignition in ACC or ON position.
6 Push
LO AD / and then “MAP”.
iNSERT iN g THE M AP DiSC:
Disc AO
C
I
R
O
T
R
E
U
P
I
I
A
W
A
HDisc B
O
C
I
R
O
T
R
E
U
P
I
I
A
W
A
HD iSC AD iSC B
189242_09c_Mazda6_SSG_112108.indd 2011/21/08 3:22:55 PM
Page 21 of 26
 20
SELECT iN g A DEST iNAT iON US iN g A STREET ADDRESS
You can choose setting a destination using a street address, a point of
interest, the nearest restaurants, ATMs, gas stations, hospitals and m")
20
SELECT iN g A DEST iNAT iON US iN g A STREET ADDRESS
You can choose setting a destination using a street address, a point of
interest, the nearest restaurants, ATMs, gas stations, hospitals and more.
1 P ush “Menu” button on navigation face.
2 Select “Destination Entry”.
3 Select “Address”.
4 Select the “State” or “Province”.
• Scroll down past the States to find Canadian Provinces.
5 Push “Ok”.
6 Select “City”.
7 Select “Input City Name”.
8 Use the keyboard to enter the city name.
9 Select “Street”.
10 Use the keyboard to enter the street name.
11 Select “House No”.
12 Use the keyboard to enter the house number, then push “O k”.
13
When the map appears, push “Destination”.
14
Push “ guide” or just start driving.
SELECT iN g A PO iNT OF i NTEREST (PO i)
NEAR YOUR CURRENT LOCAT iON
1 Push the “Menu” button on the navigation face.
2 Select “Destination Entry”.
3 Select “Point of Interest”.
4 Select “Nearest”.
5 Select “Current Position”.
6
In the QUIC k POI screen, select the category of the point of
interest you want to find. You can set multiple categories for
searching up to five.
7 After selecting categories, push “List”.
8
Search result shows up as a list in “LOCAL POIs” screen. Select
the point of interest you want to set as the destination from the list.
9 Push “Destination”.
10 Push “ guide” or just start driving.
NOTE:
When entering numbers for a street name, (e.g., 1st Ave.), push “Sym.”
button to switch to the numeric keyboard.
Please refer to your Navigation System Owner’s Manual for complete
details and important safety information.
189242_09c_Mazda6_SSG_112108.indd 2111/21/08 3:22:56 PM
Page 22 of 26
 Bluetooth
®
21
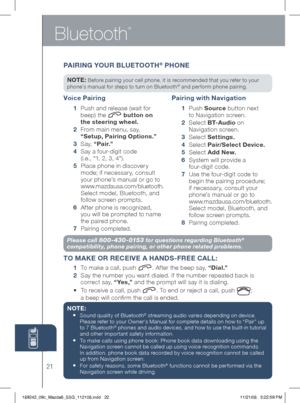
Please call 800-430-0153 for questions regarding Bluetooth®
compatibility, phone pairing, or other phone related problems.
T O MAKE OR RECE iVE A HANDS -FREE CALL :
1
To mak")
Bluetooth
®
21
Please call 800-430-0153 for questions regarding Bluetooth®
compatibility, phone pairing, or other phone related problems.
T O MAKE OR RECE iVE A HANDS -FREE CALL :
1
To make a call, push . After the beep say, “Dial.”
2
Say the number you want dialed. If the number repeated back is
correct say, “ Ye s ,” and the prompt will say it is dialing.
• To receive a call, push
. To end or reject a call, push ;
a beep will confirm the call is ended.
NOTE:
•
Sound quality of Bluetooth® streaming audio varies depending on device.
Please refer to your Owner’s Manual for complete details on how to “Pair” up
to 7 Bluetooth
® phones and audio devices, and how to use the built-in tutorial
and other important safety information.
• To make calls using phone book: Phone book data downloading using the
Navigation screen cannot be called up using voice recognition commands.
In addition, phone book data recorded by voice recognition cannot be called
up from Navigation screen.
• For safety reasons, some Bluetooth® functions cannot be per formed via the
Navigation screen while driving.
Voice Pairing
1
Push and release (wait for
beep) the button on
the steering wheel.
2
From main menu, say,
“Setup, Pairing Options.”
3 S a y, “Pair.”
4
Say a four-digit code
(i.e., “1, 2, 3, 4”).
5
Place phone in discovery
mode; if necessar y, consult
your phone’s manual or go to
www.mazdausa.com/bluetooth.
Select model, Bluetooth, and
follow screen prompts.
6
After phone is recognized,
you will be prompted to name
the paired phone.
7
Pairing completed.
Pairing with Navigation
1 P u s h Source button next
to Navigation screen.
2
Select B T- A u d i o on
Navigation screen.
3 Select Settings.
4
Select Pair/Select Device.
5
Select Add New.
6
System will provide a
four-digit code.
7
Use the four-digit code to
begin the pairing procedure;
if necessary, consult your
phone’s manual or go to
www.mazdausa.com/bluetooth.
Select model, Bluetooth, and
follow screen prompts.
8
Pairing completed.
P A iR iN g Y OUR B LUETOOTH® PHONE
NOTE: Before pairing your cell phone, it is recommended that you refer to your
phone’s manual for steps to turn on Bluetooth® and perform phone pairing.
189242_09c_Mazda6_SSG_112108.indd 2211/21/08 3:22:59 PM
Page 23 of 26
MyMazda.com—The Official
Site for Mazda Owners
Register today on MyMazda.com—the ultimate
destination for Mazda Owners. Once registered,
you’ll be able to take advantage of benefits
exclusively for Mazda owners:
• Insider access to exclusive events
and promotions
• Personalized maintenance schedules
• Zoom-Zoom Owner Magazine
• Warranty information and on-line
Owner’s Manuals
• Wallpaper, videos and other fun stuff
• Accessories specifically designed for
your vehicle
• Car Care Discount Coupons available
from your Mazda Dealer
Visit and register at MyMazda.com today!
189242_09c_Mazda6_SSG_112108.indd 2311/21/08 3:23:00 PM
Page 24 of 26
 SALES CONSULTANTCUSTOMER
All items in the Customer Delivery Checklist have been reviewed with the customer and
the first maintenance appointment has been scheduled:
*if equipped
Signed copy must be p")
SALES CONSULTANTCUSTOMER
All items in the Customer Delivery Checklist have been reviewed with the customer and
the first maintenance appointment has been scheduled:
*if equipped
Signed copy must be placed in dealer jacket
Keyless Entr y
.................................1
• k ey Fob
• Smart Entry
(Advanced k ey*)
• Door Request Switch*
• Trunk Request Switch*
• Power Door Locks
Starting the Engine*
......................2
• Push Button Ignition
• Emergency
Engine Stop
Seat Adjustments*
.........................3
Auto-Dimming Mirrors*
.................4
Driver’s View
...............................5-6
• Location of Switches and Controls
i
nstrument Cluster ......................7- 8
• Review indicator light function
and location
Lighting Control
............................9
A
UX i nput ........................................9
w
iper washer ................................10
V EH iCLE PRESENTAT iON :
Refer to Smart Start Guide during presentation
Customer Delivery Checklist
Fuel Door
......................................10
• Fuel Door Release and Fuel Spec
Blind Spot Monitoring*
................11
Climate Control
.........................13 -14
• Manual Mode
• Auto Mode*
Audio Controls
..........................15 -18
• SIRIUS™ Satellite Radio* Operation
Set Clock
..................................16, 18
Navigation System*
.................19 -20
• 2 Disc System, Insert Map Disc
• Enter Customer Address
• Enter Destination
Bluetooth Hands-Free*
...............21
• Tutorial
• Pair Phone
• Make a Call
• Toll-Free Customer Service
800-430-0153
Tutorial Videos on MyMazda.com
........................... inside Back Cover
189242_09c_Mazda6_SSG_112108.indd 2411/21/08 3:23:10 PM


 MyMazda.com—The Official
Site for Mazda Owners
Register today on MyMazda.com—the ultimate
destination for Mazda Owners. Once registered,
you’ll be able to take advantage of benefits
exclusiv")