2009 LINCOLN NAVIGATOR height
[x] Cancel search: heightPage 207 of 375
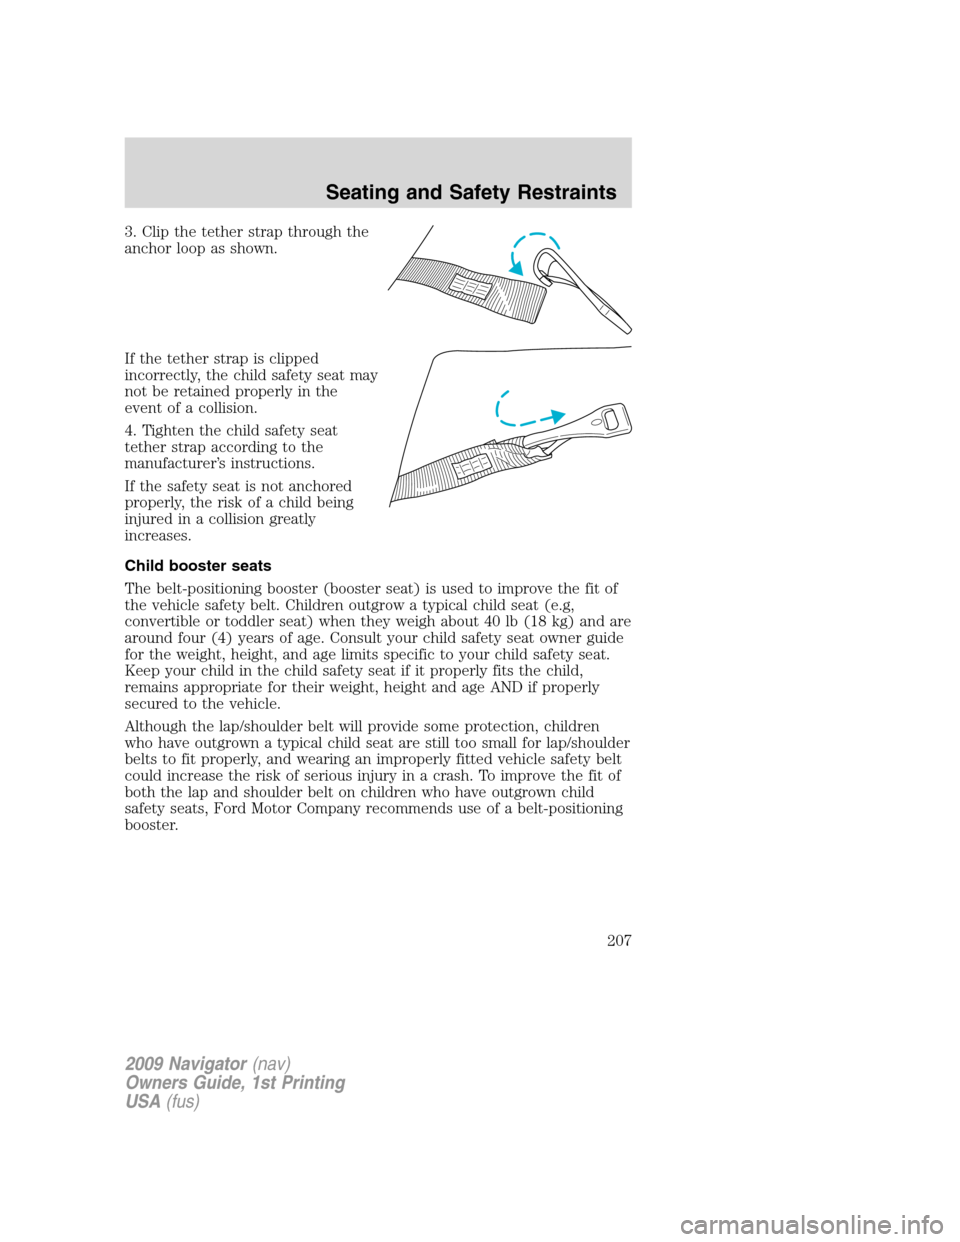
3. Clip the tether strap through the
anchor loop as shown.
If the tether strap is clipped
incorrectly, the child safety seat may
not be retained properly in the
event of a collision.
4. Tighten the child safety seat
tether strap according to the
manufacturer’s instructions.
If the safety seat is not anchored
properly, the risk of a child being
injured in a collision greatly
increases.
Child booster seats
The belt-positioning booster (booster seat) is used to improve the fit of
the vehicle safety belt. Children outgrow a typical child seat (e.g,
convertible or toddler seat) when they weigh about 40 lb (18 kg) and are
around four (4) years of age. Consult your child safety seat owner guide
for the weight, height, and age limits specific to your child safety seat.
Keep your child in the child safety seat if it properly fits the child,
remains appropriate for their weight, height and age AND if properly
secured to the vehicle.
Although the lap/shoulder belt will provide some protection, children
who have outgrown a typical child seat are still too small for lap/shoulder
belts to fit properly, and wearing an improperly fitted vehicle safety belt
could increase the risk of serious injury in a crash. To improve the fit of
both the lap and shoulder belt on children who have outgrown child
safety seats, Ford Motor Company recommends use of a belt-positioning
booster.
2009 Navigator(nav)
Owners Guide, 1st Printing
USA(fus)
Seating and Safety Restraints
207
Page 208 of 375
Booster seats position a child so that vehicle lap/shoulder safety belts fit
better. They lift the child up so that the lap belt rests low across the hips
and the knees bend comfortably at the edge of the cushion, while
minimizing slouching. Booster seats may also make the shoulder belt fit
better and more comfortably. Try to keep the belt near the middle of the
shoulder and across the center of the chest. Moving the child closer (a
few centimeters or inches) to the center of the vehicle, but remaining in
the same seating position, may help provide a good shoulder belt fit.
When children should use booster seats
Children need to use booster seats from the time they outgrow the
toddler seat until they are big enough for the vehicle seat and
lap/shoulder belt to fit properly. Generally this is when they reach a
height of at least 4 feet 9 inches (1.45 meters) tall (around age eight to
age twelve and between 40 lb (18 kg) and 80 lb (36 kg) or upward to
100 lb (45 kg) if recommended by your child restraint manufacturer).
Many state and provincial laws require that children use approved
booster seats until they reach age eight, a height of 4 feet 9 inches
(1.45 meters) tall, or 80 lb (36 kg).
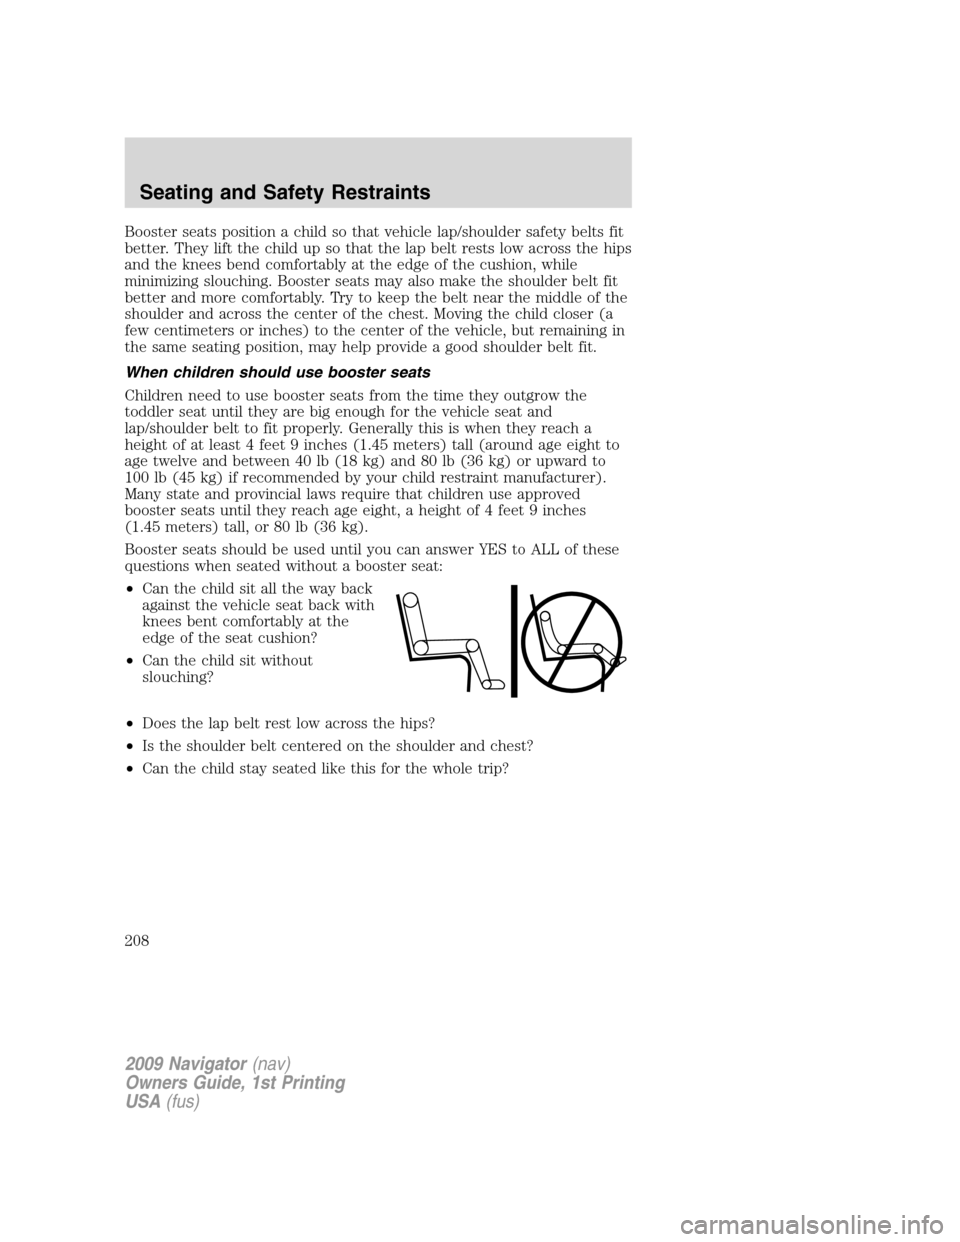
Booster seats should be used until you can answer YES to ALL of these
questions when seated without a booster seat:
•Can the child sit all the way back
against the vehicle seat back with
knees bent comfortably at the
edge of the seat cushion?
•Can the child sit without
slouching?
•Does the lap belt rest low across the hips?
•Is the shoulder belt centered on the shoulder and chest?
•Can the child stay seated like this for the whole trip?
2009 Navigator(nav)
Owners Guide, 1st Printing
USA(fus)
Seating and Safety Restraints
208
Page 211 of 375
Move a child to a different seating location if the shoulder belt does not
stay positioned on the shoulder during use.
Follow all instructions provided by the manufacturer of the booster seat.
WARNING:Never place, or allow a child to place, the shoulder
belt under a child’s arm or behind the back because it reduces
the protection for the upper part of the body and may increase the risk
of injury or death in a collision.
Child restraint and safety belt maintenance
Inspect the vehicle safety belts and child safety seat systems periodically
to make sure they work properly and are not damaged. Inspect the
vehicle and child seat safety belts to make sure there are no nicks, tears
or cuts. Replace if necessary. All vehicle safety belt assemblies, including
retractors, buckles, front safety belt buckle assemblies, buckle support
assemblies (slide bar-if equipped), shoulder belt height adjusters (if
equipped), shoulder belt guide on seatback (if equipped), child safety
seat LATCH and tether anchors, and attaching hardware, should be
inspected after a collision. Refer to the child restraint manufacturer’s
instructions for additional inspection and maintenance information
specific to the child restraint. Ford Motor Company recommends that all
safety belt assemblies in use in vehicles involved in a collision be
replaced. However, if the collision was minor and an authorized dealer
finds that the belts do not show damage and continue to operate
properly, they do not need to be replaced. Safety belt assemblies not in
use during a collision should also be inspected and replaced if either
damage or improper operation is noted.
For proper care of soiled safety belts, refer toInteriorin theCleaning
chapter.
WARNING:Failure to inspect and if necessary replace the
safety belt assembly or child restraint system under the above
conditions could result in severe personal injuries in the event of a
collision.
2009 Navigator(nav)
Owners Guide, 1st Printing
USA(fus)
Seating and Safety Restraints
211
Page 219 of 375
TIRE CARE
Inspecting your tires
Periodically inspect the tire treads for uneven or excessive wear and
remove objects such as stones, nails or glass that may be wedged in the
tread grooves. Check for holes or cuts that may permit air leakage from
the tire and make necessary repairs. Also inspect the tire sidewalls for
cracking, cuts, bruises and other signs of damage or excessive wear. If
internal damage to the tire is suspected, have the tire demounted and
inspected in case it needs to be repaired or replaced. For your safety,
tires that are damaged or show signs of excessive wear should not be
used because they are more likely to blow out or fail.
Improper or inadequate vehicle maintenance can cause tires to wear
abnormally. Inspect all your tires, including the spare, frequently, and
replace them if one or more of the following conditions exist:
Tire wear
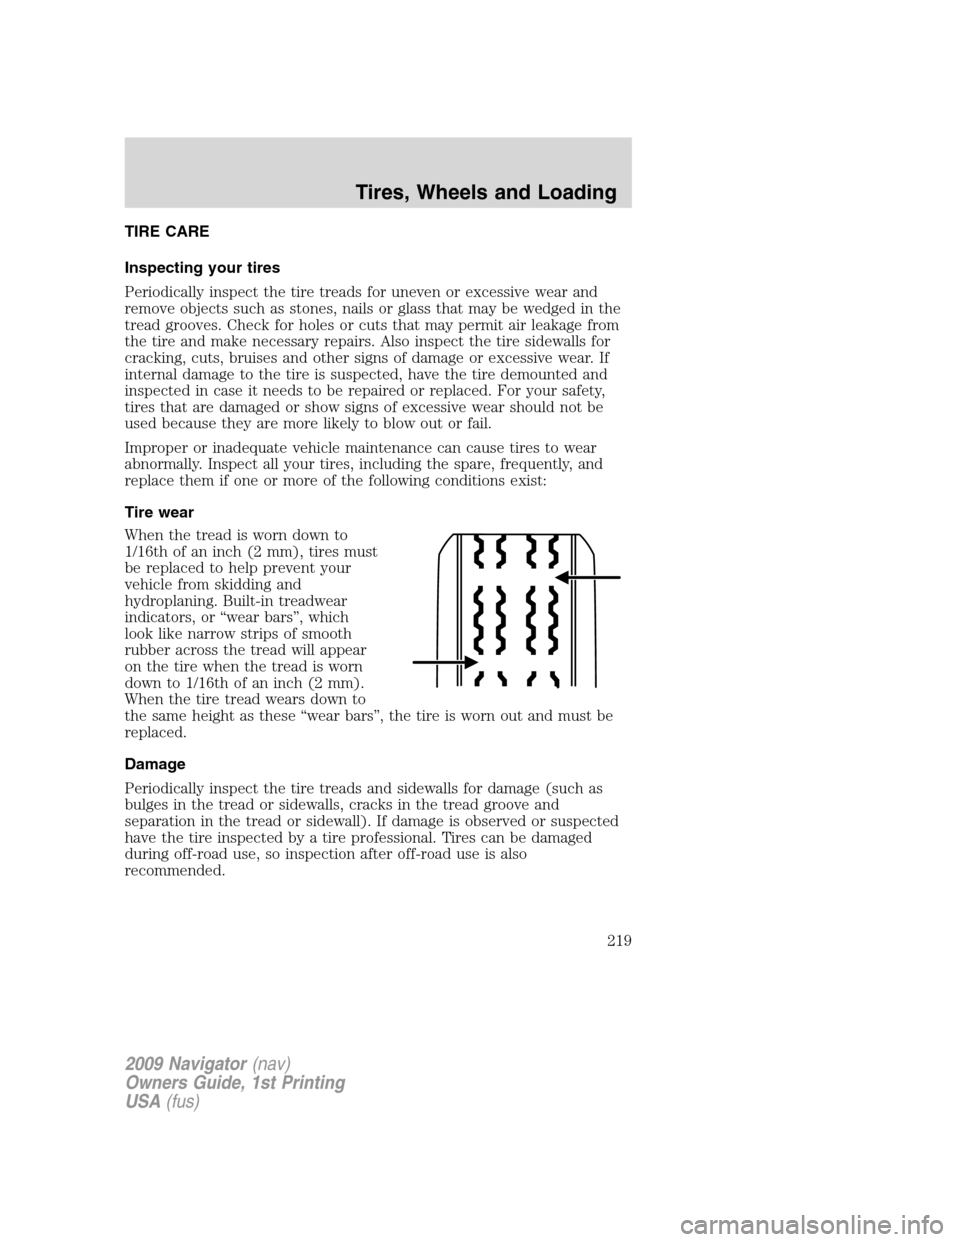
When the tread is worn down to
1/16th of an inch (2 mm), tires must
be replaced to help prevent your
vehicle from skidding and
hydroplaning. Built-in treadwear
indicators, or “wear bars”, which
look like narrow strips of smooth
rubber across the tread will appear
on the tire when the tread is worn
down to 1/16th of an inch (2 mm).
When the tire tread wears down to
the same height as these “wear bars”, the tire is worn out and must be
replaced.
Damage
Periodically inspect the tire treads and sidewalls for damage (such as
bulges in the tread or sidewalls, cracks in the tread groove and
separation in the tread or sidewall). If damage is observed or suspected
have the tire inspected by a tire professional. Tires can be damaged
during off-road use, so inspection after off-road use is also
recommended.
2009 Navigator(nav)
Owners Guide, 1st Printing
USA(fus)
Tires, Wheels and Loading
219
Page 224 of 375

Note:Your vehicle may be equipped with a dissimilar spare tire/wheel. A
dissimilar spare tire/wheel is defined as a spare tire and/or wheel that is
different in brand, size or appearance from the road tires and wheels. If
you have a dissimilar spare tire/wheel it is intended for temporary use
only and should not be used in a tire rotation.
Note:After having your tires rotated, inflation pressure must be checked
and adjusted to the vehicle requirements.
INFORMATION CONTAINED ON THE TIRE SIDEWALL
Both U.S. and Canada Federal regulations require tire manufacturers to
place standardized information on the sidewall of all tires. This
information identifies and describes the fundamental characteristics of
the tire and also provides a U.S. DOT Tire Identification Number for
safety standard certification and in case of a recall.
Information on “P” type tires
P215/65R15 95H is an example of a
tire size, load index and speed
rating. The definitions of these
items are listed below. (Note that
the tire size, load index and speed
rating for your vehicle may be
different from this example.)
1.P:Indicates a tire, designated by
the Tire and Rim Association
(T&RA), that may be used for
service on cars, SUVs, minivans and
light trucks.
Note:If your tire size does not
begin with a letter this may mean it
is designated by either ETRTO
(European Tire and Rim Technical Organization) or JATMA (Japan Tire
Manufacturing Association).
2.215:Indicates the nominal width of the tire in millimeters from
sidewall edge to sidewall edge. In general, the larger the number, the
wider the tire.
3.65:Indicates the aspect ratio which gives the tire’s ratio of height to
width.
4.R:Indicates a “radial” type tire.
2009 Navigator(nav)
Owners Guide, 1st Printing
USA(fus)
Tires, Wheels and Loading
224
Page 228 of 375

Information on “T” type tires
“T” type tires have some additional
information beyond those of “P”
type tires; these differences are
described below:
T145/80D16 is an example of a tire
size.
Note:The temporary tire size for
your vehicle may be different from
this example. Tire Quality Grades do
not apply to this type of tire.
1.T:Indicates a type of tire,
designated by the Tire and Rim
Association (T&RA), that is
intended for temporary service on
cars, SUVs, minivans and light
trucks.
2.145:Indicates the nominal width
of the tire in millimeters from sidewall edge to sidewall edge. In general,
the larger the number, the wider the tire.
3.80:Indicates the aspect ratio which gives the tire’s ratio of height to
width. Numbers of 70 or lower indicate a short sidewall.
4.D:Indicates a “diagonal” type tire.
R:Indicates a “radial” type tire.
5.16:Indicates the wheel or rim diameter in inches. If you change your
wheel size, you will have to purchase new tires to match the new wheel
diameter.
Location of the tire label
You will find a Tire Label containing tire inflation pressure by tire size
and other important information located on the B-Pillar or the edge of
the driver’s door. Refer to the payload description and graphic in the
Vehicle loading — with and without a trailersection.
2009 Navigator(nav)
Owners Guide, 1st Printing
USA(fus)
Tires, Wheels and Loading
228
Page 246 of 375
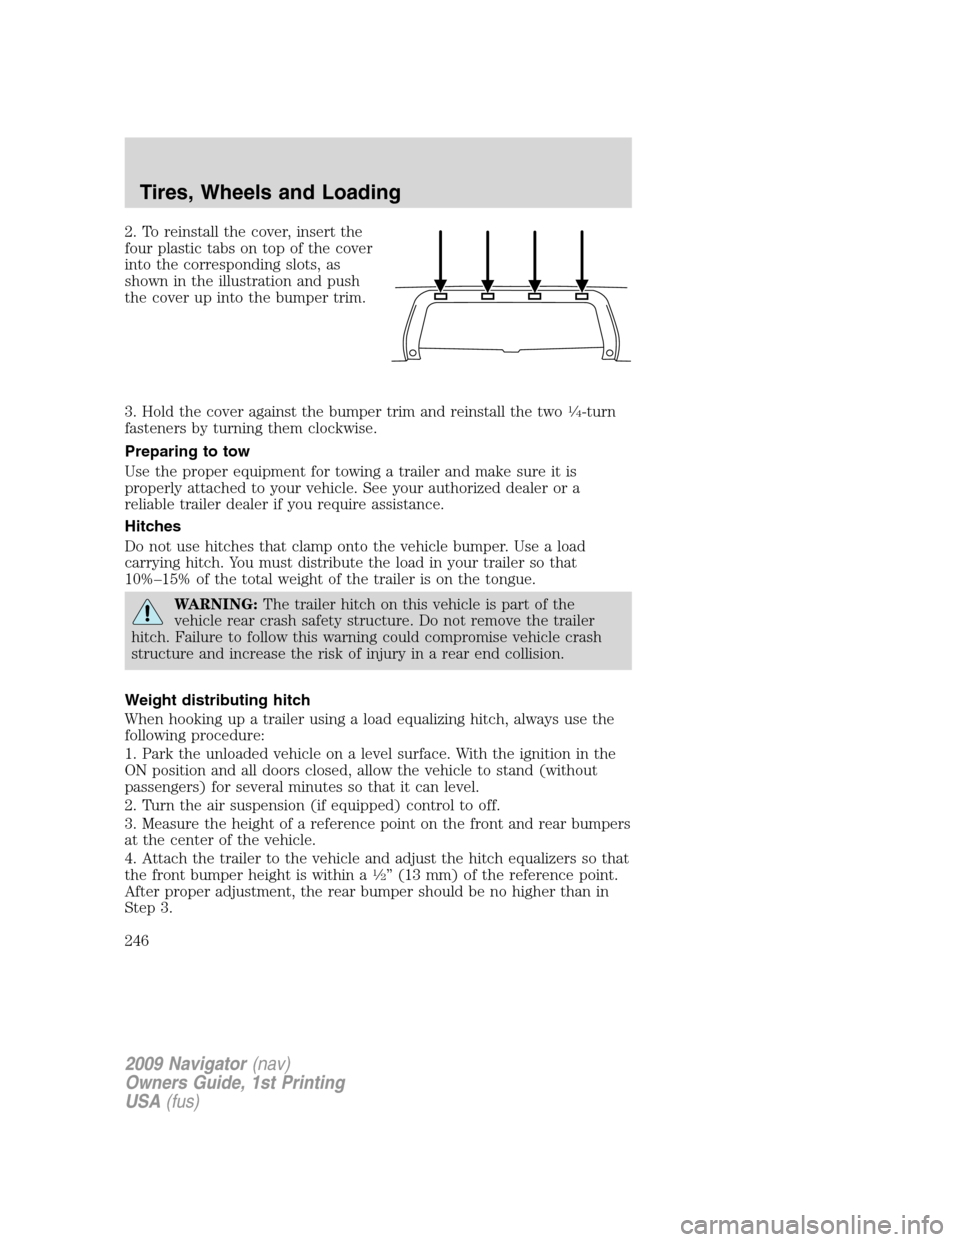
2. To reinstall the cover, insert the
four plastic tabs on top of the cover
into the corresponding slots, as
shown in the illustration and push
the cover up into the bumper trim.
3. Hold the cover against the bumper trim and reinstall the two
1�4-turn
fasteners by turning them clockwise.
Preparing to tow
Use the proper equipment for towing a trailer and make sure it is
properly attached to your vehicle. See your authorized dealer or a
reliable trailer dealer if you require assistance.
Hitches
Do not use hitches that clamp onto the vehicle bumper. Use a load
carrying hitch. You must distribute the load in your trailer so that
10%–15% of the total weight of the trailer is on the tongue.
WARNING:The trailer hitch on this vehicle is part of the
vehicle rear crash safety structure. Do not remove the trailer
hitch. Failure to follow this warning could compromise vehicle crash
structure and increase the risk of injury in a rear end collision.
Weight distributing hitch
When hooking up a trailer using a load equalizing hitch, always use the
following procedure:
1. Park the unloaded vehicle on a level surface. With the ignition in the
ON position and all doors closed, allow the vehicle to stand (without
passengers) for several minutes so that it can level.
2. Turn the air suspension (if equipped) control to off.
3. Measure the height of a reference point on the front and rear bumpers
at the center of the vehicle.
4. Attach the trailer to the vehicle and adjust the hitch equalizers so that
the front bumper height is within a
1�2” (13 mm) of the reference point.
After proper adjustment, the rear bumper should be no higher than in
Step 3.
2009 Navigator(nav)
Owners Guide, 1st Printing
USA(fus)
Tires, Wheels and Loading
246
Page 265 of 375

•Steering maneuvers
•Braking
•Acceleration
This system keeps the rear of your vehicle at a constant level by
automatically adding air or releasing air from the springs. If you exceed
the load limit, the rear air suspension may not operate. The air
suspension system will stay active for 40 minutes after the ignition is
turned off to accommodate any load changes. (The air compressor may
run when the vehicle is off; this is normal.)
The air suspension system can be enabled or disabled through the
message center. Refer toMessage centerin theDriver Controlschapter.
If the system is off, the rear air suspension will not operate and will not
raise (pump) or lower (vent) while the vehicle is not moving. However, if
the system determines that the vehicle is low or high and needs to make
a height adjustment while driving at speeds above 15 mph (24 km/h), the
system will pump or vent as required. Normal vehicle operation does not
require any action by the driver.
WARNING:On vehicles equipped with air suspension, turn the
air suspension and the ignition switch off prior to jacking,
hoisting or towing your vehicle.
PREPARING TO DRIVE
WARNING:Utility vehicles have a significantly higher rollover
rate than other types of vehicles.
WARNING:In a rollover crash, an unbelted person is
significantly more likely to die than a person wearing a seat belt.
Utility vehicles and trucks have larger tires and increased ground
clearance, giving the vehicle a higher center of gravity than a passenger
car.
WARNING:Vehicles with a higher center of gravity such as
utility vehicles and trucks handle differently than vehicles with a
lower center of gravity. Utility vehicles and trucks arenotdesigned for
cornering at speeds as high as passenger cars any more than low-slung
sports cars are designed to perform satisfactorily under off-road
conditions. Avoid sharp turns, excessive speed or abrupt maneuvers in
these vehicles. Failure to drive cautiously could result in an increased
risk of loss of vehicle control, vehicle rollover, personal injury and
death.
2009 Navigator(nav)
Owners Guide, 1st Printing
USA(fus)
Driving
265