Page 32 of 316
Finish
BASIC FUNCTIONS
31
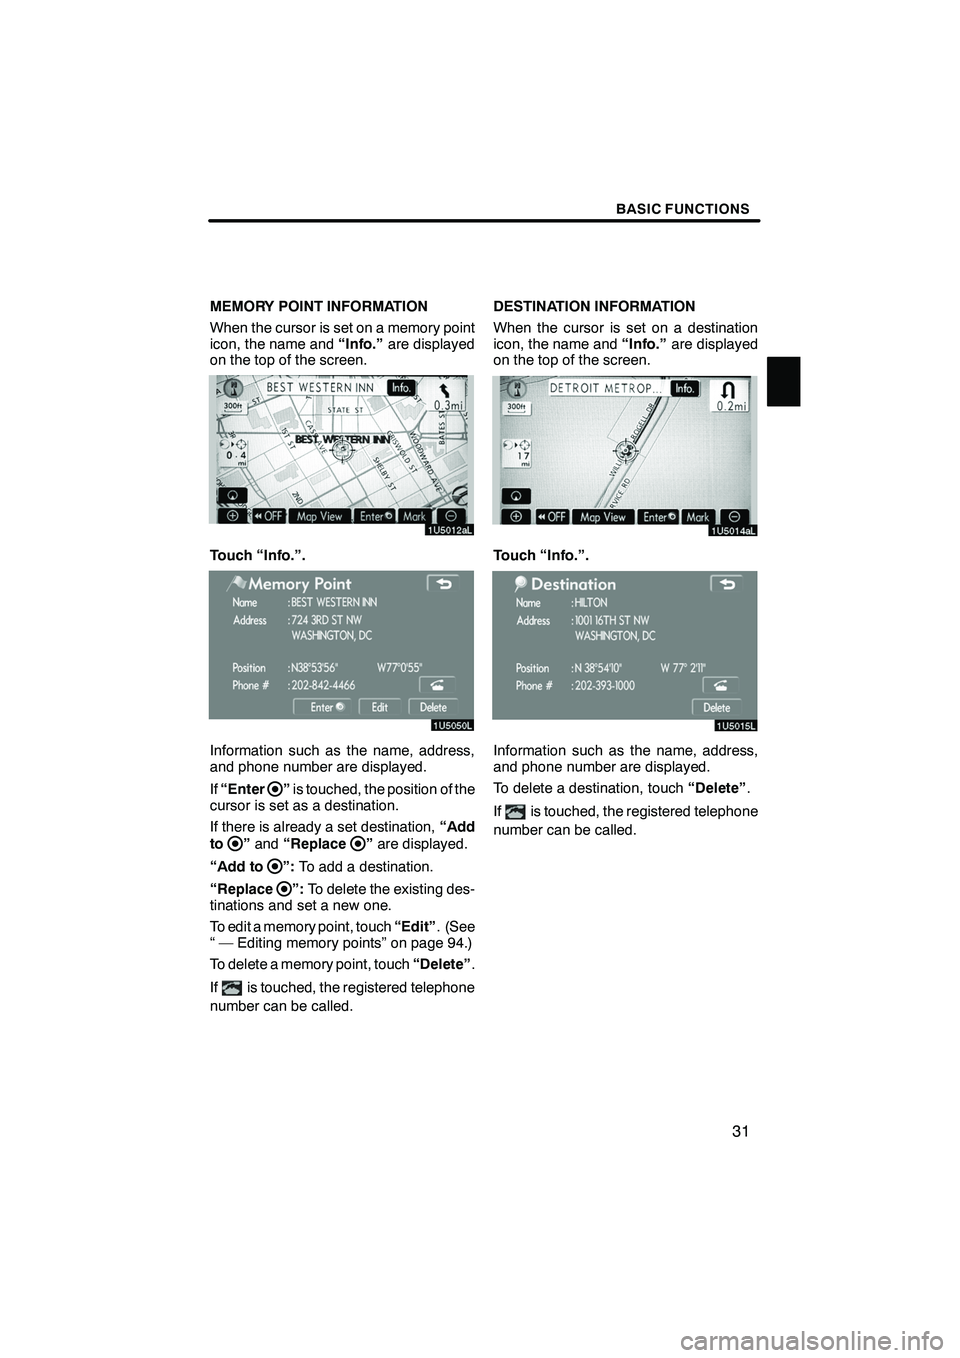
MEMORY POINT INFORMATION
When the cursor is set on a memory point
icon, the name and“Info.”are displayed
on the top of the screen.
Touch “Info.”.
Information such as the name, address,
and phone number are displayed.
If “Enter
”is touched, the position of the
cursor is set as a destination.
If there is already a set destination, “Add
to
” and “Replace”are displayed.
“Add to
”: To add a destination.
“Replace
”: To delete the existing des-
tinations and set a new one.
To edit a memory point, touch “Edit”. (See
“ — Editing memory points” on page 94.)
To delete a memory point, touch “Delete”.
If
is touched, the registered telephone
number can be called. DESTINATION INFORMATION
When the cursor is set on a destination
icon, the name and
“Info.”are displayed
on the top of the screen.
Touch “Info.”.
Information such as the name, address,
and phone number are displayed.
To delete a destination, touch “Delete”.
If
is touched, the registered telephone
number can be called.
IS F/350/250_Navi_U
(L/O 0808)
Page 38 of 316
Finish
SECTION
2
DESTINATION SEARCH
37
DESTINATION SEARCH
D Quick reference (“Destination” screen) 38 .....................
D Destination search 39
....................................
Selecting the region to search 40
..........................
Destination search by Home 42
...........................
Destination search by Quick access 42
.....................
Destination search by “Address” 43 ........................
Destination search by “POI
�”4 7
...........................
Destination search by “Phone #” 54
........................
Destination search by “Emergency” 54
.....................
Destination search by “Memory” 55
........................
Destination search by “Previous” 55
........................
Destination search by “Map” 56
...........................
Destination search by “Intersection” 57
.....................
Destination search by “Freeway Ent./Exit” 58
................
Destination search by “Coordinates” 59
.....................
Deleting set destinations 59
...............................
D Starting route guidance 60
..................................
�: Point of Interest
IS F/350/250_Navi_U
(L/O 0808)
Page 39 of 316
Finish
DESTINATION SEARCH
38
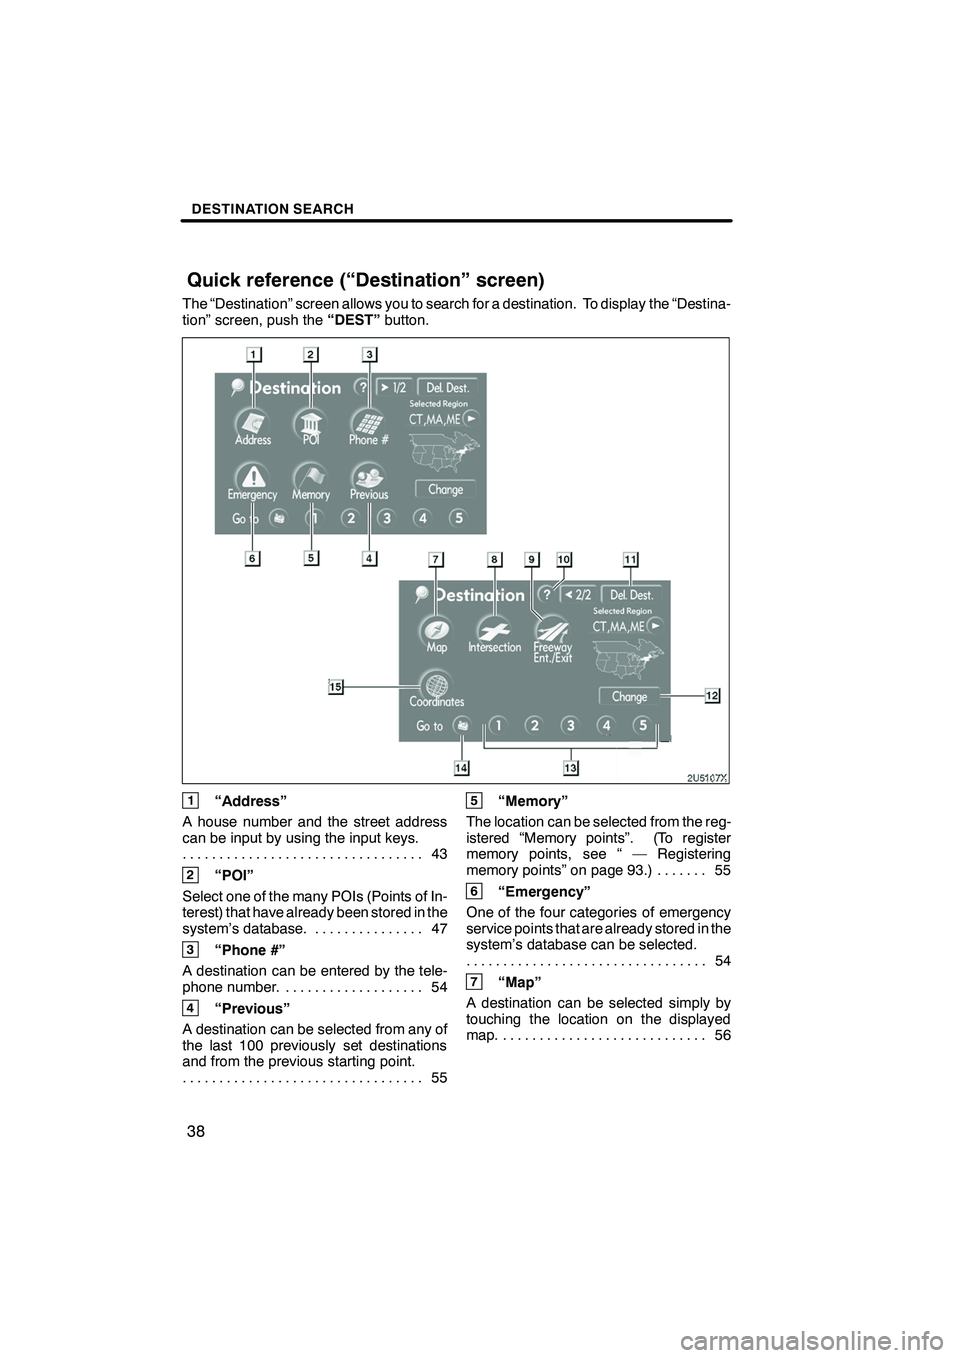
The “Destination” screen allows you to search for a destination. To display the “Destina-
tion” screen, push the“DEST”button.
1“Address”
A house number and the street address
can be input by using the input keys. 43
.................................
2“POI”
Select one of the many POIs (Points of In-
terest) that have already been stored in the
system’s database. 47 ...............
3“Phone #”
A destination can be entered by the tele-
phone number. 54 ...................
4“Previous”
A destination can be selected from any of
the last 100 previously set destinations
and from the previous starting point. 55
.................................
5“Memory”
The location can be selected from the reg-
istered “Memory points”. (To register
memory points, see “ — Registering
memory points” on page 93.) 55 .......
6“Emergency”
One of the four categories of emergency
service points that are already stored in the
system’s database can be selected. 54
.................................
7“Map”
A destination can be selected simply by
touching the location on the displayed
map. 56 ............................
IS F/350/250_Navi_U
(L/O 0808)
Quick reference (“Destination” screen)
Page 55 of 316
Finish
DESTINATION SEARCH
54
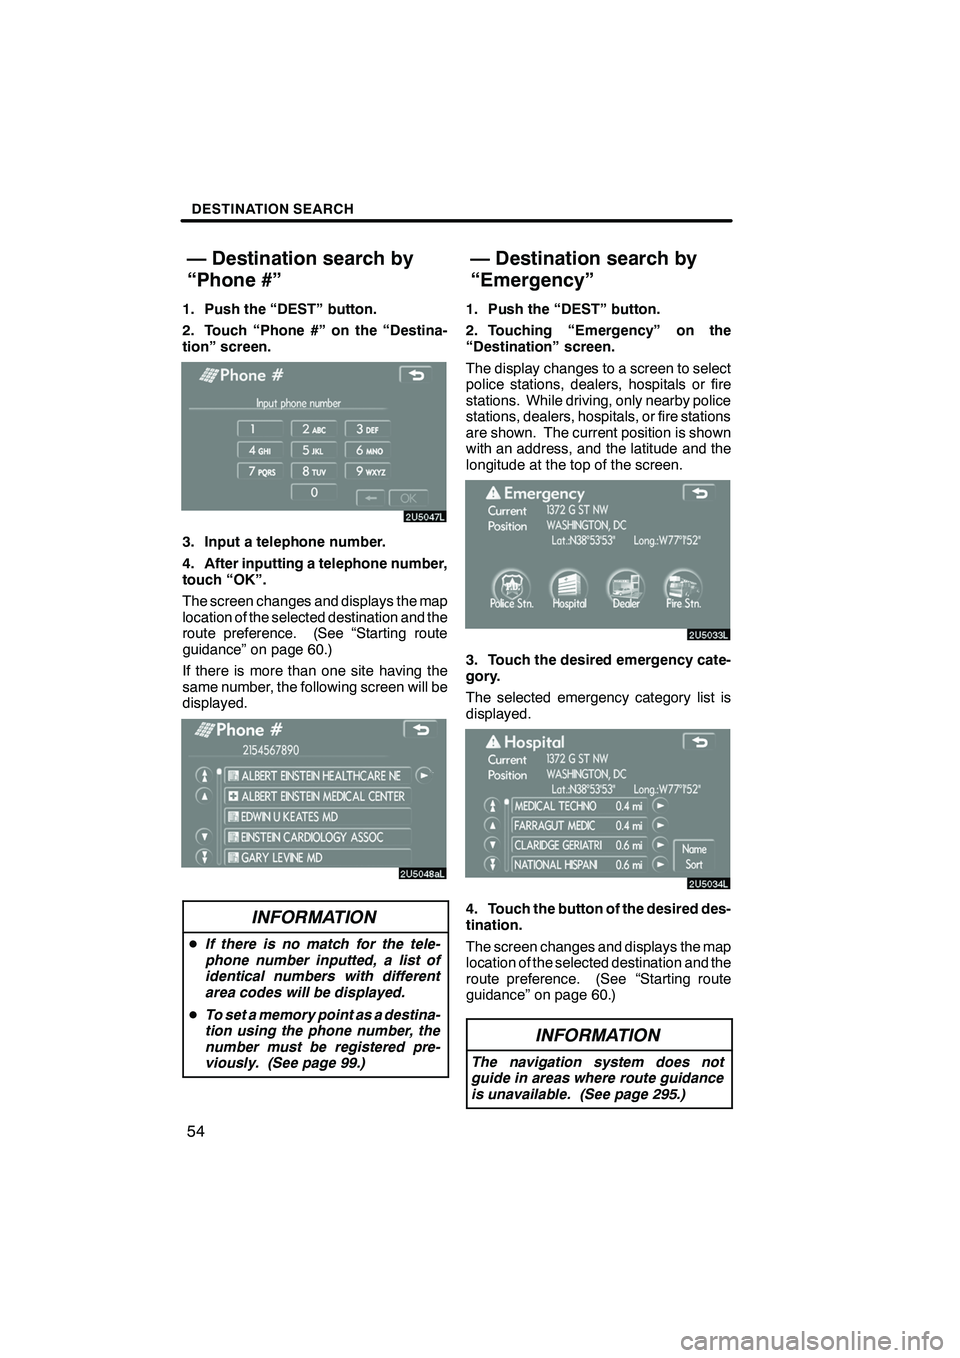
1. Push the “DEST” button.
2. Touch “Phone #” on the “Destina-
tion” screen.
3. Input a telephone number.
4. After inputting a telephone number,
touch “OK”.
The screen changes and displays the map
location of the selected destination and the
route preference. (See “Starting route
guidance” on page 60.)
If there is more than one site having the
same number, the following screen will be
displayed.
INFORMATION
DIf there is no match for the tele-
phone number inputted, a list of
identical numbers with different
area codes will be displayed.
D To set a memory point as a destina-
tion using the phone number, the
number must be registered pre-
viously. (See page 99.)
1. Push the “DEST” button.
2. Touching “Emergency” on the
“Destination” screen.
The display changes to a screen to select
police stations, dealers, hospitals or fire
stations. While driving, only nearby police
stations, dealers, hospitals, or fire stations
are shown. The current position is shown
with an address, and the latitude and the
longitude at the top of the screen.
3. Touch the desired emergency cate-
gory.
The selected emergency category list is
displayed.
4. Touch the button of the desired des-
tination.
The screen changes and displays the map
location of the selected destination and the
route preference. (See “Starting route
guidance” on page 60.)
INFORMATION
The navigation system does not
guide in areas where route guidance
is unavailable. (See page 295.)
IS F/350/250_Navi_U
(L/O 0808)
— Destination search by
“Phone #” — Destination search by
“Emergency”
Page 61 of 316
Finish
DESTINATION SEARCH
60
5. If more than one destination is set,
touch “OK” after deleting the destina-
tions.
The system searches for the guidance
route again, and displays the entire route.
INFORMATION
Set destinations can also be deleted
by touching “Route”. (See “ — Delet-
ing destinations” on page 73.)
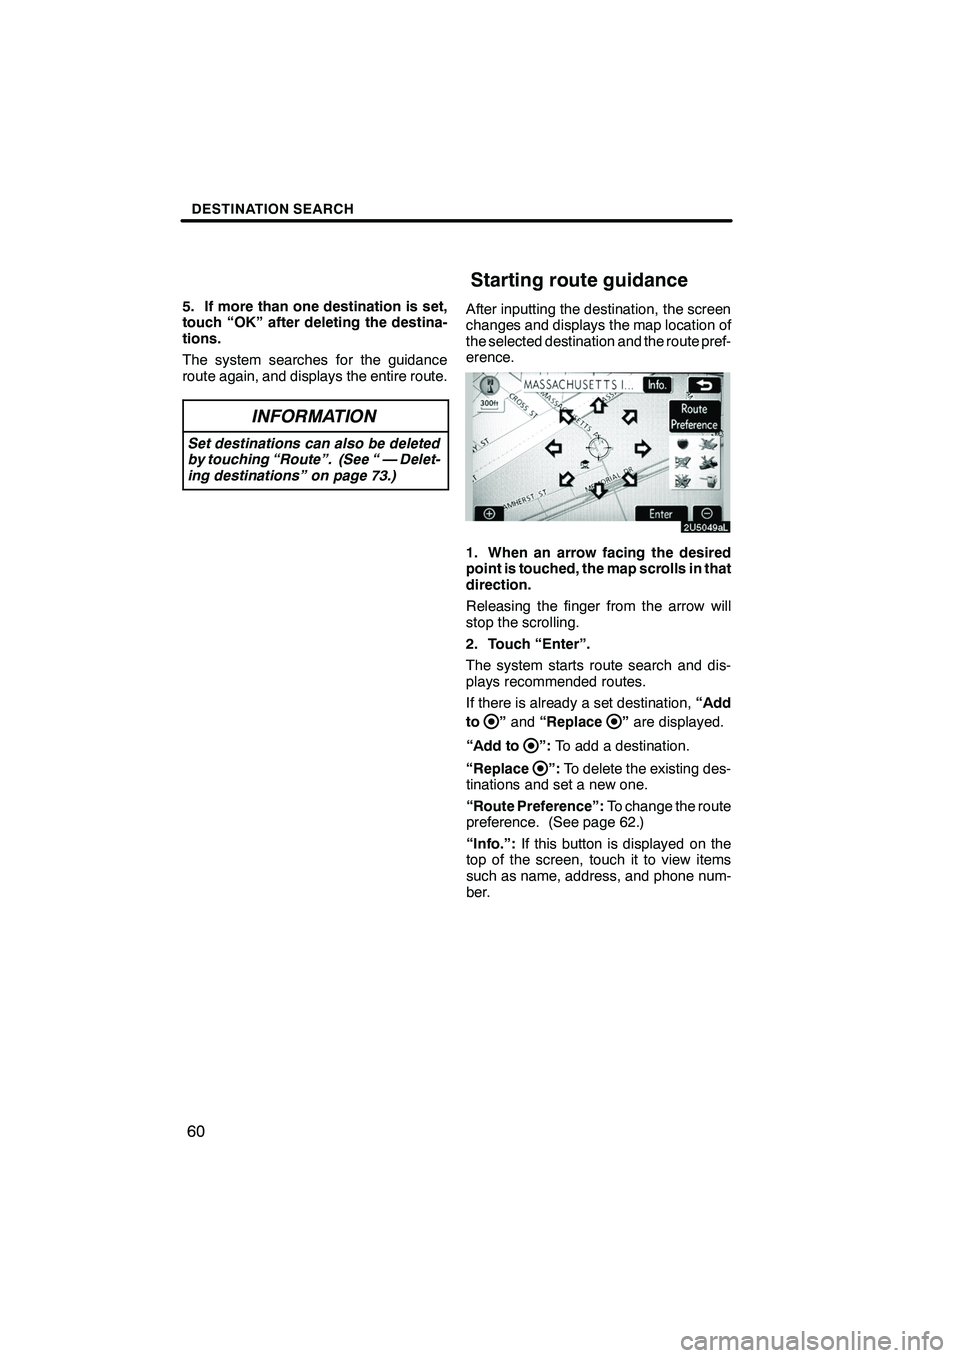
After inputting the destination, the screen
changes and displays the map location of
the selected destination and the route pref-
erence.
1. When an arrow facing the desired
point is touched, the map scrolls in that
direction.
Releasing the finger from the arrow will
stop the scrolling.
2. Touch “Enter”.
The system starts route search and dis-
plays recommended routes.
If there is already a set destination,“Add
to
” and “Replace”are displayed.
“Add to
”: To add a destination.
“Replace
”: To delete the existing des-
tinations and set a new one.
“Route Preference”: To change the route
preference. (See page 62.)
“Info.”: If this button is displayed on the
top of the screen, touch it to view items
such as name, address, and phone num-
ber.
IS F/350/250_Navi_U
(L/O 0808)
Starting route guidance
Page 95 of 316
Finish
ADVANCED FUNCTIONS
94
5. Touch “OK”.
To edit registered information, see “ —
Editing memory Points” on page 94.
INFORMATION
Up to 106 memory points can be reg-
istered.
The icon, attribute, name, location and/or
telephone number of a registered memory
point can be edited.
1. Push the “MENU” button.
2. Touch “My Places” on the “Menu”
screen.
3. Touch “Edit”.
4. Touch the desired memory point
button.
IS F/350/250_Navi_U
(L/O 0808)
— Editing memory points
Page 96 of 316
Finish
ADVANCED FUNCTIONS
95
5. Touch the button to be edited.
“Icon”:To select icons to be displayed on
the map. (See page 95.)
“Quick Access”: To set an attribute.
Memory points with a set attribute can be
used as a “Quick access” or “Home” but-
ton. (See page 96.)
“Name”: To edit memory point names.
The names can be displayed on the map. (See page 97.)
“Location”: To edit location information.
(See page 98.)
“Phone #”: To edit telephone numbers.
(See page 99.)
6. Touch “OK”.
DTo change “Icon”
1. Touch “Icon” on the “Memory Point”
screen.
2. Touch the desired icon.
Turn the page by touching “Page 1”,
“Page 2” or“with Sound” .
IS F/350/250_Navi_U
(L/O 0808)
Page 100 of 316
Finish
ADVANCED FUNCTIONS
99
D
To change “Phone #” (telephone
number)
1. Touch “Phone #” on the “Memory
Point” screen.
2. Enter the number using number
keys.
3. Touch “OK”.
The previous screen will be displayed. 1. Push the “MENU” button.
2. Touch “My Places” on the “Menu”
screen.3. Touch “Delete”.
4. Touch the button to be deleted.
“Delete All”:
To delete all memory points
in the system.
5. To delete the memory point, touch
“Yes”. To cancel the deletion, touch
“No”.
IS F/350/250_Navi_U
(L/O 0808)
— Deleting memory points