2009 KIA SOUL tow
[x] Cancel search: towPage 8 of 328
15
Introduction
A020202AUN
Biodiesel
Commercially supplied biodiesel blends of no more than 5% biodiesel, commonly
known as "B5 biodiesel" may be used in
your vehicle if it meets EN 14214 or
equivalent specifications. (EN stands for
"European Norm"). The use of biofuels
made from rapeseed methyl ester
(RME), fatty acid methyl ester (FAME),
vegetable oil methyl ester (VME) etc. ormixing diesel with biodiesel will cause
increased wear or damage to the engine
and fuel system. Repair or replacement
of worn or damaged components due to
the use of non approved fuels will not be
covered by the manufactures warranty.A030000AUN
No special break-in period is needed. By
following a few simple precautions for the
first 1,000 km (600 miles) you may add to
the performance, economy and life of
your vehicle.
Do not race the engine.
While driving, keep your engine speed
(rpm, or revolutions per minute)
between 2,000 rpm and 4,000 rpm.
Do not maintain a single speed for long periods of time, either fast or slow.
Varying engine speed is needed to
properly break-in the engine.
Avoid hard stops, except in emergen- cies, to allow the brakes to seat prop-
erly.
Don't let the engine idle longer than 3 minutes at one time.
Don't tow a trailer during the first 2,000 km (1,200 miles) of operation.
VEHICLE BREAK-IN PROCESS
CAUTION
Never use any fuel, whether
diesel or B5 biodiesel that fails tomeet the latest petroleum indus-
try specification.
Never use any fuel additives or treatments that are not recom-mended or approved by the vehi- cle manufacturer.
CAUTION
Do not let any gasoline or water
enter the tank. This would make itnecessary to drain it out and tobleed the lines to avoid jamming
the injection pump and damagingthe engine.
In winter, in order to cut down incidents due to freezing, paraffinoil may be added to the fuel if the
temperature drops to below - 10°C(50°F). Never use more than20% paraffin oil.
Page 23 of 328
Safety features of your vehicle
10
3
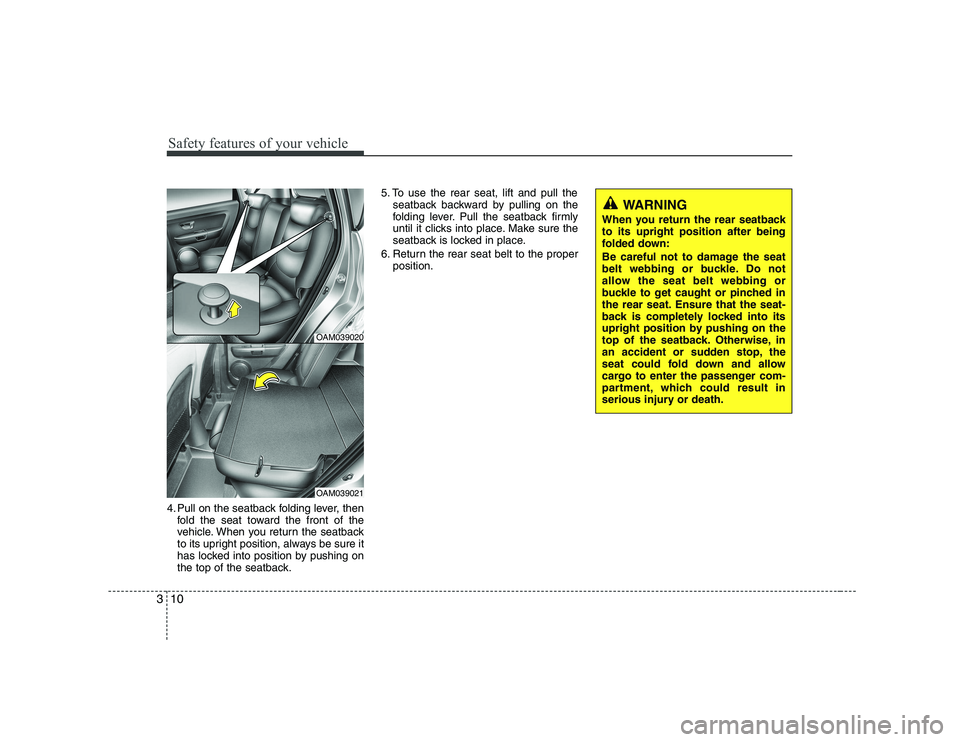
4. Pull on the seatback folding lever, then
fold the seat toward the front of the
vehicle. When you return the seatback
to its upright position, always be sure it
has locked into position by pushing on
the top of the seatback. 5. To use the rear seat, lift and pull the
seatback backward by pulling on the
folding lever. Pull the seatback firmly
until it clicks into place. Make sure the
seatback is locked in place.
6. Return the rear seat belt to the proper position.
OAM039020
OAM039021
WARNING
When you return the rear seatback to its upright position after being
folded down:
Be careful not to damage the seat
belt webbing or buckle. Do not
allow the seat belt webbing or
buckle to get caught or pinched in
the rear seat. Ensure that the seat-
back is completely locked into its
upright position by pushing on the
top of the seatback. Otherwise, in
an accident or sudden stop, the
seat could fold down and allow
cargo to enter the passenger com-
partment, which could result in
serious injury or death.
Page 31 of 328
Safety features of your vehicle
18
3
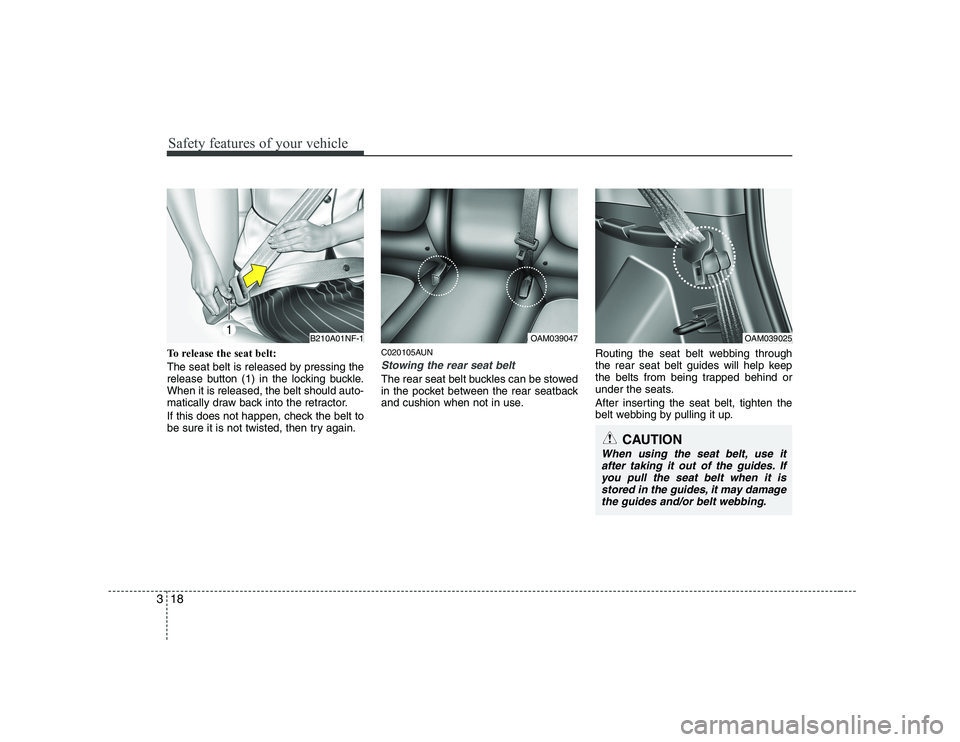
To release the seat belt:
The seat belt is released by pressing the
release button (1) in the locking buckle.When it is released, the belt should auto-
matically draw back into the retractor.
If this does not happen, check the belt to
be sure it is not twisted, then try again. C020105AUN
Stowing the rear seat belt
The rear seat belt buckles can be stowed
in the pocket between the rear seatback
and cushion when not in use.
Routing the seat belt webbing through
the rear seat belt guides will help keep
the belts from being trapped behind or
under the seats.
After inserting the seat belt, tighten the
belt webbing by pulling it up.
B210A01NF-1OAM039047OAM039025
CAUTION
When using the seat belt, use it
after taking it out of the guides. If
you pull the seat belt when it isstored in the guides, it may damage the guides and/or belt webbing.
Page 33 of 328
Safety features of your vehicle
20
3
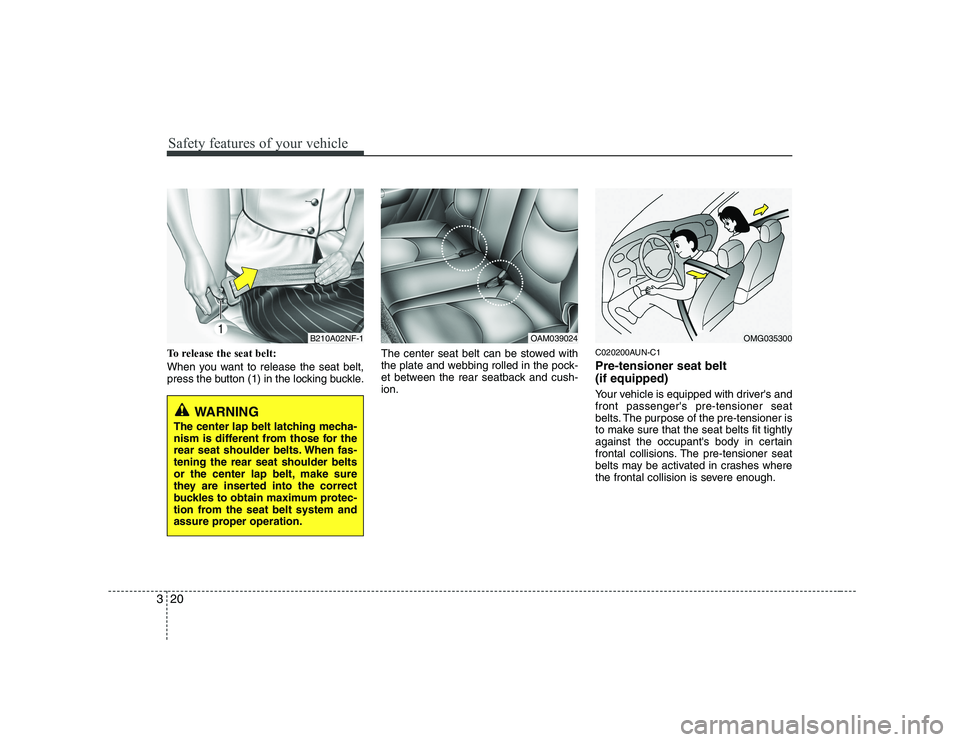
To release the seat belt:
When you want to release the seat belt,
press the button (1) in the locking buckle. The center seat belt can be stowed with
the plate and webbing rolled in the pock-
et between the rear seatback and cush-ion.C020200AUN-C1 Pre-tensioner seat belt (if equipped)
Your vehicle is equipped with driver's and front passenger's pre-tensioner seat
belts. The purpose of the pre-tensioner is
to make sure that the seat belts fit tightly
against the occupant's body in certain
frontal collisions. The pre-tensioner seat
belts may be activated in crashes where
the frontal collision is severe enough.
OMG035300OAM039024B210A02NF-1
WARNING
The center lap belt latching mecha-
nism is different from those for the
rear seat shoulder belts. When fas-tening the rear seat shoulder belts
or the center lap belt, make sure
they are inserted into the correct
buckles to obtain maximum protec-
tion from the seat belt system and
assure proper operation.
Page 42 of 328
329
Safety features of your vehicle
C030102AUN
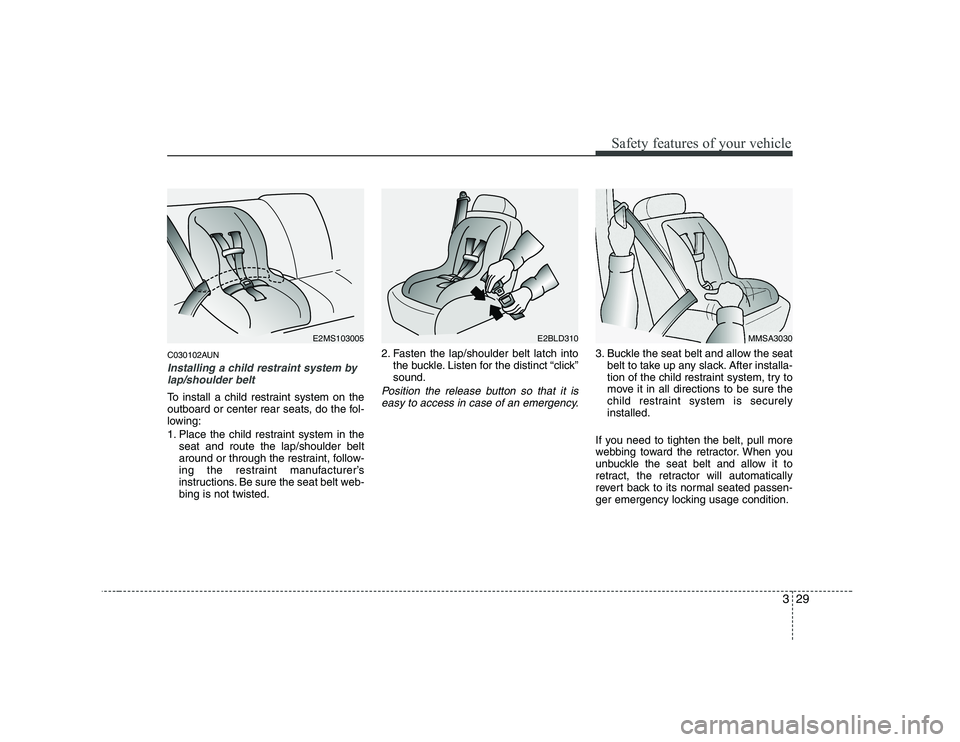
Installing a child restraint system bylap/shoulder belt
To install a child restraint system on the
outboard or center rear seats, do the fol-
lowing:
1. Place the child restraint system in the seat and route the lap/shoulder belt
around or through the restraint, follow-
ing the restraint manufacturer’s
instructions. Be sure the seat belt web-bing is not twisted. 2. Fasten the lap/shoulder belt latch into
the buckle. Listen for the distinct “click”sound.Position the release button so that it is
easy to access in case of an emergency.
3. Buckle the seat belt and allow the seat belt to take up any slack. After installa-
tion of the child restraint system, try to
move it in all directions to be sure the
child restraint system is securelyinstalled.
If you need to tighten the belt, pull more
webbing toward the retractor. When you
unbuckle the seat belt and allow it to
retract, the retractor will automatically
revert back to its normal seated passen-
ger emergency locking usage condition.
E2MS103005MMSA3030E2BLD310
Page 70 of 328
357
Safety features of your vehicle
C041100AUN-C1 SRS Care
The SRS is virtually maintenance-free
and so there are no parts you can safely
service by yourself. If the SRS air bag
warning light does not illuminate, or con-
tinuously remains on, have your vehicle
immediately inspected by an authorized
KIA dealer.
Any work on the SRS system, such as
removing, installing, repairing, or any
work on the steering wheel must be per-
formed by an authorized KIA dealer.Improper handling of the SRS system
may result in serious personal injury.
WARNING
Modification to SRS components or wiring, including the addition
of any kind of badges to the pad
covers or modifications to the
body structure, can adversely
affect SRS performance and lead
to possible injury.
For cleaning the air bag pad cov- ers, use only a soft, dry cloth or
one which has been moistened
with plain water. Solvents or
cleaners could adversely affect
the air bag covers and proper
deployment of the system.
No objects should be placed over
or near the air bag modules on the
steering wheel, instrument panel,
and the front passenger's panel
above the glove box, because any
such object could cause harm if the
vehicle is in a crash severe enough
to cause the air bags to inflate.
(Continued)
(Continued)
If the air bags inflate, they must be replaced by an authorized KIA
dealer.
Do not tamper with or disconnect SRS wiring, or other components
of the SRS system. Doing so
could result in injury, due to acci-
dental inflation of the air bags or
by rendering the SRS inopera-
tive.
If components of the air bag sys- tem must be discarded, or if the
vehicle must be scrapped, certain
safety precautions must be
observed. An authorized KIA
dealer knows these precautions
and can give you the necessary
information. Failure to follow
these precautions and proce-dures could increase the risk of
personal injury.
If your car was flooded and has soaked carpeting or water on
flooring, you shouldn't try to start
the engine; have the car towed to
an authorized KIA dealer.
Page 79 of 328
47
Features of your vehicle
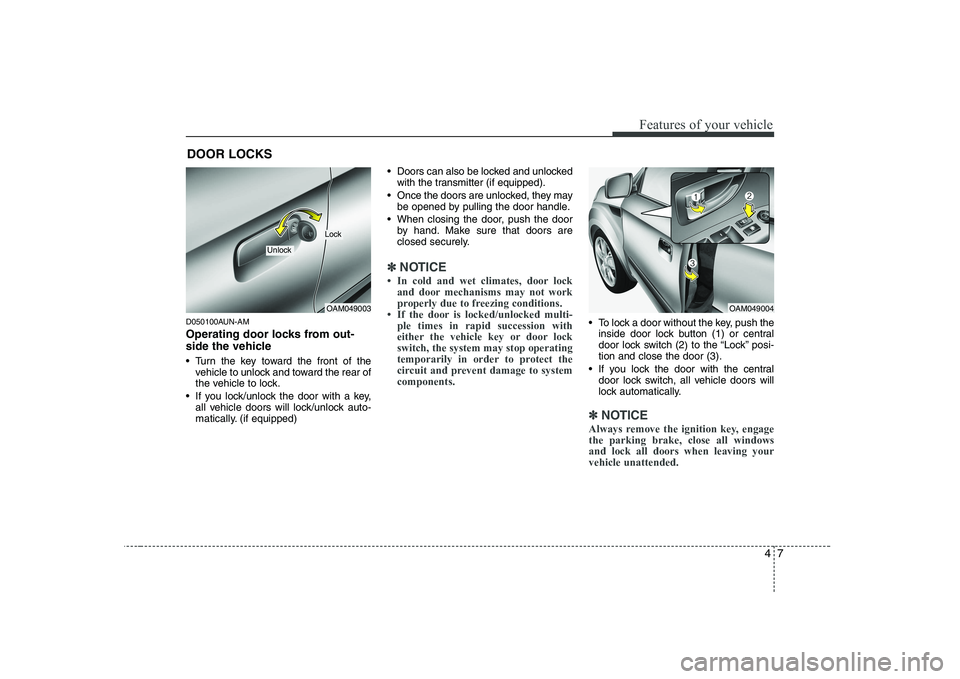
D050100AUN-AM
Operating door locks from out-
side the vehicle
Turn the key toward the front of thevehicle to unlock and toward the rear of
the vehicle to lock.
If you lock/unlock the door with a key, all vehicle doors will lock/unlock auto-
matically. (if equipped) Doors can also be locked and unlocked
with the transmitter (if equipped).
Once the doors are unlocked, they may be opened by pulling the door handle.
When closing the door, push the door by hand. Make sure that doors are
closed securely.
✽✽ NOTICE
Page 99 of 328
427
Features of your vehicle
D140100AHM
Inside rearview mirror
Adjust the rearview mirror so that the
center view through the rear window is
seen. Make this adjustment before you
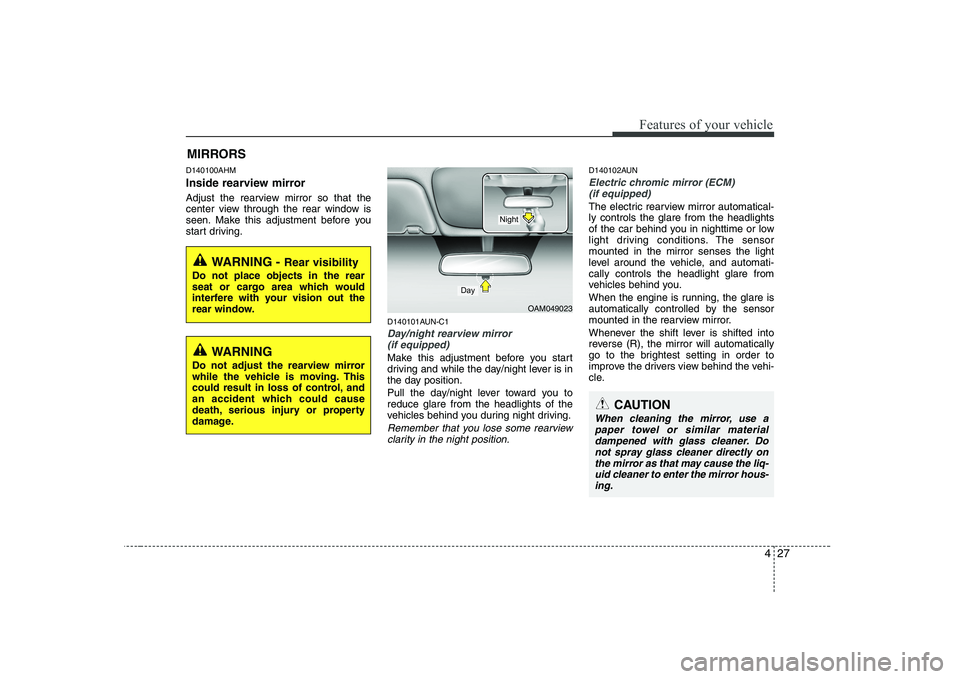
start driving.D140101AUN-C1
Day/night rearview mirror (if equipped)
Make this adjustment before you start
driving and while the day/night lever is in
the day position.
Pull the day/night lever toward you to reduce glare from the headlights of the
vehicles behind you during night driving.
Remember that you lose some rearview clarity in the night position.
D140102AUN
Electric chromic mirror (ECM) (if equipped)
The electric rearview mirror automatical- ly controls the glare from the headlights
of the car behind you in nighttime or low
light driving conditions. The sensormounted in the mirror senses the light
level around the vehicle, and automati-cally controls the headlight glare from
vehicles behind you.
When the engine is running, the glare is
automatically controlled by the sensor
mounted in the rearview mirror.
Whenever the shift lever is shifted into
reverse (R), the mirror will automatically
go to the brightest setting in order to
improve the drivers view behind the vehi-
cle.
MIRRORS
OAM049023
CAUTION
When cleaning the mirror, use a
paper towel or similar materialdampened with glass cleaner. Do
not spray glass cleaner directly onthe mirror as that may cause the liq- uid cleaner to enter the mirror hous-ing.
Day
Night
WARNING - Rear visibility
Do not place objects in the rear
seat or cargo area which would
interfere with your vision out the
rear window.
WARNING
Do not adjust the rearview mirror
while the vehicle is moving. This
could result in loss of control, and
an accident which could cause
death, serious injury or property
damage.