2009 KIA SOUL oil
[x] Cancel search: oilPage 267 of 328
Maintenance
26
7
G060200ASA Changing the engine oil and filter
Have the engine oil and filter changed by
an authorized KIA dealer according tothe Maintenance Schedule at the begin-ning of this section. G070000AUN The high-pressure cooling system has a
reservoir filled with year-round antifreeze
coolant. The reservoir is filled at the fac-
tory.
Check the antifreeze protection and
coolant level at least once a year, at thebeginning of the winter season, and
before traveling to a colder climate. G070100ASA-U1
Checking the coolant level
WARNING
Used engine oil may cause skin irri- tation or cancer if left in contact
with the skin for prolonged periods
of time. Used engine oil contains
chemicals that have caused cancer
in laboratory animals. Always pro-
tect your skin by washing your
hands thoroughly with soap and
warm water as soon as possibleafter handling used oil.
ENGINE COOLANT
WARNING - Removing
radiator cap
Never attempt to remove the radi- ator cap while the engine is oper-
ating or hot. Doing so might leadto cooling system and engine
damage. Also hot coolant orsteam could cause serious per-
sonal injury.
(Continued)
(Continued)
Turn the engine off and wait untilit cools down. Use extreme care
when removing the radiator cap.
Wrap a thick towel around it, and
turn it counterclockwise slowly to
the first stop. Step back while the
pressure is released from the
cooling system. When you aresure all the pressure has been
released, press down on the cap,
using a thick towel, and continue
turning counterclockwise to
remove it.
Even if the engine is not operat- ing, do not remove the radiatorcap or the drain plug while the
engine and radiator are hot. Hot
coolant and steam may still blow
out under pressure, causing seri-
ous injury.
Page 270 of 328
729
Maintenance
BRAKE/CLUTCH FLUID (IF EQUIPPED)
G080100ASA-U1
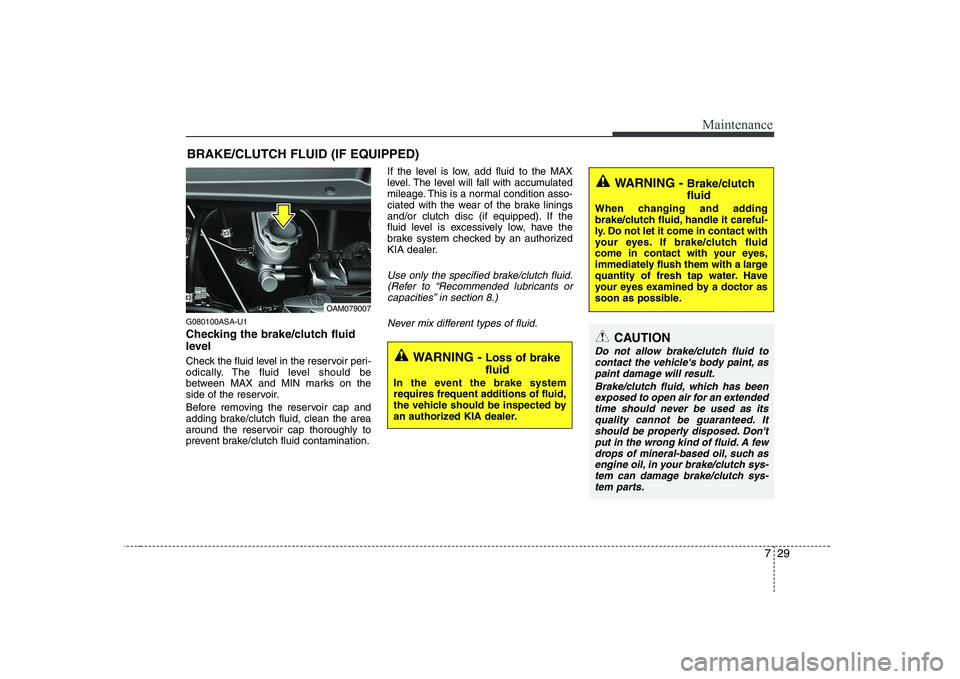
Checking the brake/clutch fluid
level
Check the fluid level in the reservoir peri-
odically. The fluid level should be
between MAX and MIN marks on the
side of the reservoir.
Before removing the reservoir cap and
adding brake/clutch fluid, clean the area
around the reservoir cap thoroughly to
prevent brake/clutch fluid contamination. If the level is low, add fluid to the MAX
level. The level will fall with accumulated
mileage. This is a normal condition asso-
ciated with the wear of the brake linings
and/or clutch disc (if equipped). If the
fluid level is excessively low, have the
brake system checked by an authorized
KIA dealer.
Use only the specified brake/clutch fluid.
(Refer to “Recommended lubricants orcapacities” in section 8.)
Never mix different types of fluid.
WARNING - Loss of brake fluid
In the event the brake system
requires frequent additions of fluid,
the vehicle should be inspected by
an authorized KIA dealer.
WARNING - Brake/clutch fluid
When changing and adding
brake/clutch fluid, handle it careful-
ly. Do not let it come in contact with
your eyes. If brake/clutch fluid
come in contact with your eyes,
immediately flush them with a large
quantity of fresh tap water. Have
your eyes examined by a doctor as
soon as possible.
CAUTION
Do not allow brake/clutch fluid to contact the vehicle's body paint, aspaint damage will result.
Brake/clutch fluid, which has beenexposed to open air for an extended
time should never be used as its quality cannot be guaranteed. Itshould be properly disposed. Don'tput in the wrong kind of fluid. A few
drops of mineral-based oil, such asengine oil, in your brake/clutch sys- tem can damage brake/clutch sys-tem parts.
OAM079007
Page 272 of 328

731
Maintenance
✽✽NOTICE
“C” (COLD) range is for reference only
and should NOT be used to determinetransaxle fluid level. ✽✽
NOTICE
New automatic transaxle fluid should be
red. The red dye is added so the assem-bly plant can identify it as automatic
transaxle fluid and distinguish it from
engine oil or antifreeze. The red dye,
which is not an indicator of fluid quali-
ty, is not permanent. As the vehicle isdriven, the automatic transaxle fluid
will begin to look darker. The color may
eventually appear light brown.
Therefore, have an authorized KIA
dealer change the automatic transaxlefluid according to the ScheduledMaintenance at the beginning of thissection.
Use only specified automatic transaxle
fluid. (Refer to "Recommended lubricantsor capacities" in section 8.) G100200AUN-U1 Changing the automatic transaxle fluid
Have the automatic transaxle fluid
changed by an authorized KIA dealeraccording to the Maintenance Scheduleat the beginning of this section.
Page 280 of 328
739
Maintenance
G190200AUN
Battery recharging
Your vehicle has a maintenance-free,
calcium-based battery.
If the battery becomes discharged in ashort time (because, for example, the
headlights or interior lights were left on
while the vehicle was not in use),
recharge it by slow charging (trickle)
for 10 hours.
If the battery gradually discharges because of high electric load while the
vehicle is being used, recharge it at 20-
30A for two hours.(Continued)
When lifting a plastic-cased bat- tery, excessive pressure on the
case may cause battery acid to
leak, resulting in personal injury.
Lift with a battery carrier or with
your hands on opposite corners.
Never attempt to recharge the battery when the battery cablesare connected.
The electrical ignition system works with high voltage. Never
touch these components with theengine running or the ignition
switched on.
Failure to follow the above warn-
ings can result in serious bodily
injury or death.WARNING - Recharging
battery
When recharging the battery,
observe the following precautions:
The battery must be removed from the vehicle and placed in an area with good ventilation.
Do not allow cigarettes, sparks, or flame near the battery.
Watch the battery during charg- ing, and stop or reduce the charg-
ing rate if the battery cells begin
gassing (boiling) violently or if
the temperature of the electrolyte
of any cell exceeds 49°C (120°F).
Wear eye protection when check- ing the battery during charging.
Disconnect the battery charger in the following order.
1. Turn off the battery charger main switch.
2. Unhook the negative clamp from the negative battery terminal.
3. Unhook the positive clamp from the positive battery terminal.
Page 298 of 328
757
Maintenance
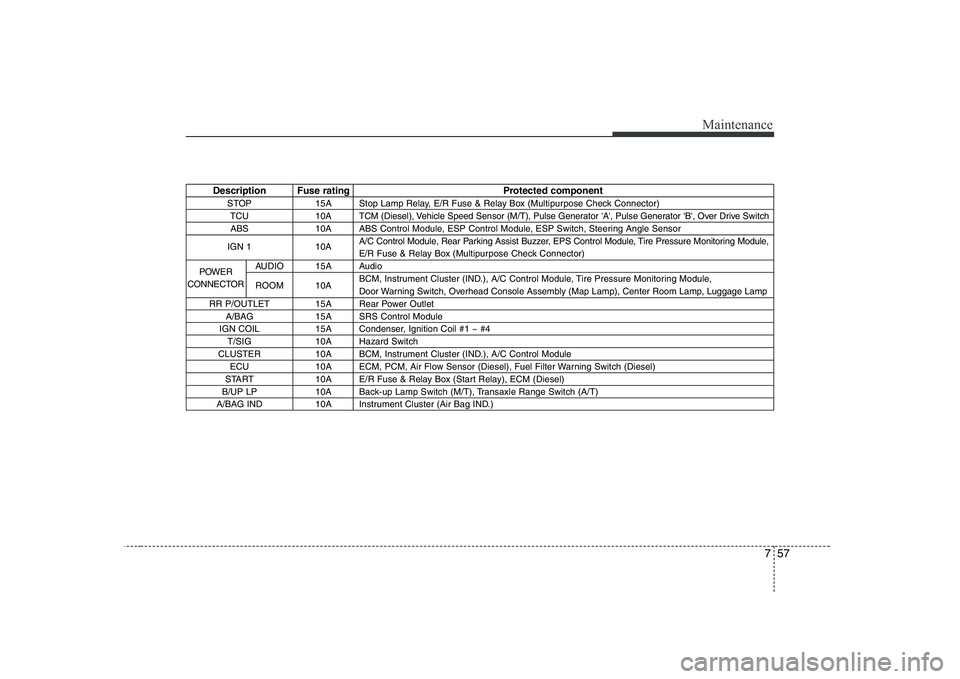
Description Fuse rating Protected componentSTOP 15A Stop Lamp Relay, E/R Fuse & Relay Box (Multipurpose Check Connector)TCU 10A TCM (Diesel), Vehicle Speed Sensor (M/T), Pulse Generator 'A', Pulse Generator 'B', Over Drive SwitchABS 10A ABS Control Module, ESP Control Module, ESP Switch, Steering Angle Sensor
IGN 1 10A A/C Control Module, Rear Parking Assist Buzzer, EPS Control Module, Tire Pressure Monitoring Module,
E/R Fuse & Relay Box (Multipurpose Check Connector)
AUDIO 15A Audio
ROOM 10A BCM, Instrument Cluster (IND.), A/C Control Module, Tire Pressure Monitoring Module,
Door Warning Switch, Overhead Console Assembly (Map Lamp), Center Room Lamp, Luggage Lamp
RR P/OUTLET 15A Rear Power Outlet A/BAG 15A SRS Control Module
IGN COIL 15A Condenser, Ignition Coil #1 ~ #4 T/SIG 10A Hazard Switch
CLUSTER 10A BCM, Instrument Cluster (IND.), A/C Control Module ECU 10A ECM, PCM, Air Flow Sensor (Diesel), Fuel Filter Warning Switch (Diesel)
START 10A E/R Fuse & Relay Box (Start Relay), ECM (Diesel)
B/UP LP 10A Back-up Lamp Switch (M/T), Transaxle Range Switch (A/T)
A/BAG IND 10A Instrument Cluster (Air Bag IND.)
POWER
CONNECTOR
Page 300 of 328
759
Maintenance
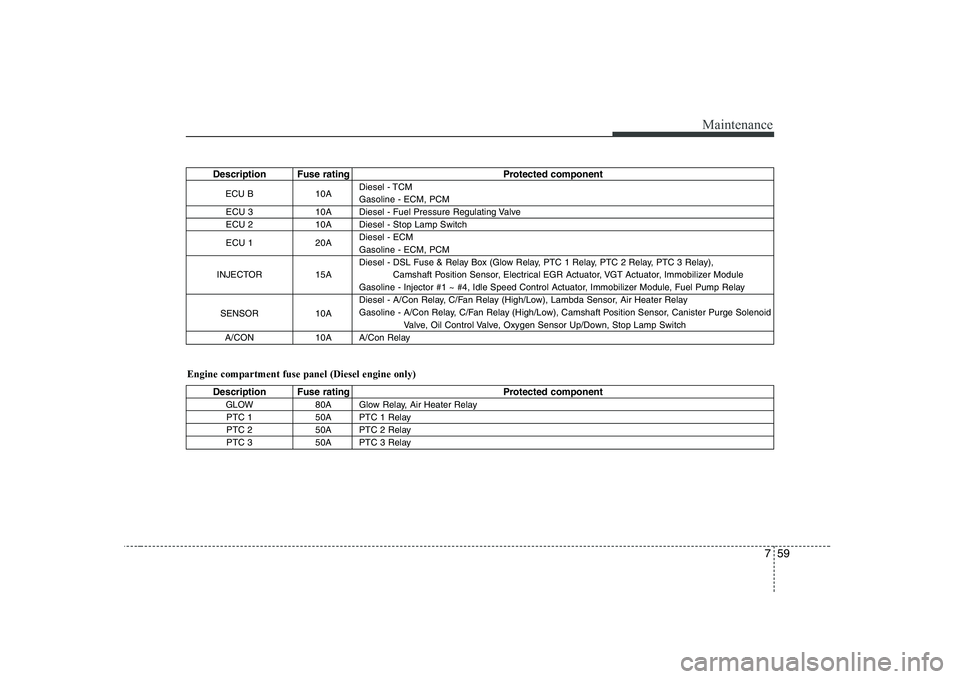
Description Fuse rating Protected componentECU B 10A Diesel - TCM Gasoline - ECM, PCM
ECU 3 10A Diesel - Fuel Pressure Regulating Valve
ECU 2 10A Diesel - Stop Lamp Switch
ECU 1 20A Diesel - ECM Gasoline - ECM, PCM
INJECTOR 15A Diesel - DSL Fuse & Relay Box (Glow Relay, PTC 1 Relay, PTC 2 Relay, PTC 3 Relay),
Camshaft Position Sensor, Electrical EGR Actuator, VGT Actuator, Immobilizer Module
Gasoline - Injector #1 ~ #4, Idle Speed Control Actuator, Immobilizer Module, Fuel Pump Relay
SENSOR 10A Diesel - A/Con Relay, C/Fan Relay (High/Low), Lambda Sensor, Air Heater Relay
Gasoline - A/Con Relay, C/Fan Relay (High/Low), Camshaft Position Sensor, Canister Purge Solenoid
Valve, Oil Control Valve, Oxygen Sensor Up/Down, Stop Lamp Switch
A/CON 10A A/Con Relay
Engine compartment fuse panel (Diesel engine only)
Description Fuse rating Protected component GLOW 80A Glow Relay, Air Heater Relay PTC 1 50A PTC 1 Relay
PTC 2 50A PTC 2 Relay
PTC 3 50A PTC 3 Relay
Page 302 of 328
761
Maintenance
G220101AUN
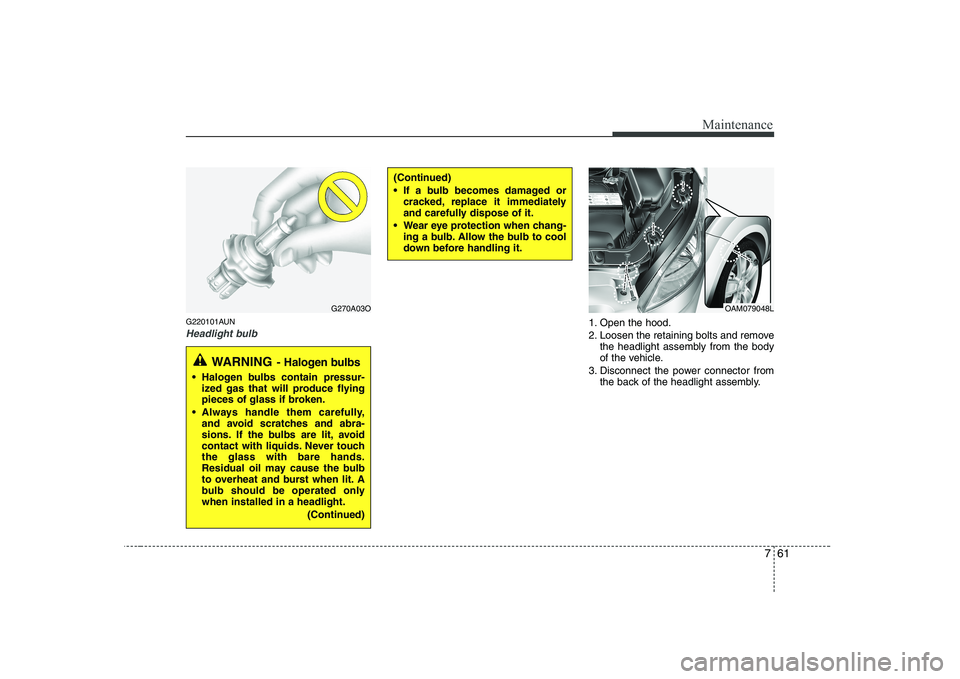
Headlight bulb1. Open the hood.
2. Loosen the retaining bolts and removethe headlight assembly from the body
of the vehicle.
3. Disconnect the power connector from the back of the headlight assembly.
(Continued)
If a bulb becomes damaged orcracked, replace it immediately
and carefully dispose of it.
Wear eye protection when chang- ing a bulb. Allow the bulb to cool
down before handling it.
G270A03O
WARNING - Halogen bulbs
Halogen bulbs contain pressur-
ized gas that will produce flying
pieces of glass if broken.
Always handle them carefully, and avoid scratches and abra-
sions. If the bulbs are lit, avoid
contact with liquids. Never touchthe glass with bare hands.
Residual oil may cause the bulb
to overheat and burst when lit. A
bulb should be operated onlywhen installed in a headlight.
(Continued)
OAM079048L
Page 310 of 328
769
Maintenance
Waxing
Wax the vehicle when water will no longer bead on the paint.
Always wash and dry the vehicle before
waxing. Use a good quality liquid or
paste wax, and follow the manufacturer’s
instructions. Wax all metal trim to protect
it and to maintain its luster.
Removing oil, tar, and similar materials
with a spot remover will usually strip the
wax from the finish. Be sure to re-wax
these areas even if the rest of the vehicle
does not yet need waxing.G230103AUN
Finish damage repair
Deep scratches or stone chips in the
painted surface must be repaired
promptly. Exposed metal will quickly rust
and may develop into a major repair
expense.
✽✽
NOTICE
If your vehicle is damaged and requires
any metal repair or replacement, be sure
the body shop applies anti-corrosion
materials to the parts repaired or
replaced.
G230104AUN
Bright-metal maintenance
To remove road tar and insects, use a tar remover, not a scraper or other
sharp object.
To protect the surfaces of bright-metal parts from corrosion, apply a coating of
wax or chrome preservative and rub to
a high luster.
During winter weather or in coastal areas, cover the bright metal parts with
a heavier coating of wax or preserva-
tive. If necessary, coat the parts with
non-corrosive petroleum jelly or other
protective compound.
CAUTION
Wiping dust or dirt off the body
with a dry cloth will scratch thefinish.
Do not use steel wool, abrasive cleaners, or strong detergentscontaining highly alkaline or caustic agents on chrome-platedor anodized aluminum parts. This
may result in damage to the pro- tective coating and cause discol-oration or paint deterioration.