Page 158 of 328

Features of your vehicle
86
4
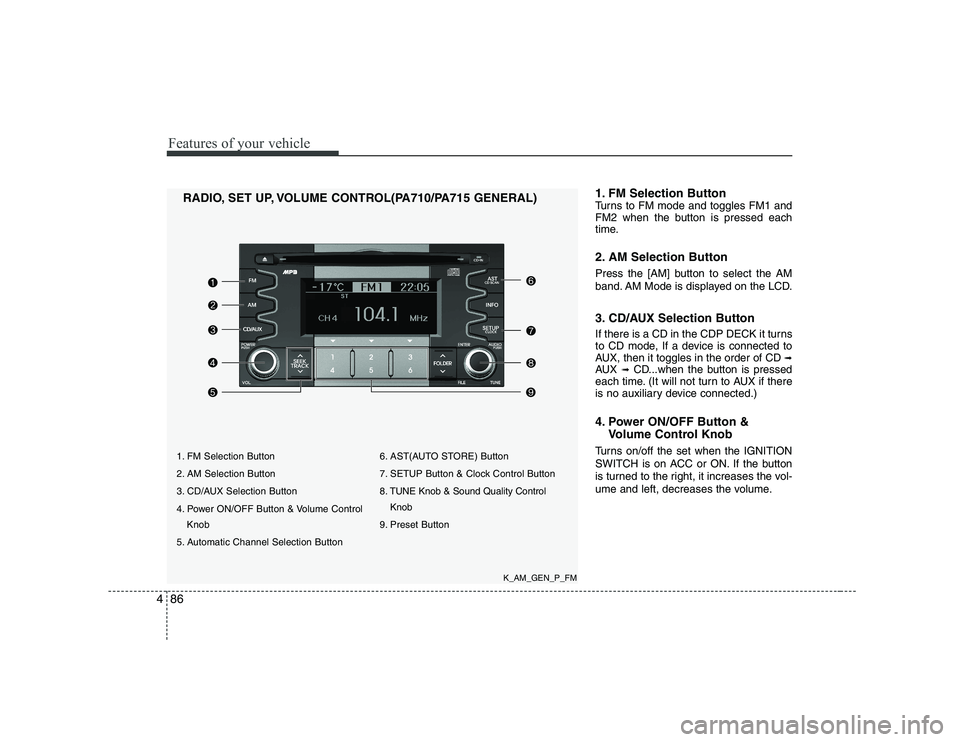
1. FM Selection Button
2. AM Selection Button
3. CD/AUX Selection Button
4. Power ON/OFF Button & Volume Control
Knob
5. Automatic Channel Selection Button 6. AST(AUTO STORE) Button
7. SETUP Button & Clock Control Button
8. TUNE Knob & Sound Quality Control
Knob
9. Preset Button
RADIO, SET UP, VOLUME CONTROL(PA710/PA715 GENERAL)
1. FM Selection Button
Turns to FM mode and toggles FM1 and
FM2 when the button is pressed each
time.
2. AM Selection Button
Press the [AM] button to select the AM
band. AM Mode is displayed on the LCD.
3. CD/AUX Selection Button
If there is a CD in the CDP DECK it turns
to CD mode, If a device is connected to
AUX, then it toggles in the order of CD
➟
AUX ➟CD...when the button is pressed
each time. (It will not turn to AUX if there
is no auxiliary device connected.)
4. Power ON/OFF Button &
Volume Control Knob
Turns on/off the set when the IGNITION
SWITCH is on ACC or ON. If the button
is turned to the right, it increases the vol-
ume and left, decreases the volume.
K_AM_GEN_P_FM
Page 159 of 328
![KIA SOUL 2009 Owners Manual 487
Features of your vehicle
5. Automatic Channel SelectionButton
] button is pressed, it reduces the band frequency by 200kHz to automatically select a chan-
nel. Stops at the previous frequency if
KIA SOUL 2009 Owners Manual 487
Features of your vehicle
5. Automatic Channel SelectionButton
] button is pressed, it reduces the band frequency by 200kHz to automatically select a chan-
nel. Stops at the previous frequency if](/manual-img/2/40388/w960_40388-158.png)
487
Features of your vehicle
5. Automatic Channel SelectionButton
] button is pressed, it reduces the band frequency by 200kHz to automatically select a chan-
nel. Stops at the previous frequency if
no channel is found.
] button is pressed, it increases the band frequency by200kHz to automatically select a chan-
nel. Stops at the previous frequency if no
channel is found.
6. AST(AUTO STORE) Button When AST is pressed, frequency is stored
on the preset memory [1]~[6] and auto-
matically plays the channel stored on the
Preset [1]. If no channels have been stored
because there was no channel received,
will return to the previous channel.
7. SETUP Button & Clock Control Button
Press this button to turn to the SETUP
adjustment mode. If no action is taken for
5 seconds after pressing the button, it will
return to the play mode. (After entering
SETUP mode, move between items
using the left, right and PUSH functions
of the [TUNE] knob.) ■
PA710 MODEL
The setup changes in the order of CLOCK
↔ SCROLL ↔ P.BASS ↔ RETURN ↔
TEMP ↔ SDVC...
■ PA715 MODEL
The setup changes in the order of CLOCK
↔ SCROLL ↔ TEMP ↔ SDVC...
Press the [SETUP] button. Use the vol-
ume controller to adjust the clock in the
following order: CLOCK ➟ENTER ➟
hour or minute. Adjust the hour and press the [ENTER]
button to set. Use the same method to
adjust the minute and press the [ENTER]
button to complete and exit from clock
adjustment mode.
Pressing the [SETUP] button while in
POWER OFF screen will allow the user to
make immediate adjustments to the clock.
This function is used to display charac-
ters longer than the LCD text display and
can be turned ON/OFF through the vol-
ume controller.
This function displays the previous MODE screen. This function is used to change the tem-
perature display setting.
This function automatically adjusts the
volume level according to the speed of
the vehicle and can be turned ON/OFF
through the volume controller.
Based on psychoacoustic technology, this
technology overcomes BASS limitations
which may occur due to the limited num-
ber and size of speakers to offer dynamic
BASS sound quality. It is possible to adjust
in 3 levels of LOW/MID/HIGH. OFF
➟
LOW ➟MID ➟HIGH
Modes: CD/FM/AUX/IPOD/USB (exclud- ing AM Mode)
Page 160 of 328

Features of your vehicle
88
4
8. TUNE Knob & Sound Quality
Control Knob
Rotate the knob clockwise by one notch
to increase frequency by 200kHz from
current frequency.
Rotate the knob counterclockwise by one
notch to decrease frequency by 200kHz
from current frequency.
MIDDLE, TREBLE, FADER and BAL-
ANCE TUNE mode. The mode selected
is shown on the display. After selecting
each mode, rotate the Audio control
knob clockwise or counterclockwise.
(Sound Quality Control will operate in FM,
AM, CD, AUX, USB, and iPod modes.)
To increase the BASS, rotate the knob
clockwise, while to decrease the BASS,
rotate the knob counterclockwise.
To increase the MIDDLE, rotate the knob
clockwise, while to decrease the MID-
DLE, rotate the knob counterclockwise. Control
To increase the TREBLE, rotate the knob
clockwise, while to decrease the TRE-
BLE, rotate the knob counterclockwise.
Turn the control knob clockwise to
emphasize rear speaker sound(front
speaker sound will be attenuated). When
the control knob is turned counterclock-
wise, front speaker sound will be empha-
sized(rear speaker sound will be attenu-ated).
Rotate the knob clockwise to emphasize
right speaker sound(left speaker sound
will be attenuated). When the control
knob is turned counter clockwise, left
speaker sound will be emphasized(right
speaker sound will be attenuated).
9. Preset Button
Push [1]~[6] buttons less than 0.8 second
to play the channel saved in each button.
Push Preset button for 0.8 second or
longer to save current channel to the
respective button with a beep.
Page 198 of 328

Driving your vehicle
28
5
Each of these actions will cancel cruise
control operation (the SET indicator lightin the instrument cluster will go off), but it
will not turn the system off. If you wish toresume cruise control operation, pushthe RES+ switch located on your steering
wheel. You will return to your previouslypreset speed.
E090600AUN
To resume cruising speed at
more than approximately 40 km/h(25 mph):
If any method other than the CRUISE
ON-OFF switch was used to cancel
cruising speed and the system is still
activated, the most recent set speed willautomatically resume when the RES+
switch is pushed.
It will not resume, however, if the vehicle
speed has dropped below approximately40 km/h (25 mph). E090700AUN-AM
To turn cruise control off, do one
of the following:
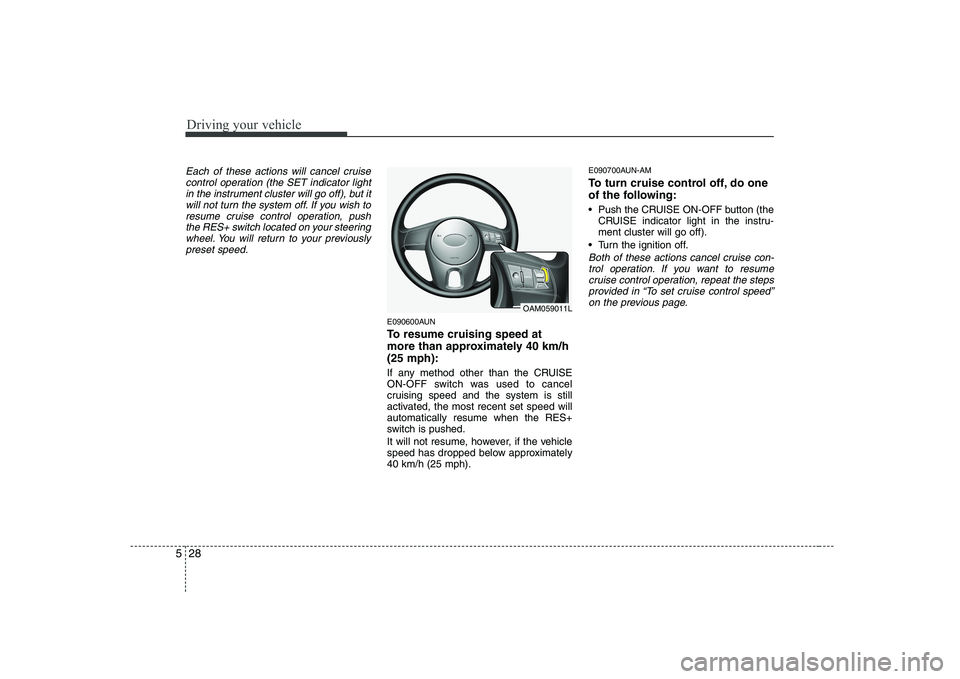
Push the CRUISE ON-OFF button (the
CRUISE indicator light in the instru- ment cluster will go off).
Turn the ignition off.
Both of these actions cancel cruise con- trol operation. If you want to resumecruise control operation, repeat the steps provided in “To set cruise control speed”
on the previous page.
OAM059011L
Page 281 of 328
Maintenance
40
7
G190300AUN-SA Reset items
Items should be reset after the battery
has been discharged or the battery hasbeen disconnected.
Sunroof (See section 4)
Climate control system
(See section 4)
Clock (See section 4, Audio)
Audio (See section 4)
WARNING
Before performing maintenance or recharging the battery, turn off all accessories and stop the
engine.
The negative battery cable must be removed first and installed
last when the battery is discon-nected.
Page 285 of 328

Maintenance
44
7
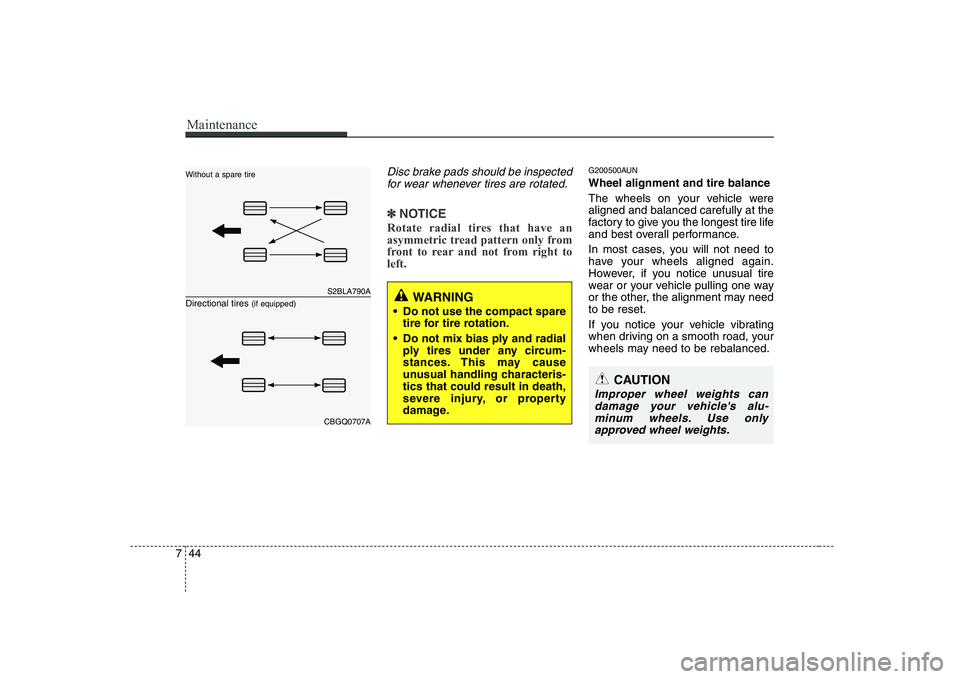
Disc brake pads should be inspected
for wear whenever tires are rotated.
✽✽ NOTICE
Rotate radial tires that have an
asymmetric tread pattern only from
front to rear and not from right toleft.
G200500AUN Wheel alignment and tire balance
The wheels on your vehicle were aligned and balanced carefully at the
factory to give you the longest tire life
and best overall performance.
In most cases, you will not need to
have your wheels aligned again.
However, if you notice unusual tire
wear or your vehicle pulling one way
or the other, the alignment may needto be reset.
If you notice your vehicle vibrating
when driving on a smooth road, your
wheels may need to be rebalanced.
S2BLA790A
CBGQ0707A
Without a spare tire Directional tires (if equipped)
WARNING
Do not use the compact spare tire for tire rotation.
Do not mix bias ply and radial ply tires under any circum-
stances. This may cause
unusual handling characteris-tics that could result in death,
severe injury, or property
damage.
CAUTION
Improper wheel weights can
damage your vehicle's alu-minum wheels. Use onlyapproved wheel weights.