2009 KIA AMANTI heater
[x] Cancel search: heaterPage 29 of 321
317
Knowing your vehicle
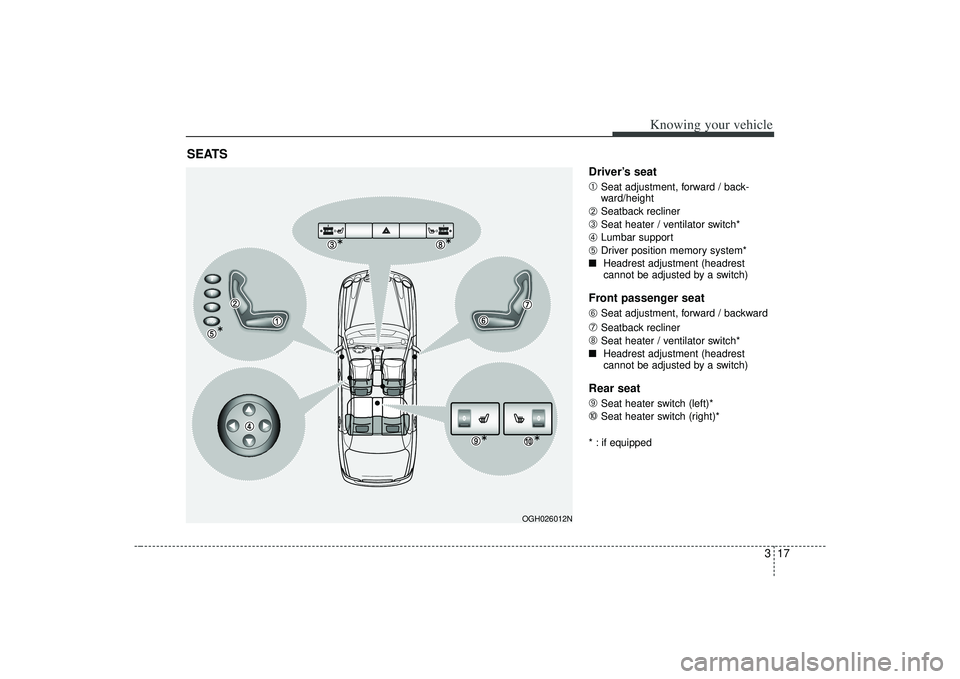
Driver’s seat
➀
Seat adjustment, forward / back-
ward/height
➁
Seatback recliner
➂
Seat heater / ventilator switch*
➃
Lumbar support
➄
Driver position memory system*
■ Headrest adjustment (headrest
cannot be adjusted by a switch)
Front passenger seat
\b
Seat adjustment, forward / backward
➆
Seatback recliner
➇
Seat heater / ventilator switch*
■ Headrest adjustment (headrest
cannot be adjusted by a switch)
Rear seat
\f
Seat heater switch (left)*
➉
Seat heater switch (right)*
* : if equipped
SEATS
STOPSTOP
OGH026012N
Page 35 of 321
323
Knowing your vehicle
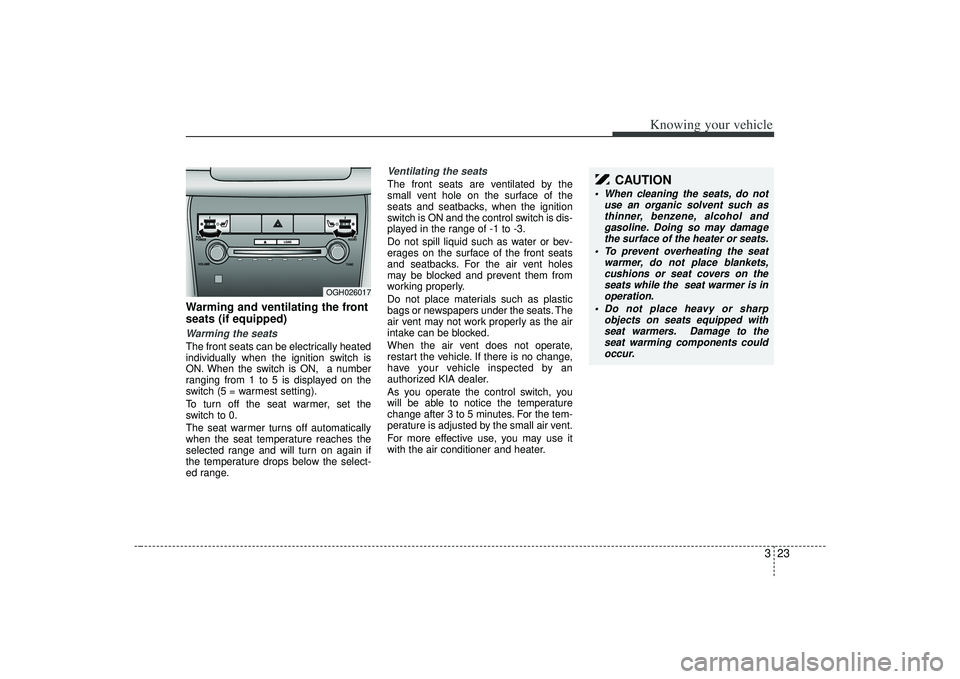
Warming and ventilating the front
seats (if equipped)Warming the seatsThe front seats can be electrically heated
individually when the ignition switch is
ON. When the switch is ON, a number
ranging from 1 to 5 is displayed on the
switch (5 = warmest setting).
To turn off the seat warmer, set the
switch to 0.
The seat warmer turns off automatically
when the seat temperature reaches the
selected range and will turn on again if
the temperature drops below the select-
ed range.
Ventilating the seatsThe front seats are ventilated by the
small vent hole on the surface of the
seats and seatbacks, when the ignition
switch is ON and the control switch is dis-
played in the range of -1 to -3.
Do not spill liquid such as water or bev-
erages on the surface of the front seats
and seatbacks. For the air vent holes
may be blocked and prevent them from
working properly.
Do not place materials such as plastic
bags or newspapers under the seats. The
air vent may not work properly as the air
intake can be blocked.
When the air vent does not operate,
restart the vehicle. If there is no change,
have your vehicle inspected by an
authorized KIA dealer.
As you operate the control switch, you
will be able to notice the temperature
change after 3 to 5 minutes. For the tem-
perature is adjusted by the small air vent.
For more effective use, you may use it
with the air conditioner and heater.
OGH026017
CAUTION
When cleaning the seats, do notuse an organic solvent such asthinner, benzene, alcohol and gasoline. Doing so may damagethe surface of the heater or seats.
To prevent overheating the seat warmer, do not place blankets,cushions or seat covers on the seats while the seat warmer is inoperation.
Do not place heavy or sharp objects on seats equipped withseat warmers. Damage to theseat warming components couldoccur.
Page 38 of 321
Knowing your vehicle26
3
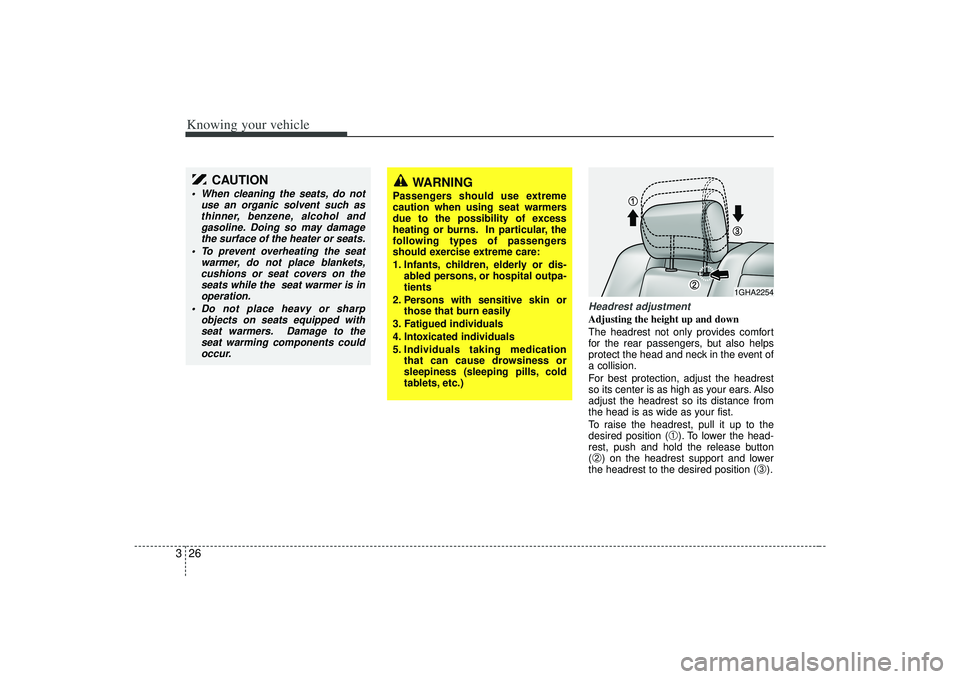
Headrest adjustmentAdjusting the height up and down
The headrest not only provides comfort
for the rear passengers, but also helps
protect the head and neck in the event of
a collision.
For best protection, adjust the headrest
so its center is as high as your ears. Also
adjust the headrest so its distance from
the head is as wide as your fist.
To raise the headrest, pull it up to the
desired position (
➀). To lower the head-
rest, push and hold the release button
(
➁) on the headrest support and lower
the headrest to the desired position (
➂).
WARNING
Passengers should use extreme
caution when using seat warmers
due to the possibility of excess
heating or burns. In particular, the
following types of passengers
should exercise extreme care:
1. Infants, children, elderly or dis- abled persons, or hospital outpa-
tients
2. Persons with sensitive skin or those that burn easily
3. Fatigued individuals
4. Intoxicated individuals
5. Individuals taking medication that can cause drowsiness or
sleepiness (sleeping pills, cold
tablets, etc.)
1GHA2254
CAUTION
When cleaning the seats, do not use an organic solvent such asthinner, benzene, alcohol and gasoline. Doing so may damagethe surface of the heater or seats.
To prevent overheating the seat warmer, do not place blankets,cushions or seat covers on the seats while the seat warmer is inoperation.
Do not place heavy or sharp objects on seats equipped withseat warmers. Damage to theseat warming components couldoccur.
Page 98 of 321
Knowing your vehicle86
3Outside rearview mirror heater
(if equipped) The outside rearview mirror heater is
actuated in connection with the rear win-
dow defroster. To heat the outside
rearview mirror glass, push the button for
the rear window defroster.
The outside rearview mirror glass will be
heated for defrosting or defogging and
will give you improved rear vision in
inclement weather conditions. Push the
button again to turn the heater off. The
outside rearview mirror heater automati-
cally turns off after 20 minutes.
Day/night rearview mirror Adjust the rearview mirror to the center
on the view through the rear window.
Make this adjustment before you start
driving.
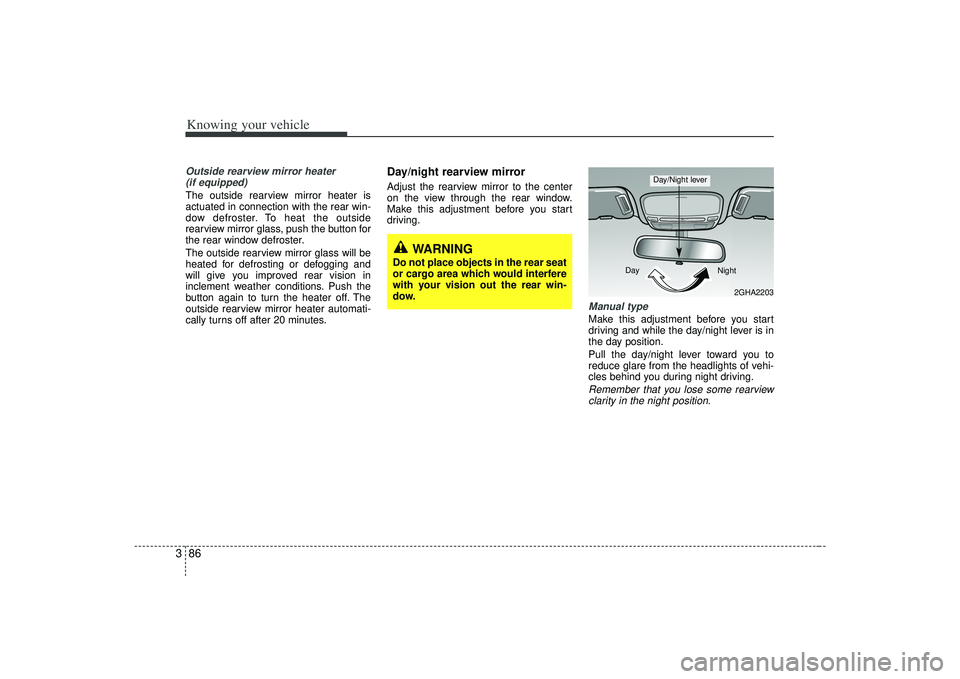
Manual type Make this adjustment before you start
driving and while the day/night lever is in
the day position.
Pull the day/night lever toward you to
reduce glare from the headlights of vehi-
cles behind you during night driving.Remember that you lose some rearviewclarity in the night position.
WARNING
Do not place objects in the rear seat
or cargo area which would interfere
with your vision out the rear win-
dow.
2GHA2203
Day
Night
Day/Night lever
Page 106 of 321
Knowing your vehicle94
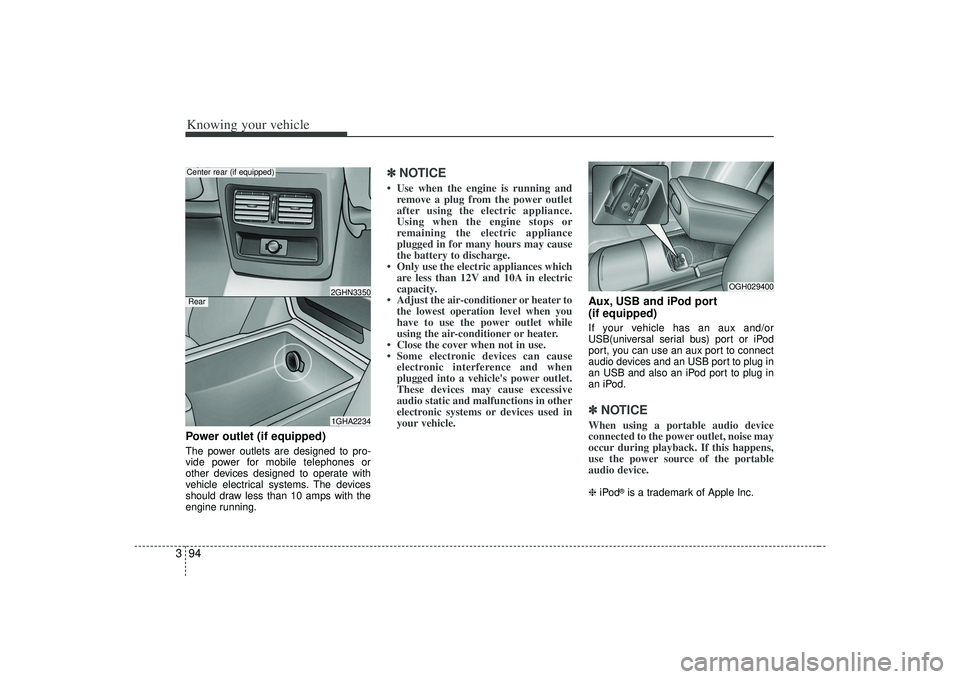
3Power outlet (if equipped)The power outlets are designed to pro-
vide power for mobile telephones or
other devices designed to operate with
vehicle electrical systems. The devices
should draw less than 10 amps with the
engine running.
✽ ✽
NOTICE• Use when the engine is running and
remove a plug from the power outlet
after using the electric appliance.
Using when the engine stops or
remaining the electric appliance
plugged in for many hours may cause
the battery to discharge.
• Only use the electric appliances which are less than 12V and 10A in electric
capacity.
• Adjust the air-conditioner or heater to the lowest operation level when you
have to use the power outlet while
using the air-conditioner or heater.
• Close the cover when not in use.
• Some electronic devices can cause electronic interference and when
plugged into a vehicle's power outlet.
These devices may cause excessive
audio static and malfunctions in other
electronic systems or devices used in
your vehicle.
Aux, USB and iPod port
(if equipped)If your vehicle has an aux and/or
USB(universal serial bus) port or iPod
port, you can use an aux port to connect
audio devices and an USB port to plug in
an USB and also an iPod port to plug in
an iPod.✽ ✽ NOTICEWhen using a portable audio device
connected to the power outlet, noise may
occur during playback. If this happens,
use the power source of the portable
audio device. ❈ iPod
®is a trademark of Apple Inc.
1GHA22342GHN3350
Center rear (if equipped)
OGH029400
Rear
Page 123 of 321
3111
Knowing your vehicle
CAUTION -
Using USB
device
To use the external USB device,make sure the device is notmounted when starting up thevehicle and mount the deviceafter starting up.
If you start the vehicle when the USB device is mounted, it maydamage the USB device. (USB isnot ESA)
If the vehicle is started up or turned off while the external USBdevice is connected, the external USB device may not work.
It may not play inauthentic MP3 or WMA files.
1) It can only play MP3 files with the compression rate between8Kbps~320Kbps.
2) It can only play WMA music files with the compression ratebetween 8Kbps~320Kbps.
Take cautions for static electricity when mounting or dismountingthe external USB device.
Encoded MP3 PLAYER is not rec- ognizable.
(Continued)
(Continued) Depending on the condition of the external USB device, the con-nected external USB device can be unrecognizable.
When the formatted byte/sector setting of External USB devices isnot either 512BYTE or 2048BYTE,then the device will not be recog- nized.
Only the USB device formatted to FAT 12/16/32.
USB device without USB IF authen- tication may not be recognizable.
Make sure the USB connection terminal does not come in contactwith human body or any object.
If you repeat mounting or dis- mounting USB device in a shortperiod of time, it may break thedevice.
You might hear strange noise when mounting or dismounting aUSB device.
(Continued)
(Continued) If you dismount the external USB device during playback in USBmode, the external USB device can be damaged or malfunction.Therefore, mount the external USBdevice when the engine is turnedoff or in another mode.
Depending on the type and capac- ity of the external USB device orthe type of the files stored in thedevice, there is a difference in thetime taken for recognition of the device, but this is not a troublePlease wait for a moment.
Do not use the USB device for other purposes than playing music files.
Use of USB accessories such as the recharger or heater using USBI/F may lower the performance or cause trouble.
If you use devices such as the USB hub you purchased separate-ly, the vehicle’s audio system maynot recognize the USB device.Connect the USB device directly to the multimedia terminal of thevehicle.
Page 180 of 321

Driving your vehicle44
4If the washer does not work, check the
washer fluid level. If the fluid level is not
sufficient, you will need to add appropri-
ate non-abrasive windshield washer fluid
to the washer reservoir.
The reservoir filler neck is located in the
front of the engine compartment on the
passenger side.
The defroster heats the window to
remove frost, fog and thin ice from the
interior and exterior of the rear window,
while the engine is running.To activate the rear window defroster,
press the rear window defroster button
located in the heater contorl panel. The
indicator on the rear window defroster
button illuminates when the defroster is
ON.
If your vehicle is equipped with the front
windshield deicer, it will be operating at
the same time when you operate the rear
window defroster.
If there is heavy accumulation of snow on
the rear window, brush it off before oper-
ating the rear defroster.
The rear window defroster automatically
turns off after 20 minutes or when the
ignition switch is turned off. To turn off the
defroster, press the rear window
defroster button again.
WARNING
Do not use the washer in freezing
temperatures without first warming
the windshield with the defrosters;
the washer solution could freeze on
contact with the windshield and
obscure your vision.
DEFROSTER
OGH026044
CAUTION
To prevent possible damage to the
washer pump, do not operate thewasher when the fluid reservoir is empty.
Page 192 of 321
Driving your vehicle56
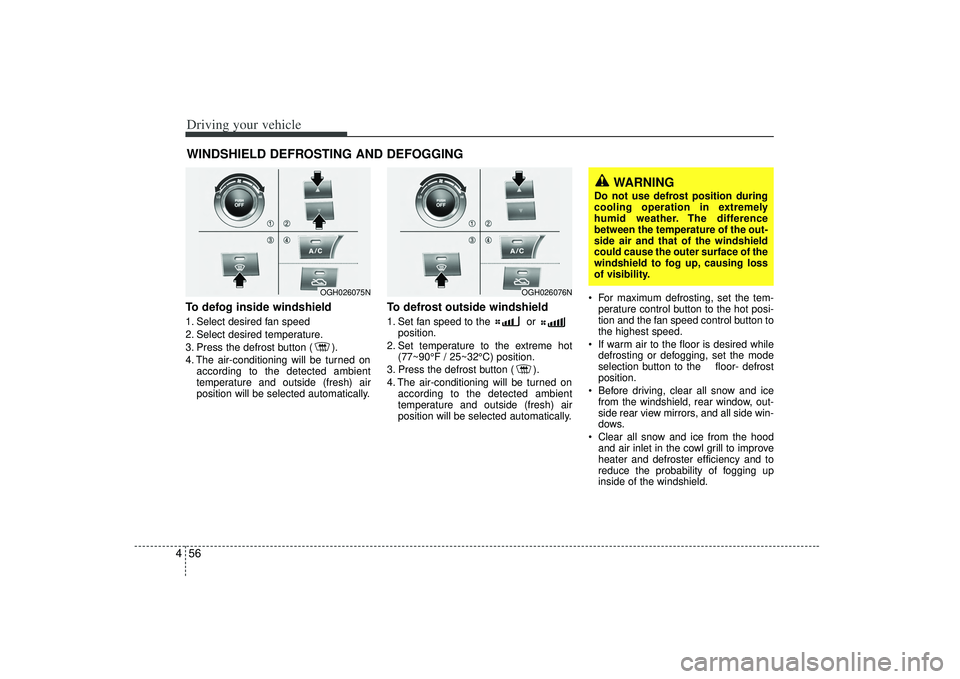
4To defog inside windshield 1. Select desired fan speed
2. Select desired temperature.
3. Press the defrost button ( ).
4. The air-conditioning will be turned on
according to the detected ambient
temperature and outside (fresh) air
position will be selected automatically.
To defrost outside windshield 1. Set fan speed to the or position.
2. Set temperature to the extreme hot (77~90°F / 25~32°C) position.
3. Press the defrost button ( ).
4. The air-conditioning will be turned on according to the detected ambient
temperature and outside (fresh) air
position will be selected automatically. For maximum defrosting, set the tem-
perature control button to the hot posi-
tion and the fan speed control button to
the highest speed.
If warm air to the floor is desired while defrosting or defogging, set the mode
selection button to the floor- defrost
position.
Before driving, clear all snow and ice from the windshield, rear window, out-
side rear view mirrors, and all side win-
dows.
Clear all snow and ice from the hood and air inlet in the cowl grill to improve
heater and defroster efficiency and to
reduce the probability of fogging up
inside of the windshield.
WINDSHIELD DEFROSTING AND DEFOGGING
WARNING
Do not use defrost position during
cooling operation in extremely
humid weather. The difference
between the temperature of the out-
side air and that of the windshield
could cause the outer surface of the
windshield to fog up, causing loss
of visibility.
OGH026075N
OGH026076N